Sorcerer Black Hole Ignite Endgame Build for Last Epoch (Patch 1.0)
Build Introduction
Ever wanted to drop the sun on an enemy? Now you can! Wield the cosmic power of the stars, igniting
any nearby enemy, leaving nothing behind. This build is red hot, focusing on the fiery damage from
![]() Black Hole, further amplified by capped Fire Resistance Shred and hundreds
of stacks of Ignite.
Black Hole, further amplified by capped Fire Resistance Shred and hundreds
of stacks of Ignite.
 Highly effective burst windows
 - Does not need full uptime to deal damage

 Requires enemies to stand in damage instances
 - If you're unlucky with procs, the build can feel Mana-starved in prolonged encounters

Skill Selection
This build focuses around ![]() Black Hole, which abuses Fire Resistance to stack an obnoxious
amount of Ignite stacks on enemies. This effectively turns
Black Hole, which abuses Fire Resistance to stack an obnoxious
amount of Ignite stacks on enemies. This effectively turns ![]() Black Hole into a nuke that
will instantly kill the majority of mobs you come across.
Black Hole into a nuke that
will instantly kill the majority of mobs you come across. ![]() Frost Claw is the filler spell, dealing Fire Damage
to enemies and replenishing our Health pool and increasing Ward generation between Black Hole usage.
Frost Claw is the filler spell, dealing Fire Damage
to enemies and replenishing our Health pool and increasing Ward generation between Black Hole usage.
![]() Frost Wall is converted to deal Fire Damage, near-instantly applying 10 stacks of Fire Shred
on any enemy that's foolish enough to walk close to it, and will help boost the damage we deal with
Frost Wall is converted to deal Fire Damage, near-instantly applying 10 stacks of Fire Shred
on any enemy that's foolish enough to walk close to it, and will help boost the damage we deal with ![]() Flame Rush and we zip
around maps.
Flame Rush and we zip
around maps. ![]() Flame Ward is taken to add on-demand Ward generation to the build while also serving to add a burst phase for
dealing damage.
Flame Ward is taken to add on-demand Ward generation to the build while also serving to add a burst phase for
dealing damage.

Class and Skill Passive Trees
Our base class is Mage, which fills the role of spell caster and magic user in Last Epoch. Upon finishing Act 1 in the campaign, your character will be offered an opportunity to select an Advanced Mastery. Each base class has three possible Masteries to choose from. For Mage, you can choose between Passive Trees for Sorcerer, Spellsword, and Runemaster. Upon selecting a Mastery and placing 20 Passive Points into the Mage Tree, you'll then be able to place Passive Points into the Mastery Trees.
Sorcerer is the Advanced Class used for this build, and also where the majority of our Passive Points will come from. The Sorcerer Tree will
focus around picking nodes that increase our Fire Damage, Fire Penetration, and Chance to Ignite. A lesser amount of
Passive Points will come from Runemaster, focusing on Ignite interactions, but also unlocking
![]() Frost Wall and
Frost Wall and ![]() Flame Rush as usable spells. Spellsword is not used in this build. Each Passive
Tree and their points are broken down below.
Flame Rush as usable spells. Spellsword is not used in this build. Each Passive
Tree and their points are broken down below.
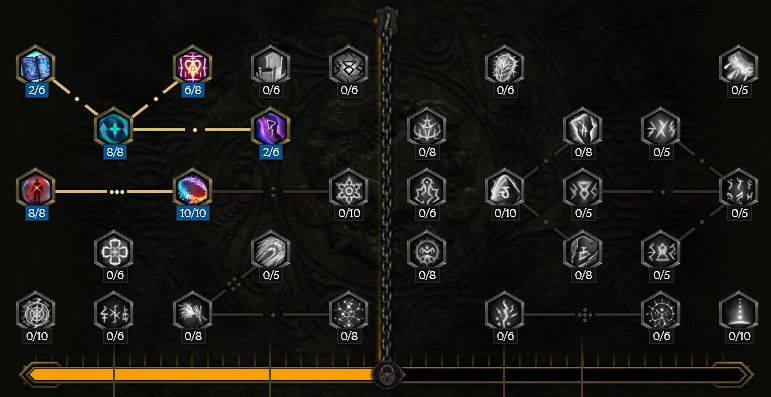
Mage Passive Points
- 8 points into Elementalist: Increases Fire Damage.
- 8 points into Arcanist: Intelligence and Resistances.
- 5 points into Arcane Flames: Using a Fire Skill Ignites nearby enemies.
- 5 points into Ice and Fire: Increased Cold Damage, Fire Damage, and chance to Ignite with Fire Skills.
Our base class is Mage, which fills the role of spell caster and magic user in Last Epoch. Upon finishing Act 1 in the campaign, your character will be offered an opportunity to select an Advanced Mastery. Each base class has three possible Masteries to choose from. For Mage, you can choose between Passive Trees for Sorcerer, Spellsword, and Runemaster. Upon selecting a Mastery and placing 20 Passive Points into the Mage Tree, you'll then be able to place Passive Points into the Mastery Trees.
Sorcerer is the Advanced Class used for this build, and also where the majority of our Passive Points will come from. The Sorcerer Tree will
focus around picking nodes that increase our Fire Damage, Fire Penetration, and Chance to Ignite. A lesser amount of
Passive Points will come from Runemaster, focusing on Ignite interactions, but also unlocking
![]() Frost Wall and
Frost Wall and ![]() Flame Rush as usable spells. Spellsword is not used in this build. Each Passive
Tree and their points are broken down below.
Flame Rush as usable spells. Spellsword is not used in this build. Each Passive
Tree and their points are broken down below.
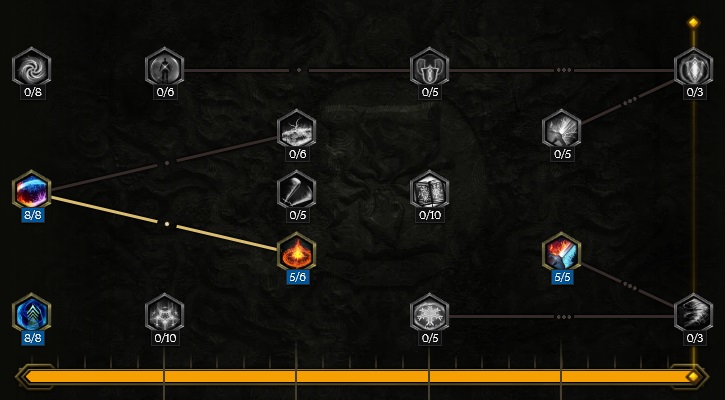
Sorcerer Passive Points
- 6 points into Mana Shell: Increased Armor, and required for pathing.
- 5 points into Arcane Momentum: Increased Cast Speed, increasing over each cast to a maximum.
- 8 points into Essence of Celerity: Arcane Momentum stacks now increase Spell Damage.
- 8 points into Pyromancer: Fire Damage and Ignite Chance.
- 5 points into Lavamancer: Invaluable Fire Penetration and Fire Damage Leech. Helps generate Ward with
 Twisted Heart of Uhkeiros.
 - 8 points into Inferno: Ignite Chance duration and Damage increase.
- 5 points into Arcane Insight: Extra Intelligence and a 25% chance on cast to gain Insight, which increases Elemental Damage and Ward Retention.
- 3 points into Elixir of Knowledge: Potions will now grant you around 350 Ward on use if you have the gear listed in this guide.
- 4 points into Recollection: Lowers cooldown for
 Black Hole.
Our base class is Mage, which fills the role of spell caster and magic user in Last Epoch. Upon finishing Act 1 in the campaign, your character will be offered an opportunity to select an Advanced Mastery. Each base class has three possible Masteries to choose from. For Mage, you can choose between Passive Trees for Sorcerer, Spellsword, and Runemaster. Upon selecting a Mastery and placing 20 Passive Points into the Mage Tree, you'll then be able to place Passive Points into the Mastery Trees.
Sorcerer is the Advanced Class used for this build, and also where the majority of our Passive Points will come from. The Sorcerer Tree will
focus around picking nodes that increase our Fire Damage, Fire Penetration, and Chance to Ignite. A lesser amount of
Passive Points will come from Runemaster, focusing on Ignite interactions, but also unlocking
![]() Frost Wall and
Frost Wall and ![]() Flame Rush as usable spells. Spellsword is not used in this build. Each Passive
Tree and their points are broken down below.
Flame Rush as usable spells. Spellsword is not used in this build. Each Passive
Tree and their points are broken down below.
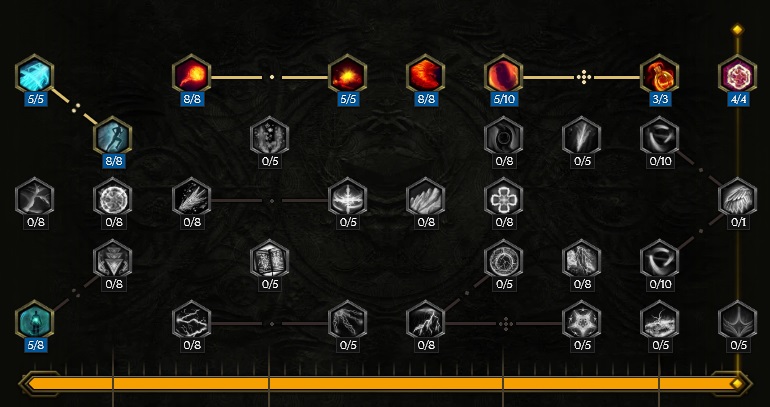
Runemaster Passive Points
- 8 points into Sphere of Protection: Since everything we do causes Ignite stacks, this effectively becomes a permanent Damage Reduction.
- 2 points into Unsealed Mana: Bonus to Cast Speed.
- 10 points into Circle of Elements: 100% Ignite Chance for all Fire Skills.
- 8 points into Arcane Focus: Ward gain on cast, and extra Intelligence.
- 2 points into Mental Catalysis This is taken to round out the reduced bonus damage from crits, functioning with our Unique Boots,
 Fiery Dragon Shoes.
Depending on your roll on these, you can opt to remove or add points into this node, using Unsealed Mana to do so.
Fiery Dragon Shoes.
Depending on your roll on these, you can opt to remove or add points into this node, using Unsealed Mana to do so. - 6 points into Transcendence: Health and Ward per Second.
In this section, we will break down each skill and highlight the key passives we have selected to make the skill shine in the build. While some of these skills do allow for some variation to exist depending on your own custom choices, we recommend utilizing the skill trees as presented until you have a strong understanding of the build itself.
Black Hole

![]() Black Hole acts as a giant nuke for the build. Looking at the stats on
your character page, it looks like our actual Ignite Chance is low, however through the node Heat Wave
this spell will generate Ignite stacks off of the uncapped Fire Resistance we have. This will make for very potent Ignite
stacks at once on enemies within its range, dealing hundreds of thousands in the form of DoT Fire Damage.
Black Hole acts as a giant nuke for the build. Looking at the stats on
your character page, it looks like our actual Ignite Chance is low, however through the node Heat Wave
this spell will generate Ignite stacks off of the uncapped Fire Resistance we have. This will make for very potent Ignite
stacks at once on enemies within its range, dealing hundreds of thousands in the form of DoT Fire Damage.
Order of Skill Points
- 4 points into Catalyst: 60% increase in damage. Black Hole will not pull in this build, so that is irrelevant.
- 1 point into Red Giant: Turns Black Hole into a star, converting the damage dealt into Fire and increasing the duration.
- 3 points into Flaming: 30% increase in Fire Damage.
- 5 points into Heat Wave: Increases Ignite Chance by increases to Fire Resistance.
- 1 point into Binary System: This node creates an awesome visual with a Cold and Fire star both orbiting each other, but this is taken for the 100% more damage.
- 3 points into Stability: Increase to the duration of Black Hole.
- 3 points into Umbral Core: Black Hole deals 30% more damage.
- 4 points into Event Horizon: Black Hole deals 60% more damage.
- 1 point into Pulsar: Black Hole explodes once a second. This deals Hit Damage.
In this section, we will break down each skill and highlight the key passives we have selected to make the skill shine in the build. While some of these skills do allow for some variation to exist depending on your own custom choices, we recommend utilizing the skill trees as presented until you have a strong understanding of the build itself.
Frost Claw
![]() Frost Claw is what we use in between casts of
Frost Claw is what we use in between casts of ![]() Black Hole in order to maintain damage output. While
Black Hole is a nuke meant for a single target or for taking care of clustered mobs, it doesn't do a great job of taking
out mobs that are spread out, or coming from multiple directions. This is where Frost Claw comes in. There is a moderate Mana cost
associated with this skill, but that is handled through extra Mana Regen on our gear and by taking several Mana nodes within the tree.
Black Hole in order to maintain damage output. While
Black Hole is a nuke meant for a single target or for taking care of clustered mobs, it doesn't do a great job of taking
out mobs that are spread out, or coming from multiple directions. This is where Frost Claw comes in. There is a moderate Mana cost
associated with this skill, but that is handled through extra Mana Regen on our gear and by taking several Mana nodes within the tree.
Order of Skill Points
- 3 points into Gift of Winter: Massive Mana cost reduction, with a chance to regain 12 Mana on cast.
- 1 point into Fen of the Frozen: Pathing node mostly, a bit of extra Ignite Chance.
- 1 point into Lava Talon: Converts the skill from Cold to Fire.
- 5 points into Spark of Celerity: Taken almost entirely for the Mana Efficiency, the Projectile Speed is a bonus.
- 1 point into Brightfrost: Cleanses ailments on cast.
- 1 point into Hand of Morditas: Increases Mana cost, but adds more projectiles.
- 1 point into Volley of Glass: Projectiles no longer burst, but all projectiles have their own instance of damage.
- 2 point into Rending Cascade: Increased base Critical Strike Chance.
- 1 point into Frozen Reign: Reduced Mana cost.
- 1 point into Glamdring: Pathing node.
- 1 point into Cold Star: Since we remove the burst on Frost Claw, half this node does nothing. We do gain the extra damage from it, though.
- 1 point into On Through The Snow: Frost Claw's initial hit continues on for a second jump.
- 1 point into Frozen Malice: The previous node, that hit is now directed at a nearby enemy.
- 1 point into A Crack in the Ice: The second hit from the previous nodes now creates a third jump, which directs back to the player.
If missing points from gear, remove them from Adept.
In this section, we will break down each skill and highlight the key passives we have selected to make the skill shine in the build. While some of these skills do allow for some variation to exist depending on your own custom choices, we recommend utilizing the skill trees as presented until you have a strong understanding of the build itself.
Frost Wall

![]() Frost Wall is converted into a Fire Wall for the purpose of this build, used to quickly
apply Fire Resistance Shred stacks to enemies within its range. Walking through
Frost Wall will cause it to explode, and also significantly buff our character and the damage potential
for
Frost Wall is converted into a Fire Wall for the purpose of this build, used to quickly
apply Fire Resistance Shred stacks to enemies within its range. Walking through
Frost Wall will cause it to explode, and also significantly buff our character and the damage potential
for ![]() Flame Rush if Flame Rush was used to move through Frost Wall.
Flame Rush if Flame Rush was used to move through Frost Wall.
Order of Skill Points
- 5 points into Marching Winter: Frost Wall is now larger and has the potential to last longer.
- 1 point into Pyroglass: Converts Frost Wall into Fire Wall.
- 1 point into Brand the Invaders: Applies a heavy Fire DoT to enemies that pass through the wall.
- 4 points into Crystals of Protection: Ward generation and Mana refund when passing through the wall.
- 3 points into Boosted Kickoff: Provides Haste and Frenzy when the player passes through the wall.
- 1 point into Runic Conclusion: Frost Wall will now detonate when you walk through it.
- 1 point into Glyph of Direfrost: Increases the damage and area of the detonation.
- 1 point into Shattered to Pieces: Significant increases to the damage and area of the detonation, but also destroys Frost Wall in the process.
- 2 points into Biting Limit: Applies Fire Shred stacks at an incredibly fast rate; 4 stacks per second.
In this section, we will break down each skill and highlight the key passives we have selected to make the skill shine in the build. While some of these skills do allow for some variation to exist depending on your own custom choices, we recommend utilizing the skill trees as presented until you have a strong understanding of the build itself.
Flame Ward

![]() Flame Ward has two purposes in this build. The main purpose is survival, as using this skill
will enhance us with extra Ward and mitigation a large amount of damage dealt to us. It may also be used
as an offensive skill, as this adds an extra 250% Increased Fire Damage to attacks while Flame Ward is active.
Flame Ward has two purposes in this build. The main purpose is survival, as using this skill
will enhance us with extra Ward and mitigation a large amount of damage dealt to us. It may also be used
as an offensive skill, as this adds an extra 250% Increased Fire Damage to attacks while Flame Ward is active.
Order of Skill Points
- 3 points into Stalwart Defense: Bonus 120 Ward on activation.
- 3 points into Dilation: Increases the duration Flame Ward persists.
- 5 points into Infusion: Bonus 250% Fire Damage while Flame Ward is active.
- 1 point into Desperate Defense: Pathing node.
- 1 point into Astonish: When you are stunned, Flame Ward is automatically cast so long as you have positive Mana and Flame Ward is not on cooldown.
- 3 points into Fuel The Flames: All Ward generated by Flame Ward is boosted by 20%.
- 1 point into Dual Aegis: Flame Ward now has a second charge.
- 5 points into Barrier: When Flame Ward is active, you take 40% less Hit Damage.
Alternative Nodes
If you're looking to pump higher amounts of damage with this build, forego selecting Concentrated Shielding, Fortification, and Fuel The Flames
and instead place these extra 8 points into Dilation and Infusion. This will subtract a bit of Ward generation from the build, but ![]() Black Hole
will deal a lot more damage.
Black Hole
will deal a lot more damage.
In this section, we will break down each skill and highlight the key passives we have selected to make the skill shine in the build. While some of these skills do allow for some variation to exist depending on your own custom choices, we recommend utilizing the skill trees as presented until you have a strong understanding of the build itself.
Flame Rush
![]() Flame Rush is the Traversal Skill in the build and has been amplified to go fast on a short cooldown.
Flame Rush will function best when used together with
Flame Rush is the Traversal Skill in the build and has been amplified to go fast on a short cooldown.
Flame Rush will function best when used together with ![]() Frost Wall, as doing this will apply
Haste and Frenzy, cleanse us, force the Frost Wall to explode, and increase
the damage and area of Flame Rush's final explosion.
Frost Wall, as doing this will apply
Haste and Frenzy, cleanse us, force the Frost Wall to explode, and increase
the damage and area of Flame Rush's final explosion.
Order of Skill Points
- 3 points into Solar Rush: Increases the speed and range.
- 4 points into Blazeborn: Flame Rush deals more damage in a larger area.
- 1 point into Gas Powered: As long as you pass through
 Frost Wall when using Flame Rush, the skill
will deal damage in a much larger area, and has a much higher chance to deal critical damage.
Frost Wall when using Flame Rush, the skill
will deal damage in a much larger area, and has a much higher chance to deal critical damage. - 5 points into Smolder and Burn: Applies 5 stacks of Fire Resistance Shred upon passing through an enemy.
- 3 points into Blazing Flux: Increased Cooldown Recovery Speed and Mana Efficiency. These bonuses are doubled with this build.
- 3 points into Runic Eclipse: Reduces damage taken when channeling Flame Rush.
- 2 points into Celestial Guidance: The mitigation from the previous node persists for a set amount of time after you stop channeling.
Build Mechanics and Playstyle
Damage for this build is split between ![]() Black Hole, which is mostly used to take care of Rare and
Boss enemies, or occasionally to help zone maps to avoid being over-ran, and Fire-based
Black Hole, which is mostly used to take care of Rare and
Boss enemies, or occasionally to help zone maps to avoid being over-ran, and Fire-based ![]() Frost Claw, which
will be used as a spam skill in order to take care of smaller mobs and maintain uptime when Black Hole is on cooldown.
While the build is mostly scaled to deal Hit Damage, it takes advantage of Heat Wave, a Passive Node
in the Black Hole skill. This allows us to scale our damage through both Prefixes and Suffixes (Fire Resistance)
and boost the overall damage of the build through means not usually available.
Frost Claw, which
will be used as a spam skill in order to take care of smaller mobs and maintain uptime when Black Hole is on cooldown.
While the build is mostly scaled to deal Hit Damage, it takes advantage of Heat Wave, a Passive Node
in the Black Hole skill. This allows us to scale our damage through both Prefixes and Suffixes (Fire Resistance)
and boost the overall damage of the build through means not usually available.
There's further synergy in the build with Fire Resistance through ![]() Flame Rush. Blazing Flux gains
Increased Cooldown Recovery and Mana Efficiency when you have at least 150% Fire Resistance, something this build bypasses
by a mile. This allows us to maintain Fire Resistance Shred on enemies consistantly and provides
great mobility when clearing maps. Using this skill in tandem with
Flame Rush. Blazing Flux gains
Increased Cooldown Recovery and Mana Efficiency when you have at least 150% Fire Resistance, something this build bypasses
by a mile. This allows us to maintain Fire Resistance Shred on enemies consistantly and provides
great mobility when clearing maps. Using this skill in tandem with ![]() Frost Wall will boost our damage output and ensure we
stay ailment-free, so long as we're using Flame Rush to blast through the pillars of Frost Wall.
Frost Wall will boost our damage output and ensure we
stay ailment-free, so long as we're using Flame Rush to blast through the pillars of Frost Wall.
![]() Flame Ward is the defensive layer for the build, but can also be used offensively in order to deal immense amounts of
damage. If using it this way, pop Flame Ward prior to throwing down
Flame Ward is the defensive layer for the build, but can also be used offensively in order to deal immense amounts of
damage. If using it this way, pop Flame Ward prior to throwing down ![]() Black Hole. This ensures the death of just about any enemy
that isn't an actual Boss. Flame Ward will come on a charge, and this was done mainly for safety reasons. It allows you to use the skill
for damage, but also keep an extra in your back pocket in case you need to extra Ward / mitigation on the fly. For additional protection,
Flame Ward will automatically pop if you're Stunned, further emphasizing the need to have two charges of Flame Ward.
Black Hole. This ensures the death of just about any enemy
that isn't an actual Boss. Flame Ward will come on a charge, and this was done mainly for safety reasons. It allows you to use the skill
for damage, but also keep an extra in your back pocket in case you need to extra Ward / mitigation on the fly. For additional protection,
Flame Ward will automatically pop if you're Stunned, further emphasizing the need to have two charges of Flame Ward.
Equipment and Gear Affixes
For this build, we will be focusing on several main affixes for each piece of non-unique gear, as well as working towards acquiring the specific Uniques needed to make this build operate correctly. Our equipment will focus on these specific affixes for the Implicits and Modifier stats.
| Gear Slot | Implicits | Modifiers |
|---|---|---|
| Wand | Spell Damage Increased Cast Speed -3 Mana Cost for Spell Skills |
Prefixes Increased Fire Damage Increased Cast Speed Suffixes Chance to apply Ignite Chance to apply Slow |
| Off-hand Catalyst | Intelligence Ward per Second Ward Retention |
Prefixes Increased Fire Damage Increased Cast Speed Suffixes Fire Resistance Ward per Second |
| Head | Armor Mana Spent Gained as Ward Increased Mana Regen |
Prefixes Intelligence Increased Fire Damage Over Time Suffixes Increased Armor Needed Resistances |
| Amulet | Less Damage Over Time Taken | Prefixes Increased Mana Regen Increased Fire Damage Suffixes Health Needed Resistances |
| Chest | Armor Mana Spent Gained as Ward Ward Decay Threshold |
Prefixes Intelligence Increased Fire Damage Over Time Suffixes Health Increased Health |
| Belt | Poison Resistance Cold Resistance |
Prefixes Increased Fire Damage Increased Mana Regen Suffixes Fire Resistance Hybrid Health |
| Ring | Fire Resistance Increased Fire Damage |
Prefixes Increased Fire Damage Intelligence Suffixes Health Fire Resistance |
| Ring | Fire Resistance Increased Fire Damage |
Prefixes Increased Fire Damage Intelligence Suffixes Needed Resistances |
| Gloves | Armor Armor Mitigation Applies to Damage Over Time |
Prefixes Intelligence Increased Cast Speed Suffixes Hybrid Health Fire Resistance |
| Feet | Legendary Potential Intelligence |
|
| Relic | Legendary Potential +4 Levels to Black Hole |
A loot filter made specifically for the gear table above may be copied by pressing the button below. Once in the Loot Filter portion of the in-game menu, choose the "Paste Clipboard Contents" option to import the code.
Copy Loot Filter to Clipboard
Uniques
Below we have the required uniques to make the build work. While the idea behind the build will work decently in either Normal Monoliths or low Corruption, it is suggested to have these drops to effectively play the build.
Twisted Heart of Uhkeiros
![]() Twisted Heart of Uhkeiros: This relic is by far the most important part of ensuring your survivability. It
converts current Health into Ward any time you cast an Elemental Spell. Combined with the Blessing
Twisted Heart of Uhkeiros: This relic is by far the most important part of ensuring your survivability. It
converts current Health into Ward any time you cast an Elemental Spell. Combined with the Blessing ![]() Grand Hunger of the Void,
you'll be able to continually generate Ward while also refilling your Health on each cast. This Relic can be target farmed in
Monolith Timeline "Reign of Dragons".
Grand Hunger of the Void,
you'll be able to continually generate Ward while also refilling your Health on each cast. This Relic can be target farmed in
Monolith Timeline "Reign of Dragons".
Fiery Dragon Shoes
![]() Fiery Dragon Shoes: These shoes, in conjunction with the Mage node Mental Catalysis, will reduce Critical Strike damage 100% down to a normal hits' damage.
This means we do not need Critical Strike Avoidance at all. These boots will suffer from it anyway, since Fire Trail will activate from being hit with a critical strike.
Overall a fantastic gear piece for this build, as it scales Fire Penetration, Fire Damage, and Fire Resistance. Target farm on the Monolith Timeline "Spirits of Fire".
Fiery Dragon Shoes: These shoes, in conjunction with the Mage node Mental Catalysis, will reduce Critical Strike damage 100% down to a normal hits' damage.
This means we do not need Critical Strike Avoidance at all. These boots will suffer from it anyway, since Fire Trail will activate from being hit with a critical strike.
Overall a fantastic gear piece for this build, as it scales Fire Penetration, Fire Damage, and Fire Resistance. Target farm on the Monolith Timeline "Spirits of Fire".
Idols
Idol slots are gained through the campaign, unlocking small bonuses and unique affixes for the player to discover and augment their builds with. The Idol screen consists of a grid system for the player to fill out with different sized Idols, eventually filling in every part of the grid. As the Idol shape increases (1x1, 1x2, 1x3, 1x4, etc.) the stronger an affix you might find for your build.
To optimize the Idols in this build, aim to collect four Large Arcane Idols with Fire Penetration with Ignire and Health. This build
will utilize a ![]() Throne of Ambition, but any empty slots can be used for Health, Ward Retention, or missing Resistances.
Throne of Ambition, but any empty slots can be used for Health, Ward Retention, or missing Resistances.
Blessing
Blessings are permanent buffs that are applied to your character. These come in two different powers, Standard and Grand. Grand blessings are significantly stronger than the Standard Blessings. In total, there are 10 Blessing Slots, one for each Monolith Timeline. When you complete a Monolith and defeat the final boss you will be awarded a choice of three blessing with a random value.
| Blessing Name | Affix | Timeline |
|---|---|---|
| Spell Damage Leeched as Health | The Black Sun | |
| Fire Resistance | Spirits of Fire | |
| All Resistances | Reign of Dragons | |
| Increased Armor | The Age of Winter | |
| Ward per Second | Ending the Storm |
The Blessings listed above cover the most important slots, with the remaining Blessing Slots being filled with whatever the player may be lacking for stats.
Changelog
- 13 Feb. 2024: Updated for Patch 1.0.
- 21 Jan. 2024: Updated Flame Ward and Fireball to increase damage output of build. Added Legendary affix suggestions.
- 12 Jan. 2024: Loot Filter added.
- 26 Dec. 2023: Guide added.

GhazzyTV is a professional content creator that knows all about theory crafting builds in Path of Exile and Last Epoch and has been teaching players how to build their characters for over 9 years. He is a huge Blizzard fan with thousands of hours invested into Diablo 3 and 4 and is a frequent World of Warcraft Classic player. His builds will be helpful content for new players and veterans alike. You can find his PoE Vault Guide Hub here and his LE Guide Hub here. You can follow him on Twitch, YouTube or Twitter.
- Patch 1.0.7 Update: Multiplayer, Skills and More!
- Patch 1.0.6 Update: Camera Setting, Controller Keybinds, Bug Fixes, and More!
- Eleventh Hour Games on Real-Money Trading and Exploits in Last Epoch
- Patch 1.0.5 Update: Many Bug Fixes, Including Loot Filter Toggle Sensitivity, and Other Improvements!
- The First 30 Days of Last Epoch!
- 1.0 Launch Retrospective: A Message From Eleventh Hour Games
- Patch 1.0.4 Update: More In-Game Changes, Bug Fixes, and Improvements
- Last Epoch Mid-Cycle Balance Survey Recap