Warlock Bleed Fissure Endgame Build for Last Epoch (Patch 1.0)
Build Introduction
Spew frozen blood from your palm of your hand and rip the life force from your enemies to empower you. This build focuses on building an extreme amount of Ward in order to push Corruption. This is the High End version of our original Chaos Fissure build, and plays nearly identical.
Due to the nature of this version of the build, it is highly suggested to use the original Chaos Fissure build and slowly progress into this one as you collect gear. There will not be substitutions listed in this build, as it's intended to act as a goal for players who wish to climb Corruption with a clear indicator for what gear to chase. The original build is linked at the top of the page, under Build Variations.
 Cold Resistance scales the build both offensively and defensively
 - Hotbar only needs three actions
- High mobility
- High Freeze Rate built in

 Extremely reliant on Legendary Potential and specific Exalted gear

Skill Selection
![]() Chaos Bolts is the spam skill for this build; this spell is typically
a mixture of Necrotic and Fire Damage, however for this set up we will be converting
it into both a Physical and Cold spell. This allows it to scale extremely well
with Cold Resistance and Bleed. Automated off these Chaos Bolts will
be
Chaos Bolts is the spam skill for this build; this spell is typically
a mixture of Necrotic and Fire Damage, however for this set up we will be converting
it into both a Physical and Cold spell. This allows it to scale extremely well
with Cold Resistance and Bleed. Automated off these Chaos Bolts will
be ![]() Rip Blood, used as a Ward generator and a way to inflict Bleed, and
Rip Blood, used as a Ward generator and a way to inflict Bleed, and ![]() Bone Curse,
used to increase our damage output and inflict Curses on enemies.
Bone Curse,
used to increase our damage output and inflict Curses on enemies. ![]() Transplant is used
for mobility, but also scales into nodes that provide Bleed, Frenzy, Haste, and Bone Armor,
as well as providing another way to inflict Bone Curse while aggressively moving from pack to pack.
As the final nail in the coffin, the entire build is automated off
Transplant is used
for mobility, but also scales into nodes that provide Bleed, Frenzy, Haste, and Bone Armor,
as well as providing another way to inflict Bone Curse while aggressively moving from pack to pack.
As the final nail in the coffin, the entire build is automated off ![]() Chthonic Fissure.
This build has a hard-focus on maximizing Curses in order to quickly take enemies to an
early grave.
Chthonic Fissure.
This build has a hard-focus on maximizing Curses in order to quickly take enemies to an
early grave.

Class and Skill Passive Trees
Our base class is the Acolyte, which acts as a generic spell caster and summoner. Our character will be offered an opportunity to select an Advanced Mastery once we have completed the first act of the campaign. Each base class has three possible masteries to choose from. For the Acolyte, we have access to the Mastery Tree Passives for Necromancers, Lich and Warlock. Upon selecting a Mastery and placing 20 Passive Points into the Acolyte Tree, you'll then be able to place Passive Points into the Mastery Trees.
Warlock is our advanced class for the build. We will utilize the majority of our Passive Points for the Warlock Passive Tree, with a handful of points taken in Lich. The Warlock passives will unlock Bleed Overload, supply Haste and Ward, and allow us to apply Withering to enemies. To help round the build out we will be taking additional points in the Lich tree. These points will focus on Intelligence and help us enable a Low Life playstyle.
Acolyte Passive Points
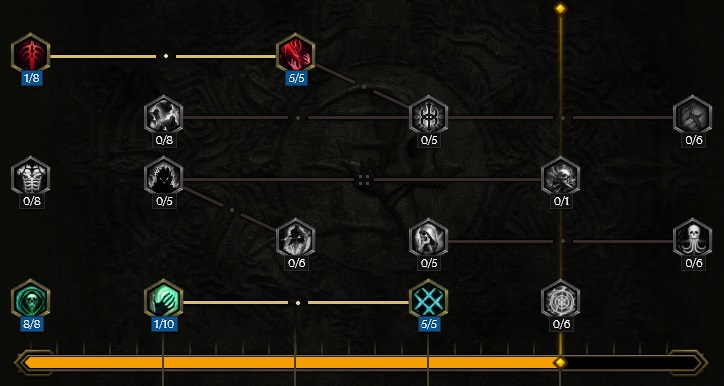
- 8 points into Forbidden Knowledge: Intelligence and Necrotic Resistance.
- 1 points into Blood Aura: Taken to proceed through the tree.
- 1 point into Mania of Mortality: Taken to proceed through the tree.
- 5 points into Blood Pact: Increased damage, as well as Health Drain if you have killed an enemy recently.
- 5 points into Unnatural Preservation: Large gains to Ward Retention, Necrotic Resistance, and Poison Resistance.
Our base class is the Acolyte, which acts as a generic spell caster and summoner. Our character will be offered an opportunity to select an Advanced Mastery once we have completed the first act of the campaign. Each base class has three possible masteries to choose from. For the Acolyte, we have access to the Mastery Tree Passives for Necromancers, Lich and Warlock. Upon selecting a Mastery and placing 20 Passive Points into the Acolyte Tree, you'll then be able to place Passive Points into the Mastery Trees.
Warlock is our advanced class for the build. We will utilize the majority of our Passive Points for the Warlock Passive Tree, with a handful of points taken in Lich. The Warlock passives will unlock Bleed Overload, supply Haste and Ward, and allow us to apply Withering to enemies. To help round the build out we will be taking additional points in the Lich tree. These points will focus on Intelligence and help us enable a Low Life playstyle.
Warlock Passive Points
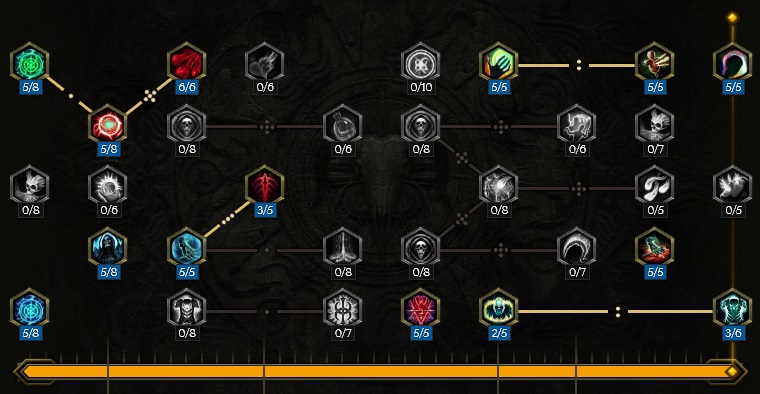
- 5 points into Spiteful Decay: Increased Damage Over Time, and More Damage Over Time to Cursed enemies.
- 5 points into Soul Stealer: Increased Mana Regen, as well as the ability to gain a substantial amount of Mana when hitting a Cursed enemy.
- 5 points into Cauldron of Blood: Unlocks Bleed Overload and adds Bleed Chance.
- 6 points into Crimson Favors: Higher Bleed Chance for Rip Blood, and Rip Blood now automatically activates Rip Blood on enemies.
- 5 points into Occultist's Mind: Intelligence, and scales Mana off Intelligence.
- 5 points into Ward of Malevolence: Adds Ward Decay Threshold and Ward gained on kill.
- 3 points into Imperishable: Taken for the bonus Ward Decay Threshold per 1% Necrotic Resistance.
- 5 points into Wither: 100% Chance to Wither, and 8% damage reduction from Withered enemies.
- 5 points into Chaotic Strikes: Adds a chance to deal double damage, increased per Curse on a target. Synergizes well with Chaos Bolts.
- 5 points into Wreak Havoc: Critical Multiplier, with additional Multiplier if Chaotic Strikes triggers.
- 5 points into Fleeting Crone: A massive boost to Haste.
- 5 points into Aspect of Death: Increased Health, but also applies Damned to ourselves in order to increase damage when we kill an enemy.
- 2 points into Encroaching Darkness: Chthonic Fissure now applies Anguish on hit.
- 3 points into Duskbringer: Spell Damage for Curses, but applies the damage effect from Anguish on Boss hit.
Our base class is the Acolyte, which acts as a generic spell caster and summoner. Our character will be offered an opportunity to select an Advanced Mastery once we have completed the first act of the campaign. Each base class has three possible masteries to choose from. For the Acolyte, we have access to the Mastery Tree Passives for Necromancers, Lich and Warlock. Upon selecting a Mastery and placing 20 Passive Points into the Acolyte Tree, you'll then be able to place Passive Points into the Mastery Trees.
Warlock is our advanced class for the build. We will utilize the majority of our Passive Points for the Warlock Passive Tree, with a handful of points taken in Lich. The Warlock passives will unlock Bleed Overload, supply Haste and Ward, and allow us to apply Withering to enemies. To help round the build out we will be taking additional points in the Lich tree. These points will focus on Intelligence and help us enable a Low Life playstyle.
Lich Passive Points
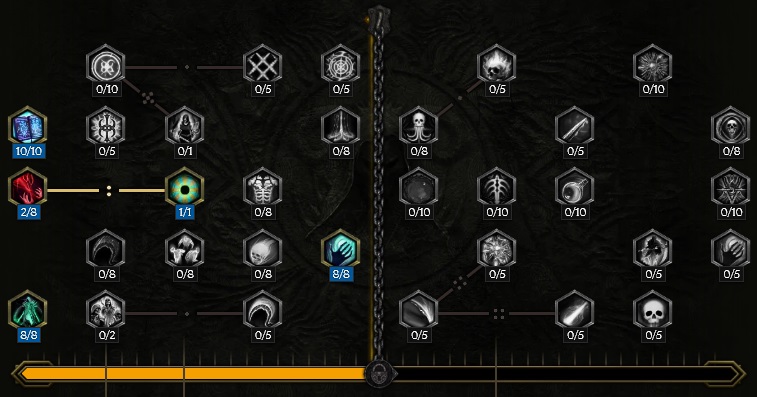
- 8 points into Dance with Death: 120% Increased Damage while at Low Life.
- 2 points into Survival of the Cruel Added Health and Spell Leech, which will be converted to Increased Damage.
- 10 points into Apocrypha: Intelligence and Mana Regen.
- 1 point into Hollow Lich: Converts any source of Leech into Increased Damage.
In this section, we will break down each skill and highlight the key passives we have selected to make the skill shine in the build. While some of these skills do allow for some variation to exist depending on your own custom choices, we recommend utilizing the skill trees as presented until you have a strong understanding of the build itself.
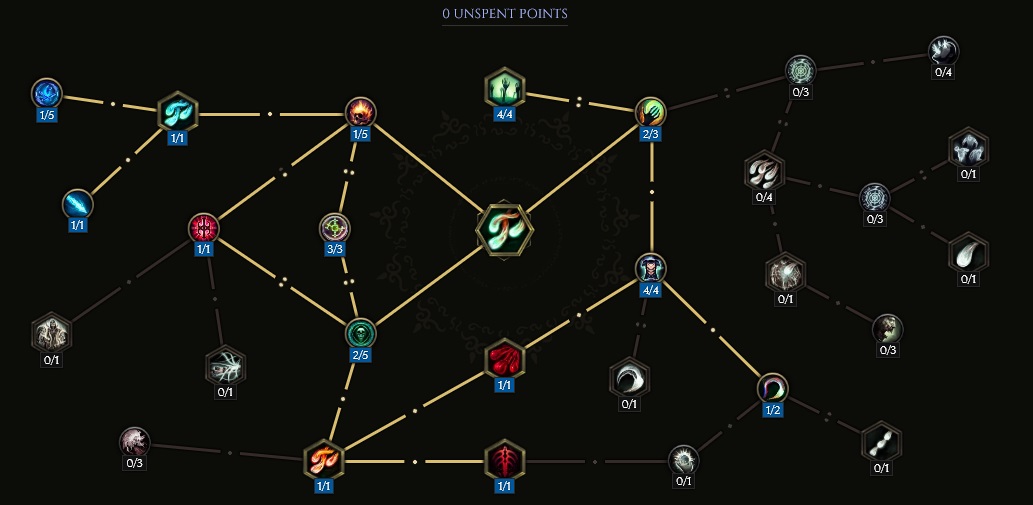
Chthonic Fissure
To start the explanation of how the skills work, we will begin with ![]() Chthonic Fissure. This
skill is capable of automating
Chthonic Fissure. This
skill is capable of automating ![]() Chaos Bolts off itself, which means further automation with
Chaos Bolts off itself, which means further automation with
![]() Bone Curse and
Bone Curse and ![]() Rip Blood. Aside from this automation, this spell will place Anguish,
Acid Skin, and Torment on enemies, scaling multiple parts of this build. We've selected nodes
very purposely to maximize damage output on average while keeping Mana stable. To facilitate Bleed Overload and scale the
build properly, Fissure will convert to a Physical Spell.
Rip Blood. Aside from this automation, this spell will place Anguish,
Acid Skin, and Torment on enemies, scaling multiple parts of this build. We've selected nodes
very purposely to maximize damage output on average while keeping Mana stable. To facilitate Bleed Overload and scale the
build properly, Fissure will convert to a Physical Spell.
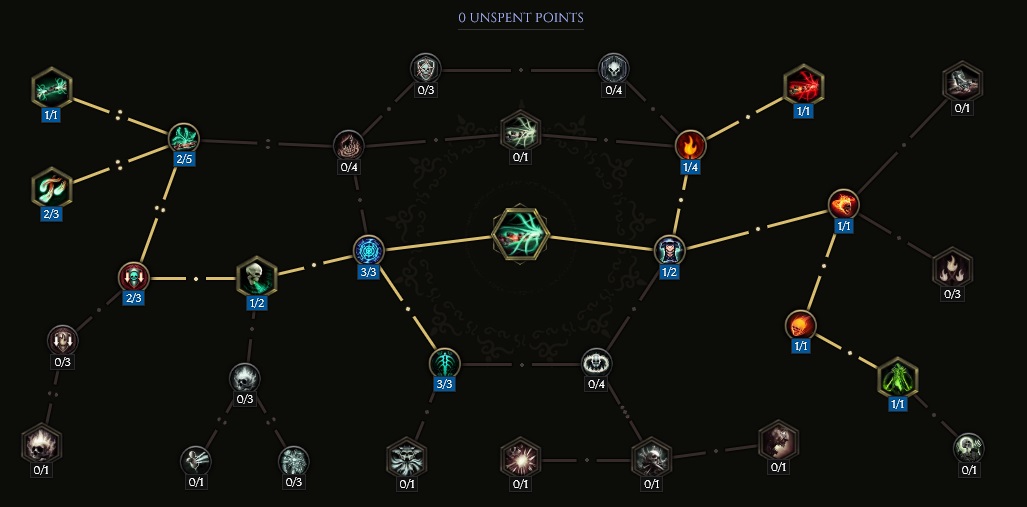
Order of Skill Points
- 1 point into Death from Below: We will not be Cursing ourselves, however this node is taken to reach further nodes in the tree.
- 1 point into Mantle of Flames: With the conversion, this replaces Ignite with Bleed to help activate Bleed Overload.
- 1 point into Blood Gulch: This converts the Fire portion of the skill into Physical. It will retain its Necrotic Damage as well.
- 1 point into Pyrochasm: Adds a Hit component to Chthonic Fissure.
- 1 point into Fissure of Wrath: Adds Spell Damage to Fissure per 2% Bleed Chance.
- 1 point into Forbidden Chasm: The Hit aspect of Fissure now applies Acid Skin, boosting Critical Hit Rate of the build to 100%.
- 3 points into Fragile Crust: Lowers the Mana cost as long as Fissure is cast with a Cursed Boss or Rare enemy nearby.
- 1 point into Spirit Gale: Chance for dead enemies to release a Spirit.
- 2 points into Severed Wards: Shreds Necrotic Resistance, which boosts the damage Spirits do.
- 2 points into Stygian Current: Spirits release more frequently from the Fissure.
- 1 point into Of Gloom and Flames: Adds a secondary Fissure that erupts behind you.
- 2 points into Chaotic Rupture: 40% Chance for Spirits to turn into Chaos Bolts.
In this section, we will break down each skill and highlight the key passives we have selected to make the skill shine in the build. While some of these skills do allow for some variation to exist depending on your own custom choices, we recommend utilizing the skill trees as presented until you have a strong understanding of the build itself.
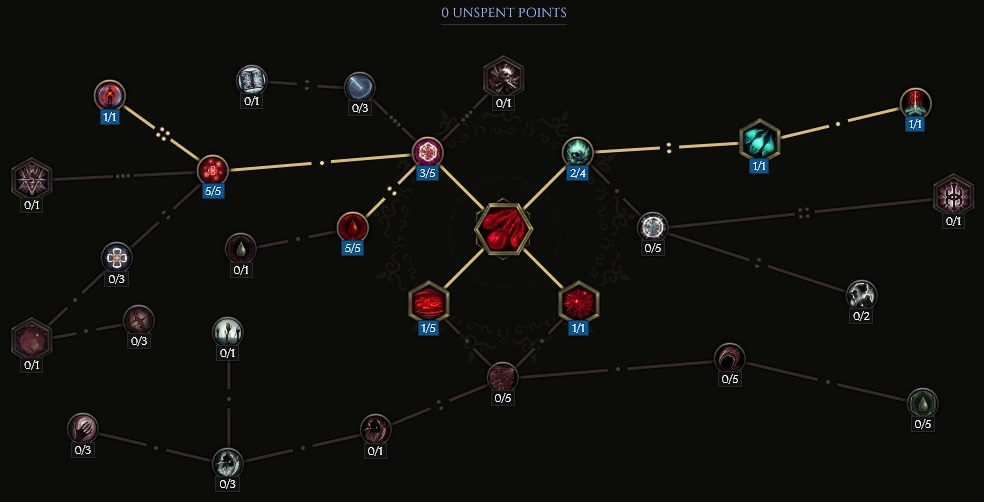
Chaos Bolts
![]() Chaos Bolts are more important in this build than they were in the original Chaos Fissure build.
While the other version of the build was highly reliant on
Chaos Bolts are more important in this build than they were in the original Chaos Fissure build.
While the other version of the build was highly reliant on ![]() Chthonic Fissure damage, the majority of the
damage potential for this build comes from Chaos Bolts. The spell is converted from Fire and Necrotic to Cold and
Physical in order to scale with Bleed, Physical, and Cold Resistance. We've combined the synergy between
Chthonic Fissure damage, the majority of the
damage potential for this build comes from Chaos Bolts. The spell is converted from Fire and Necrotic to Cold and
Physical in order to scale with Bleed, Physical, and Cold Resistance. We've combined the synergy between ![]() Oceareon
and Chill to not only scale the damage based off the unique property of the ring, but also allow us
an even higher chance for double hits on Chilled enemies.
Oceareon
and Chill to not only scale the damage based off the unique property of the ring, but also allow us
an even higher chance for double hits on Chilled enemies. ![]() Rip Blood and
Rip Blood and ![]() Bone Curse are both automated
off this spell and provide both an offensive and defensive aspect to the build. Finally, the base Critical Hit Rate
is boosted substantially through continued casting.
Bone Curse are both automated
off this spell and provide both an offensive and defensive aspect to the build. Finally, the base Critical Hit Rate
is boosted substantially through continued casting.
Order of Skill Points
- 2 points into Condemned to Chaos: 40% Bleed Chance.
- 1 point into Sanguine Reverie: Converts the Necrotic aspect of the spell into Physical.
- 1 point into Exacted Libation: Adds automation of
 Rip Blood scaled off Intelligence.
 - 1 point into Another Affliction: Adds automation of
 Bone Curse based on the prerequisite that a Curse already exists on the target.
 - 1 point into Mania in Flames: 20% Frostbite Chance.
- 1 point into Call of Morditas: Converts the Fire aspect of the spell into Cold.
- 1 point into Torment of the Red Tundra: Scales Bleed Damage and Freeze Rate Multiplier off Cold Resistance, adding synergy with
 Frostbite Shackles.
 - 1 point into Chance of Snow: While the Chill Chance is negligible, as we already have enough on our Wand, the chance to deal double damage to Chilled enemies is massive
and synergizes with Chaotic Strikes, as well as the Unique Ring
 Oceareon.
 - 3 points into Exult in Misery: Adds 48% more damage to Chaos Bolts.
- 2 points into Abrupt Chaos: Increases Cast Speed and projectiles now move faster. This results in more accurate firing.
- 4 points into Doom's Vindication: Until you get the added Levels in
 Peak of the Mountain, limit the points in this node.
This will add 32% more damage to Chaos Bolts.
Peak of the Mountain, limit the points in this node.
This will add 32% more damage to Chaos Bolts. - 1 point into Devour the Damned: Helps sustain Mana for the build.
- 4 points into Destructive Intensity: This is how we get 100% Critical Hit Rate on Chaos Bolts. Continuous casting results in an added 8% Critical Hit Rate.
In this section, we will break down each skill and highlight the key passives we have selected to make the skill shine in the build. While some of these skills do allow for some variation to exist depending on your own custom choices, we recommend utilizing the skill trees as presented until you have a strong understanding of the build itself.
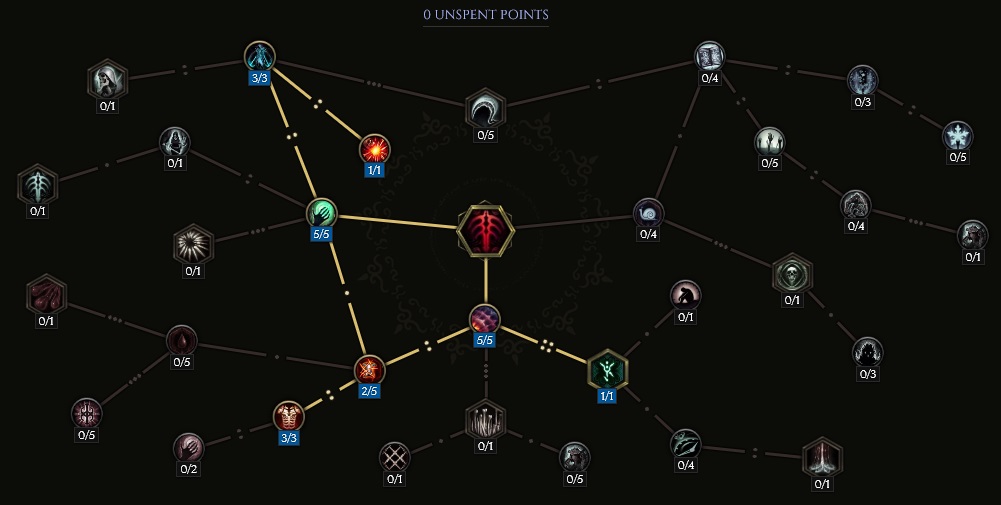
Rip Blood
![]() Rip Blood serves a dual purpose in this build. We will never cast Rip Blood manually. It will always automate
either off
Rip Blood serves a dual purpose in this build. We will never cast Rip Blood manually. It will always automate
either off ![]() Chaos Bolts or through Bleed Overload. While not used for direct damage, it does provide Bleed stacks on
its own, which ensures we will have 100% uptime on Bleed Overload. However, every Rip Blood that goes off with generate Ward for
us, and creates a situation where we're able to maintain extremely high Ward values simply by pressing a single button with Chaos
Bolts.
Chaos Bolts or through Bleed Overload. While not used for direct damage, it does provide Bleed stacks on
its own, which ensures we will have 100% uptime on Bleed Overload. However, every Rip Blood that goes off with generate Ward for
us, and creates a situation where we're able to maintain extremely high Ward values simply by pressing a single button with Chaos
Bolts.
Order of Skill Points
- 2 points into Arcane Absorption: Purely for moving through the tree. We never manually cast this spell.
- 1 point into Rip Spirit: Converts Rip Blood from Physical into a Necrotic Spell.
- 1 point into Arcane Fortress: Health from Rip Blood is converted into Ward.
- 3 points into Hemomancer: Traversal node, this will not apply to anything we do.
- 5 points into Gushing Wound: Adds 100% Chance for Rip Blood to cause Bleed.
- 5 points into Quenching: Amplifies the Ward gain from this spell.
- 1 point into Hematology: Scales the Ward gained from Rip Blood off Intelligence.
- 1 point into Eviscerate: Enables 100% rate for Rip Blood to Splatter with a single point.
- 1 point into Splatter: 20% Chance for Rip Blood to Splattter twice, which can then hit the original target.
In this section, we will break down each skill and highlight the key passives we have selected to make the skill shine in the build. While some of these skills do allow for some variation to exist depending on your own custom choices, we recommend utilizing the skill trees as presented until you have a strong understanding of the build itself.
Bone Curse
For the sake of this build, ![]() Bone Curse may as well be called Bone Bomb. Bone Curse enables
a large portion of the damage in this build, both for single target bossing and for area clearing.
This skill adds a 12% Kill Threshold and will cause enemies to explode on death 25% of the time, potentially causing
a chain reaction of blood eruptions on the screen. Additionally, Bone Curse applies Marked For Death to enemies,
and Bone Armor to us.
Bone Curse may as well be called Bone Bomb. Bone Curse enables
a large portion of the damage in this build, both for single target bossing and for area clearing.
This skill adds a 12% Kill Threshold and will cause enemies to explode on death 25% of the time, potentially causing
a chain reaction of blood eruptions on the screen. Additionally, Bone Curse applies Marked For Death to enemies,
and Bone Armor to us.
Order of Skill Points
- 5 points into Iron Maiden: Bone Curse deals 50% more damage.
- 3 points into Brittle Bones: 12% more damage, on top of a 12% Kill Threshold.
- 1 point into Ruptured Corpse: Enables Bone Curse to cause enemies to explode when they die, dealing Physical Spell Damage to nearby enemies. The actual name for this is Detonate Body, which has a base of 50 Damage, and applies effectiveness at a 250% rate.
- 5 points into Conflation: More than doubles the size of Bone Curse, taken for clear potential.
- 1 point into Sigil of Mortality: Bone Curse now applies Marked for Death.
- 2 points into Defile Defenses: Mostly traversal, but may apply a stack of Armor Shred on use.
- 3 points into Marrow Thief: Has a chance to apply Bone Armor when an enemy afflicted with bone Curse dies. When running maps, this turns into a permanent defensive boost for your character.
In this section, we will break down each skill and highlight the key passives we have selected to make the skill shine in the build. While some of these skills do allow for some variation to exist depending on your own custom choices, we recommend utilizing the skill trees as presented until you have a strong understanding of the build itself.
Transplant
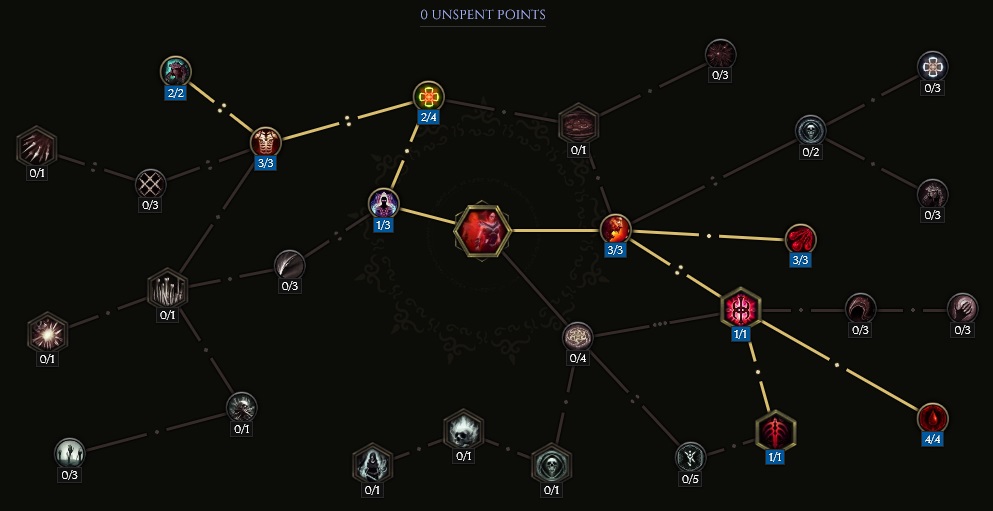
Much like ![]() Bone Curse,
Bone Curse, ![]() Transplant deals a ton of damage while also supplying the build
with a ton of support. For starters, Haste and Frenzy are applied after teleporting,
with Haste gaining a massive boost from Fleeting Crone in the Warlock Passive Tree. Since we
run
Transplant deals a ton of damage while also supplying the build
with a ton of support. For starters, Haste and Frenzy are applied after teleporting,
with Haste gaining a massive boost from Fleeting Crone in the Warlock Passive Tree. Since we
run ![]() Exsanguinous, we're free to take the nodes which apply extra Bleed to enemies, as we will be immune
to it from being applied to us.
Exsanguinous, we're free to take the nodes which apply extra Bleed to enemies, as we will be immune
to it from being applied to us. ![]() Bone Curse is automated off Transplant, and using this movement skill
will also apply Bone Armor to ourselves, ensuring we're protected regardless of how aggressively we play.
Bone Curse is automated off Transplant, and using this movement skill
will also apply Bone Armor to ourselves, ensuring we're protected regardless of how aggressively we play.
This skill acts as a way for us to apply Bone Curse when the automation off ![]() Chaos Bolts is on cooldown.
While mobility is nice, using
Chaos Bolts is on cooldown.
While mobility is nice, using ![]() Transplant as an actively offensive ability will prove to be more useful while
completing Echoes.
Transplant as an actively offensive ability will prove to be more useful while
completing Echoes.
Order of Skill Points
- 3 points into Acolyte's Fervor: Applies Frenzy and Haste on Transplant usage.
- 3 points into Dance of Blood: Casts Rip Blood and three targets on use.
- 1 point into Reign of Blood: Transplant now deals damage twice; once when leaving a location, once when arriving.
- 4 points into Hemophilia: Transplant now has a 400% Chance to Bleed on every detonation. When combined with Rip Blood activation, this can satisfy the requirements for Bleed Overload immediately.
- 1 point into Doom Bringer: Transplant automates Bone Curse at the arrival point.
- 1 point into Fleeting Form: Mostly for pathing, but does reduce the cooldown slightly.
- 2 points into Anemia: Reduces the Health cost. This build is Low Life, so this does not really matter.
- 3 points into Bone Armor: Activates Bone Armor on us, resulting in more Armor and 12% less damage taken.
- 2 points into Plated Bone: Bone Armor effects are increased by 20%.
Build Mechanics and Playstyle
While major nodes have changed in this version of the Chaos Fissure build, the playstyle has mostly remained the same.
There is a larger emphasis on the damage from ![]() Chaos Bolts, as well as
Chaos Bolts, as well as ![]() Bone Curse enabling everything in our kit
to deal huge bursts of damage.
Bone Curse enabling everything in our kit
to deal huge bursts of damage.
While clearing maps, ![]() Chthonic Fissure will likely be enough to clear smaller mobs. Manual casts of
Chthonic Fissure will likely be enough to clear smaller mobs. Manual casts of ![]() Chaos Bolts
can be used to increase clear time, as well as using
Chaos Bolts
can be used to increase clear time, as well as using ![]() Transplant right into the middle of mobs. Bleed Overload, triggered
by using a Physical Spell while nearby enemies have a combined 25 stacks of Bleed on them, is a huge enabler for the build. This further
automates
Transplant right into the middle of mobs. Bleed Overload, triggered
by using a Physical Spell while nearby enemies have a combined 25 stacks of Bleed on them, is a huge enabler for the build. This further
automates ![]() Rip Blood for us, working off nothing but the simple fact you have Bleed Overload active. Rip Blood does not deal a ton of damage
on its own, however the Bleed stacks will continue to rise and Bleed Overload will persist continually so long as you have mobs to hit. Furthermore,
Bleed Overload is acting as a sort of battery for us, supplying the build with massive Ward generation just by existing.
Rip Blood for us, working off nothing but the simple fact you have Bleed Overload active. Rip Blood does not deal a ton of damage
on its own, however the Bleed stacks will continue to rise and Bleed Overload will persist continually so long as you have mobs to hit. Furthermore,
Bleed Overload is acting as a sort of battery for us, supplying the build with massive Ward generation just by existing.
In order to scale ![]() Chaos Bolts damage, we will be increasing the rate at which double hits can happen with it. Between the
Class Passive node Chaotic Strikes and the Chaos Bolts Skill Tree node Chance of Snow, this will raise
our chances of getting a double hit to 14%. It does not seem high, but this will trigger fairly frequently, as we have taken the affix
Chance for 3 additional projectiles when you directly cast Chaos Bolts on our Unique Helmet,
Chaos Bolts damage, we will be increasing the rate at which double hits can happen with it. Between the
Class Passive node Chaotic Strikes and the Chaos Bolts Skill Tree node Chance of Snow, this will raise
our chances of getting a double hit to 14%. It does not seem high, but this will trigger fairly frequently, as we have taken the affix
Chance for 3 additional projectiles when you directly cast Chaos Bolts on our Unique Helmet, ![]() Peak of the Mountain.
Peak of the Mountain.
The build comes together when you notice the Cold Resistance synergy between the Unique Gloves, ![]() Frostbite Shackles and
the
Frostbite Shackles and
the ![]() Chaos Bolts Passive Torment of the Red Tundra. Cold Resistance will now increase our Ward Retention
and the Physical Damage Over Time applied by Chaos Bolts. This can be seen as passive bonus damage; the ticks will be noticeable.
Chaos Bolts Passive Torment of the Red Tundra. Cold Resistance will now increase our Ward Retention
and the Physical Damage Over Time applied by Chaos Bolts. This can be seen as passive bonus damage; the ticks will be noticeable.
Equipment and Gear Affixes
This build is extremely gear dependent. While you can run it with less gear than what is shown, and has been tested with both the same and less gear, if you're looking to push Corruption you should aim for the exact rolls listed below, or something very close.
| Gear Slot | Implicits | Modifiers |
|---|---|---|
| Wand | Spell Damange Increased Cast Speed -3 Spell Mana Cost |
Prefixes Critical Strike Multiplier Increased Physical Damage Suffixes Chance to Chill on Hit Chance to Shock on Hit Sealed Affix Chance to Ignite on Hit |
| Off-hand Catalyst | Intelligence Ward per Second Ward Retention |
Prefixes Critical Strike Multiplier Increased Cast SPeed Suffixes Cold Resistance Ward per Second Sealed Affix Increased Spell Damage |
| Head | Legendary Potential +4 Levels to Chaos Bolts, Increased Spell Damage Chance for 3 additional projectiles when you directly cast Chaos Bolts Cold Resistance |
|
| Amulet | Physical Resistance Necrotic Resistance |
Prefixes Increased Physical Damage Increased Spell Critical Strike Chance Suffixes Fire Resistance Cold Resistance Sealed Affix Health |
| Chest | Legendary Potential Intelligence Cold Resistance Increased Health |
|
| Belt | Poison Resistance Cold Resistance |
Prefixes Increased Physical Damage Increased Mana Regen Suffixes Critical Strike Avoidance Cold Resistance Sealed Affix Hybrid Health |
| Gloves | Legendary Potential Current Health Lost per Second, Missing Health gained as Ward per Second Hybrid Health |
|
| Ring | Legendary Potential Cold Resistance |
|
| Ring | Necrotic Resistance Ward Decay Threshold |
Prefixes Increased Physical Damage Increased Mana Regen Suffixes Physical Resistance Cold Resistance Sealed Affix Intelligence |
| Feet | Legendary Potential Intelligence Cold Resistance |
|
| Relic | Chance to Bleed on Hit Chance to Bleed on Minion Hit |
Prefixes Intelligence Increased Cast Speed Suffixes Health Cold Resistance Sealed Affix Critical Strike Multiplier |
A loot filter made specifically for the gear table above may be copied by pressing the button below. Once in the Loot Filter portion of the in-game menu, choose the "Paste Clipboard Contents" option to import the code.
Copy Loot Filter to Clipboard
Uniques
The Uniques listed in this build have been picked specifically to provide the best synergy possible with this build. Changing items out will likely result in lower performance and should be avoided. On top of that, a portion of these items are required in order to go Low Life, which is what enables the build to live at high levels of Corruption.
Frostbite Shackles
![]() Frostbite Shackles: These gloves synergize with how we are running
Frostbite Shackles: These gloves synergize with how we are running ![]() Chaos Bolts, as they actively scale our Ward Retention with every percent of
Cold Resistance we add to the build. From a crowd control perspective, this build's Freeze Rate is extremely high, and these gloves will generate Ward every time we
freeze an enemy. These are a rare drop from Frost Lich Formosus in the Monolith Timeline "Blood, Frost, and Death".
Chaos Bolts, as they actively scale our Ward Retention with every percent of
Cold Resistance we add to the build. From a crowd control perspective, this build's Freeze Rate is extremely high, and these gloves will generate Ward every time we
freeze an enemy. These are a rare drop from Frost Lich Formosus in the Monolith Timeline "Blood, Frost, and Death".
Peak of the Mountain
![]() Peak of the Mountain: We take this for one very important reason, that being the immense amount of Critical Strike Chance. We don't Leech in this build,
so that portion of the helmet's effects does not matter. Out of every Unique in the build, this is the most accessible, with a high drop rate from every tier
of the dungeon Lightless Arbor.
Peak of the Mountain: We take this for one very important reason, that being the immense amount of Critical Strike Chance. We don't Leech in this build,
so that portion of the helmet's effects does not matter. Out of every Unique in the build, this is the most accessible, with a high drop rate from every tier
of the dungeon Lightless Arbor.
Oceareon
![]() Oceareon: This ring is extremely rare, but for good reason. When you fulfill the requirements the ring requires, it adds
10% more global damage to your build, alongside a potential for 600% Freeze Rate. Combined with the Cold Resistance scaling on
Oceareon: This ring is extremely rare, but for good reason. When you fulfill the requirements the ring requires, it adds
10% more global damage to your build, alongside a potential for 600% Freeze Rate. Combined with the Cold Resistance scaling on ![]() Chaos Bolts,
this is enough to freeze most bosses, allowing you a much easier time as you climb Corruption. To enable this ring, we take Chill and Shock Chance
on our Wand. This ring is considered very rare. We've listed it with Legendary Potential, but that portion is completely optional, as it only adds more
Cold Resistance to the build's scaling. You may farm this in the Monolith Timeline "The Age of Winter" within Unique or Set Reward Echoes.
Chaos Bolts,
this is enough to freeze most bosses, allowing you a much easier time as you climb Corruption. To enable this ring, we take Chill and Shock Chance
on our Wand. This ring is considered very rare. We've listed it with Legendary Potential, but that portion is completely optional, as it only adds more
Cold Resistance to the build's scaling. You may farm this in the Monolith Timeline "The Age of Winter" within Unique or Set Reward Echoes.
Exsanguinous
![]() Exsanguinous: A staple in Low Life builds, this chest converts Health to Ward, and prevents us from suffering from any and all
Bleed ailments. You can farm for this in the Monolith Timeline "Blood, Frost, and Death" within Unique or Set Reward Echoes.
Exsanguinous: A staple in Low Life builds, this chest converts Health to Ward, and prevents us from suffering from any and all
Bleed ailments. You can farm for this in the Monolith Timeline "Blood, Frost, and Death" within Unique or Set Reward Echoes.
Last Steps of the Living
![]() Last Steps of the Living: Another Low Life item. Besides enabling Ward generation for us, these boots also supply an immense amount of Movement
Speed, which is greatly needed as we climb Corruption in order to avoid lethal damage. On top of this, these boots synergize well with
Last Steps of the Living: Another Low Life item. Besides enabling Ward generation for us, these boots also supply an immense amount of Movement
Speed, which is greatly needed as we climb Corruption in order to avoid lethal damage. On top of this, these boots synergize well with ![]() Oceareon,
providing another 300% or more Freeze Rate. These have a very high drop rate from Frost Lich Formosus in the Monolith Timeline "Blood, Frost,
and Death".
Oceareon,
providing another 300% or more Freeze Rate. These have a very high drop rate from Frost Lich Formosus in the Monolith Timeline "Blood, Frost,
and Death".
Idols
Idol slots are gained through the campaign, unlocking small bonuses and unique affixes for the player to discover and augment their builds with. The Idol screen consists of a grid system for the player to fill out with different sized idols, eventually filling in every part of the grid. As the Idol shape increases (1x1, 1x2, 1x3, 1x4, etc.) the stronger an affix you might find for your build.
There are a lot of Idols that will enable this build to deal damage, however we suggest snagging two Ornate Bone Idols with Increased Cast Speed while Cursed amd Increased Spell Damage while at Low Health, two Grand Bone Idols with Chance to apply Damned on Hit and Increased Spell Damage while at Low Health and a single Large Immortal Idol with Increased Health and Added Health. You will have three slots open, which you are free to fill in with either Ward Retention, Armor, or Health.
Blessing
Blessings are permanent buffs that are applied to your character. These come in two different powers, Standard and Grand. Grand blessings are significantly stronger than the Standard Blessings. In total, there are 10 Blessing Slots, one for each Monolith Timeline. When you complete a Monolith and defeat the final boss you will be awarded a choice of three blessing with a random value.
| Blessing Name | Affix | Timeline |
|---|---|---|
| Void Resistance | The Black Sun | |
| Armor | Spirits of Fire | |
| Chance to Shred Physical Resistance on Hit | The Age of Winter | |
| Critical Avoidance | Reign of Dragons | |
| Lightning Resistance | Ending the Storm |
Changelog
- 13 Mar. 2024: Build Planner added.
- 04 Mar. 2024: Guide Added.

GhazzyTV is a professional content creator that knows all about theory crafting builds in Path of Exile and Last Epoch and has been teaching players how to build their characters for over 9 years. He is a huge Blizzard fan with thousands of hours invested into Diablo 3 and 4 and is a frequent World of Warcraft Classic player. His builds will be helpful content for new players and veterans alike. You can find his PoE Vault Guide Hub here and his LE Guide Hub here. You can follow him on Twitch, YouTube or Twitter.
- Patch 1.0.7 Update: Multiplayer, Skills and More!
- Patch 1.0.6 Update: Camera Setting, Controller Keybinds, Bug Fixes, and More!
- Eleventh Hour Games on Real-Money Trading and Exploits in Last Epoch
- Patch 1.0.5 Update: Many Bug Fixes, Including Loot Filter Toggle Sensitivity, and Other Improvements!
- The First 30 Days of Last Epoch!
- 1.0 Launch Retrospective: A Message From Eleventh Hour Games
- Patch 1.0.4 Update: More In-Game Changes, Bug Fixes, and Improvements
- Last Epoch Mid-Cycle Balance Survey Recap