Warlock Chaos Fissure Endgame Build for Last Epoch (Patch 1.0)
Build Introduction
Sunder the earth beneath your feet, releasing tormented souls that will attack all nearby enemies. From the crack in the earth, chaotic balls of necrotic fire will target your foes, ripping the blood from their very being while cursing their existence.
 Minimal button build
 - Fast ramp-up of damage
- Capable of taking on high corruption and endgame dungeons without being fully leveled

 Heavily reliant on Mana
 - Requires uptime to build defensive layers due to Ward from casting

Skill Selection
The star of this build is ![]() Chthonic Fissure, which deals both Necrotic
and Fire Damage types, but is also the way we automate several skills:
Chthonic Fissure, which deals both Necrotic
and Fire Damage types, but is also the way we automate several skills:
 Chaos Bolts: Automated from Spirits on
  Chthonic Fissure. These
have a 60% chance to propogate on every released Spirit from the Fissure.
Chthonic Fissure. These
have a 60% chance to propogate on every released Spirit from the Fissure. Rip Blood: Automated from casts of Chaos Bolts, either self-casted
or automated off Chthonic Fissure. There is a 1% chance to cast this for every 1
Intelligence on your character.
Rip Blood: Automated from casts of Chaos Bolts, either self-casted
or automated off Chthonic Fissure. There is a 1% chance to cast this for every 1
Intelligence on your character. Bone Curse: Automated from casts of Chaos Bolts, either self-casted
or automated off Chthonic Fissure. Bone Curse will only get cast on ememies who
are already Cursed through other means. This can be Torment from Chthonic
Fissure, Bone Curse itself, or Marked For Death from
Bone Curse: Automated from casts of Chaos Bolts, either self-casted
or automated off Chthonic Fissure. Bone Curse will only get cast on ememies who
are already Cursed through other means. This can be Torment from Chthonic
Fissure, Bone Curse itself, or Marked For Death from  Mortality's Grasp.
For mobility, this build uses ![]() Transplant which doubles as a way for
us to cast
Transplant which doubles as a way for
us to cast ![]() Bone Curse on enemies. With a detonation on departure and arrival, alongside
the Bone Curse cast, this skill does ample damage on its own. As an additional bonus, Transplant
will also grant us Bone Armor momentarily after displacement, providing a way
to boost our defenses on the move.
Bone Curse on enemies. With a detonation on departure and arrival, alongside
the Bone Curse cast, this skill does ample damage on its own. As an additional bonus, Transplant
will also grant us Bone Armor momentarily after displacement, providing a way
to boost our defenses on the move.

Class and Skill Passive Trees
Our base class is the Acolyte, which acts as a generic spell caster and summoner. Our character will be offered an opportunity to select an Advanced Mastery once we have completed the first act of the campaign. Each base class has three possible masteries to choose from. For the Acolyte, we have access to the Mastery Tree Passives for Necromancers, Lich and Warlock. Upon selecting a Mastery and placing 20 Passive Points into the Acolyte Tree, you'll then be able to place Passive Points into the Mastery Trees.
Warlock is our advanced class for the build. We will utilize the majority of our Passive Points for the Warlock Passive Tree, with minimal points in the Acolyte tree. The Warlock passives will focus around increases to Intelligence, Mana Regen, Leech and Cast Speed. To help round the build out we will be taking additional points in the Lich tree. These points will focus on Intelligence, Leech and Ward.
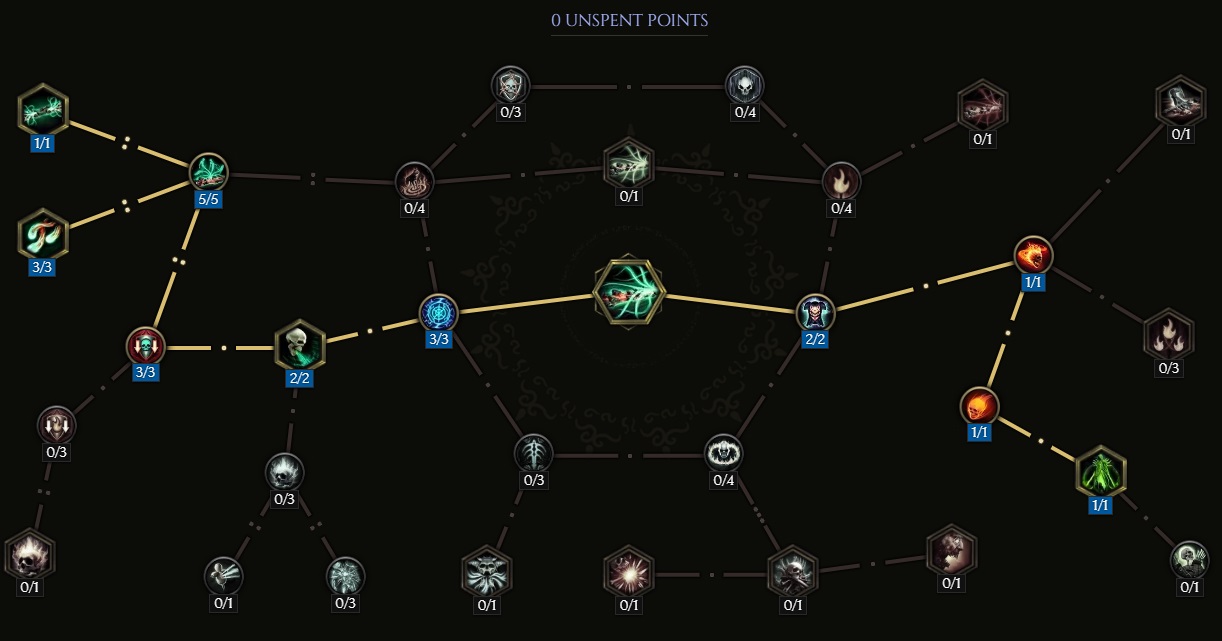
Acolyte Passive Points
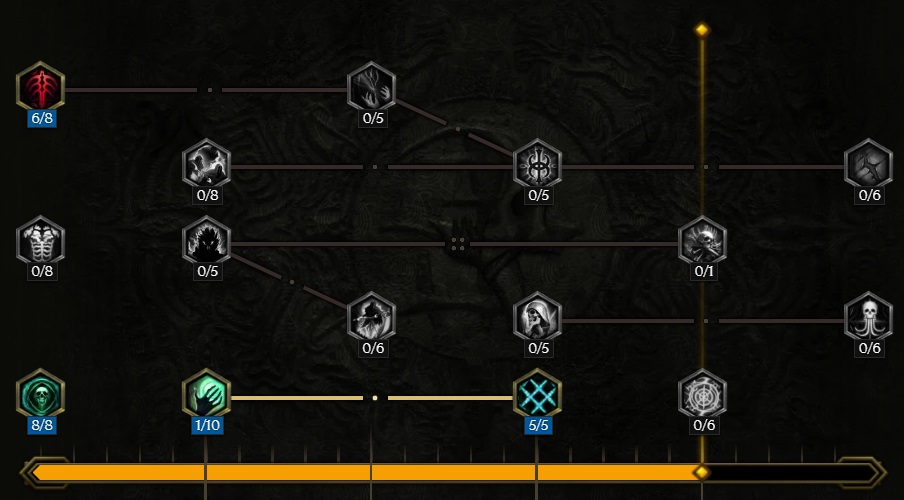
- 8 points into Forbidden Knowledge: Intelligence and Necrotic Resistance.
- 6 points into Blood Aura: Increased damage for you and Golems.
- 1 point into Mania of Mortality: Traversal node.
- 5 points into Unnatural Preservation: Large gains to Ward Retention, Necrotic Resistance, and Poison Resistance.
Our base class is the Acolyte, which acts as a generic spell caster and summoner. Our character will be offered an opportunity to select an Advanced Mastery once we have completed the first act of the campaign. Each base class has three possible masteries to choose from. For the Acolyte, we have access to the Mastery Tree Passives for Necromancers, Lich and Warlock. Upon selecting a Mastery and placing 20 Passive Points into the Acolyte Tree, you'll then be able to place Passive Points into the Mastery Trees.
Warlock is our advanced class for the build. We will utilize the majority of our Passive Points for the Warlock Passive Tree, with minimal points in the Acolyte tree. The Warlock passives will focus around increases to Intelligence, Mana Regen, Leech and Cast Speed. To help round the build out we will be taking additional points in the Lich tree. These points will focus on Intelligence, Leech and Ward.
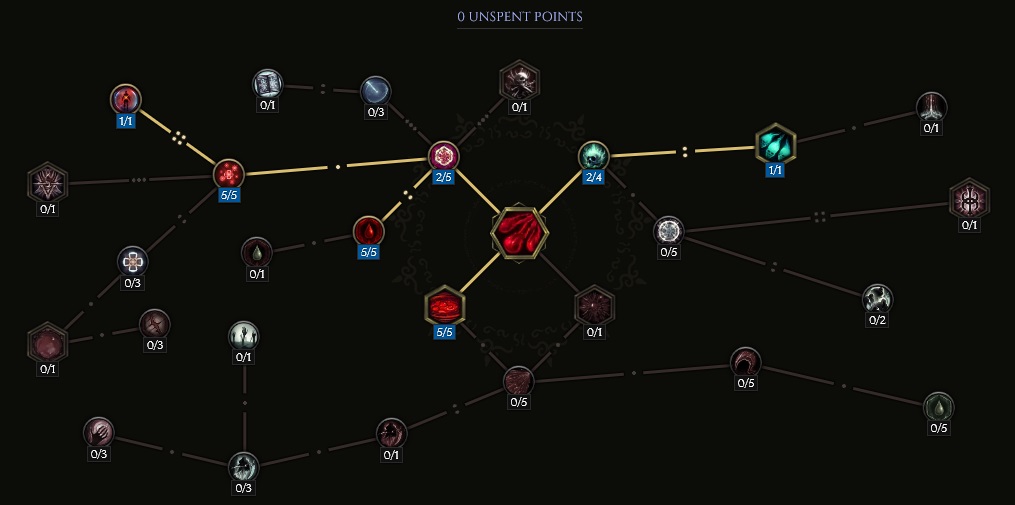
Warlock Passive Points
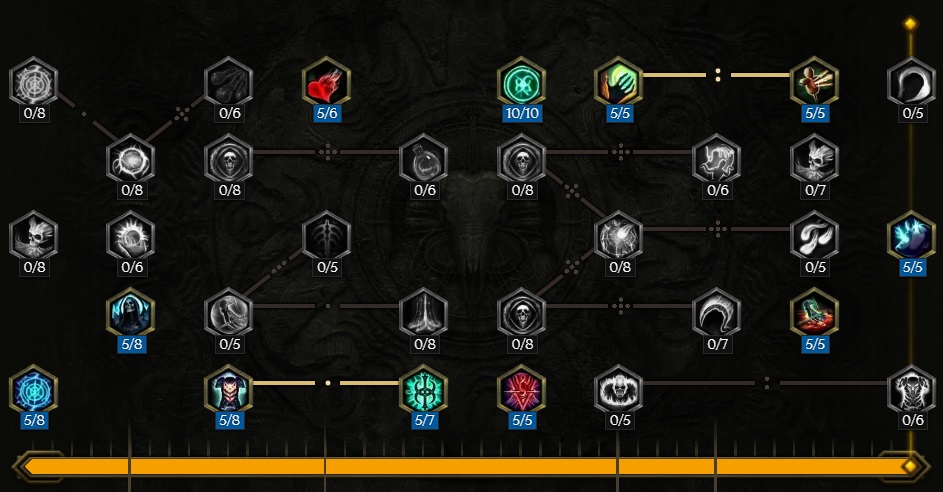
- 5 points into Soul Stealer: Mana Regen, along with a chance to gain Mana when you hit Cursed targets.
- 5 poinst into Occultist's Mind: Added Intelligence, and provides 1 Mana per Intelligence on your character.
- 5 points into Harrowing Armor: Added Armor and Health, and even further boosts to Armor per Curse on enemies when they hit you.
- 5 points into Spirit Leech: Leech, and extra Leech against Cursed enemies.
- 5 points into Dark Protections: Ward per second, and less damage taken from enemies per active Curse on them.
- 5 points into Wither: Enemies inflicted with Wither deal less damage.
- 10 points into Malefic Body: Additional Intelligence and Vitality.
- 5 points into Chaotic Strikes: Adds 5% chance to deal double damage, alongside a chance to deal double damage per Curse on the target.
- 5 points into Wreak Havoc: Added Critical Multiplier, and even more if the double damage from the previous node is applied and the hit crits.
- 5 points into Fleeting Crone: Adds a chance for Haste on kill or Boss/Rare hit, along with increased Haste effect.
- 5 points into Accursed Seer: Increased Cast Speed, and extra Cast Speed for Curses.
Our base class is the Acolyte, which acts as a generic spell caster and summoner. Our character will be offered an opportunity to select an Advanced Mastery once we have completed the first act of the campaign. Each base class has three possible masteries to choose from. For the Acolyte, we have access to the Mastery Tree Passives for Necromancers, Lich and Warlock. Upon selecting a Mastery and placing 20 Passive Points into the Acolyte Tree, you'll then be able to place Passive Points into the Mastery Trees.
Warlock is our advanced class for the build. We will utilize the majority of our Passive Points for the Warlock Passive Tree, with minimal points in the Acolyte tree. The Warlock passives will focus around increases to Intelligence, Mana Regen, Leech and Cast Speed. To help round the build out we will be taking additional points in the Lich tree. These points will focus on Intelligence, Leech and Ward.
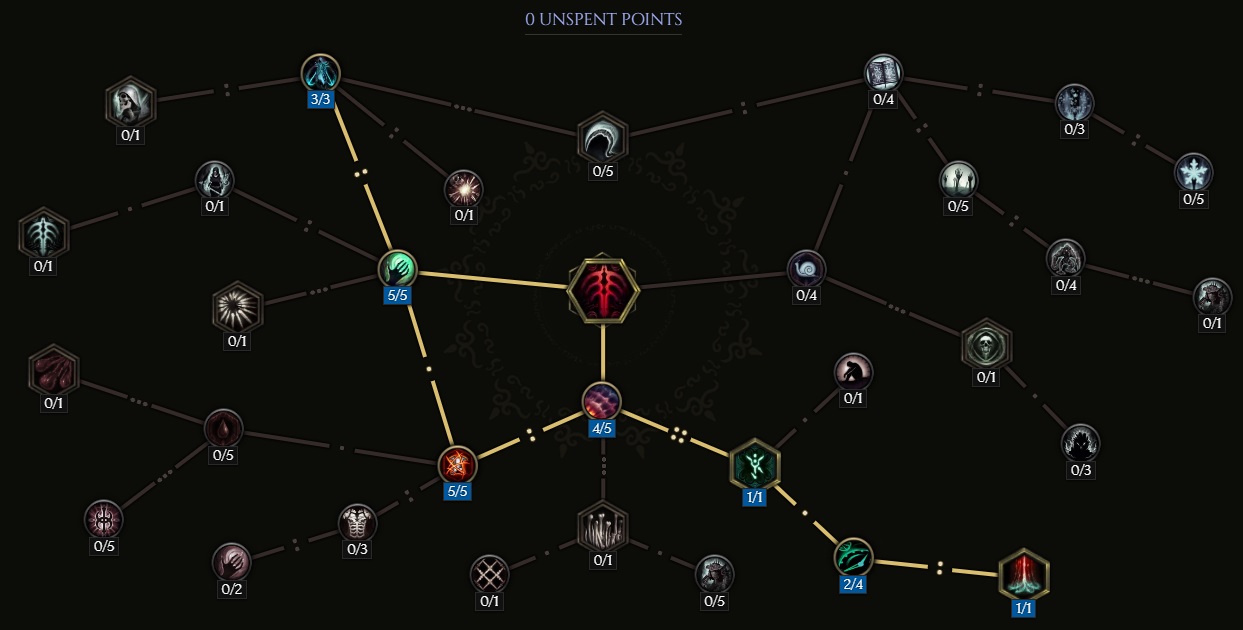
Lich Passive Points
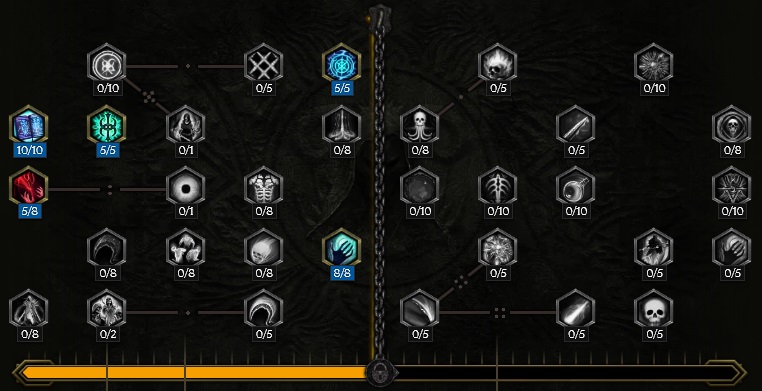
- 10 points into Apocrypha: Intelligence and extra Mana Regen.
- 5 points into Survival of the Cruel: Additional Health and Spell Leech.
- 5 points into Grasp of Fate: Increased Necrotic Damage.
- 5 points into Mental Cacophony: Extra Mana and Ward Retention.
- 8 points into Crippling Insight: Provides a substantial boost to Intelligence, but greatly reduces Health Regeneration.
In this section, we will break down each skill and highlight the key passives we have selected to make the skill shine in the build. While some of these skills do allow for some variation to exist depending on your own custom choices, we recommend utilizing the skill trees as presented until you have a strong understanding of the build itself.
Chaos Bolts
While ![]() Chaos Bolts will be automated for a large portion of its casts, we will still be manually casting
it quite a bit. With the Mana cost of double-sided
Chaos Bolts will be automated for a large portion of its casts, we will still be manually casting
it quite a bit. With the Mana cost of double-sided ![]() Chthonic Fissure being as high as it is, manually
casted Chaos Bolts are a good alternative for clearing packs of low Health enemies and moving through maps quickly.
Chaos Bolts casted this way will still automate both
Chthonic Fissure being as high as it is, manually
casted Chaos Bolts are a good alternative for clearing packs of low Health enemies and moving through maps quickly.
Chaos Bolts casted this way will still automate both ![]() Rip Blood and
Rip Blood and ![]() Bone Curse. Chaos Bolts are the
light show of the build, and the main driver in allowing the build to work.
Bone Curse. Chaos Bolts are the
light show of the build, and the main driver in allowing the build to work.
Order of Skill Points
- 2 points into Condemned to Chaos: Adds a chance to apply Damned.
- 3 points into Exult in Misery: Chaos Bolts deal 12% more damage to enemies inflicted with Damned, Ignite, Bleed and Frostbite.
- 3 points into Abrupt Chaos: Increases Cast and Projectile Speed.
- 1 points into Doom's Vindication: Traversal node, but does add more damage to base and against Cursed enemies.
- 1 points into Exacted Libation: Allows for the automation of Rip Blood.
- 2 point into Devour the Damned: Hits regain Health and Mana against Cursed enemies.
- 1 point into Cursed Blood: Hits with Chaos Bolts refresh the duration of all Curses on enemies.
- 1 points into Another Affliction: Automates Bone Curse when you hit a Cursed enemy with Chaos Bolts.
- 4 points into Destructive Intensity: Continued casting of Chaos Bolts increase the base Critical Hit Chance, but also reduces the size of the AoE per stack.
- 2 points into Pandemonium: 39% chance for larger Chaos Bolts to be cast.
- 2 points into Cthonic Aurora: Adds projectiles to Chaos Bolts cast, but also increases the Mana cost significantly per projectile.
In this section, we will break down each skill and highlight the key passives we have selected to make the skill shine in the build. While some of these skills do allow for some variation to exist depending on your own custom choices, we recommend utilizing the skill trees as presented until you have a strong understanding of the build itself.
Rip Blood
![]() Rip Blood has two uses for this build. The most important reason is to regain Health on cast,
which is important due to the interaction with
Rip Blood has two uses for this build. The most important reason is to regain Health on cast,
which is important due to the interaction with ![]() Twisted Heart of Uhkeiros. Every Blood Orb will refund
us approximately 150 Health, depending on your level and the amount of Intelligence you have. Blood Rip
is also our only source of Bleed in the build, which boosts
Twisted Heart of Uhkeiros. Every Blood Orb will refund
us approximately 150 Health, depending on your level and the amount of Intelligence you have. Blood Rip
is also our only source of Bleed in the build, which boosts ![]() Chaos Bolts damage by 12%.
Chaos Bolts damage by 12%.
Order of Skill Points
- 2 points into Arcane Absorption: Traversal node.
- 1 point into Rip Spirit: Converts the skill to deal Necrotic Damage instead of Physical.
- 2 points into Hemomancer: Traversal node.
- 5 points into Quenching: Increases Health gains and Blood Orbs travel faster.
- 1 point into Hematology: Scales the Health gained from Blood Orbs with Intelligence.
- 5 points into Gushing Wound: Adds a 100% chance to Bleed on hit.
- 5 points into Splatter: Rip Blood has 100% chance to Splatter, dealing AoE damage.
In the event you find that you are leeching too much, or it isn't providing any significant usefulness for the build, feel free to take a point out of Splatter and put it into Arcane Fortress. This will convert the Health gain from this skill into Ward. There is no level where this is applicable, it is only based on player comfort.
In this section, we will break down each skill and highlight the key passives we have selected to make the skill shine in the build. While some of these skills do allow for some variation to exist depending on your own custom choices, we recommend utilizing the skill trees as presented until you have a strong understanding of the build itself.
Bone Curse
![]() Bone Curse is full automated for this build and should realistically never be manually casted.
Since we run the unique gloves,
Bone Curse is full automated for this build and should realistically never be manually casted.
Since we run the unique gloves, ![]() Mortality's Grasp, we can apply Marked For Death by
any spell that we cast and deals a hit. This means that Marked for Death can be applied with
Mortality's Grasp, we can apply Marked For Death by
any spell that we cast and deals a hit. This means that Marked for Death can be applied with
![]() Chaos Bolts, which will then force the auto-cast of Bone Curse and keep it applied for
an unlimited duration, forcing more casts as you keep casting. If you open with
Chaos Bolts, which will then force the auto-cast of Bone Curse and keep it applied for
an unlimited duration, forcing more casts as you keep casting. If you open with ![]() Chthonic Fissure,
that spell automatically applies Torment and Acid Skin, so Bone Curse
will cast on the first instance of Chaos Bolts that you hit an enemy with. Bone Curse cast this way does
have a 6 second cooldown, so keep this in mind. There is a 12% Kill Threshold on this, so just let your
Chaos Bolts take advantage of this. It is not worth manually casting this in an effort to guess when the boss is
at 12% Health.
Chthonic Fissure,
that spell automatically applies Torment and Acid Skin, so Bone Curse
will cast on the first instance of Chaos Bolts that you hit an enemy with. Bone Curse cast this way does
have a 6 second cooldown, so keep this in mind. There is a 12% Kill Threshold on this, so just let your
Chaos Bolts take advantage of this. It is not worth manually casting this in an effort to guess when the boss is
at 12% Health.
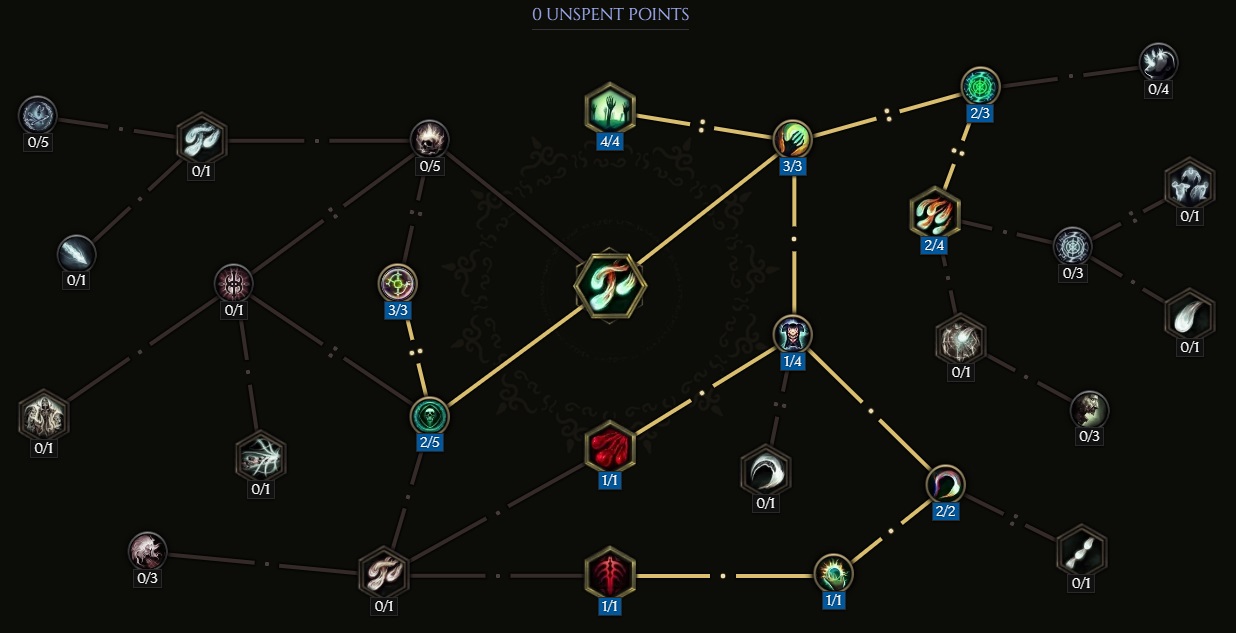
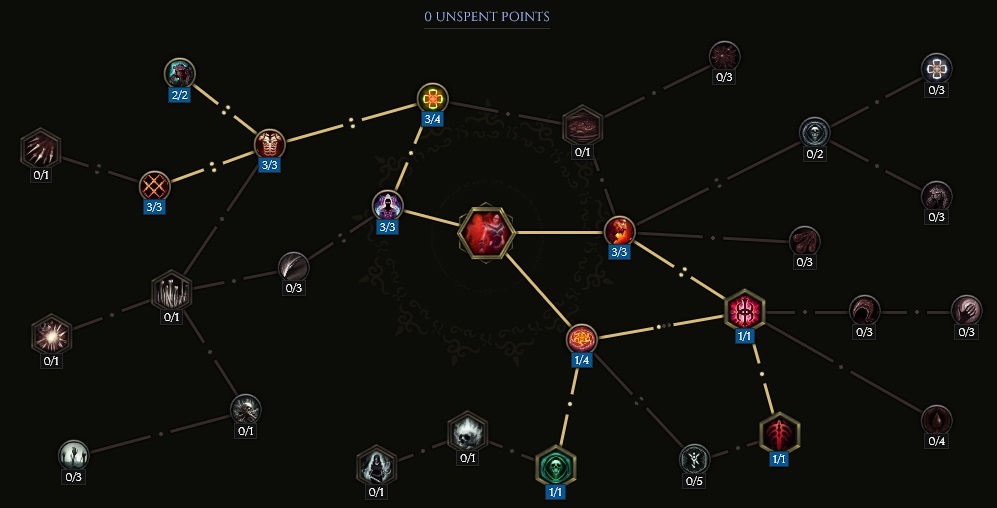
Order of Skill Points
- 4 points into Conflation: Amplifies the size of Bone Curse by 150%.
- 1 point into Sigil of Mortality: Casts Marked For Death on enemies hit by Bone Curse.
- 2 points into Reaper's Mark: Marked for Death now lasts longer.
- 1 point into Misery: Converts Bone Curse into a Necrotic spell.
- 5 points into Defile Defenses: Applies 1 stack of Shred Armor to enemies hit.
- 5 points into Iron Maiden: 50% more damage.
- 3 points into Brittle Bones: Additional damage and Kill Threshold.
In this section, we will break down each skill and highlight the key passives we have selected to make the skill shine in the build. While some of these skills do allow for some variation to exist depending on your own custom choices, we recommend utilizing the skill trees as presented until you have a strong understanding of the build itself.
Cthonic Fissure
![]() Chthonic Fissure is a powerhouse. This spell will automate every aspect of our kit for us. The only
thing it does not provide is mobility, and only because we don't take the node for this specific build.
The initial fissure hit will apply Acid Skin and also deal a large amount of Fire Damage
when it hits. Once opened, Spirits will either apply Torment or be converted into
Chthonic Fissure is a powerhouse. This spell will automate every aspect of our kit for us. The only
thing it does not provide is mobility, and only because we don't take the node for this specific build.
The initial fissure hit will apply Acid Skin and also deal a large amount of Fire Damage
when it hits. Once opened, Spirits will either apply Torment or be converted into ![]() Chaos Bolts.
The Spirits will also Shred Necrotic Resistance on hit, making it a great tool to
quickly rid the map of enemies. Be mindful of the associated Mana cost with this skill; manual-casting
of Chaos Bolts is enough for most instances. Save Chthonic Fissure for Elites and Bosses or for when you
are overwhelmed by mobs and need a way out.
Chaos Bolts.
The Spirits will also Shred Necrotic Resistance on hit, making it a great tool to
quickly rid the map of enemies. Be mindful of the associated Mana cost with this skill; manual-casting
of Chaos Bolts is enough for most instances. Save Chthonic Fissure for Elites and Bosses or for when you
are overwhelmed by mobs and need a way out.
Order of Skill Points
- 3 points into Fragile Crust: Refunds a portion of the Mana if an enemy is Cursed nearby.
- 2 points into Spirit Gale: If enemies die while afflicted by Torment, they have a 50% chance to release a Spirit.
- 3 points into Severed Wards: Spirits shred Necrotic Resistance.
- 5 points into Stygian Current: Increases the frequency of Spirits released by the fissure by 50%.
- 3 points into Chaotic Rupture: Spirits are replaced by Chaos Bolts 60% of the time.
- 1 point into Of Gloom and Flames: Chthonic Fissure now activates behind you as well as in front.
- 2 points into Death from Below: Chthonic Fissure deals 10% more damage.
- 1 point into Pyrochasm: The fissure now deals an initial hit of Fire Damage.
- 1 point into Fissure of Wrath: The initial hit now deals more damage per Ignite Chance.
- 1 point into Forbidden Chasm: The initial hit from the fissure now applies Acid Skin.
In this section, we will break down each skill and highlight the key passives we have selected to make the skill shine in the build. While some of these skills do allow for some variation to exist depending on your own custom choices, we recommend utilizing the skill trees as presented until you have a strong understanding of the build itself.
Transplant
![]() Transplant is the traversal skill used for the build, and is pretty straight forward in its use.
Upon arrival at the destination when used, Transplant will cast
Transplant is the traversal skill used for the build, and is pretty straight forward in its use.
Upon arrival at the destination when used, Transplant will cast ![]() Bone Curse, and can be used as a way to initiate
fights before using
Bone Curse, and can be used as a way to initiate
fights before using ![]() Chthonic Fissure. Doing this will activate the Mana refund from Fragile Crust.
Transplant will also activate Bone Armor when used, improving our defensive layers.
Chthonic Fissure. Doing this will activate the Mana refund from Fragile Crust.
Transplant will also activate Bone Armor when used, improving our defensive layers.
Order of Skill Points
- 1 point into Scarlet Rain: Traversal node.
- 1 point into Ethereal Body: Converts the skill into Necrotic.
- 3 points into Acolyte's Fervor: Grants Haste and Frenzy on use.
- 1 point into Reign of Blood: Transplant now deals damage from where you start and where you end.
- 1 point into Doom Bringer: Automates Bone Curse on arrival.
- 3 points into Fleeting Form: Increases the Cast Speed and reduces the cooldown.
- 3 points into Anemia: Transplant costs less Health to use.
- 3 points into Bone Armor: Bone Armor increases Armor and reduces damage taken while active.
- 3 points into Apostasy: Bone Armor lasts an additional 3 seconds.
- 2 points into Plated Bone: Bone Armor is 20% more effective.
Build Mechanics and Playstyle
This build only requires three buttons. The only spells
that need to be manually casted will be ![]() Chthonic Fissure,
Chthonic Fissure,
![]() Chaos Bolts, and
Chaos Bolts, and ![]() Transplant. Chthonic Fissure should
be used to take care of Elites and Boss enemies, or whenever you have a
full Mana bar. For normal mob groups and low Health enemies, manual
casting of Chaos Bolts is more than enough. The unique gloves,
Transplant. Chthonic Fissure should
be used to take care of Elites and Boss enemies, or whenever you have a
full Mana bar. For normal mob groups and low Health enemies, manual
casting of Chaos Bolts is more than enough. The unique gloves, ![]() Mortality's Grasp
will provide us the ability to apply Marked For Death on enemies with any hit
on an enemy. This helps bypass the requirement of needing to manually cast
Mortality's Grasp
will provide us the ability to apply Marked For Death on enemies with any hit
on an enemy. This helps bypass the requirement of needing to manually cast ![]() Bone Curse
or Chthonic Fissure on an enemy to take advantage of several triggered effects in the build,
and helps us conserve Mana while moving between mob packs.
Bone Curse
or Chthonic Fissure on an enemy to take advantage of several triggered effects in the build,
and helps us conserve Mana while moving between mob packs.
For Boss fights, start with ![]() Chthonic Fissure and just maintain uptime with
Chthonic Fissure and just maintain uptime with
![]() Chaos Bolts from that point onward. Chthonic will apply both Torment and
Acid Skin to enemies, while the node Cursed Blood will maintain
these buffs, alongside all others, indefinitely through a constant duration refresh. If your curses
ever fall off, you will need to cast Chthonic Fissure again to reactivate Acid Skin and keep damage output
high.
Chaos Bolts from that point onward. Chthonic will apply both Torment and
Acid Skin to enemies, while the node Cursed Blood will maintain
these buffs, alongside all others, indefinitely through a constant duration refresh. If your curses
ever fall off, you will need to cast Chthonic Fissure again to reactivate Acid Skin and keep damage output
high.
The defensives of the build rely on the unique relic, ![]() Twisted Heart of Uhkeiros. This item will
drain our Health with every cast we make and in return grant us a portion of that Health cost with Ward.
To combat this,
Twisted Heart of Uhkeiros. This item will
drain our Health with every cast we make and in return grant us a portion of that Health cost with Ward.
To combat this, ![]() Rip Blood is used to return Health to us with Blood Orbs. This ensures a maximum
amount of Ward is generated with each cast.
Rip Blood is used to return Health to us with Blood Orbs. This ensures a maximum
amount of Ward is generated with each cast.
Equipment and Gear Affixes
In order to run this build smoothly, the following stat thresholds should be met:
- 100 or more Intelligence.
- A significant amount of Mana Regen. This is mostly taken care of by prioritizing Mana Regen rings.
- 100% Critical Hit Chance, when taking Acid Skin into account.
- A priority should be taken on acquiring Critical Strike Multiplier.
- The Unique items Mortality's Grasp and
 Twisted Heart of Uhkeiros.
| Gear Slot | Implicits | Modifiers |
|---|---|---|
| Wand | Spell Damange Increased Cast Speed -3 Spell Mana Cost |
Prefixes Critical Strike Multiplier Increased Spell Critical Strike Chance Suffixes Chance to Ignite on Hit Chance to Chill on Hit |
| Off-hand Catalyst | Intelligence Spell Critical Strike Chance Ward Retention |
Prefixes Critical Strike Multiplier Increased Spell Critical Strike Chance Suffixes Needed Resistances |
| Head | Armor Ward Retention |
Prefixes Intelligence Chance for 3 additional projectiles when you directly cast Chaos Bolts Suffixes Needed Resistances Increased Health |
| Amulet | Increased Cast Speed | Prefixes Critical Strike Multiplier Increased Mana Regen Suffixes Needed Resistances |
| Chest | Armor Increased Mana Regen |
Prefixes Intelligence Increased Critical Strike Chance, Increased Minion Critical Strike Chance Suffixes Health Increased Health |
| Belt | Mana | Prefixes Increased Necrotic Damage Increased Mana Regen Suffixes Critical Strike Avoidance Hybrid Health |
| Gloves | Legendary Potential Increased Cast Speed |
|
| Ring | Mana Mana Regen |
Prefixes Intelligence Increased Mana Regen Suffixes Health Needed Resistances |
| Ring | Mana Mana Regen |
Prefixes Intelligence Increased Mana Regen Suffixes Health Needed Resistances |
| Feet | Armor Movement Speed Ward Retention |
Prefixes Intelligence Movement Speed Suffixes Health Hybrid Health |
| Relic | Legendary Potential Increased Cast Speed |
A loot filter made specifically for the gear table above may be copied by pressing the button below. Once in the Loot Filter portion of the in-game menu, choose the "Paste Clipboard Contents" option to import the code.
Copy Loot Filter to Clipboard
Uniques
This build requires every single Unique item that appears in this section, however ![]() Twisted Heart of Uhkeiros is non-negotiable. There
is no substitute.
Twisted Heart of Uhkeiros is non-negotiable. There
is no substitute.
Twisted Heart of Uhkeiros
![]() Twisted Heart of Uhkeiros: This is where a large portion of our Ward generation will come from. Every cast of
Twisted Heart of Uhkeiros: This is where a large portion of our Ward generation will come from. Every cast of
![]() Chaos Bolts will trigger the effect, so it is important to make sure you have the ability to leech Health back
and sustain ourselves. You can be target farm this in the Monolith Timeline "Reign of Dragons".
Chaos Bolts will trigger the effect, so it is important to make sure you have the ability to leech Health back
and sustain ourselves. You can be target farm this in the Monolith Timeline "Reign of Dragons".
Mortality's Grasp
![]() Mortality's Grasp: This is how we force
Mortality's Grasp: This is how we force ![]() Chaos Bolts to apply a Curse on hit and refrain from
manual casting of
Chaos Bolts to apply a Curse on hit and refrain from
manual casting of ![]() Bone Curse. Keep in mind, these gloves also supply a large amount of Health as well, boosting our
defensives and Ward generation. Farm these gloves in the Monolith timeline "Ending the Storm".
Bone Curse. Keep in mind, these gloves also supply a large amount of Health as well, boosting our
defensives and Ward generation. Farm these gloves in the Monolith timeline "Ending the Storm".
Idols
Idol slots are gained through the campaign, unlocking small bonuses and unique affixes for the player to discover and augment their builds with. The Idol screen consists of a grid system for the player to fill out with different sized idols, eventually filling in every part of the grid. As the Idol shape increases (1x1, 1x2, 1x3, 1x4, etc.) the stronger an affix you might find for your build.
This build does not require any hard idols to obtain. Focus on any Idol that supplies Ward Retention, Health, or missing Resistances. If needed, Stout Lagonian Idols can also supply Increased Critical Hit Chance.
Blessing
Blessings are permanent buffs that are applied to your character. These come in two different powers, Standard and Grand. Grand blessings are significantly stronger than the Standard Blessings. In total, there are 10 Blessing Slots, one for each Monolith Timeline. When you complete a Monolith and defeat the final boss you will be awarded a choice of three blessing with a random value.
| Blessing Name | Affix | Timeline |
|---|---|---|
| Critical Multiplier | The Black Sun | |
| Chance to Shred Necrotic Resistance | Spirits of Fire | |
| Chance to apply Frostbite on Hit | The Age of Winter | |
| Critical Avoidance | Reign of Dragons |
All remaining Blessings can and should be used to fill in gaps in Resistances or to bolster other aspects of our defensive layering, depending on what gear drops you have gotten.
Changelog
- 13 Mar. 2024: Build Planner added.
- 16 Feb. 2024: Guide Added.

GhazzyTV is a professional content creator that knows all about theory crafting builds in Path of Exile and Last Epoch and has been teaching players how to build their characters for over 9 years. He is a huge Blizzard fan with thousands of hours invested into Diablo 3 and 4 and is a frequent World of Warcraft Classic player. His builds will be helpful content for new players and veterans alike. You can find his PoE Vault Guide Hub here and his LE Guide Hub here. You can follow him on Twitch, YouTube or Twitter.
- Patch 1.0.7 Update: Multiplayer, Skills and More!
- Patch 1.0.6 Update: Camera Setting, Controller Keybinds, Bug Fixes, and More!
- Eleventh Hour Games on Real-Money Trading and Exploits in Last Epoch
- Patch 1.0.5 Update: Many Bug Fixes, Including Loot Filter Toggle Sensitivity, and Other Improvements!
- The First 30 Days of Last Epoch!
- 1.0 Launch Retrospective: A Message From Eleventh Hour Games
- Patch 1.0.4 Update: More In-Game Changes, Bug Fixes, and Improvements
- Last Epoch Mid-Cycle Balance Survey Recap