Great Axe Guide and Builds for New World
Welcome to our guide for Great Axe, a weapon in New World. Within these pages, you will find everything required to understand how best to play with this weapon in both PvE and PvP.
Great Axe Overview
The Great Axe is one of the most popular PvP weapons, and can be seen frequently in PvE. It will almost always
be paired with the War Hammer because of the complementary nature
of these weapons, they are a great pair. The Great Axe will be seen as a primary damage weapon that is equipped
with some of the strongest abilities, like ![]() Gravity Well, to help with crowd-control and stacking enemies
on top of one another. In both light and medium loadouts it will have fantastic damage potential, and it is loaded
with defensive passives and self healing. This is one of the easier weapons to use in New World and it is a nice
option when just starting out. It can be used to level quickly, go through PvE content, and reigns as one of the
top PvP options.
Gravity Well, to help with crowd-control and stacking enemies
on top of one another. In both light and medium loadouts it will have fantastic damage potential, and it is loaded
with defensive passives and self healing. This is one of the easier weapons to use in New World and it is a nice
option when just starting out. It can be used to level quickly, go through PvE content, and reigns as one of the
top PvP options.
Great Axe Strengths and Weaknesses
High damage output in PvP and PvE
Best abilities in the game for CC and damage
Easy to learn and very forgiving
Great defensiveness and self-healing
Can be used in any armor weight
Is typically only seen with a War Hammer
One of the most common weapons in New World
Struggles if cooldowns are misused
Mobility can be difficult due to collision
Can be difficult to find War slots due to its popularity
Great Axe Builds
When it comes to Great Axe builds all three armor weights can play any option. Traditionally, light will be focused on mobility and lockdown, but there are situations that can be beneficial for heavier armor weights.
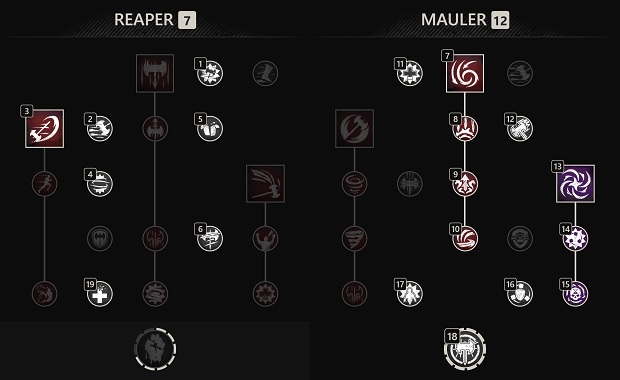
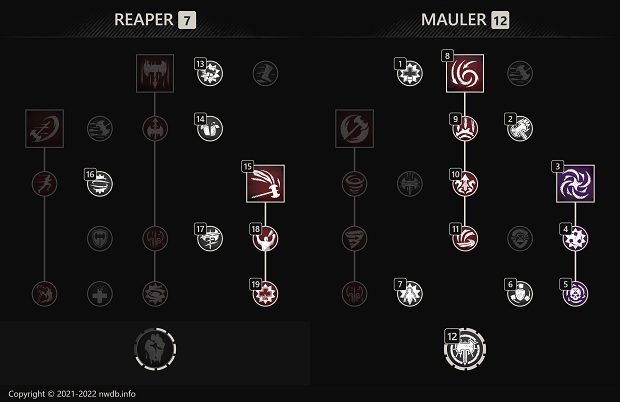
Typically, ![]() Maelstrom will be better for those staying in combat and playing in clumps. This does have great burst
damage still and adds survivability.
Maelstrom will be better for those staying in combat and playing in clumps. This does have great burst
damage still and adds survivability.
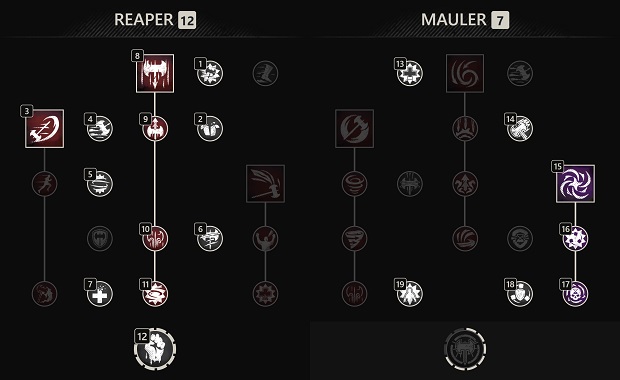
![]() Reap will play with
Reap will play with ![]() Blood Lust making it easier to chase down targets and keep them close so that you
can lock down single targets. This is typically played in a light build. Tanky heavy armor builds may also use this to
add CC in clump fights.
Blood Lust making it easier to chase down targets and keep them close so that you
can lock down single targets. This is typically played in a light build. Tanky heavy armor builds may also use this to
add CC in clump fights.
Maelstrom Mauler
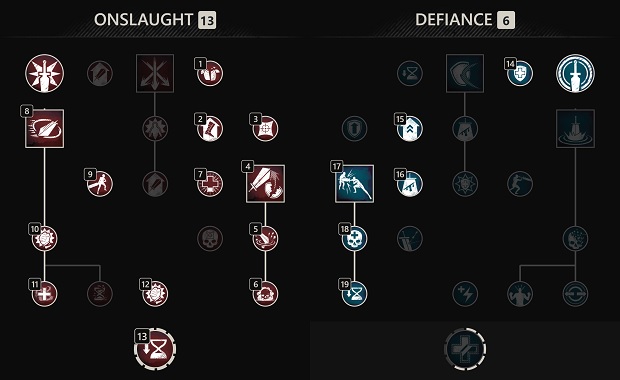
 Charge — This is an extremely fast option for mobility to escape a fight or chase down a target.
It does have collision, even with allies, so it has to be used with no obstacles in your way. This can also be
a way to provide a quick burst of damage if used at close range immediately after finishing a light or heavy
attack.
 Maelstrom — This ability offers single-target and AoE burst. It then deflects all incoming
projectiles, and it pulls enemies within its range. It will also apply a weaken with its perk. Prioritize
using it in a clump fight, or if you have setup a War Hammer combo on a single target you can use it to
quickly burst them down.
 Gravity Well — This is the best crowd-control ability in New World. Much of the PvP META
revolves around gathering up targets with this ability and pairing up crowd-control combos. This will
pull targets, do great damage, and heal you with its perk. Avoid using it on a single target unless
they are prioritized and the cooldown would otherwise be unused for a significant duration.
This is general standard build with this weapon combination. Use this build if you are wanting to stay in clumps
and continue fighting. You will be focused on increasing damage by stacking ![]() Mauler's Fury.
Mauler's Fury.
Reap Bloodlust
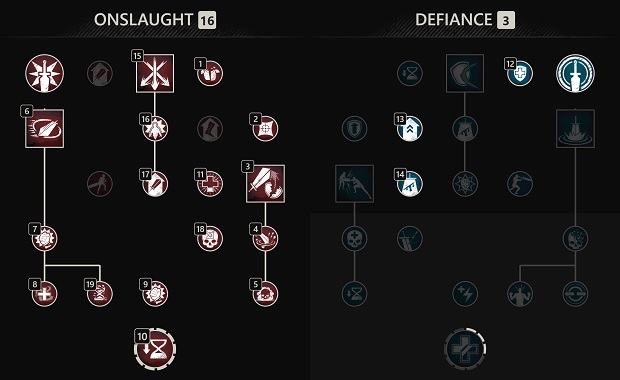
 Reap — This will pull your target from a very far distance away. It is great for enemies who are escaping
or to keep several targets in a clump and keep them close. It also offers some quick healing potential through its own
passive in combinattion with the various other healing passives. Its perk will also add a slowing effect that makes
it difficult to get away after being pulled in.
Use this while in light armor build when playing in a dive team, or a heavier setup where you are wanting more crowd-control. This is best for applying pressure to a single target.
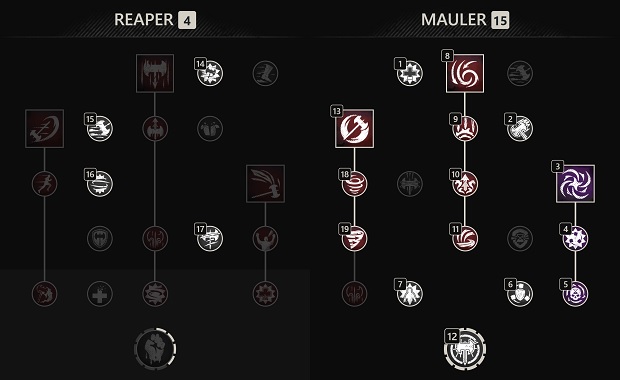
Whirlwind Mobility
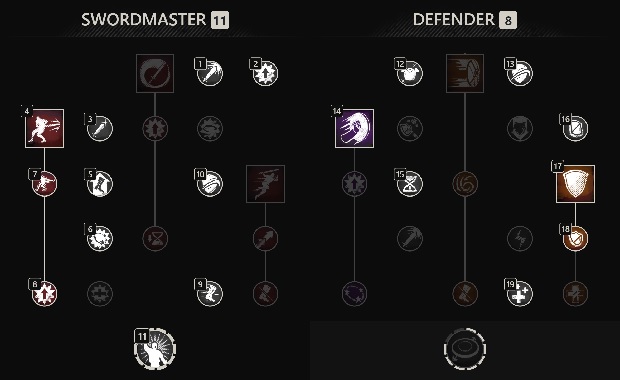
 Whirlwind — In medium and heavy loadouts it can be beneficial to use this ability as a means of
repositioning. It has a stacking fortify with its perk, deals good AoE damage, and has no problems with collision.
It can be used to escape more easily in heavier weight builds that lack a roll.
Use this build if you are in heavy or medium and do not want to use ![]() Charge for mobility. This will
help apply a bit more AoE damage, add stacks of
Charge for mobility. This will
help apply a bit more AoE damage, add stacks of ![]() Fortifying Whirlwind, and build
Fortifying Whirlwind, and build ![]() Mauler's Fury. It
can quickly build stacks, but you do not have the instant escape potential. This can be used as a repositioning
technique. Think of
Mauler's Fury. It
can quickly build stacks, but you do not have the instant escape potential. This can be used as a repositioning
technique. Think of ![]() Whirlwind as a boomerang and you use it to get out of a fight and reposition around
to another spot within a clump fight.
Whirlwind as a boomerang and you use it to get out of a fight and reposition around
to another spot within a clump fight.
PvE Options
Damage Crowd-Control
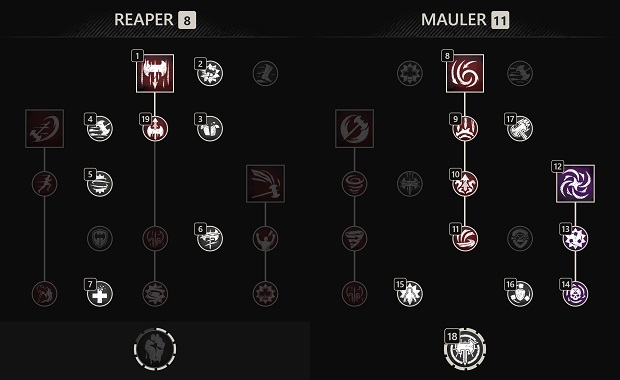
This can be used with a Hatchet or Greatsword in PvE to group enemies together and deal fantastic AoE damage.
Execute Damage
This is optimal for single-target damage if you choose to use a Great Axe as your primary weapon, which typically will not happen. But, if you enjoy this playstyle this can be a competitive build.
Second Weapon
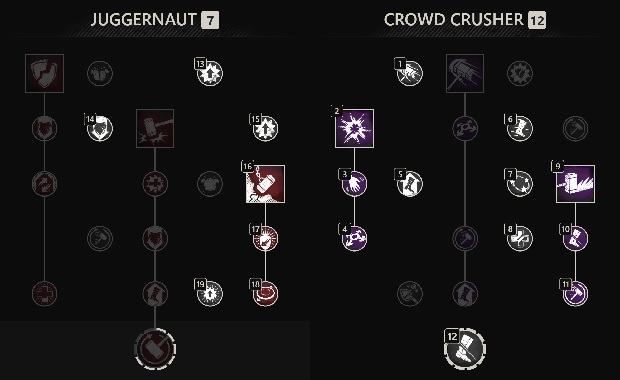
War Hammer
For more detailed information on War Hammer usage and other aspects of its gameplay, please refer to our War Hammer guide.
The War Hammer is the main
complement to the Great Axe. In light armor, it is perfect for setting up potent
burst damage combos. In medium armor, you can play a defensive frontline bruiser equipped with all of the fantastic
crowd-control options of the War Hammer, and still have high damage output. Every ability, especially
![]() Shockwave and
Shockwave and ![]() Wrecking Ball offer massive AoE stun and crowd-control pressure. On top of that
Wrecking Ball offer massive AoE stun and crowd-control pressure. On top of that
![]() Path Of Destiny also staggers and interrupts enemies, and applies a slowing debuff. No matter what ability
hits a target they will always be affected by
Path Of Destiny also staggers and interrupts enemies, and applies a slowing debuff. No matter what ability
hits a target they will always be affected by ![]() Aftershock on top of the crowd-control effect.
Aftershock on top of the crowd-control effect.
Hatchet
For a thorough breakdown on the Hatchet and how it can be used, please refer to our Hatchet guide.
PvP
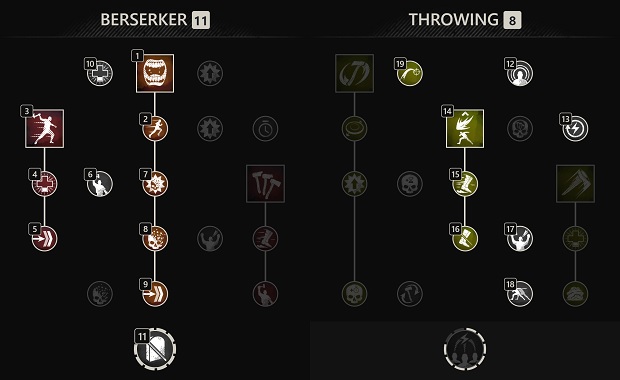
This is the standard build option in PvP. It provides survivability and CC escape with ![]() Berserk and
Berserk and
![]() Social Distancing. It also has single-target CC with
Social Distancing. It also has single-target CC with ![]() Feral Rush and
Feral Rush and ![]() Social Distancing to
lockdown players who are trying to escape. This is commonly seen as a utility secondary in PvP that is only
used for its abilities.
Social Distancing to
lockdown players who are trying to escape. This is commonly seen as a utility secondary in PvP that is only
used for its abilities.
PvE
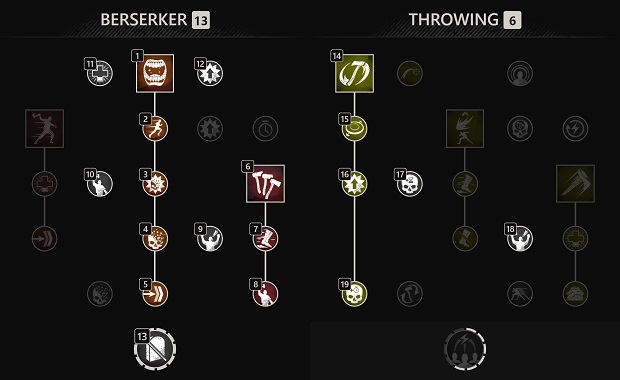
This will act as a primary PvE DPS weapon that comes with an incredible amount of damage. You should never
heavy attack, this is a DPS loss when comparing the time it takes to heavy attack with the damage it does
compared to two light attacks. You will want to maintain ![]() Berserk, use three light attacks, then use
abilities like
Berserk, use three light attacks, then use
abilities like ![]() Raging Torrent for single-target or AoE. You will also maintain
Raging Torrent for single-target or AoE. You will also maintain ![]() Rending Throw
to increase damage output.
Rending Throw
to increase damage output.
Greatsword
PvP
This is an uncommon pairing in PvP, but it does have some great viability when using a Great Axe build
with ![]() Reap and
Reap and ![]() Blood Lust. Your Greatsword
will function as your primary weapon and have incredble burst damage potential. The Great Axe just
provides more mobility and more ways to CC your target.
Blood Lust. Your Greatsword
will function as your primary weapon and have incredble burst damage potential. The Great Axe just
provides more mobility and more ways to CC your target.
PvE Damage
Tanking
The tank role is one that will always be taking a Sword and Shield, but its secondary choice is up to the tank's preference. At times it can be beneficial to use a Great Axe
Tanks will have the ability to flex into many builds, but here is a great build that can be played in a heavy or light tanking setup.
Attributes
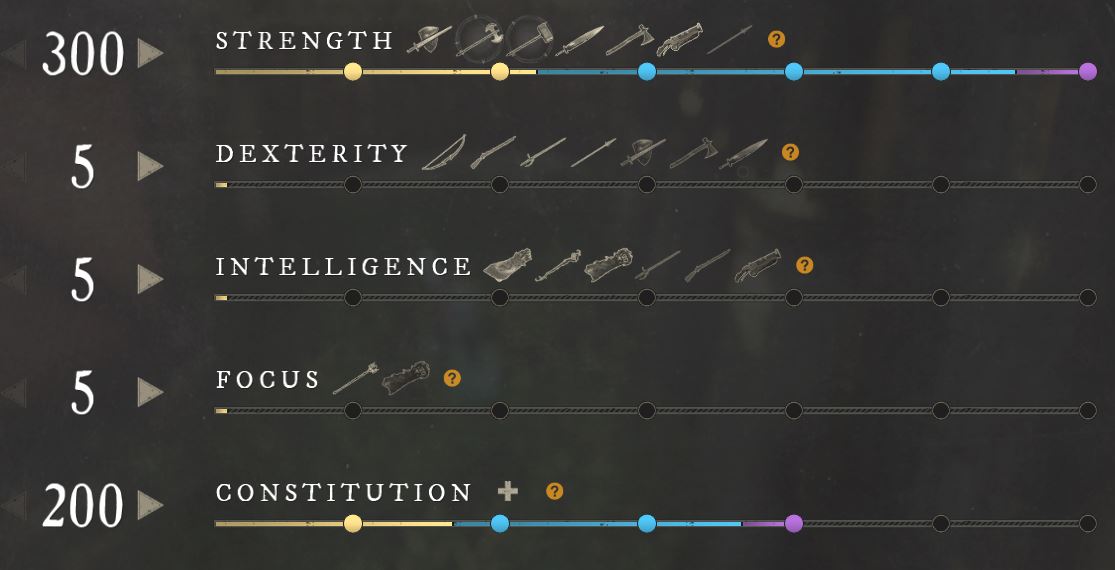
Traditional Strength builds playing on points with medium armor will use this split. This is the standard bruiser setup in New World. In a light build you can switch to 150 Constitution if you want more damage, but it is not needed.
In PvE you want to play with as little Constitution as possible. As such, it is best to play around 100 Constitution, but you can go as low as 50.
Season One Bruiser
While many will still play the traditional bruiser attribute setup. It is also a great option to play at 300 Constitution to maintain constant grit and 200 Strength. You may have less damage, but you will have more survivability and can maintain clump fights.
Important Perks
Ability Perks
 Insatiable Gravity Well — (Armor) In any War Hammer build it is crucial to have this on your weapon.
It will apply a large rend to anyone it hits, making them extremely vulnerable. This is necessary in PvP and PvE.
 Enfeebling Maelstrom — (Armor) This is fantastic self-sustain. It is a great utility option
if you can fit it into your gear.
 Fortifying Whirlwind — (Armor) When using a
  Whirlwind build this can be a viable defensive
option.
Weapon Perks
 Refreshing Move — Great Axe abilities are incredibly strong, and because its attacks easily hit
more than one target, this can be used to quickly reset abilities.
 Thwarting Strikes — This will apply bonus damage to all Great Axe attacks, making it one of the
best perks available.
Thwarting Strikes — This will apply bonus damage to all Great Axe attacks, making it one of the
best perks available.- Attunement Perks — This can be used for a free damage addition on any hit, including abilities.
PvP Perks
 Health — This provides free damage reduction against all sources and is one of the most beneficial PvP options.
 Shirking Heals — Incredible source of self-healing and allows for great survivability regardless of build.
 Shirking Fortification — Can be a great complement to
  Shirking Heals. Will add increased armor to
improve overall defensiveness.
 Freedom — This will allow you to play more aggressively by reducing the duration of crowd-control. You should
play with either 3 or 5 stacks.
 Elemental Aversion — Use this perk for elemental damage reduction from weapons like the Fire Staff.
 Refreshing — This can be an optional third perk when you want a source of cooldown reduction in your build.
- Harnessing Perks — Stack these for increased damage if you chose to forgo defensive options.
Mortal Empowerment vs. Invigorated Punishment
In most light armor builds, or ranged builds, it can be very strong to snowball kills with ![]() Mortal Empowerment,
and drastically increase your damage potential. With that being said, it is important to note that this will not stack if
a the weapons have persistent damage source, or DoT, deal the final blow. This means if Attunement or any Runeglass gem
secure the kill, you will not receive a stack. This makes it inconsistent and not worth using in some builds.
Mortal Empowerment,
and drastically increase your damage potential. With that being said, it is important to note that this will not stack if
a the weapons have persistent damage source, or DoT, deal the final blow. This means if Attunement or any Runeglass gem
secure the kill, you will not receive a stack. This makes it inconsistent and not worth using in some builds.
When making this decision you also have to think about your likliness to be killed. If you are playing a light armor
build, or one that is frequently diving into melee, you have high chances of dying. At that point if you lose your stacks,
it is a wasted perk, especially if this happens multiple times, or in the middle of building stacks. As such, it may be
more advantageous to use ![]() Invigorated Punishment.
Invigorated Punishment.
TLDR: If you are medium armor, want more consistent damage, or you have a high chance of death,
![]() Invigorated Punishment is the better option. If you want to snowball and have insanely high damage,
you have a pocket healer, you are a dedicated ranged build, or you simply do not care and want to gamble,
Invigorated Punishment is the better option. If you want to snowball and have insanely high damage,
you have a pocket healer, you are a dedicated ranged build, or you simply do not care and want to gamble,
![]() Mortal Empowerment is the better option.
Mortal Empowerment is the better option.
PvE Perks
 Elemental Aversion — This perk is a viable alternative in PvP as well, but is overshadowed by other PvP options.
It provides great defensein mutated expeditions to help mitigate magical effects.
 Physical Aversion — Only projectiles that do physical damage will be mitigated by this perk. As such, it can
be useful in PvE as another potential option. It alsoprovides a small amount of PvP value, but
  Elemental Aversion and
enemy Ward perks are certainly more defensive options.
Jewelry Perks
Amulet
 Health — This is the standard pick for all builds, it is free health that will add to the defensiveness of
your kit.
 Stamina Recovery — This is a backpocket save when being focused and taking heavy damage.
You will receive a burst of stamina that will allow you to potentially get a quick dodge that can save your iife and continue
the fight.
 Slash Protection — This acts as a third perk slot that provides more defensiveness against Greatswords,
Great Axes, Hatchets, and Swords.
Ring
 Slash Damage (Medium)
 Keen Awareness (Medium)
 Leeching (Medium)
 Invigorated Punishment (Budget Medium)
 Mortal Empowerment (Light)
 Hearty — This is necessary for any light armor build.
 Refreshing Ward (Medium)
Earring
Artifacts
Weapon
Armor
Jewelry
Heartrune
![]() Minor Heartrune of Detonate should be used for light armor builds where you are prioritizing burst damage or for
medium Bruisers who are able to stay in AoE clump fights.
Minor Heartrune of Detonate should be used for light armor builds where you are prioritizing burst damage or for
medium Bruisers who are able to stay in AoE clump fights.
There are two viable upgrade options:
![]() Brutal Heartrune of Detonate makes you more vulnerable, but will result in a massive
AoE burst of damage. This is the preferred option.
Brutal Heartrune of Detonate makes you more vulnerable, but will result in a massive
AoE burst of damage. This is the preferred option.
![]() Cunning Heartrune of Detonate is an interesting choice that can be taken. It will result in less detonate burst.
But you will not be as vulnerable and can deal more damage with your melee weapons.
Cunning Heartrune of Detonate is an interesting choice that can be taken. It will result in less detonate burst.
But you will not be as vulnerable and can deal more damage with your melee weapons.
If you are looking for a more defensive option, ![]() Stalwart Heartrune of Stoneform will be best. The choice is up to
player preference of more defensive buffs or self-healing. This will be typically used by medium armor players looking to
push through chokepoints into the Fort in Wars, or just to be able to hold points more
effectively.
Stalwart Heartrune of Stoneform will be best. The choice is up to
player preference of more defensive buffs or self-healing. This will be typically used by medium armor players looking to
push through chokepoints into the Fort in Wars, or just to be able to hold points more
effectively.
Heartrune Usage Tips
Try to avoid using ![]() Brutal Heartrune of Detonate while you have low health or are being focused on.
The goal is to start the ability and wait a short duration and attempt to dive in right as
the ability detonates so you can catch enemies off guard and not be bursted down.
Brutal Heartrune of Detonate while you have low health or are being focused on.
The goal is to start the ability and wait a short duration and attempt to dive in right as
the ability detonates so you can catch enemies off guard and not be bursted down.
You can activate your Detonate and then use ![]() Charge to "deliver" your explosion and time it right as you meet a
clump of players. This will catch them off guard and will not be dodged in many cases.
Charge to "deliver" your explosion and time it right as you meet a
clump of players. This will catch them off guard and will not be dodged in many cases.
Save your Detonate for when there are multiple targets stacked on top of one another. Preferably the targets will
already be under some kind of CC effect, or exhausted and unable to dodge out of them. It is best paired with something
like ![]() Gravity Well or
Gravity Well or ![]() Shockwave.
Shockwave.
When using Detonate try to time it right as you hit an enemy with another burst damage weapon ability, or something
that will CC the target, like ![]() Shockwave or
Shockwave or ![]() Wrecking Ball. When pairing this
with a Great Axe, use something
to again burst the target, or pull them toward you, like
Wrecking Ball. When pairing this
with a Great Axe, use something
to again burst the target, or pull them toward you, like ![]() Maelstrom or
Maelstrom or ![]() Reap. This can
result in a kill even when the target is full health.
Reap. This can
result in a kill even when the target is full health.
When using ![]() Stalwart Heartrune of Stoneform, or other variants, you should save this for times where you are stunned
or affected by other forms of CC. Alternatively, you can use this right before pushing through a doorway or chokepoint to
negate the potential of being affected by CC.
Stalwart Heartrune of Stoneform, or other variants, you should save this for times where you are stunned
or affected by other forms of CC. Alternatively, you can use this right before pushing through a doorway or chokepoint to
negate the potential of being affected by CC.
Take advantage of down time to charge your heartrune. For instance if you are far away you might as well continue to try hitting targets or structures to build charge.
Your heartrune will charge fast. While it is obviously beneficial to hold for times where there are large clusters of enemies. Do not wait too long and continue to waste your cooldown when you would have had the time to get another one recharged. Get familiar with how quickly you can get it back online and do not hesitate to use it to secure high priority kills.
A Heartrune in PvE is significantly different than PvP. This will charge incredibly fast due to the sustained damage output on
single targets. When using something like ![]() Brutal Heartrune of Detonate this is best used on large numbers of enemies instead of
single target. With that being said, use this as many times as possible in a boss fight since it will be available and otherwise
wasted.
Brutal Heartrune of Detonate this is best used on large numbers of enemies instead of
single target. With that being said, use this as many times as possible in a boss fight since it will be available and otherwise
wasted.
Gems and Consumables
For more information on how to manage your cooldown hotbar, what consumables to use, what foods should be eaten, or tips on how to be more effective with your consumables in PvP and PvE, please refer to Great Axe Consumables guide.
Gems
Remember, Runeglass can only be slotted into armor pieces that are not jewelry items, and weapons.
Runeglass gems WILL NOT be the most optimal or efficient in the armor of a strict bruiser build . Please reference the FAQ section below as to why.
Weapon Gems
For any type of bruiser build it will be best to use any Runeglass variant of ![]() Cut Pristine Opal that applies
a damage over time effect. For example :
Cut Pristine Opal that applies
a damage over time effect. For example : ![]() Runeglass of Arboreal Opal
Runeglass of Arboreal Opal
In PvE it will be best to use ![]() Cut Pristine Diamond for maximum damage output.
Cut Pristine Diamond for maximum damage output.
PvP Gems
In PvP combat your optimal resistance distribution is going to prioritize Slash resistance, then Physical, and lastly Elemental. This is the standard for any build where you will frequently be in melee range.
To hit a 22.5 (Slash)/12.5 (Physical)/7.5 (Elemental) resistance setup you will need:
 Cut Pristine Onyx x5 +
  Cut Pristine Opal x3 +
  Slash Protection on Amulet
![]() Runeglass of Punishing Onyx results in marginal offensive gains for a bruiser build because of
hidden internal cooldown effects. As such, it is preferred to take the defensive gains instead.
Runeglass of Punishing Onyx results in marginal offensive gains for a bruiser build because of
hidden internal cooldown effects. As such, it is preferred to take the defensive gains instead.
PvE Gems
In PvE combat, more specifically mutators, elemental resistance is the main concern.
You can use the following gems in your gear:
- Elemental Resistance Gem x8 + Amulet Protection Perk (Based on mutator elemental effect)
Maximum Damage
In PvP and PvE you can still use Punishing Runeglass variants of your gems if you only care about
raw damage, and not effective damage based on survivability. For example, you would use
![]() Runeglass of Punishing Onyx x5 in PvP
Runeglass of Punishing Onyx x5 in PvP
The age old saying: "A dead DPS does no DPS.", should come to mind when making this decision.
Consumables
For more information on how to manage your cooldown hotbar, what consumables to use, what foods should be eaten, or tips on how to be more effective with your consumables in PvP and PvE, please refer to our War Hammer Gems Guide.
Rotation and Gameplay
Ability Priority List
Priorities
- Use
 Gravity Well on clumps of enemies, or on a priority target.
 - Use
 Maelstrom to pull enemies toward you and provide burst damage. It also can be used for defensive purposes.
 - Use
 Charge to escape or to secure a kill and chase targets.
 - Consistently light attack targets in between abilities to maintain
 Mauler's Fury stacks or deal damage.
 - On players who are unaware, CC'd, or exhausted, it can be beneficial to use a heavy attack.
Secondary Weapon Priority List and Build Rotation
To learn how to use your second weapon properly, and complete rotation, please refer to our PvE and PvP build pages:
Gameplay Tips
Feinting
You can feint attacks with melee weapons, such as the War Hammer or Great Axe, to try and bait an enemy into dodging and wasting their stamina. This can be done to try an exhaust enemies so that you can get free hits in. To do so, charge a heavy attack and block before the attack is initiated. This will make it look like you are swinging, and then you cancel the attack until you can strike at the correct opportunity.
Ability Weaving
With many melee weapons it is advantageous to weave abilities with other abilities or with light and heavy attacks.
For example, it can be advantageous to hit a target with a light attack and quickly use ![]() Charge to deal a large
burst of damage to secure a kill. This same concept can be applied to
Charge to deal a large
burst of damage to secure a kill. This same concept can be applied to ![]() Maelstrom to sneak in extra damage. If
you choose to use a War Hammer, you can use
Maelstrom to sneak in extra damage. If
you choose to use a War Hammer, you can use ![]() Wrecking Ball and immediately follow that up with
Wrecking Ball and immediately follow that up with
![]() Shockwave in most situations. Then, swap back to the Great Axe and begin dealing damage.
Shockwave in most situations. Then, swap back to the Great Axe and begin dealing damage.
It is important to try and sneak in as much free damage as possible, especially in medium armor.
In all builds, especially when playing as a bruiser, it is important to synergize your abilities and attacks to setup lethal combos.
Charge Usage
![]() Charge is a great escape ability that will allow you to clear a considerable amount of distance at a high speed.
The problem with it is that you can be "body-blocked". If you have an ally, or an enemy, anywhere near your path
while using it, your charge will be stopped. This can result in a quick death in some cases, or the inability to
chase down an enemy. So be aware of your surroundings when using this ability.
Charge is a great escape ability that will allow you to clear a considerable amount of distance at a high speed.
The problem with it is that you can be "body-blocked". If you have an ally, or an enemy, anywhere near your path
while using it, your charge will be stopped. This can result in a quick death in some cases, or the inability to
chase down an enemy. So be aware of your surroundings when using this ability.
This can be a great ability to execute a target when they are low health. If you use a light attack, and immediately
follow it up with ![]() Charge while in melee range, you will perform to quick swings that deal significant damage and
are hard to avoid.
Charge while in melee range, you will perform to quick swings that deal significant damage and
are hard to avoid.
Gravity Well Usage
This ability is one of the most important ones in all of New World. It is what begins fights, clumps targets, and can be the difference maker in many battles. Be sure to not waste this on a single target unless it is a healer or other priority target, and it is absolutely necessary. Do your best to gather as many targets as possible.
![]() Gravity Well will pull targets back to the center of the Well. This can be used to pull back an enemy who is running
away. Additionally, if placed properly, this can pull enemies off of walls or ramparts and allow for easy priority kills.
Gravity Well will pull targets back to the center of the Well. This can be used to pull back an enemy who is running
away. Additionally, if placed properly, this can pull enemies off of walls or ramparts and allow for easy priority kills.
Maelstrom Usage
This is an incredibly potent source of AoE or single target damage. It should be used on as many targets as possible to build
![]() Mauler's Fury stacks, and deal high damage.
Mauler's Fury stacks, and deal high damage.
It can also be used for its utility. It will deflect all incoming projectiles and abilities, even ![]() Ice Spikes, and could
potentially save your life. Also, it will pull enemies toward you which can be the difference maker when someone is escaping. If
you choose to use
Ice Spikes, and could
potentially save your life. Also, it will pull enemies toward you which can be the difference maker when someone is escaping. If
you choose to use ![]() Enfeebling Maelstrom, this is a very strong defensive tool and should be prioritized on as many targets as
possible.
Enfeebling Maelstrom, this is a very strong defensive tool and should be prioritized on as many targets as
possible.
Proper Cooldown Management
Great Axe cooldowns are very impactful, so a player needs to recognize when they have a window of opportunity, perhaps when there are several targets stacked on top of one another. With that being said, you also need to be cognizant of how to reduce your cooldowns. Thankfully, this is very easy with this weapon--either hit enemies, or be hit by enemies.
![]() Refreshing Move is free cooldown reduction from swinging light and heavy attacks, and it can quickly reset cooldowns when
hitting multiple targets at once.
Refreshing Move is free cooldown reduction from swinging light and heavy attacks, and it can quickly reset cooldowns when
hitting multiple targets at once.
![]() Refreshing Ward will provide cooldown reduction while staying in clump fights. When you have multiple stacks on your gear
this will reward you from receiving hits, not from DoTs or persistent damage, and will allow you to frequently use abilities, especially
when combined with
Refreshing Ward will provide cooldown reduction while staying in clump fights. When you have multiple stacks on your gear
this will reward you from receiving hits, not from DoTs or persistent damage, and will allow you to frequently use abilities, especially
when combined with ![]() Refreshing Move.
Refreshing Move.
Movement
Effective movement is incredibly important in a build like this, especially when playing in medium. Do not panic and use your entire stamina bar and exhaust yourself, as it may result in death. You can take advantage of jumping, diving (going prone while moving), and changing direction by quickly moving your mouse or taking advantage of quick inputs on your movement keys.
There are many movements in New World that will stagger you in place for a moment when quickly changing direction. If you move left and right or if you jump left and right you will notice there is a momentwhere you will be standing still. To prevent this you will need to use a key input while your character is in the animation. For example, if you hold your left directional key and jump then right before you land you hit your right directional key and jump, you will quickly jump left and right. If you simply run left and right using your directional keys your character will respond similarly. To avoid this you can move left and then right before you pivot to go right, hit the backward directional key and instantly follow up with your right directional key. If you continue doing this back and forth you will avoid the sliding animation.
War Hammer Usage
The War Hammer is the perfect secondary complement. It has endless crowd-control potential that will allow the Great Axe to shine by locking down several targets at a time, and providing self-sustain through its defensiveness and healing.
To learn more about ability usage and the intracies of the War Hammer, please refer to our War Hammer guide.
Hatchet Usage
When deciding to use a Hatchet with your Great Axe, this will either be for PvP survival and utility, or PvE damage output.
Please refer to our Hatchet tips for more on this playstyle.
FAQ - Great Axe
What Should I Use For Cooldown Reduction?
Generally, in any bruiser build where you are consistently fighting in melee clumps, your best perk for cooldown reduction will be ![]() Refreshing Ward.
When stacked on multiple pieces of gear, this will result in large amounts of cooldown reduction and allow you to use more abilities. The bruiser melee META
consists of primarily medium armor Great Axe and War Hammer builds. Since you are more defensive and can take far more hits than a light armor player, especially
with a healer in your group, the difference between a perk like
Refreshing Ward.
When stacked on multiple pieces of gear, this will result in large amounts of cooldown reduction and allow you to use more abilities. The bruiser melee META
consists of primarily medium armor Great Axe and War Hammer builds. Since you are more defensive and can take far more hits than a light armor player, especially
with a healer in your group, the difference between a perk like ![]() Refreshing versus
Refreshing versus ![]() Refreshing Ward will be very noticeable.
Refreshing Ward will be very noticeable.
 Refreshing — Reduces max cooldowns by 2.9% per stack.
 Refreshing Ward — Reduces active cooldowns by 1.9% after being hit 4 times.
Does not trigger off persistent damage, DoT effects or blocked attacks.
What Gems Do I Put In My Gear?
When playing a bruiser build it will be tempting to use ![]() Runeglass of Punishing Onyx. While this will provide a damage increase, there is
an internal cooldown when using something like a Great Axe, which is your primary damage in these types of builds, which will only allow it
to proc every other hit. So, this will not actually be as much of a damage increase as it was thought to be. In most cases, just use regular
gems for more defensiveness. The marginal damage loss will be made up for by survivability.
Runeglass of Punishing Onyx. While this will provide a damage increase, there is
an internal cooldown when using something like a Great Axe, which is your primary damage in these types of builds, which will only allow it
to proc every other hit. So, this will not actually be as much of a damage increase as it was thought to be. In most cases, just use regular
gems for more defensiveness. The marginal damage loss will be made up for by survivability.
What Magic Damage Should I Use For Runeglass, Attunement, and Chain Damage?
It is best practice to use a magic damage type that is the least likely to be countered. While most players tend not to focus on a specific magic damage type like they do for physical damage, it is still possible. In most cases, players may use extra Ice damage protection due to the Ice Gauntlet, or Fire due to the Fire Staff or Blunderbuss. As such, Nature, Arcane, or Lightning damage can be beneficial options. Nature specifically is beneficial because it will always work in PvE environments because it is never weak to any enemy types.
Changelog
- 22 Oct. 2023 (PvP builds page): Guide updated for expansion.
- 22 Oct. 2023 (PvE builds page): Guide updated for expansion.
- 22 Oct. 2023 (gems page): Guide updated for expansion.
- 22 Oct. 2023 (perks page): Guide updated for expansion.
- 22 Oct. 2023 (abilities page): Guide updated for expansion.
- 22 Oct. 2023 (this page): Guide updated for expansion.
- 28 Mar. 2023 (gems page): Updated PvE gems.
- 28 Mar. 2023 (perks page): Updated perk tiers for Season One.
- 28 Mar. 2023 (this page): Updated perks, gems, and heartrune.
- 09 Feb. 2023 (PvP builds page): Guide added.
- 09 Feb. 2023 (PvE builds page): Guide added.
- 09 Feb. 2023 (gems page): Guide added.
- 09 Feb. 2023 (perks page): Guide added.
- 09 Feb. 2023 (abilities page): Guide added.
- 09 Feb. 2023 (this page): Guide added.
More Weapon Guides
Lemoni is a New World content creator with thousands of hours of gameplay. He specializes in theory crafting builds and various gameplay mechanics to improve player performance. He also enjoys long walks on the beach.
- Icy Veins Launches Genshin Impact Guides Section
- Icy Veins Podcast About Path of Exile
- ARPG Vault Discord Giveaway
- Icy Veins is Getting a New Look
- Join Us Live on Twitch for the Icy Veins Podcast
- New World Update 1.5.6
- TwitchCon Amsterdam New World PvP Arena Open & Twitch Drop
- New World July Team Update Video


