


Gauntlet Build Introduction for Barrage Rogue
The Barrage Rogue is the best build to obtain a top ranking on the Gauntlet leaderboard in Season 4 of Diablo 4. This is your optimized guide for a late endgame setup designed for the highest Gauntlet scores. For more information on this endgame activity, check out our Gauntlet Guide.
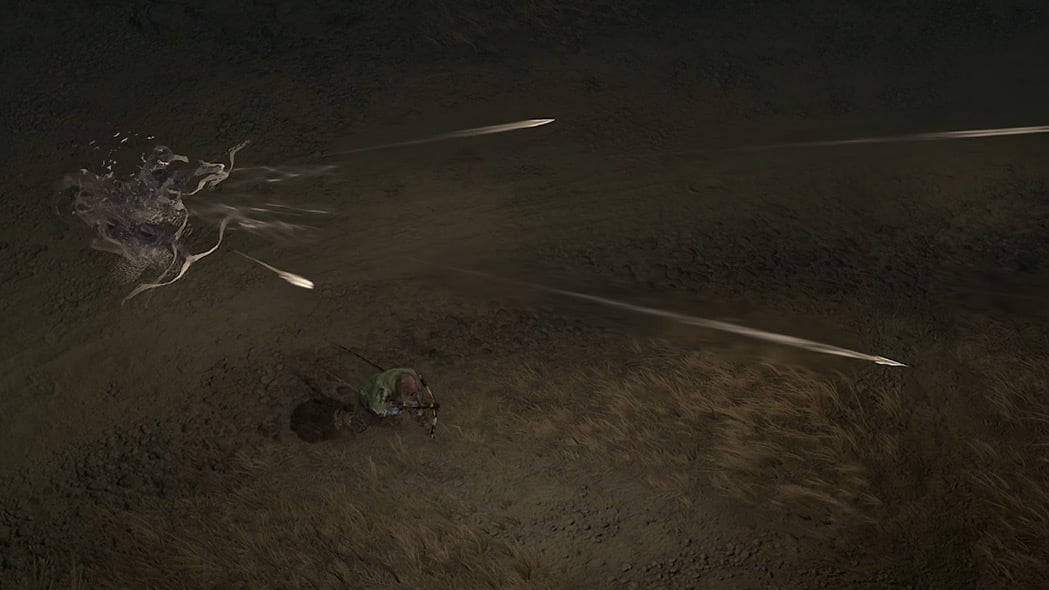
![]() Barrage is a highly versatile Core Skill that can deal high single-target damage while ricocheting to additional targets. The ricochets auto-target nearby enemies, so you can keep moving with a fire-and-forget playstyle. The Gauntlet setup for the Barrage Rogue focuses on maximizing damage and mobility, by sacrificing defense whenever possible.
Barrage is a highly versatile Core Skill that can deal high single-target damage while ricocheting to additional targets. The ricochets auto-target nearby enemies, so you can keep moving with a fire-and-forget playstyle. The Gauntlet setup for the Barrage Rogue focuses on maximizing damage and mobility, by sacrificing defense whenever possible.
Before following this Gauntlet build guide, make sure you have a Level 100 Rogue. Follow the Rogue Leveling Guide to progress a character from Level 1-50, and then the Barrage Endgame Guide from Level 50-100.
Strengths and Weaknesses
- Barrage can shotgun elites and bosses, while ricocheting to multiple enemies
- Barrage ricochets auto-target nearby enemies
- Relatively simple playstyle for a Rogue
- Slightly lower single-target damage than Rapid Fire
- Limited targeting against high density packs
- Defense is lowered in the Gauntlet setup
To see how this build compares to the other builds on our site, you can check out our build tier lists.
Skill Tree Points and Skill Bar
 Barrage
  Dash
Dash  Shadow Step
  Concealment
  Shadow Clone
  Shadow Imbuement
 The Skill Tree above shows the full allocation of 58 Skill Points for the Barrage Rogue build. Make sure you obtain the 10 Skill Points available from Renown.
Barrage Rogue Specialization
Combo Points are not selected, since the Gauntlet setup for the Barrage Rogue does not equip any Basic Skills. Instead, Preparation is utilized to reduce the Cooldown of ![]() Shadow Clone and reset other Skills.
Shadow Clone and reset other Skills.
Paragon
The Paragon progression system unlocks after reaching Level 50, and offers a considerable boost to character power. Within the Paragon Board, there are many different bonuses, ranging from minor stat enhancements on Magic Nodes to more significant gains with Rare Glyphs and Legendary Nodes.
Important Notes:
- Additional Bonus requirements on Rare Glyphs may not be obtainable until they gain increased radius range at Level 15.
- Attach Legendary Boards in the correct order. Bonus requirements of Rare Nodes increase with their placement order.
- Make sure you select the correct Legendary Boards and rotate them into the correct orientation before attachment.
The Gauntlet setup makes the following slight adjustments to the original Barrage Endgame Build, so you do not have to completely refund all Paragon points.
- Remove
 Ranger and
  Turf.
Turf. - Insert
 Canny and Efficacy.
 - Reallocate points from
 Calculated to obtain other damage increases and nodes in radius range of the new Glyphs.
WARNING: Multiple sources of Damage Reduction are traded for Damage Multipliers in this Glyph setup for the Gauntlet. Survivability is extremely low. Players in Hardcore mode should follow the tankier setup in the original Barrage Endgame Build.
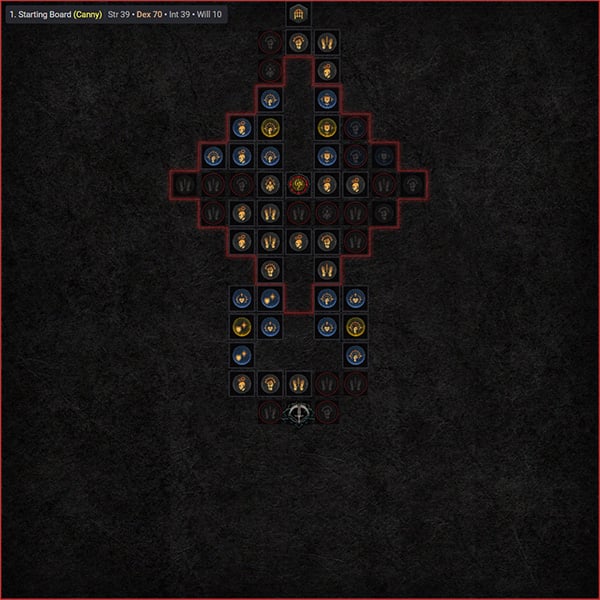
1. Starting Board (Canny)
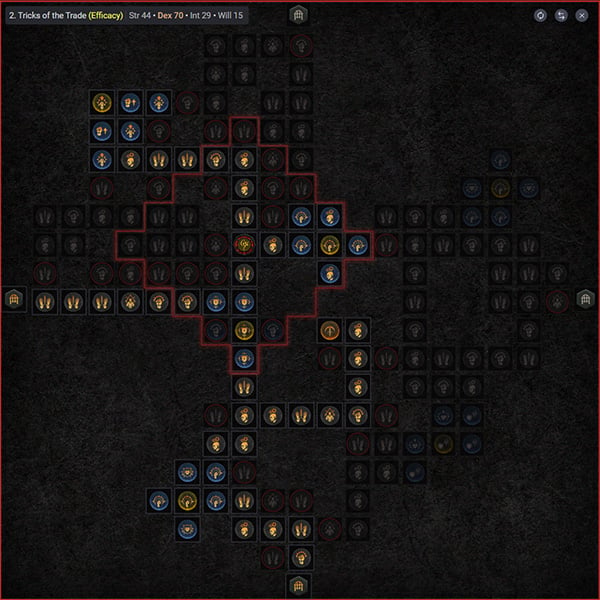
2. Tricks of the Trade (Efficacy)
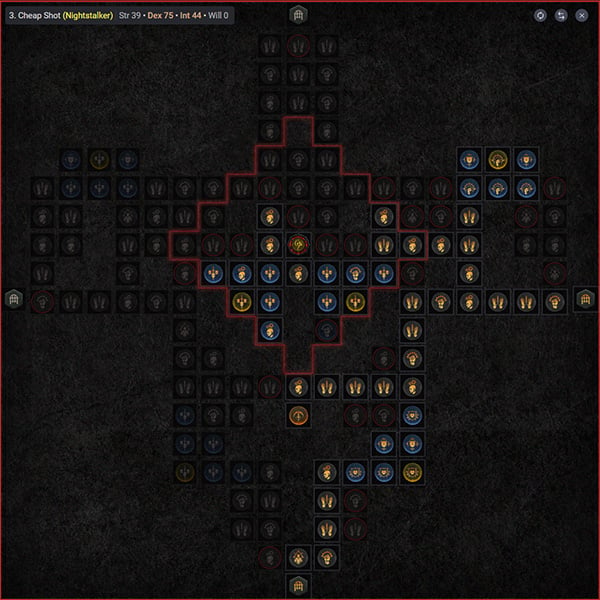
3. Cheap Shot (Nightstalker)
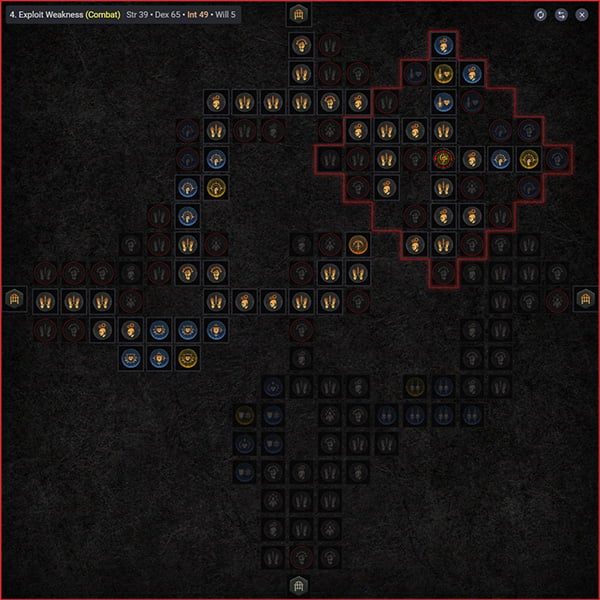
4. Exploit Weakness (Combat)
5. No Witnesses (Exploit)
Paragon Board images courtesy of d4builds.gg. Click this link for the Paragon planner.
Gear, Gems, Elixirs, and Stats
Season 4 brings an incredible shift in character progression systems. The major rework to itemization and crafting in Patch 1.4.0 changes the core mechanics of Diablo 4, and the changes will remain in effect beyond Season 4. For further details, read the overview in the Tempering and Masterworking section.
Legendary Aspects
Listed below are all the best-in-slot Aspects for the Barrage Rogue build. Salvage Legendary Items with higher Aspect values to unlock them in the Codex of Power, and then imprint them onto Legendary Items with the preferred affixes.
| Gear Slot | Aspect Name | Aspect Power |
|---|---|---|
| Ranged Weapon (replaced by |  Aspect of Branching Volleys Aspect of Branching Volleys | Increase the damage of arrows that Ricochet from Barrage from 40% to [60 – 80%]. In addition, Barrage’s arrows have a [40 – 60%] chance to split into 2 arrows whenever they ricochet. Note: Move this aspect to the Amulet if Skyhunter is equipped. |
| Amulet | Edgemaster’s Aspect | Skills deal up to [10 – 20%] increased damage based on your available Primary Resource when cast, receiving the maximum benefit while you have full Primary Resource. |
| Gloves (optional replacement with | Aspect of Inner Calm | Deal [5.0 – 10.0%] increased damage for each second you stand still, up to 40%. |
| Ring Slot #1 (replaced by | Aspect of Elements | Gain + [20 – 30%] increased damage to a set of damage types for 7 seconds. This effect alternates between 2 sets: Fire, Lightning, and Physical. Cold, Poison, and Shadow. |
| Dual-Wielded Weapons or Ring Slot #2 | Accelerating Aspect | Critical Strikes with Core Skills increase your Attack Speed by [15 – 25%] for 3 seconds. |
| Dual-Wielded Weapons or Ring Slot #2 | Aspect of Inner Calm | Deal [5.0 – 10.0%] increased damage for each second you stand still, up to 40%. |
| Dual-Wielded Weapons or Ring Slot #2 | High Velocity Aspect | Barrage arrows now pierce through 1 enemy. Barrage has [10 – 20%] increased Attack Speed. |
| Helm (replaced by |  Resistant Assailant’s Aspect Resistant Assailant’s Aspect | Breaking Concealment grants +10% Resistance and Maximum Resist to all elements for 4 seconds. Killing an Elite enemy reduces Concealment’s cooldown by 6–10 seconds. |
| Chest |  Aspect of Quickening Fog Aspect of Quickening Fog | You automatically drop a Smoke Grenade at the end of Dash. Smoke Grenades reduce Dash’s Cooldown by [0.4 – 0.6] seconds for each enemy hit, up to [2.0 – 3.0] seconds. |
| Pants (replaced by | Aspect of Disobedience | You gain [0.6 – 1.1%] increased Armor for 4 seconds when you deal any form of damage, stacking up to [36 – 66%]. |
| Boots |  Ravager’s Aspect Ravager’s Aspect | Shadow Step has an additional Charge. Killing an enemy with Shadow Step refunds a Charge and increases the damage of Shadow Step by [1 – 6%] for 2 seconds, up to [5 – 30%]. |
Gems
Listed below are the best Gems to socket into gear for each item type.
| Slot | Gems |
|---|---|
| Weapon | |
| Armor | |
| Jewelry | Any Resistance Gems needed or |
Elixirs
Visit the Alchemist in any main town to craft helpful Elixirs that increase stats and experience gain for 30 minutes. Make sure to forage plants and pick up the necessary crafting materials during your adventures; they randomly spawn around the world. Elixirs can also drop randomly from enemies and chests during many activities in Diablo 4. Listed below are the best Elixirs to consume, ranked by importance.
 Elixir of Precision provides the highest damage output increase, if not already capped at 100% Critical Strike Chance.
 Elixir of Advantage increases damage output, if not already capped at 100% Attack Speed bonus from gear and Paragon.
Stat Priority and Tempering Affixes
Listed below are the affixes to prioritize on gear for Barrage Rogues. Each line of affixes are listed in order of importance. Affixes on the same line are considered to be equally important, but their benefits may vary depending on how much is stacked or other character stats. Bolded affixes are the most important targets for Masterworking upgrades.
When comparing Legendary weapons with similar item levels, Crossbows are preferred over Bows for the better implicit stat and ![]() Weapon Mastery bonus. Daggers are beneficial for faster Combo Point generation, while Swords offer a boost to
Weapon Mastery bonus. Daggers are beneficial for faster Combo Point generation, while Swords offer a boost to ![]() Precision with the Critical Strike Damage implicit.
Precision with the Critical Strike Damage implicit.
The priority order of Resistances is Lightning > Poison > Fire > Cold > Shadow. Maximum Resistance is 70% by default for each element and can be increased to 85% by various sources.
Check the Tempering and Masterworking section for more details on Blacksmith upgrading.
| Slot | Gear Affixes | Tempering Affixes |
|---|---|---|
| Weapons | 1. Attack Speed, Critical Strike Damage 2. Resource Cost Reduction, Dexterity, Vulnerable Damage, Maximum Life | |
| Helm | 1. Cooldown Reduction, Energy per Second 2. Resistances, Armor 3. Maximum Life, Dexterity, Lucky Hit Chance | |
| Chest | 1. Ranks to Dark Shroud, Energy per Second 2. Resistances, Armor 3. Maximum Life, Dexterity | |
| Gloves | 1. Ranks to Barrage, Critical Strike Chance, Attack Speed, Critical Strike Damage 2. Resistances, Armor 3. Maximum Life, Dexterity, Vulnerable Damage, Lucky Hit Chance | |
| Pants | 1. Resistances, Armor 2. Maximum Life, Dexterity | |
| Boots | Implicit Stat: Attacks Reduce Evade’s Cooldown 1. Movement Speed, Energy per Second 2. Resistances, Armor 3. Ranks to Dash, Maximum Life, Dexterity | |
| Amulet | 1. Ranks to Weapon Mastery, Critical Strike Chance, Cooldown Reduction, Attack Speed 2. Movement Speed, Armor | |
| Rings | 1. Critical Strike Chance, Attack Speed, Critical Strike Damage 2. Resource Cost Reduction, Vulnerable Damage, Resistances, Maximum Life 3. Dexterity, Lucky Hit Chance |
Unique Items
Listed below are the recommended and optional Unique Items for this build.
 Skyhunter (required) is important for damage and Energy generation. Increasing
  Exploit to Rank 3 from Rank 6 results in a 15% overall damage increase against Healthy and Injured enemies (1.36 / 1.18).
 - Masterworking Priority: Ranks of the Exploit Passive
 Harlequin Crest (recommended) provides a good amount of offense and defense, if you are lucky enough to find this Uber Unique Item.
 - Masterworking Priority: Cooldown Reduction
 Ring of Starless Skies (recommended) is an Uber Unique Item that provides a highly valued 1.4x multiplier. The downside is the unique effect requires some management to ramp up and maintain the buff stacks.
 - Masterworking Priority: Critical Strike Chance
 Tibault’s Will (recommended) provides a damage multiplier and Energy generation effect, in addition to a Damage Reduction from Close Enemies affix that is not usually obtainable in the Pants slot. Activate the unique effect with
  Shadow Step. Optionally,
  Subverting Concealment can replace
  Disciplined Dash for a second source of Unstoppable.
 - Masterworking Priority: Damage Reduction from Close Enemies
Season 4: Loot Reborn
The following list details the changes in the Season 4 Update (Patch 1.4.0) that may pertain to Barrage Rogues. Check the Changelog for all the other guide updates.
- High Velocity Aspect
- Barrage arrows now pierce through 1 enemy.
- Barrage has 10%-20% increased Attack Speed.
 Exploit Weakness
 - Maximum increased damage buffed from 15%[x] to 25%[x].
 Skyhunter
 - Damage bonus increased from 10-30% to 20-40%.
Advanced Information
Additional details are provided in the following sections for a more in-depth explanation of the Barrage Rogue. Read this advanced information after understanding the basic overview of the build in the previous sections.
Build Mechanics
Barrage can be casted right next to elites and bosses to shotgun them with all the arrows for high single-target damage. The buff to Aspect of Branching Volleys in Patch 1.3.3 greatly improves the clearing ability of Barrage against multiple enemies. Therefore, the Barrage Rogue has become an effective build for every situation in combat.
The Gauntlet setup for the Barrage Rogue removes any Basic Skills and Combo Points, greatly simplifying the playstyle. ![]() Barrage is spammed to deal damage without a Combo Points rotation, while
Barrage is spammed to deal damage without a Combo Points rotation, while ![]() Dash,
Dash, ![]() Shadow Step and
Shadow Step and ![]() Concealment are utilized for quick mobility.
Concealment are utilized for quick mobility.
![]() Shadow Clone provides supplemental damage, but the clone does not benefit from many damage increases on the character. The Preparation Specialization allows the Ultimate Skill to be used more often, and reset the Cooldowns of other Skills.
Shadow Clone provides supplemental damage, but the clone does not benefit from many damage increases on the character. The Preparation Specialization allows the Ultimate Skill to be used more often, and reset the Cooldowns of other Skills.
![]() Nightstalker reduces the Cooldown of
Nightstalker reduces the Cooldown of ![]() Shadow Imbuement when
Shadow Imbuement when ![]() Concealment is casted. Reallocate extra Ranks of
Concealment is casted. Reallocate extra Ranks of ![]() Concealment for
Concealment for ![]() Consuming Shadows if you need more Energy generation.
Consuming Shadows if you need more Energy generation.
![]() Exploit instantly applies Vulnerable to enemies at the beginning of a fight. Afterwards,
Exploit instantly applies Vulnerable to enemies at the beginning of a fight. Afterwards, ![]() Improved Barrage continues to maintain Vulnerable status in longer battles against elites and bosses.
Improved Barrage continues to maintain Vulnerable status in longer battles against elites and bosses.
Animation Cancel Technique
An Evade can be used immediately after using Barrage to cancel their casting animations. This technique is important to quickly dodge incoming attacks or advance forward. Boots with the implicit effect, Attacks Reduce Evade’s Cooldown, allow for an animation cancel after using 3 Basic Attacks and a Core Skill. Practice hitting Evade after every Core Skill to build muscle memory.
Damage Rotation
Use the following rotation to optimize DPS.
- Use Dash, Shadow Step and Concealment to quickly travel between packs of enemies.
- (Optional) Activate
 Shadow Imbuement against large groups of enemies to supplement Area of Effect damage.
 - Cast Barrage rapidly to deal damage. Stand next to elites or bosses to shotgun them with all the arrows, while ricochets take care of weaker enemies.
- Restart the rotation.
Tempering and Masterworking
The Season 4 update (Patch 1.4.0) introduces a rework for itemization. Tempering and Masterworking brings the biggest change to itemization since the release of Diablo 4, so make sure you understand the new systems explained in this section.
The amount of affixes on items has been changed to reflect its rarity: Normal Items have no affixes, Magic Items have 1 affix, Rare Items have 2 affixes, Legendary Items have 3 affixes, and Unique Items have 4 affixes. Upgrading a Rare Item to a Legendary Item by imprinting a Legendary Aspect from the Codex of Power will not add a third affix. Therefore, Legendary Items are superior to lower rarity items for a min-maxed character.
Greater Affixes are a newly added mechanic that increases the value of an affix by 50%. Ancestral Legendary Items and Unique Items can now drop with up to 4 Greater Affixes! Search for items with your preferred Greater Affixes to upgrade with Tempering and Masterworking.
Tempering and Masterworking is an important system, even mandatory in the endgame, for character progression. You are able to add 2 additional affixes on any Rare Item or Legendary Item, exclusive to the Tempering System. An Ancestral Legendary Item can have up to 5 total affixes! Unfortunately, Unique Items cannot be tempered to add affixes.
Masterworking uses new crafting materials found in The Pit to further enhance the stats of an item. These upgrades can be applied on an Ancestral Legendary Item that has its Tempering Slots filled out. Unique Items can be upgraded with Masterworking right away, as tempering does not apply to them. Each item has 12 upgrade slots. On upgrade Ranks 4, 8, and 12, a random affix is increased in value by 25%. Every other upgrade Rank applies a 5% increase to all affixes on an item. Attempt to apply the bonus 25% upgrade to your preferred affix multiple times by resetting the Masterworking Ranks to repeat the process.
Obol Gambling
Obol gambling is a great way to potentially find item upgrades or items missing from your build. Use Obols on your target equipment for a chance to receive Greater Affixes. Check out the new tool from Icy Veins for gambling Obols in the link below.
Obol Gambling Optimization ToolChangelog
- May 14th, 2024: Guide updated for Season 4 (Patch 1.4.0).
- March 11th, 2024: Guide created.
