


Gauntlet Build Introduction
The Gauntlet variant build for the Blood Surge Necromancer is a late endgame setup, focused on speed to obtain the highest leaderboard score. This is one of the best Gauntlet builds for Necromancers in Season 4 of Diablo 4. For more information on this endgame activity, check out our Gauntlet Guide.
Climbing up leaderboard ranks of the Gauntlet requires quick mobility and high damage to clear enemies before the timer runs out. Therefore, the Gauntlet setup for the Blood Surge Necromancer trades defense for offense whenever possible. Since this build guide is meant to be the absolute best to top the leaderboards, it will be using a very gear heavy setup. However, you are still able to play and perform well in the Gauntlet without them.
This Gauntlet build guide assumes your character is Level 100. Start with the Blood Surge Necromancer Leveling Guide if you are starting a new character from Level 1-50, and then the Blood Surge Necromancer Endgame Guide from Level 50-100. You should also already have the Build Requirements listed in the section below.
Strengths and Weaknesses
- Strong Necromancer option for Gauntlet Leaderboard pushing
- Extremely fast paced build
- Survival is top tier playing Blood
- Heavily emphasized Gauntlet approach
- Heavy gear requirements
To see how this build compares to the other builds on our site, you can check out our build tier lists.
Build Requirements
There’s a handful of unique items required for this build to perform at a very high level. You can realistically play it without these unique items by replacing them with Legendary Aspect Powers from the original base endgame build guide. Do keep in mind that it will perform less optimally should you not have all of the high end items listed below.
Skill Tree Points and Skill Bar
 Corpse Tendrils
  Decrepify
  Blood Mist
  Blood Surge
  Bone Storm
  Corpse Explosion
 WARNING: This Skill Tree setup is designed for maximum damage output to obtain the highest score possible in the Gauntlet. Defense is traded for Offense at nearly every possible opportunity. This glass cannon playstyle can take some practice to master.
Book of the Dead
This Blood Surge Necromancer is designed to speed clear the Gauntlet to compete in the leaderboards. To achieve this we are going to be sacrificing every single one of our minions to further boost the capabilities of the builds performance.
- Melee Skeletons: We sacrifice the Skirmishers here for higher critical strike chance.
- Mage Skeletons: Bone mages provides increased Overpower damage output.
- Golem: Iron Golem further scales our critical strike damage output.
Paragon Board
The Paragon progression system unlocks after reaching Level 50, and offers a considerable boost to character power. Within the Paragon Board, there are many different bonuses, ranging from minor stat enhancements on Magic Nodes to more significant gains with Rare Glyphs and Legendary Nodes.
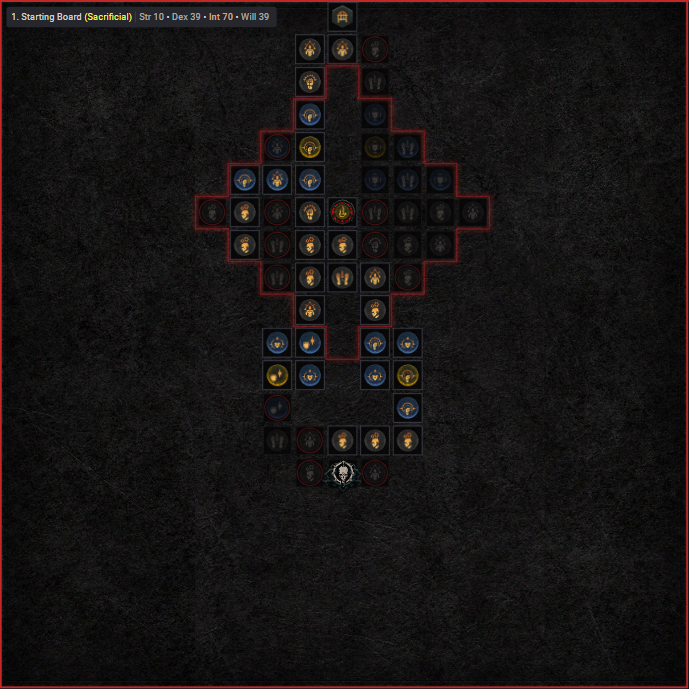
Starting Board
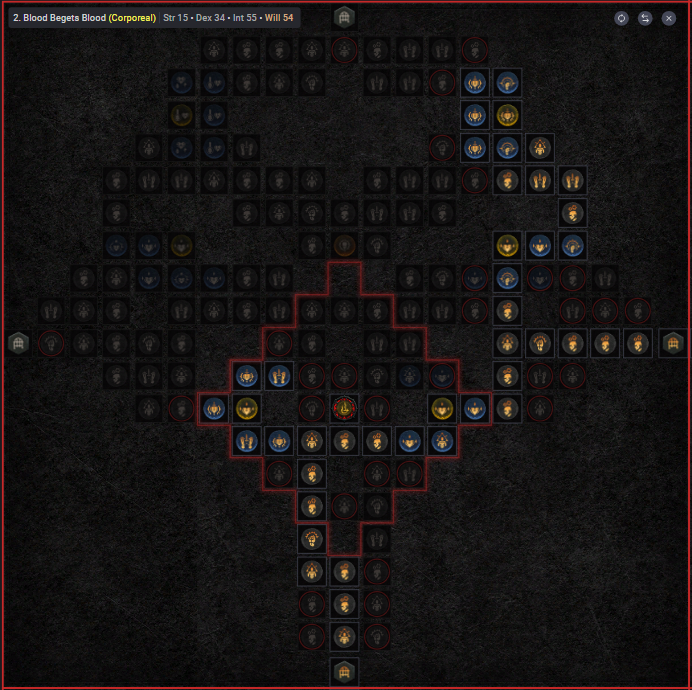
Blood Begets Blood
No need to rotate this board.
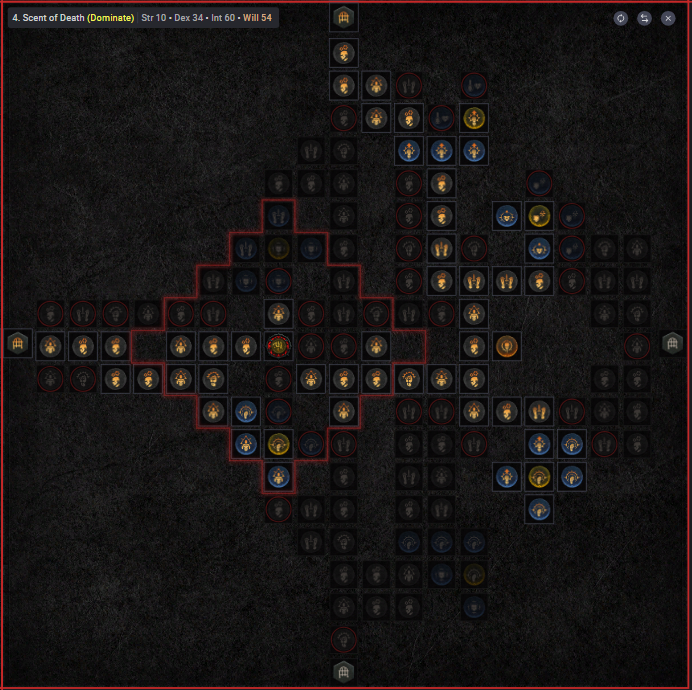
Scent of Death
This board requires 3 rotations to fit the image.
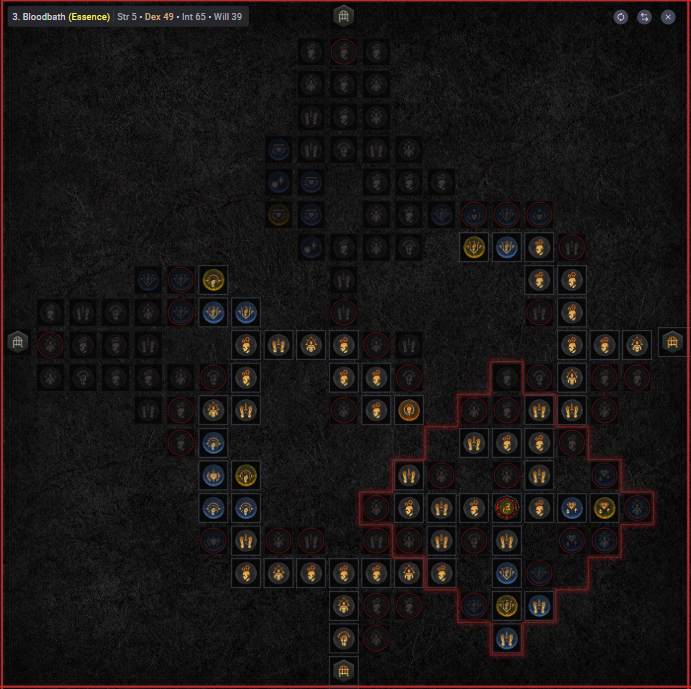
Bloodbath
3 rotations will be needed here as well.
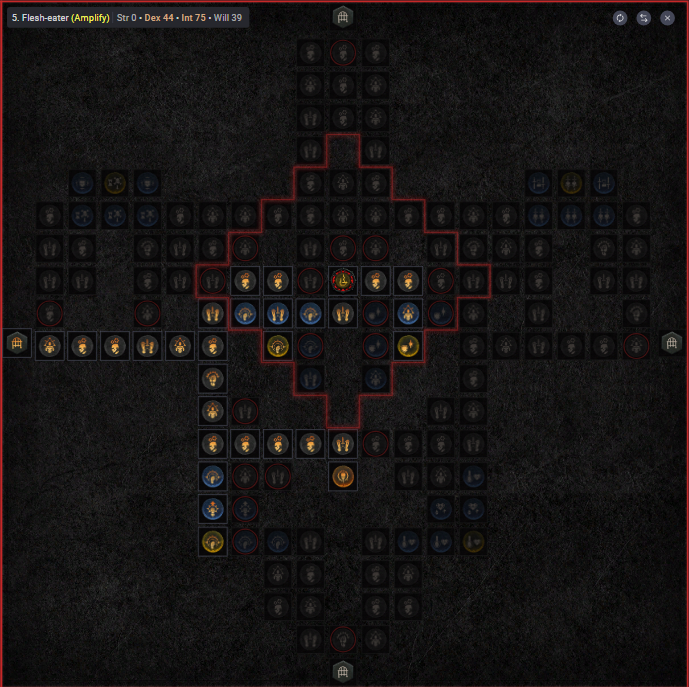
Flesh-Eater
This board also requires 3 rotations.
Paragon Board images courtesy of d4builds.gg. Click this link for the Paragon planner.
Gear, Gems, Elixirs, and Stats
The Season of Loot Reborn brings us an incredible shift in how gear and itemization are done. It is a major and will affect the game beyond Season 4’s confines. For further details, make sure to read our Tempering and Masterworking section below.
Legendary Aspects
Each aspect is listed with its matching gear slot. Do your best to keep each aspect in the assigned slot. Additionally, if you are trying to farm a specific item, we recommend using your Obols to target farm them!
| Gear Slot | Aspect Name | Legendary Aspect Power |
| Body Armor |  Aspect of the Embalmer Aspect of the Embalmer | Consuming a Corpse has a 20-30% chance to spawn a Blood Orb. |
| Gloves |  Blood-bathed Aspect Blood-bathed Aspect | Blood Surge’s nova echoes again after a short delay, dealing 30-10% less damage. |
| Boots |  Aspect of Metamorphosis Aspect of Metamorphosis | When you Evade you turn into a cloud of bats, becoming Unstoppable for 2.5 seconds. Enemies along your path take X Physical damage and are inflicted with Vampiric Curse. Evade’s Cooldown is increased by 10-5 seconds. |
| Amulet | Aspect of Rathma’s Chosen | Whenever your Blood Skills Overpower you gain 20-50% Attack Speed for 4 seconds. |
Gems
See below for a more detailed explanation of the best Gems to socket into your gear for each category.
| Weapon Gems | Armor Gems | Jewelry Gems |
|---|---|---|
For Crit Damage. | For increased Maximum Life. |
Which Elixirs Should You Use?
Visit the Alchemist and craft an Elixir providing any Resistance you need most, or the ![]() Elixir of Advantage to increase Attack Speed. Some Elixirs cannot be crafted and only drop from things like Helltides or Nightmare Dungeons. Additionally, make sure to keep your health potion upgraded!
Elixir of Advantage to increase Attack Speed. Some Elixirs cannot be crafted and only drop from things like Helltides or Nightmare Dungeons. Additionally, make sure to keep your health potion upgraded!
Stat Priority and Tempering Affixes
| Slot | Targeted Gear Affixes | Tempering Affixes |
| Body Armor | 1. Maximum Life 2. Armor 3. Intelligence | |
| Gloves | 1. Attack Speed 2. Maximum Life 3. Intelligence | |
| Boots | 1. Movement Speed 2. Maximum Life 3. Essence per Second | |
| Amulet | 1. Ranks to Tides of Blood 2. Movement Speed 3. Attack Speed |
Keep in mind that the maximum Resistance is 70% by default for each element and can be increased to 85% by various sources.
Rotation and Playstyle
The playstyle of the build is extremely straight forward, as it is with the base Blood Surge Necromancer build. Ensure enemies are cursed by ![]() Decrepify, as this will provide Cooldown Reduction, lowered enemy damage output, and significantly boost your own damage output on the enemies. After this, you will rip
Decrepify, as this will provide Cooldown Reduction, lowered enemy damage output, and significantly boost your own damage output on the enemies. After this, you will rip ![]() Blood Surge while keeping your
Blood Surge while keeping your ![]() Bone Storm up, clearing large packs of enemies while on the move. Combine this simple rotation while using your Evade action to speed through the Gauntlet.
Bone Storm up, clearing large packs of enemies while on the move. Combine this simple rotation while using your Evade action to speed through the Gauntlet.
The Unique items for this build will not only boost defensive and offensive scaling modifiers but also provides comfortable sustain for Essence and automates corpse consumption for damage boost, crowd-control and to gain a bit of Essence back. Legendary Aspect Powers such as Metamorphosis renders you Unstoppable to make it easier to avoid crowd-control situations such as freezing enemies.
Uniques and Uber Uniques
Below you will find information on Uniques and Uber Uniques that are useful for this build. Moreover, if you are interested in target farming Uber Uniques, check out our How to Farm Uber Uniques guide. For optimal performance in the Gauntlet this build has quite the list of unique items being used!
 Harlequin Crest – Huge damage reduction with massive scaling of all our abilities.
 Blood Moon Breeches – Considerable Overpower damage scaling piece.
 The Grandfather – Incredible crit scaling weapon.
 Ring of Starless Skies – Bread and butter to sustain the Essence cost of the build.
 Ring of the Sacrilegious Soul – Quality of Life and efficiency piece that automates our corpse abilities for increased speed.
Season 4: Loot Reborn
The following list details the changes in the Season 4 Update (Patch 1.4.0) that may pertain to the Summoner Necromancer build. Check the Changelog for all the other guide updates. As you can see only 1 change affected the build directly and it’s a good one!
- Minor tweaks, most of which has had no impact on this except for the possibility of reaching significantly higher HP and much more via the introduction of Mastercrafting and Tempering.
Advanced Information
Below, you will find every additional piece of information you need to know for a more in-depth look at this build.
Build Mechanics
This build is exclusively focused on the Gauntlet, this means it’s designed to have the bare minimum layer of defense to handle it with as much offensive scaling as possible on top of speed.
Compared to the base-line Blood Surge build this one packs a much higher requirement with gearing but plays the same; you curse the enemies with ![]() Decrepify then blow them up with
Decrepify then blow them up with ![]() Blood Surge! Maintaining
Blood Surge! Maintaining ![]() Bone Storm provides layers of damage reduction as well as Critical Strike Chance whilst
Bone Storm provides layers of damage reduction as well as Critical Strike Chance whilst ![]() Corpse Tendrils is designed to group enemies up, stun them, and make you deal more damage.
Corpse Tendrils is designed to group enemies up, stun them, and make you deal more damage.
Blood Surge Necromancer is an extremely straight forward and easy build to both play and grasp.
Defenses
Blood Surge itself leeches health from enemies hit, combining this with a hilariously massive amount of Health you become a literal tank fighting enemies with sticks and stones. ![]() Corpse Tendrils groups enemies up and stuns them, and is also automatically triggered by
Corpse Tendrils groups enemies up and stuns them, and is also automatically triggered by ![]() Ring of the Sacrilegious Soul to keep a consistent flow of safety and speed.
Ring of the Sacrilegious Soul to keep a consistent flow of safety and speed.
Do keep in mind that this is a Gauntlet build, Blood necromancers are naturally resilient builds and this one is deliberately made slightly less so in favor of more damage and speed as that is a preferable choice in the Gauntlet itself.
Offenses
Having a constant up-time of ![]() Bone Storm provides increased Critical Strike Chance.
Bone Storm provides increased Critical Strike Chance. ![]() Ring of the Sacrilegious Soul will keep consuming corpses and pop
Ring of the Sacrilegious Soul will keep consuming corpses and pop ![]() Corpse Tendrils even if it’s on cooldown allowing for a constant flow of grouping enemies together and stunning them making them take more damage. Thanks to the unique items the build brings to the fight making sure
Corpse Tendrils even if it’s on cooldown allowing for a constant flow of grouping enemies together and stunning them making them take more damage. Thanks to the unique items the build brings to the fight making sure ![]() Decrepify is on the enemies at all times is crucial as it scales our damage significantly.
Decrepify is on the enemies at all times is crucial as it scales our damage significantly.
Outside of the details, we are essentially going to be spamming ![]() Blood Surge which will hit the entire screen of nuke enemies out of existence.
Blood Surge which will hit the entire screen of nuke enemies out of existence.
Paragon
The table below contains the most beneficial Rare Glyphs and Legendary Nodes for the Blood Surge Necromancer in the Gauntlet, sorted in the order obtained in the final Level 100 Paragon Tree. The images that follow provide a visual of each Paragon Board setup.
| Name | Effect |
| * Grants + 150% bonus to all Magic nodes within range. * Additional Bonus (requires 40 intelligence purchased in radius range): You deal x10% increased damage while you have no active Minions. | |
| Grants + 150% bonus to all Magic nodes within range. * Additional Bonus (requires 40 intelligence purchased in radius range): You and your minions deal x10% increased Physical damage and you gain 1% Movement Speed for each active Minion. | |
| * For every 5 Willpower purchased within range, you deal + 39.45% increased Overpower damage. * Additional Bonus (requires 25 willpower purchased in radius range): When you Overpower an enemy, all damage they take from you and your Minions is increased by x12% for 5 seconds. | |
| With at least 2 Corpses Nearby, you gain 15% Damage Reduction. With no Corpses Nearby, you deal x15% increased damage. | |
| * For every 5 dexterity purchased within range, you deal + 20% increased Critical Strike Damage. * Additional Bonus (requires 25 dexterity purchased in radius range): Critical Strikes deal x22% increased damage to enemies that are not Healthy. | |
| Deal x35% increased Overpower damage. | |
| * Grants + 150% bonus to all Magic nodes within range. * Additional Bonus (requires 40 intelligence purchased within radius range): Enemies affected by a Curse Skill take x10% increased damage from you and your Minions. | |
| Consuming 5 Corpses grants x40% increased damage for 6 seconds. |
Let’s take it one step further and break down each of the beneficial nodes we spend our Paragon Points on
Starting Board
- Life is equal to damage for this build so any chance we get to pick that up on any of our boards, we will.
- Socket node rushing is crucial as you progress the build, on the starting board that means
 Sacrificial.
Blood Begets Blood
- Socket rush as expected to use the Corporeal.
- Grab the remaining Magic and Rare nodes before entering the next board.
Scent of Death
- Socket rush yet again for
 Dominate.
 - Pick up the Legendary Node
 Scent of Death.
 - Grab the remaining Magic and Rare nodes before entering the next board.
Bloodbath
- Socket rush for
 Essence.
 - Grab surrounding Magic and Rare nodes as you move to the Legendary node
 Bloodbath.
 - Pick up the remaining Magic and Rare nodes before you enter the next board.
Flesh-Eater
- Socket rush for Amplify
- Pick up surrounding Magic and Rare nodes as you move to the Legendary node
 Flesh-eater.
Obol Gambling
Obol gambling is a great way to potentially find item upgrades or items missing from your build. Check out the new tool from Icy Veins for gambling Obols in the link below:
Obol Gambling Optimization ToolChangelog
- May 31st, 2024: Guide fully updated for Season 4 Loot Reborn.
- May 13th, 2024: Prepped the guide for Season 4 Loot Reborn.
- March 9th, 2024: Guide created.
