
Arlecchino Guide and Best Builds for Genshin Impact
Arlecchino is a 5-star Pyro Polearm character in Genshin Impact. Our Arlecchino guide and build will focus on Arlecchino's best weapons, best artifacts, skills, constellations and Arlecchino's best teams.
Arlecchino Guide Introduction
Arlecchino is a 5-star Polearm character released in patch 4.6. Our Arlecchino guide will cover Ascensions, Talents, Constellations as well as some building advice.
Strengths and Weaknesses
 High hypercarry damage using her Elemental Skill with unique gameplay from managing her Bond of Life.
 - Pyro infusion persists when you swap characters.

 Can not be healed by other characters, only her Elemental Burst or Abyss Buffs.
 - Due to the lack of healing, low HP pool and barely any interruption resistance even at C1, a shielder is incredibly useful for smoother gameplay.

Hypercarry DPS Build
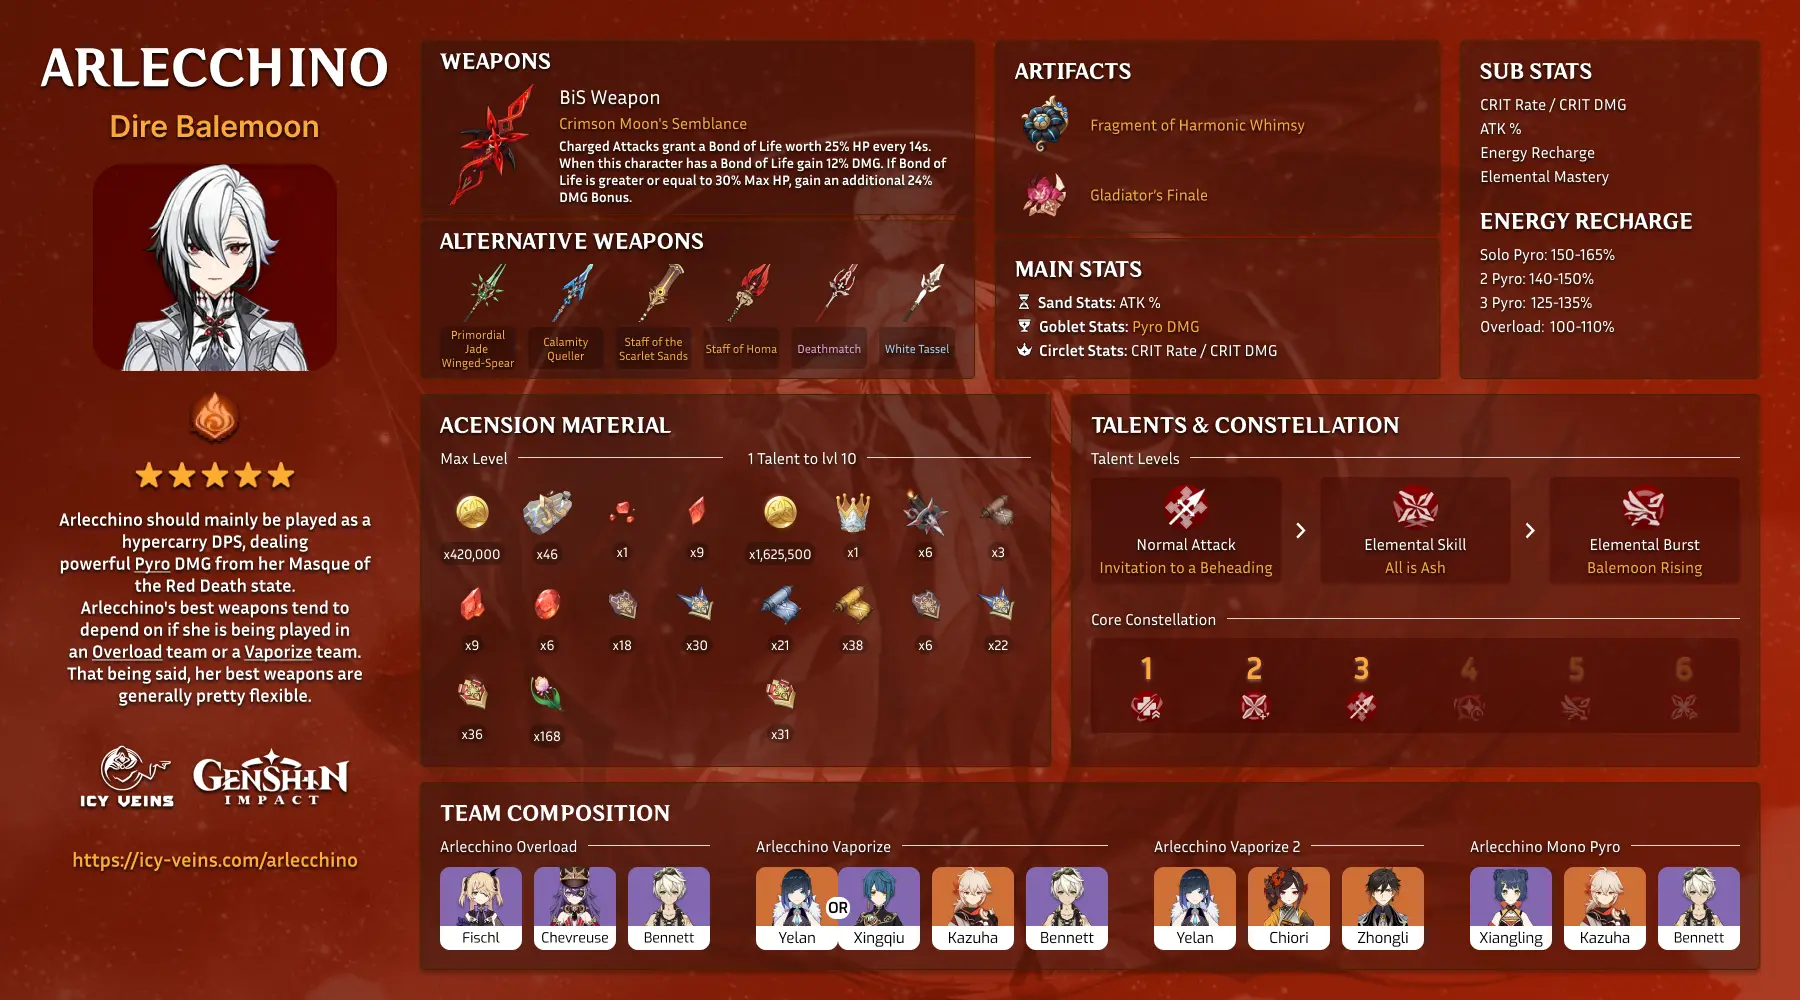
Arlecchino should mainly be played as a hypercarry DPS, dealing powerful Pyro DMG from her Masque of the Red Death state.
Arlecchino's best weapons tend to depend on if she is being played in an Overload team or a Vaporize team. That being said, her best weapons are generally pretty flexible.
| BiS Weapon | Crimson Moon's Semblance |
| Overload Weapons |
|
| Vaporize Weapons |
|
| Best Artifacts |
|
| Main Stats |
|
| Substat Priority |
|
| Talent Priority |
|
Arlecchino's best weapon is her signature weapon Crimson Moon's Semblance being tailor-made for her gameplay and kit to the point where it has a unique style specifically on her. Primordial Jade Winged-Spear is otherwise an amazing substitute, there are many other good 5-star weapon options while Deathmatch and Ballad of the Fjords are her best 4-star options.
Fragment of Harmonic Whimsy is by far Arlecchino's best artifact set. Nothing even remotely comes close. Gladiator's Finale is a good transitional set to prepare or to easily use to help make Arlecchino viable while farming for Fragment of Harmonic Whimsy pieces.
Arlecchino's Normal Attacks are her main source of damage and is therefore the most important talent to level. Consider raising it to level 10 before spending boss materials on the other talents. From there her Skill and Burst are roughly equivalent with her Skill being the more important talent because of the fact that you may not always burst every rotation.
Arlecchino's Energy Recharge Requirements
Arlecchino's Energy Recharge requirements depend on if she is played with other Pyro characters, if she has her C4 You Shall Love and Protect Each Other Henceforth... and if any characters are using Favonius weapons.
Additionally, because Arlecchino's Elemental Burst Balemoon Rising is primarily used for healing, if you do not need the healing you should not use her Burst as it is a DPS loss. This can drastically lower the Energy that you realistically need. Because she is a Hypercarry, there will often be a support on her team that should be using a Favonius weapon.
You can subtract roughly 35-40% Energy Recharge for C4 and 10-15% for any character using a Favonius Weapon.
| Situation | Energy Recharge |
|---|---|
| Solo Pyro | 150-165% |
| 2 Pyro | 140-150% |
| 3 Pyro | 125-135% |
| Overload | 100-110% |
Arlecchino Combos and Bond of Life Explained
Arlecchino's gameplay kit primarily revolves around "Bond of Life" which was introduced with Fontaine's release. Bond of Life essentially prevents healing with the Bond absorbing any healing received until enough HP has been cleared. Once the Bond of Life has been cleared, a character will obtain benefits depending on what caused the Bond to be applied.
Arlecchino however uses the Bond of Life differently, instead having it more as a stacking buff. The higher the value of the Bond of Life, the more damage dealt by her Normal Attacks as well as healing provided by her Elemental Burst.
Both Arlecchino's Normal Attacks and Elemental Burst will consume Bond of Life with Normal Attacks consuming a small amount with each attack and the Burst consuming the entire thing when healing.
To generate Bond of Life, you need to utilise her Elemental Skill All Is Ash. This marks opponents with Blood-Debt Directive and then grants Bond of Life if you defeat the marked enemy or if you hit them with a Charged Attack. Additionally, her Signature Weapon Crimson Moon's Semblance also generates Bond of Life when Charged Attacks hit opponents.
Arlecchino's Attack Combos and Rotation
Listed below is the following rotation. If your Arlecchino is C6, you would instead start with Skill > Burst > Skill so that you gain the additional CRIT DMG and CRIT Rate on your burst which now does a lot more damage.
- All Is Ash
- Switch to and setup supports
- Charged Attack
- Normal Attack: Invitation to a Beheading Combos
- All Is Ash
- Balemoon Rising
- Repeat
There are various Normal Attack combos which can be used. Generally amounting to 15 or 16 Normal Attacks. The most important thing to know is that the sixth Normal Attack is very slow and therefore you can often dash cancel after the fifth Attack. Normal Attack combos do depend on what works best for your specific team however. 3 N5D and 4 N4D are common combos.
Arlecchino's Best Team Comps
Arlecchino has a range of teams primarily involving the Overload and Vaporize reactions but can also be played effectively in Mono Pyro teams.
Due to Arlecchino's Ascension Passive The Balemoon Alone May Know, Arlecchino cannot be healed during combat and instead heals herself. This makes a shielder more preferable or a healer with DMG buffing utility who only heals the other party members.
Bennett is in theory an incredibly powerful support for Arlecchino due to the attack buffs he provides. This does mean however that you have to restrict your gameplay to the buff circle which can result in more difficult gameplay, no interruption resistance if Bennett is used instead of a shielder and DPS losses when you leave the AoE as a result of mobile enemies, Overload knockback or enemy knockback.
Arlecchino Overload Teams
| Main DPS | Sub DPS | Support | Support |
|---|---|---|---|
| Arlecchino | Fischl | Chevreuse | Bennett |
| Arlecchino | Fischl | Chevreuse |
The first team involving Bennett should be Arlecchino's best overload team assuming you can reliably maintain Bennett's buff. This can be difficult depending on the enemy that you are facing. Some good Pyro alternatives are Thoma and Dehya both of which do not interfere much with Elemental Reactions while Thoma brings shielding and Dehya brings interruption RES. Beidou however is a powerful Electro shielder alternative.
In this team Fischl helps by bringing amazing Electro application and acts as a battery while Chevreuse brings powerful Electro and Pyro buffs.
Arlecchino Vaporize Teams
| Main DPS | Sub DPS | Support | Support |
|---|---|---|---|
| Arlecchino | Yelan | Bennett | |
| Arlecchino | Zhongli | Bennett | |
| Main DPS | Sub DPS | Sub DPS | Support |
| Arlecchino | Yelan | Xingqiu | Bennett |
| Arlecchino | Yelan | Chiori | Zhongli |
In Vaporize teams, Yelan is Arlecchino's best teammate with her incredible Hydro application. Xingqiu is also another great Hydro option while also being able to provide some DMG reduction.
Zhongli is best used when paired with Chiori due to the amazing synergy they have, but Zhongli can otherwise just be used with Bennett so that you can have both shielding and Bennett's DMG buffs.
Arlecchino Mono Pyro Teams
| Main DPS | Sub DPS | Support | Support |
|---|---|---|---|
| Arlecchino | Xiangling | Bennett |
While Mono Pyro teams are best used with Lyney, you can still deal great damage. Xiangling is able to deal great off-field Pyro DMG while Bennett buffs the team and Kaedehara Kazuha helps to lower the enemies Pyro RES or Zhongli instead provides universal RES Shred and more survivability.
Leaked Arlecchino's Ascensions, Talents and Constellations
Arlecchino's Ascension Passives and Materials
| Unlock | Ascension Passive | Explanation |
|---|---|---|
| With Character | The Balemoon Alone May Know | While in combat, Arlecchino gains a 40% Pyro DMG Bonus and can only be healed through Balemoon Rising. |
| 1st Ascension | Agony Alone May Be Repaid | Blood-Debt Directives have the following characteristics:
A Bond of Life created in the aforementioned ways cannot exceed the original limit on the value of Bonds of Life obtained through All Is Ash. |
| 4th Ascension | Strength Alone Can Defend | Arlecchino gains 1% All Elemental and Physical RES for every 100 ATK she has in excess of 1,000. The maximum RES increase she can gain this way for each is 20%. |
Arlecchino requires a range of materials to ascend to the 6th ascension. Starting from the second ascension she gains CRIT DMG as she levels, giving a total of 38.4% Bonus CRIT DMG at the final ascension. The total cost to upgrade all ascensions is:
| Source | Quantity |
|---|---|
| Mora | 420,000 Mora |
| Boss Material | 46x Fragment of a Golden Melody |
| Ascension Material | |
| Local Specialty | 168x Rainbow Rose |
| Enhancement Material |
|
Arlecchino's Talents
Listed below is each talent alongside the talents explanation of how they work.
| Type | Talent Name | Skill Explanation |
|---|---|---|
| Normal | Normal Attack: Invitation to a Beheading |
Normal Attack Performs a maximum of 6 consecutive strikes. Charged Attack Consumes a fixed amount of Stamina, dashing toward a nearby opponent and cleaving once. Continuously holding this button will cause Arlecchino to consume Stamina to engage in up to 5s of high-speed movement. Plunging Attack Plunges from mid-air to strike the ground below, damaging opponents along the path and dealing AoE DMG upon impact. Masque of the Red Death When Arlecchino has a Bond of Life equal to or greater than 30% of her Max HP, she will enter the "Masque of the Red Death" state, where her Normal, Charged, and Plunging Attacks will be converted to deal Pyro DMG. This cannot be overridden. When in the "Masque of the Red Death" state, Arlecchino's Normal Attacks will deal extra DMG to opponents on hit that scales off her ATK multiplied by a certain ratio of her current Bond of Life percentage. This will consume 7.5% of said current Bond of Life. Her Bond of Life can be consumed this way every 0.03s. When her Bond of Life is consumed in this manner, All is Ash's CD will decrease by 0.8s. |
| Elemental Skill | All Is Ash |
Summons forth Balemoon Bloodfire, dealing Pyro DMG to multiple nearby opponents and performing a dash-cleave against one of them, dealing AoE Pyro DMG. Opponents hit by the aforementioned attack will have a Blood-Debt Directive applied to them. Blood-Debt Directive
|
| Elemental Burst | Balemoon Rising | Arlecchino's great wing of Balemoon Bloodfire beats as she absorbs and clears Blood-Debt Directives around her. She deals AoE Pyro DMG before clearing the CD of All Is Ash and healing herself. The healing is based on her Bond of Life value and ATK. |
To upgrade Arlecchino's talents, it costs:
| Source | One Talent to Lv10 | 10/10/10 |
|---|---|---|
| Mora | 1,625,500 Mora | 4,876,500 Mora |
| Special Material | 1x Crown of Insight | 3x Crown of Insight |
| Boss Material | 6x Fading Candle | 18x Fading Candle |
| Domain Material |
|
|
| Enhancement Material |
|
|
Arlecchino's Constellations
Arlecchino has some really good early constellations with All Reprisals and Arrears, Mine to Bear... (C1), All Rewards and Retribution, Mine to Bestow... (C2) and You Shall Become a New Member of Our Family... (C3) providing huge damage boosts.
I would recommend C2 and C3 as a good stopping points unless you plan to aim for C6. C2 is a great Constellation for players who want to have more team flexibility due to the additional 20% RES while C3 is a significant damage boost to her Normal Attacks.
| # | Name | Explanation |
|---|---|---|
| C1 | All Reprisals and Arrears, Mine to Bear... | Masque of the Red Death is further enhanced, the value of the increase is 100%. Additionally, Arlecchino's interruption resistance is increased when she performs Normal Attacks while affected by the Masque of the Red Death. |
| C2 | All Reprisals and Arrears, Mine to Bear... |
Blood-Debt Directives are now already Blood-Debt Due when first applied. When Arlecchino absorbs such a Due, she unleashes Balemoon Bloodfire in front of her, dealing 900% of her ATK as AoE Pyro DMG and increasing her All Elemental RES and Physical RES by 20% for 15s. This effect can trigger once every 10s. |
| C3 | You Shall Become a New Member of Our Family... |
|
| C4 | You Shall Love and Protect Each Other Henceforth... |
When Arlecchino successfully absorbs a Blood-Debt Directive, Balemoon Rising's CD will decrease by 2s and 15 Energy will be restored to her. This effect can occur once every 10s." |
| C5 | For Alone, We Are as Good as Dead... |
|
| C6 | From This Day On, We Shall Delight in New Life Together... |
The DMG of Balemoon Rising is increased by Arlecchino's ATK multiplied by 700% of Arlecchino's current Life Bond percentage. For 20s after Arlecchino uses All Is Ash, both her Normal Attacks and Elemental Burst gain 10% increased CRIT Rate and 70% increased CRIT DMG. This effect can be triggered up to once every 15s. |
Changelog
- 22 Apr. 2024: Full release version with tags and tier added.
- 09 Apr. 2024: Updated following the final beta changes to provide more detailed advice.
- 01 Apr. 2024: Updated for new beta changes.
- 25 Mar. 2024: Guide updated to support new beta changes.
- 21 Mar. 2024: Tentative Information Added.