Build Introduction
The first build to finish Tier 100 Nightmare Dungeons in the game just got better! This build guide will take you through the optimized version of the Exploding Shadow Mist Necromancer, also known as “Infinimist” or “Shadowblight Stacker”.
Keep in mind that this build is gear-sensitive to function properly. This build requires the ![]() X’Fal’s Corroded Signet to get proper single-target damage output and a combination of Cooldown Reduction modifiers on your gear, together with % Increased Lucky Hit Chance!
X’Fal’s Corroded Signet to get proper single-target damage output and a combination of Cooldown Reduction modifiers on your gear, together with % Increased Lucky Hit Chance!
Playing the build without the Unique ring is theoretically possible, but it will make you have significantly less single-target damage output. If you lack this ring or the modifiers on gear listed in this guide the recommendation is to use any of the previous versions of this build till you have the proper items!
This build is a variant of both, the  Sever and
  Blight Shadowmancer Necromancer:
Have questions or feedback on this guide? Join the livestream and ask me!
Strengths and Weaknesses
- Incredibly safe
- Capable of Tier 100 Nightmare Dungeons
- High ceiling of upgrades
- Ramp-up Damage that requires a few seconds before bosses melt
- Relies on Lucky Hit & Cooldown Reduction to function properly
- Requires unique items to be played properly
To see how this build compares to the other builds on our site, you can check out our build tier lists.
Build Requirements
This build requires ![]() X’Fal’s Corroded Signet to deal proper single-target damage, without this unique it will feel a bit lackluster against bosses.
X’Fal’s Corroded Signet to deal proper single-target damage, without this unique it will feel a bit lackluster against bosses.
Skill Bar and Skill Tree Points
Follow the points allocated in the Skill Tree above for the complete 58-point build. The additional 10 skill points are completed using the Renown system.
Book of the Dead
Since we are focusing entirely on dealing brutal damage with our shadow skills, we have no interest in bothering with using our minions, so they will all be sacrificed in the name of Lilith.
- Melee Skeletons: Reapers; these are sacrificed for a great amount of extra Shadow damage dealt.
- Mage Skeletons: Cold Mages; this provides increased damage against Vulnerable targets.
- Golem: Iron; this gives us more damage output.
Paragon Board
The Paragon progression system unlocks at level 50 and provides a vast amount of character power. On the Paragon Board, bonuses range from minor stats on Magic Nodes to more powerful Rare Glyphs and Legendary Nodes.
As you path towards Glyph Sockets and Legendary Nodes, you should prioritize Damage, Intelligence, Resistance, and Life for Normal and Magic Nodes. Glyph radius increases as you level them up. Therefore, if you cannot fulfill Additional Bonus requirements early on, skip allocating extra nodes for now. It’s also important to point out that you might not have the Glyph you want when you reach your first socket; if that’s the case, simply slot in any Glyph providing any beneficial stats for you until you get the correct one.
Listed below are images of the pathing you should take along with the locations of the Glyphs and order you should choose your Paragon Boards past the initial Starting Board. Also, note that the Glyph radius is based on level 21 Glyphs.
1. Starting Board
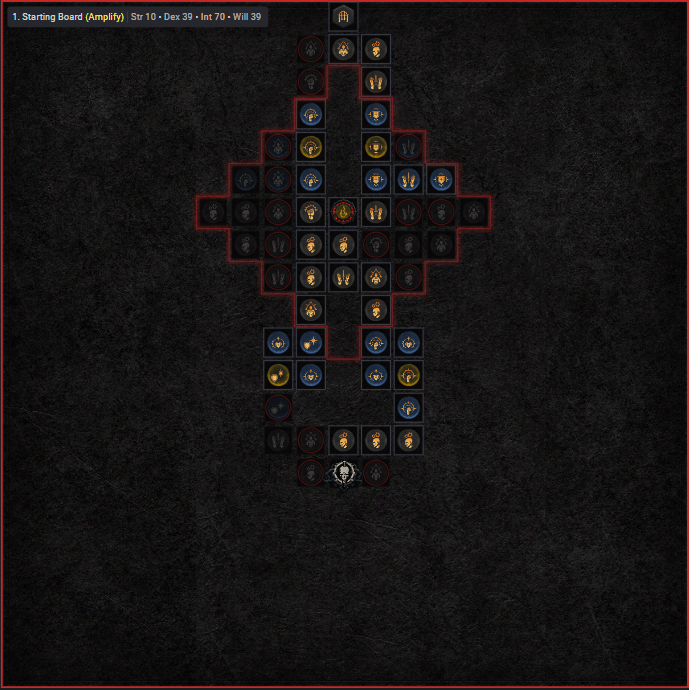
The Starting Board is very straight-forward: You’ll want to focus on picking up the Rare nodes and only taking the extra pathing to fulfill the desired attributes required to benefit from the Additional Bonus modifier of the  Amplify Glyph when it’s high enough level to achieve that. Any extra attribute nodes should be ignored unless they serve the purpose of that.
2. Wither
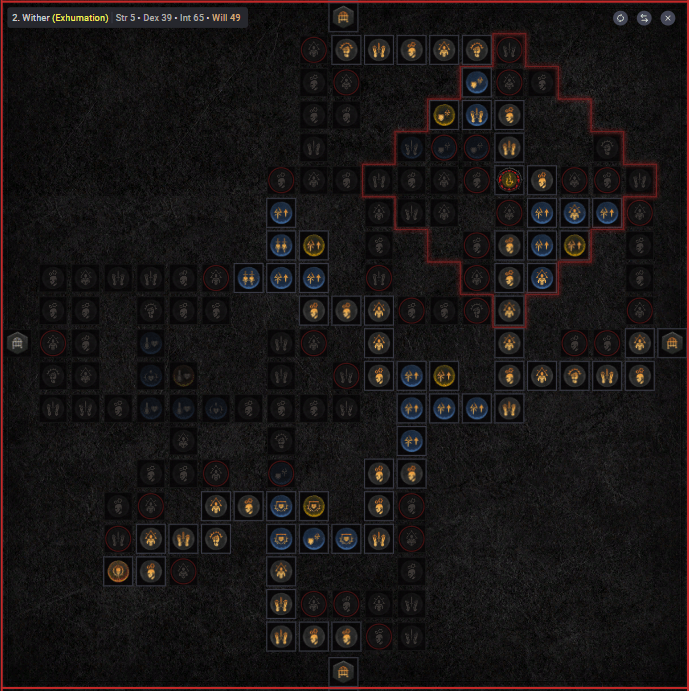
Make sure to rotate Wither to fit the image above. The first thing we’ll want to do here is grab the Wither Legendary Node then rush the socket and put in the Exhumation Glyph. Similar to our Starting Board, we’ll only take the extra attributes if they are within radius, and can fulfill the Additional Bonus requirement of the Glyph. After this, we will ignore the north exit till later and focus on heading out on the right-hand side to Flesh-Eater.
3. Flesh-Eater
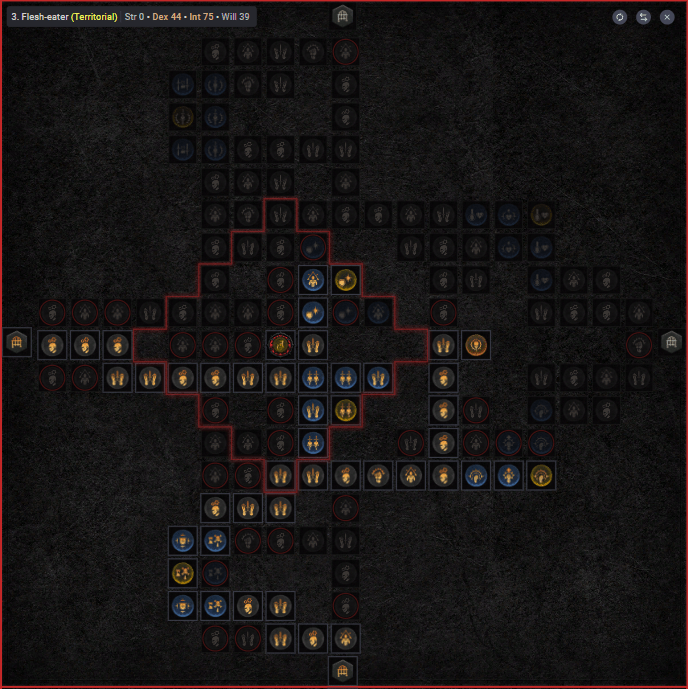
For Flesh-Eater we want to rush the Legendary Node. You will head towards the socket on your way to the node and use the  Territorial Glyph. Same story as always: don’t take the extra attributes unless the Glyph level is high enough to cover the required attributes within range! Next up we skip the Rare and Magic Nodes on the right side and instead save them for our last Paragon Points, as it is more important to head down south and connect Scent of Death.
4. Scent of Death
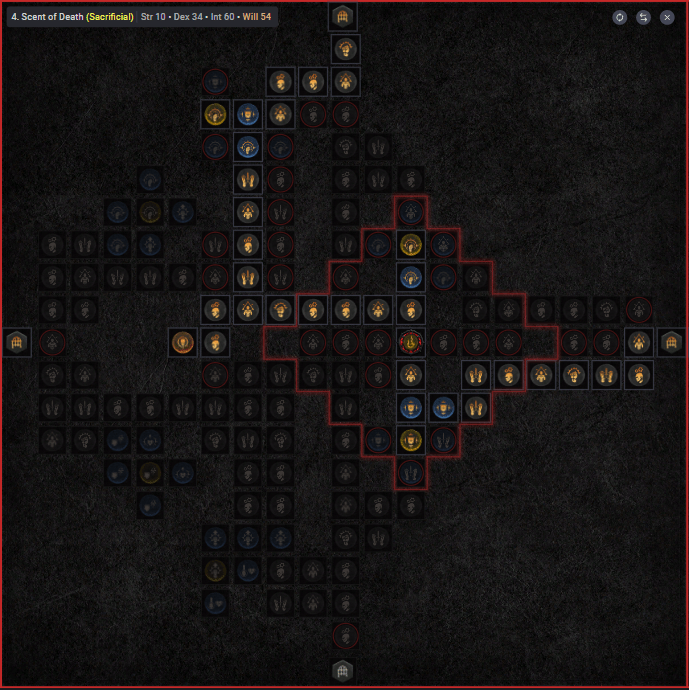
Scent of Death is just as straight-forward as our previous boards. We will first want to rush the Legendary Node, then grab the socket and put in a  Sacrificial Glyph and, as per usual, only take the extra attributes if the Glyph level allows for it within its radius. Once this is completed, we will head back to Wither, as we want to head out north from that one and connect Cult Leader.
5. Cult Leader
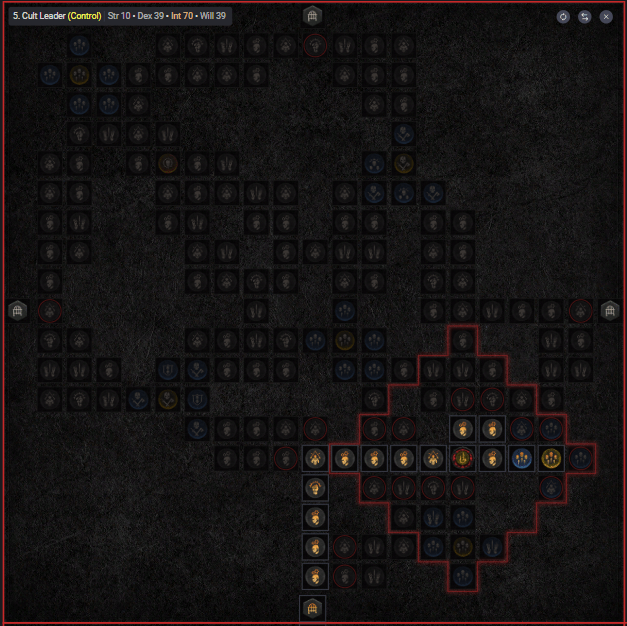
Cult Leader is here to serve but one purpose: another Glyph. So we will therefor rush the socket and use the  Control Glyph and grab the surrounding nodes required to enable the bonus modifier from the Glyph itself. Once done we’ll head back to our Flesh-Eater Board as we are now heading out on the right side from that board.
6. Bloodbath
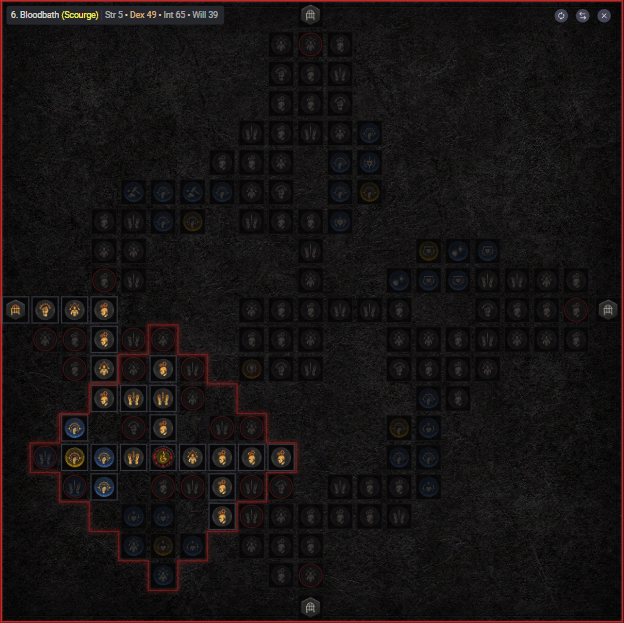
Our final board is the Bloodbath Board. Similar to our previous board in this guide we are strictly here to make use of yet another Glyph to further scale our damage efficiency. We’ll rush the socket in which we use the  Scourge Glyph and as per usual; grab any required attributes within range if the level of the Glyph allows for it to be done within the radius. After this, you’ll simply fill out any extra nodes you’ve skipped in any of the previous boards as you progress to Level 100. Happy hunting!
Paragon board images courtesy of d4builds.gg.
For an in-depth analysis of each board and our particular node choices, please see the detailed Paragon section here.
Gear, Gems, Elixirs, and Stats
The Season of Loot Reborn brings us an incredible shift in how gear and itemization are done. It is a major and will affect the game beyond Season 4’s confines. For further details, make sure to read our Tempering and Masterworking section below.
Legendary Aspects
Each aspect is listed with its matching gear slot. Do your best to keep each aspect in the assigned slot. Additionally, if you are trying to farm a specific item, we recommend using your Obols to target farm them!
| Gear Slot | Gems | Aspect / Unique | Legendary Aspect / Unique Power |
|---|---|---|---|
| Helm |  Aspect of Shielding Storm Aspect of Shielding Storm | Each time that Bone Storm damages an enemy, gain a Barrier equal to 2-5% of your Base Life for 10 seconds. | |
| Chest |  Aspect of Hardened Bones Aspect of Hardened Bones | You and your Minions gain 15-20% increased Damage Reduction. | |
| Gloves | N/A |  Aspect of Grasping Veins Aspect of Grasping Veins | Gain 10-20% increased Critical Strike Chance for 6 seconds when you cast Corpse Tendrils. You deal 20-40% bonus Critical Strike Damage to enemies damaged by Corpse Tendrils. |
| Pants |  Aspect of Explosive Mist Aspect of Explosive Mist | Blood Mist triggers Corpse Explosion on surrounding corpses. When Blood mist detonates a corpse, its cooldown is reduced by 0.1-0.6 seconds. | |
| Boots | N/A |  Ghostwalker Aspect Ghostwalker Aspect | While Unstoppable and for 4 seconds after, you gain 10-25% increased Movement Speed and can move freely through enemies. |
| Weapon 1H |  Blighted Aspect Blighted Aspect | You deal 60-120% increased damage for 6 seconds after the Shadowblight Key Passive damages enemies 10 times. | |
| Off-hand |  Blood-soaked Aspect Blood-soaked Aspect | Blood Mist leaves a trail of Desecrated Ground that lasts for 4 seconds and deals x Shadow damage per second. Gain 20% Movement Speed while Blood Mist is active. | |
| Amulet (50% Scaling) | Any Resistance Gem |  Aspect of the Damned Aspect of the Damned | You deal x% increased Shadow damage to enemies afflicted by any Curse. |
| Any Resistance Gem | Unique | Lucky Hit: Your damage over time effects have up to a 50% chance to erupt, dealing X damage of the same type to surrounding enemies. | |
| Ring | Any Resistance Gem |  Aspect of Ultimate Shadow Aspect of Ultimate Shadow | Bone Storm is also a Darkness skill dealing X Shadow damage over time. |
Gems
See below for a more detailed explanation of the best Gems to socket into your gear for each category.
| Weapon Gems | Armor Gems | Jewelry Gems |
|---|---|---|
For Crit Damage. | For increased Maximum Life. |
Which Elixirs Should You Use?
Visit the Alchemist and craft an Elixir providing any Resistance you need most, or the ![]() Elixir of Advantage to increase Attack Speed. Some Elixirs cannot be crafted and only drop from things like Helltides or Nightmare Dungeons. Additionally, make sure to keep your health potion upgraded!
Elixir of Advantage to increase Attack Speed. Some Elixirs cannot be crafted and only drop from things like Helltides or Nightmare Dungeons. Additionally, make sure to keep your health potion upgraded!
Stat Priority and Tempering Affixes
Below are the affixes to prioritize on gear. Each line of affixes is listed in order of importance. Tempering Manuals and their recommended affixes are provided in the second column, and the bolded affixes are the most important targets for Masterworking upgrades. To masterwork, you will need rare materials that only drop from The Pit. Be sure to check our Tempering guide, our Masterworking guide, as well as our guide about The Pit for more details about these topics.
| Slot | Targeted Gear Affixes | Tempering Affixes |
|---|---|---|
| Helm | 1. Lucky Hit Chance 2. Cooldown Reduction 3. Ranks to Crippling Darkness | |
| Chest | 1. Ranks to Blood Mist 2. Armor 3. Maximum Life | |
| Gloves | 1. Lucky Hit Chance 2. Critical Strike Chance 3. Intelligence | |
| Pants | 1. Maximum Life 2. Armor 3. Intelligence | |
| Boots | 1. Movement Speed 2. Maximum Life 3. Intelligence | |
| Amulet | 1. Ranks to Gloom 2. Ranks to Terror 3. Critical Strike Chance | |
| Rings | 1. Lucky Hit Chance 2. Critical Strike Chance 3. Lucky Hit: Up to X% chance to make enemies vulnerable for 2 seconds. | |
| 1H-Weapon | 1. Critical Strike Damage 2. Intelligence 3. Maximum Life | |
| Off-hand | 1. Lucky Hit Chance 2. Critical Strike Chance 3. Cooldown Reduction |
Keep in mind that the maximum Resistance is 70% by default for each element and can be increased to 85% by various sources.
Rotation and Playstyle
The main focus is to make sure you have as much damage over time effects on the target(s) as possible. Essentially you’ll want to cast ![]() Blight,
Blight, ![]() Corpse Tendrils,
Corpse Tendrils, ![]() Corpse Explosion and keep your
Corpse Explosion and keep your ![]() Bone Storm active before you jump in to
Bone Storm active before you jump in to ![]() Blood Mist. However, thanks to your legendary aspect powers you will provide Corpse Explosions via your Blood Mist so if you ever need to get out of harm’s way or feel like you’re getting swarmed, you should always skip applying your skills and just jump into Blood Mist. All this AFTER you’ve applied
Blood Mist. However, thanks to your legendary aspect powers you will provide Corpse Explosions via your Blood Mist so if you ever need to get out of harm’s way or feel like you’re getting swarmed, you should always skip applying your skills and just jump into Blood Mist. All this AFTER you’ve applied ![]() Decrepify, making sure the enemies are cursed is fundamental for this builds functionality!
Decrepify, making sure the enemies are cursed is fundamental for this builds functionality!
Make sure to check out the advanced Build Mechanics section for a more in-depth description of how the build works, what synergies exist, and what to look out for.
Uniques and Uber Uniques
Below you will find information on Uniques and Uber Uniques that are useful for this build. Moreover, if you are interested in target farming Uber Uniques, check out our How to Farm Uber Uniques guide.
Uniques
Listed below are the recommended and optional Unique Items for this build. This build thrives of the legendary aspect powers so we would prefer not to involve any uniques to have the build function the best. This doesn’t mean you can’t play around with some changes and test it out yourself though!
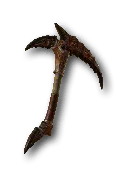 Black River is a solid choice for more consistent DoT play at the cost of high burst damage outputs as you’ll rather focus on pure damage output over critical strikes using this weapon. It’s ok to use but not something we recommend.
 Harlequin Crest will be a great asset to the build but will replace one of your defensive aspects to fit, make sure you feel comfortable with the defensive layers the build provides before equipping this.
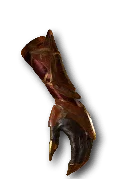 Howl from Below is a fun pair of gloves, making your corpse explosions stand up and move to the enemies before exploding! Once you have crit scaling on your character, this is not to be recommended, but before that, these gloves are a great asset!
Season 4: Loot Reborn
The following list details the changes in the Season 4 Update (Patch 1.4.0) that may pertain to the Summoner Necromancer build. Check the Changelog for all the other guide updates. As you can see, only 1 change affected the build directly, and it’s a good one!
- Blood Mist movement speed reduction is now removed.
Video Guide
Advanced Information
Below, you will find every additional piece of information you need to know for a more in-depth look at this build.
Build Mechanics
The build focuses entirely on creating multiple hits with damage over time effects relying on Lucky Hits to create bursts of damage via both the Shadowblight Key Passive node and the unique ring ![]() X’Fal’s Corroded Signet. Having enemies cursed allows for a crazy amount of cooldown reduction via the
X’Fal’s Corroded Signet. Having enemies cursed allows for a crazy amount of cooldown reduction via the ![]() Abhorrent Decrepify node, this is how we make the build essentially stay in
Abhorrent Decrepify node, this is how we make the build essentially stay in ![]() Blood Mist form for the majority of the time playing the build.
Blood Mist form for the majority of the time playing the build.
The Blood Mist will trigger ![]() Corpse Explosion and when you are not required to use Blood Mist you can cast
Corpse Explosion and when you are not required to use Blood Mist you can cast ![]() Corpse Tendrils and
Corpse Tendrils and ![]() Blight for even more damage output.
Blight for even more damage output.
Defenses
Making sure your resistances are capped and high damage reduction on top of armor via your gear and legendary aspects this build thrives on doing tons of lucky hits lowering the cooldown of your abilities. This allows you to stay inside ![]() Blood Mist form almost all the time which makes you literally immortal.
Blood Mist form almost all the time which makes you literally immortal.
Offenses
Ramping up Shadow damage with consistent hits is the name of the game. The ![]() Shadowblight Key Passive and the unique ring
Shadowblight Key Passive and the unique ring ![]() X’Fal’s Corroded Signet are our main sources of damage triggered by all our damage over time sources we throw on the enemies!
X’Fal’s Corroded Signet are our main sources of damage triggered by all our damage over time sources we throw on the enemies!
Paragon
The recommended Paragon boards for this build are listed above, and further down below, you can find a more thorough route for allocating the Paragon points, as well as some notes on why specific nodes were chosen and why they are essential for this build.
| Glyphs & Legendary Nodes | Effect |
|---|---|
| – Grants +150% bonus to all Magic Nodes within range. – Additional Bonus is unlocked with 40 intelligence in radius making enemies affected by your Curses take an additional x10% increased damage from you and your minions. | |
| – For every 5 Intelligence purchased within range, your Corpse skills deal x% increased damage. – Additional Bonus is unlocked with 40 intelligence in radius, consuming a corpse fortifies you for 4% of your maximum life and grants 4% damage reduction for 4 seconds. | |
| – For every 5 Dexterity purchased within range, you deal 10% increased damage to Close targets. – Additional Bonus is unlocked with 25 Dexterity in radius, you gain 15% damage reduction against Close targets. | |
| – Grants +150% bonus to all Magic nodes within range. – Additional Bonus is unlocked with 40 Intelligence in radius, you deal x10% increased damage while you have no active minions. | |
| – For every 5 Intelligence purchased within range, you deal 10% increased damage to Crowd Controlled Targets. – Additional Bonus is unlocked with 40 Intelligence in radius making you and minions deal x20% increased damage to Crowd Controlled targets. | |
| – For every 5 Intelligence purchased within range, you deal x% increased Shadow damage over time. – Additional Bonus is unlocked with 40 Intelligence in radius, you and your minions deal x10% increased damage to enemies affected by Shadow damage over time effects. | |
| Your Shadow damage over time effects have x5% chance to deal x50% bonus damage each time they deal damage. This chance is increased by x1% and bonus damage is increased by x4% for each 60 Intelligence you have. | |
| Consuming 5 Corpses grants x40% increased damage for 6 seconds. | |
| With at least 2 Corpses Nearby, you gain 15% Damage Reduction. With no Corpses Nearby, you deal x15% increased damage. |
Let’s take it one step further and break down each of the beneficial nodes we spend our Paragon Points on:
Starting Board
 Amplify We mainly grab this Glyph for the additional bonus effect which is easy to unlock on the starting board.
Wither
 Exhumation is yet again a Glyph chosen for the ease of access to unlock the bonus modifier, in the higher levels you’ll want to pick up the remaining attributes in range to further scale this Glyph!
 Wither This legendary node is the name of the game for the build to further scale our damage output.
Flesh-Eater
 Territorial Glyph makes perfect sense as we are more often than not close to our enemies, on the Flesh-Eater board it’s very easy to enable the bonus modifier as well.
 Flesh-eater Considering how many corpses this build is consuming on a regular basis this node is a logical choice!
Scent of Death
 Sacrificial Glyph provides increased power from our Magic nodes in radius but we are mainly taking this glyph on the board for the bonus modifier.
 Scent of Death is similar to our previous board with the idea of corpse consuming, we are always going to be near a corpse making this a solid legendary node to grab.
Cult Leader
 Control Similar to previous boards we are running through our paragon board to chase bonus modifiers from all our glyphs.
Bloodbath
 Scourge Yet another glyph mainly taken for the bonus modifier.
Obol Gambling
Obol gambling is a great way to potentially find item upgrades or items missing from your build. Check out the new tool from Icy Veins for gambling Obols in the link below:
Obol Gambling Optimization ToolChangelog
- May 16th, 2024: Gem updates.
- May 10th, 2024: Guide updated for Season 4 Loot Reborn.
- January 22nd, 2024: Guide updated for Season 3 Season of the Construct.
- October 28th, 2023: Big rework of both skill-tree, gear and paragon board to optimize performance.
- October 21st, 2023: Updated Paragon Boards.
- October 15th, 2023: Guide updated for Season 2 Season of Blood, Patch 1.2.
- August 7th, 2023: Guide updated for Patch 1.1.1.
- August 3rd, 2023: Updated Season 1 Heart list for better performance.
- July 19th, 2023: Guide updated for Season 1 including Malignant Hearts.
