


This build is not being updated, as it is no longer viable. Please take a look at the other Rogue builds on Icy Veins.
Build Introduction
The  Poison Trap Rogue build melts foes into a puddle of goo. This is your guide to building a character for endgame activities in Diablo 4, with the optimal setup for Skills, gear and Paragon points.
Poison Trap deals high Damage Over Time (DoT) over a large Area of Effect (AoE), but it has a disadvantage of having a cooldown. Even with heavy investment into Poison Trap,  Rapid Fire is needed to supplement more single target damage. Currently, it is better to fully invest into a Core Skill, and use traps as a utility instead of a main source of damage.
If you still want to fulfill a trapper fantasy, then continue with our Poison Trap Rogue! Alternatively, check out our Dual Core Flurry Rapid Fire Rogue for the fastest speed farming build.
The only starting requirement for this endgame build guide is a character around Level 50 in World Tier 3. Check our Rogue Leveling Guide if you need help getting there.
Strengths and Weaknesses
- Large Area of Effect with traps
- High single-target damage with Rapid Fire
- Satisfying rotation-based trap setup
- Bosses can move out of trap setup
- Hybrid build reduces overall damage
- Complex rotation playstyle
To see how this build compares to the other builds on our site, you can check out our build tier lists.
Season of the Construct
Season 3 Patch Updates
The following list details the changes in the Season 3 Update (Patch 1.3.0) that may pertain to Poison Trap Rogues. Check the Changelog for all the other guide updates.
 Close Quarters Combat
 - Amount of Damage vs Crowd Controlled bonus conversion percent reduced from 40% to 10%.
- Attack Speed per stack increased from 10% to 15%.
 Aspect of the Expectant: Damage bonus now has a 5-second duration to be used.
Seneschal Construct Companion Powers
The Season 3 theme introduces a Seneschal Construct Companion that can deal damage or provide support to complement your character. Equip the Seneschal with two Governing Stones to activate their abilities, and then link them to three Tuning Stones each to augment the abilities. There are 12 different Governing Stones and 27 different Tuning Stones that can be found in Vaults scattered across Sanctuary. Fuse together duplicate stones to level them up, increasing the potency of Governing Stones or adding augments to Tuning Stones.
Listed below is the best Seneschal Construct Companion setup for Poison Trap Rogues. The first 2 Governing Stone setups are equipped for the construct to support the player. The 3rd setup is equipped for the construct to deal high damage on its own. Although only 3 Tuning Stones can be linked to each Governing Stone, alternative options are provided and sorted in order of importance.
- Flash of Adrenaline: Administers a quick flash of adrenaline into the player, granting bonus damage for a duration.
- Genesis: Increase the effectiveness of the supported Skill.
- Tactical Support: Decrease the cooldown of the supported Skill.
- Duration Support: Supported Skills have their durations increased.
- Fortify Support: When the Seneschal Construct uses the supported Skill, you gain Fortify. Skills with slower attack speeds or skills with cooldowns will increase the amount of Fortify granted.
- Tempest: Electrically charge an enemy causing it to deal damage to themselves and additional enemies each second over time. If the enemy is killed, Tempest spreads to another enemy gaining additional time and bonus damage. These bonuses are also applied if Tempest is reapplied onto the same enemy. — This attack setup is used for a supportive construct, buffing the player to deal more damage.
- Evernight: The supported Skill grants you +4 to all Skills when used.
- Resource Support: Player gains an amount of Primary Resource when the supporting Skill first deals damage.
- Efficiency Support: When the supporting skill deals damage, you gain Critical Strike Chance to the same targets hit.
- Safeguard Support: When used, the supported Skill grants Damage Reduction to you.
- Firefly: Deploy a small construct that lands on the target and explodes 3 times, dealing damage. — Replace the Tempest setup to enable more damage output from the construct.
- Multishot Support: Supported Projectile skills launch additional projectiles.
- Piercing Support: The supported Projectile Skill will pierce multiple enemies.
- Seeking Support: The supported Projectile Skill will auto-seek enemies for a limited duration.
Skill Tree Points and Skill Bar
Poison Trap Rapid Fire  Death Trap
  Puncture
  Concealment
  Dash
Dash The following tables show the full allocation of Skill Points for the Poison Trap Rogue build. The first table has the most important 48 points to start the build. The second table has the remaining 10 points that are allocated once you obtain all Skill Points from Renown.
| Priority Skills | Cluster |
|---|---|
| Puncture Level 1, Enhanced Puncture, Fundamental Puncture |  Basic Skill Basic Skill |
| Rapid Fire Level 5, Enhanced Rapid Fire, Improved Rapid Fire |  Core Skill Core Skill |
| Dash Level 1, Enhanced Dash, Disciplined Dash |  Agility Skill Agility Skill |
Poison Trap Level 5, Enhanced Poison Trap, Subverting Poison TrapConcealment Level 1, Enhanced Stealth, Subverting Stealth Exploit Level 3, Exploit Level 3,  Malice Level 3 Malice Level 3 Agile Level 3 Agile Level 3 |  Subterfuge Skill Subterfuge Skill |
 Deadly Venom Level 3 Deadly Venom Level 3 |  Imbuement Skill Imbuement Skill |
Death Trap, Prime Death Trap, Supreme Death Trap Innervation Level 3, Innervation Level 3,  Second Wind Level 3 Second Wind Level 3 Trap Mastery Level 3 Trap Mastery Level 3 |  Ultimate Skill Ultimate Skill |
 Exposure Exposure |  Key Passives Key Passives |
| Remaining Renown Points | Cluster |
|---|---|
 Debilitating Toxins Level 3 Debilitating Toxins Level 3 | Imbuement Skill |
 Adrenaline Rush Level 1, Adrenaline Rush Level 1,  Haste Level 3 Haste Level 3 | Ultimate Skill |
 Stutter Step Level 3 Stutter Step Level 3 | Core Skill |
Poison Trap Rogue Specialization
Preparation is the preferred Rogue Specialization for this trapper build due to the focus on Poison Trap and Death Trap. Every 100 Energy spent reduces Trap cooldowns by 4 seconds and activating Death Trap resets all cooldowns for another rotation of Poison Traps.
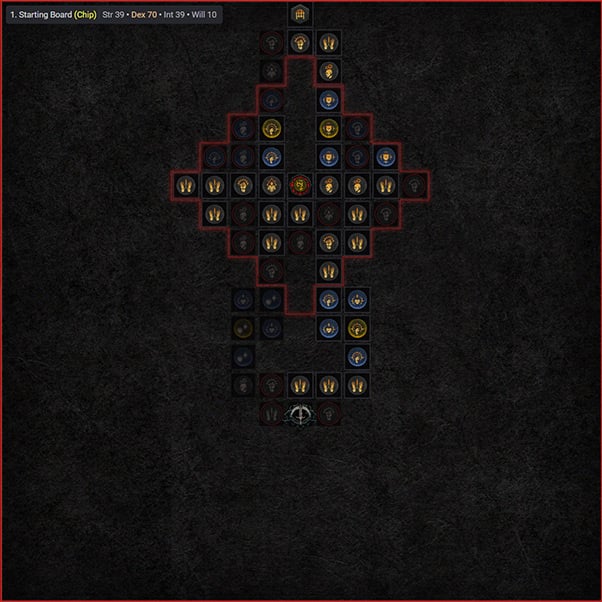
Paragon
The Paragon progression system unlocks after reaching Level 50, and offers a considerable boost to character power. Within the Paragon Board, there are many different bonuses, ranging from minor stat enhancements on Magic Nodes to more significant gains with Rare Glyphs and Legendary Nodes.
Important Notes:
- Additional Bonus requirements on Rare Glyphs may not be obtainable until they gain increased radius range at Level 15.
- Attach Legendary Boards in the correct order. Bonus requirements of Rare Nodes increase with their placement order.
- Make sure you select the correct Legendary Boards and rotate them into the correct orientation before attachment.
The list below contains the most beneficial Rare Glyphs and Legendary Nodes for the Poison Trap Rogue build, sorted in the order obtained in the final Level 100 Paragon Tree. The images that follow provide a visual of each Paragon Board setup.
| Name | Effect |
|---|---|
 Chip Chip | • For every 5 Dexterity purchased within range, you deal + [6.24%] increased Physical damage. • Additional Bonus (requires 40 Dexterity purchased in radius range): Physical damage increases the damage an enemy takes from you by x1%, up to x10%, for 15 seconds. |
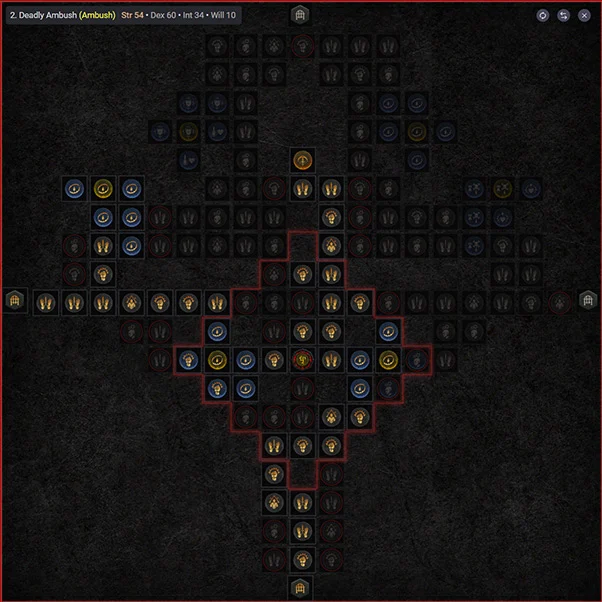
 Deadly Ambush Deadly Ambush | You deal x22.5% increased Critical Strike Damage to enemies affected by your Trap Skills. |
 Ambush Ambush | • For every 5 Strength purchased within range, you deal + [9.6%] increased damage to targets affected by Trap Skills. • Additional Bonus (requires 25 Strength purchased in radius range): Enemies affected by Trap Skills take x10% increased damage from you. |
| Cheap Shot | You deal x5% increased damage for each Nearby enemy that is Crowd Controlled, up to x25%. |
 Combat Combat | • For every 5 Intelligence purchased within range, you deal + [19.2%] increased Critical Strike Damage. • Additional Bonus (requires 40 Intelligence purchased in radius range): Skills that Critically Strike restore 12% of their Energy cost. |
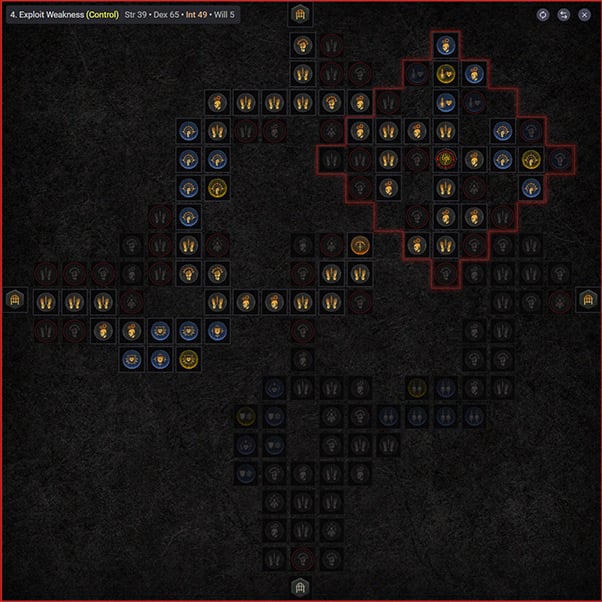
| Exploit Weakness | Grants + [144%] bonus to all Magic nodes within range. • Additional Bonus (requires 40 Dexterity purchased in radius range): When you hit an enemy with an attack that applies a Crowd Control effect, they take x2%, up to x10%, increased damage from you for 20 seconds. |
| Control | For every 5 Intelligence purchased within range, you deal + [14.21%] increased damage to Crowd Controlled targets. • Additional Bonus (requires 25 Intelligence purchased in radius range): You deal x10% increased damage to Slowed or Chilled enemies or, instead, x20% increased damage to Stunned or Frozen enemies. |
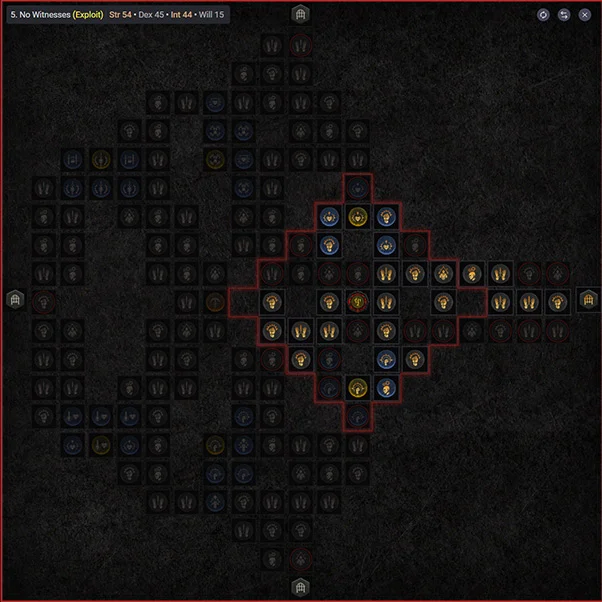
| No Witnesses | Your Ultimate Skills deal x30% increased damage and grant you x10% increased damage for 20 seconds when cast. (Legendary Nodes not used) |
 Exploit Exploit | • For every 5 Strength purchased within range, you deal + [7.7%] increased damage to Vulnerable targets. • Additional Bonus (requires 25 Strength purchased in radius range): When an enemy is damaged by you, they become Vulnerable for 3 seconds. This cannot happen more than once every 20 seconds per enemy. |
1. Starting Board (Chip)
2. Deadly Ambush (Ambush)
3. Cheap Shot (Combat)

4. Exploit Weakness (Control)
5. No Witnesses (Exploit)
Paragon Board images courtesy of d4builds.gg. Click this link for the Paragon planner.
Mechanics and Playstyle
The Poison Trap Rogue build requires careful management of cooldowns. Infiltrator’s Aspect allows you to place up to 4 Poison Traps while in Stealth from Concealment. Only the first Poison Trap placed applies Vulnerable from Subverting Stealth. If you try to place more than 4 traps, the first trap disappears and you lose the Vulnerable application.
Afterwards, you can activate Death Trap to reset all cooldowns with Preparation, the Rogue Specialization. Death Trap does not reset Concealment if you are still in Stealth. Exposure is also used to reduce Trap cooldowns. Rinse and repeat for another set of Poison Traps!
Damage is increased further with Exploit Malice, Deadly Venom and Trap Mastery.
Survivability is gained through Agile and Debilitating Toxins.
Finally, Stutter Step, Haste and Dash speed up movement for faster farming.
Lucky Hit
Both Rapid Fire and Fundamental Puncture hit multiple times per cast to increase the amount of Lucky Hit procs, activating Innervation, Exposure and  Mangler’s Aspect. Lucky Hit Chance is further increased with Second Wind.
Status Effects
The Poison Trap Rogue utilizes multiple status effects to render enemies helpless.
Fundamental Puncture easily applies Vulnerable to a target with a single Basic attack. In group play, apply this debuff to Elites and Bosses so your teammates deal 20% more damage!
Once an enemy is Vulnerable, Mangler’s Aspect can Daze them. Dash also Dazes enemies by dropping an automatic Smoke Grenade with Aspect of Quickening Fog.
Stack Damage to Poisoned, Vulnerable, Dazed and Controlled Enemies on gear and the Paragon Board to scale your damage further.
Damage Rotation
Use the following rotation to optimize DPS.
- Activate Concealment and get close to any enemies.
- Place exactly 4 Poison Traps stacked on top of each other. If you try to place more than 4 traps, the first trap disappears and you lose the Vulnerable application from Subverting Stealth.
- Cast Puncture to come out of Stealth or wait until it ends.
- Cast Death Trap to pull enemies together and reset all cooldowns.
- Spam Rapid Fire on the toughest enemies to finish them off.
- Move on to the next pack of enemies or repeat the rotation against bosses.
Gear Choice and Stat Priority in the Endgame
Make sure to pick up all Rare Item drops that may be upgrades while you are farming with Poison Trap Rogue. Save Legendary Items with useful aspects in your stash to be used later for extraction and imprinting onto well rolled Rare Items.
When comparing weapons with similar item levels, Crossbows are preferred over Bows for the Vulnerable Damage implicit. The DPS value on Ranged Weapons is used for Rapid Fire. The DPS value on Dual Wielded Weapons is equally as important for Poison Trap and Death Trap damage. Daggers are preferred over Swords for the Damage to Close Enemies implicit.
Stat Priority List
Listed below are the affixes to prioritize on gear for Poison Trap Rogues. Each line of affixes are listed in order of importance. Affixes on the same line are considered to be equally important, but their benefits may vary depending on how much is stacked or other character stats. Bolded stats are the most important and sometimes vital for the build to function properly.
The priority order of Resistances is Lightning > Poison > Fire > Cold > Shadow. Maximum Resistance is 70% by default for each element and can be increased to 85% by various sources.
| Gear Slot | Important Affixes |
|---|---|
| Weapons | + Dexterity, All Stats + Vulnerable Damage, Damage to Close Enemies + Critical Strike Damage, Damage to Stunned / Dazed / Poisoned / Trapped Enemies |
| Helm | + Armor, Resistances + Basic Attack Speed, Cooldown Reduction, Maximum Life + Crowd Control Duration, Dexterity, Maximum Energy |
| Chest | + Armor, Damage Reduction, DR from Close Enemies, Resistances + DR from Distant Enemies, Maximum Life + Dexterity |
| Gloves | + Ranks of Rapid Fire, Attack Speed and Critical Strike Chance + Dexterity, Critical Strike Chance Against Injured Enemies + Reduces the Arm Time of Your Trap Skills, Trap Cooldown Reduction + Lucky Hit Chance, LHC to Restore Primary Resource |
| Pants | + Armor, Damage Reduction, DR from Close Enemies, Resistances + Ranks of Poison Trap + DR from Distant Enemies, Maximum Life + Dodge Chance, DC Against Close Enemies, Dexterity |
| Boots | + Resistances, Movement Speed + Energy Cost Reduction, Ranks of Dash + Dexterity, Dodge Chance, DC Against Distant Enemies, DR while Injured |
| Amulet | + Armor + Ranks of Malice, Exploit or Weapon Mastery Passive + Cooldown Reduction, Movement Speed + Energy Cost Reduction, Damage Reduction, DR from Close Enemies, DR from Poisoned Enemies + DR from Distance Enemies, % Dexterity |
| Rings | + Critical Strike Chance, Damage to Crowd Controlled Enemies + Maximum Life, Resource Generation + Damage to Close Enemies, Vulnerable Damage + Maximum Energy, Lucky Hit Chance |
Legendary Aspects and Codex of Power
Listed below are all the best-in-slot Aspects found on Legendary Items that are important for the Poison Trap Rogue build. Aspects from the Codex of Power can be used if you cannot find the proper Legendary drops, but they have weaker effects. Extract Aspects from lower level Legendary Items and imprint them onto better Rare Items with preferred stats.
Resource Aspects, such as  Aspect of the Umbral and Ravenous Aspect, help with Energy management early on. Unfortunately, they are limited to Ring slots and replace Offensive Aspects. Resource management is improved elsewhere in this build, so important separate damage multipliers are not lost.
| Gear Slot | Aspect Name | Aspect Power |
|---|---|---|
| Ranged Weapon (+100% bonus effect) | Aspect of Repeating | Rapid Fire has a [25%] chance to ricochet to another target. |
| Amulet (+50 bonus effect) | Smiting Aspect | You have [10 – 20%] increased Critical Strike Chance against Injured enemies. While you are Healthy, you gain [20 – 40%] increased Crowd Control Duration. |
| Dual-Wielded Weapons, Rings or Gloves | Infiltrator’s Aspect | Poison Trap no longer breaks Stealth and triggers no Cooldown or arm time while you are in Stealth. All Poision Traps activate when you exit Stealth and Poison Trap’s Cooldown will be [5 – 8] seconds per trap placed. |
| Dual-Wielded Weapons, Rings or Gloves | Edgemaster’s Aspect | Skills deal up to [10 – 20%] increased damage based on your available Primary Resource when cast, receiving the maximum benefit while you have full Primary Resource. |
| Dual-Wielded Weapons, Rings or Gloves | Aspect of the Expectant | Attacking enemies with a Basic Skill increases the damage of your next Core Skill cast by [5 – 10%], up to 30%. |
| Dual-Wielded Weapons, Rings or Gloves | Rapid Aspect | Basic Skills gain [15 – 30%] Attack Speed. |
| Dual-Wielded Weapons, Rings or Gloves | Accelerating Aspect | Critical Strikes with Core Skills increase your Attack Speed by [15 – 25%] for 3 seconds. |
| Helm (optional replacement with | Exploiter’s Aspect | You have 20% increased Crowd Control Duration. While enemies are Unstoppable, you deal [20 – 50%] increased damage to them. |
| Chest or Pants |  Aspect of Might Aspect of Might | Basic Skills grant 20% Damage Reduction for [2 – 6] seconds |
| Chest or Pants | Aspect of Disobedience | You gain [0.25 – 0.50%] increased Armor for 4 seconds when you deal any form of damage, stacking up to [15.00 – 66.00%]. |
| Boots | Aspect of Quickening Fog | You automatically drop a Smoke Grenade at the end of Dash. Dash’s Cooldown is reduced by [0.4 – 0.6] seconds for each enemy Dazed this way, up to [2.0 – 3.0] seconds. |
Unique Items
Listed below are the recommended and optional Unique Items for this build.
 Eyes in the Dark (Optional): The Unique Pants synergize well with this trapper build. It can potentially add more DPS for clearing packs of enemies, but it is only useful in high difficulty content where enemies do not already die immediately.
 Harlequin Crest (Recommended Uber Unique): This powerful Uber Unique provides the best of offensive and defense, if you are lucky enough for it to drop from Uber Duriel.
Not Recommended Unique items
Listed below are the Unique Items not recommended for this build and the reasons they are not worthwhile.
 Tibault’s Will: 40%[x] increased damage is not usually possible in this gear slot, but Legendary Pants with 4 well-rolled defensive affixes and a Defensive Aspect are more beneficial.
 Skyhunter: A Legendary Ranged Weapon can provide a higher damage multiplier from an Offensive Aspect with +100% bonus effect on 2-Handed Weapons.
 Asheara’s Khanjar: The Attack Speed bonus on this Unique Dagger is decent, but the rest of its affixes are lacking. A Legendary Sword with well-rolled affixes and an Offensive Aspect is more beneficial.
 Grasp of Shadow: These Unique Gloves provide up to +6 Ranks for all Core Skills, but well-rolled Legendary Gloves are better. The summoned Shadow Clone attack does significantly less damage than the original attack being copied.
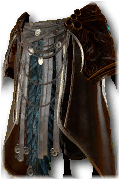 Temerity: These Unique Pants provide a consistent Barrier when paired with
  Siphoning Strikes. Conceited Aspect can also be used with this Barrier generation for increased damage, but this build already has enough Offensive Aspect choices. Using Temerity causes you to miss out on 4 Damage Reduction affixes and an Aspect from Legendary Pants, making them not worthwhile.
Gems
Listed below are the best Gems to socket into gear for each slot type for the Poison Trap Rogue build.
- Weapon:
 Royal Emerald for Critical Strike Damage to Vulnerable Enemies.
 - Armor:
 Royal Ruby for Maximum Life or
  Royal Topaz to prevent deaths from chain Crowd Controls.
 - Jewelry:
 Royal Skull to cap Armor (13200 for Tier 100 Nightmare Dungeons) or Individual Resistance Gems for Resistances that are not already capped at 70%. The priority order of Resistances is Lightning > Poison > Fire > Cold > Shadow.
Elixirs and Health Potions
Visit the Alchemist in any main town to craft helpful Elixirs that increase stats and experience gain for 30 minutes. Make sure to forage plants and pick up the necessary crafting materials during your adventures; they randomly spawn around the world. Listed below are the best Elixirs to consume, ranked by importance. Elixirs that are not available at the Alchemist can only be found as drops. Open Splitting Steel and Mystery Chests in Helltides to farm non-craftable Elixirs.
 Iron Skin Elixir (non-craftable): Use if Armor is not capped (13200 in Tier 100 Nightmare Dungeons). Alternatively, Heady Iron Barb Elixir can be crafted at the Alchemist.
 Elixir of Cruelty (non-craftable): Provides the highest source of Critical Strike Chance from an Elixir. Alternatively,
  Heady Precision Elixir can be crafted at the Alchemist.
 Heady Assault Elixir (craftable): Attack Speed increases Damage Per Second (DPS).
 Elixir of Fortitude (non-craftable): Maximum Life greatly improves survivability in AoZ.
Return to the Alchemist again when you reach Level 20, 30, 45, 60, 70, 80 and 90, to upgrade your potion. The extra healing is essential to survival.
Changelog
- February 5th, 2024: Seneschal Construct Companion Powers section updated with an optional setup for construct damage.
- January 28th, 2024: Seneschal Construct Companion Powers section updated.
- January 22nd, 2024: Guide updated for Season 3 (Patch 1.3.0).
- Seneschal Construct Companion Powers section added.
- December 18th, 2023: Stat Priority List reevaluated with an emphasis on capping Armor and Resistances.
- December 6th, 2023: Tears of Blood Unique Glyph added to Paragon section.
- November 15th, 2023: Paragon Board images added.
- November 1st, 2023:
- Resistances added to Stat Priority List and Gem sections.
- Vampiric Power Tier List reevaluated.
- October 17th, 2023: Guide updated for Season 2 (Patch 1.2.0).
- August 30th, 2023: Not Recommended Unique Items section added.
- August 2nd, 2023: Patch 1.1.1 section added with build specific changes.
- July 18th, 2023: Guide updated for Season 1.
- July 14th, 2023: Stat Priority List reevaluated.
- July 12th, 2023: Aspects reevaluated.
