


This build guide is specifically designed for Season 2 of Diablo 4, and may not be effective for use after the season ends.
Abattoir of Zir (AoZ) Build Introduction
The Abattoir of Zir (AoZ) variant build for HotA Barbarian is a late endgame setup, designed to specifically tackle the hardest content in Diablo 4. This build task is not for the faint of heart and will test your skills against very difficult circumstances. For more information on this endgame activity, check out our Abattoir of Zir Guide.
The Abattoir of Zir is scaled to push you further at each level, racing against a clock and fighting through hordes of hells more powerful demons. This Abattoir of Zir build guide assumes your character is Level 100 and you have proper gear equipped, not just the Uniques, but farmed for a solid set of affixes and aspects for the rest of your gear slots. This is build not meant for a new character; if you are looking for resources on creating a new character using Barbarian, our Leveling Build is what you will want to use. This content was made for characters that have beaten Nightmare Dungeons at level 100, defeated the Endgame Bosses, and completed their Season’s Journey. This build is a high-tier modified version of the HotA Barbarian build.
Strengths and Weaknesses
- Strong AoE damage style
- Good defensive layers
- Shout cooldowns are extremely low
- Easy NM100 Clear
- Fury management
- Cooldown management
- Positional gameplay
To see how this build compares to the other builds on our site, you can check out our build tier lists.
Build Requirements
This build has several Legendary Aspects that are required before it will function properly. You will need the following at to maximize the build to its fullest. These Aspects are all non-codex, which means you will need to find them on a Legendary Item, then imprint them onto specific gear. However, for Season 2 rewards will give you access to  Aspect of Limitless Rage.
Aspect of Limitless Rage Bold Chieftain’s Aspect
To begin this build, we recommend you have everything ready as there are no substitutions. For this build to become fully functional and able to fight in the Abattoir of Zir, we recommend you have everything including the Uber unique drop from Duriel the Maggot King.
Season of Blood
Season 2 Patch Updates
The following list details the changes in the Season 2 Update (Patch 1.2.0) that are specific to this build. Check the Changelog for all other guide updates.
- Resistances now stack additively and no longer become less effective with each additional source, while also contributing their full value to Non-physical Damage Reduction. Resistance values on equipment, Elixirs and Paragon have been increased to more easily reach the new 70% cap. Furthermore, Intelligence now gives +0.025% All Resistance per 1 Intelligence instead of 0.05% All Resistance to compensate.
- Increased Critical Strike / Vulnerable Damage affixes are now additive with other damage increases instead of being multiplicative. This change is a nerf to make Critical Strike Damage and Vulnerable Damage comparable to other dame increase options. All classes are affected by this change.
- % Total Armor affix has been increased by 160%.
 Mighty War Cry – Fortify amount changed from being based on Base Life to Maximum life.
 Strategic Rallying Cry – Fortify amount changed from being based on Base Life to Maximum life.
 Supreme Wrath of the Berserker – Maximum damage bonus is now x100% bonus damage.
 Decimator
 - Previous: Two-Handed Slashing Weapon attacks have up to a 8% chance to make enemies Vulnerable for 2 seconds.
- New: Each time you make an enemy Vulnerable, your damage is increased by 10% for 5 seconds. Overpowering a Vulnerable enemy grants an additional 10% bonus for 5 seconds.
- Carnage
- Bone Breaker
- Previous: Overpowers with your Two- Handed Bludgeoning Weapon Stun enemies for 1 second and grant you 20% of your Maximum Life (273) as Fortify.
- New: Every 12 seconds, your next Skill is guaranteed to Overpower.
- Warbringer
- Fortify amount increased from 12% to 15% maximum Life.
- Blood Rage
Vampiric Power Tier List
Season 2 introduces Vampiric Powers that provide build-altering bonuses. We start by spending Potent Blood, which is acquired from vampiric enemies, to unlock and upgrade your Vampiric Powers. Make sure your equipped chest armor, pants, gloves , boots and helm contain the appropriate Vampiric Pacts (Ferocity, Divinity and Eternity) that match the activation costs needed to unlock a Vampiric Power.
A Vampiric Curse status effect has been added to complement the new powers: killing an enemy affected by your Vampiric Curses will store their soul. Casting a Defensive skill will unleash your stored souls to attack nearby enemies. You can store up to 8 souls total.
Listed below is the tier list for Vampiric Powers , ranked by importance to this build. Stat values displayed reflect a maximum level 3 Vampiric Power. Also, please note the list below is our theory-crafted recommendations compiled without testing. Until the Season 2 is live, we cannot test the validity of these choices.
Minor Powers:
- Resilience (2 Eternity): You gain 1% Damage Reduction for each 2% Life you are missing.
- Sanguine Brace (1 Divinity, 1 Eternity): When you kill an enemy, Fortify for 6% of your Base Life. While you have more Fortify than half of your Maximum Life, you gain 8% Critical Strike Chance.
- Prey on the Weak (2 Ferocity): You deal 16% increased damage to Vulnerable enemies. Enemies are Vulnerable while affected by a Vampiric Curse from your other Vampiric Powers.
Major Powers:
- Accursed Touch (6 Divinity): Lucky Hit: Up to a 44% chance to inflict Vampiric Curse on enemies. Enemies with the Vampiric Curse have a 15% chance to spread it to other surrounding enemies. Accursed Souls deal 200% increased damage.
- Metamorphosis (2 Ferocity, 2 Divinity, 2 Eternity): When you Evade you turn into a cloud of bats, becoming Unstoppable for 4 seconds. Enemies along your path take 160% Physical damage and are inflicted with Vampiric Curse.
Skill Tree Points and Skill Bar
 Hammer of the Ancients
  Lunging Strike Rallying Cry
  Challenging Shout War Cry Wrath of the Berserker
 Follow the points allocated in the image above for the complete 58 point build. The additional 10 skill points are completed using the Renown system.
| Hammer of the Ancients Barbarian Skills | Cluster |
|---|---|
 Basic Skill Basic Skill | |
| Hammer of the Ancients Level 5, Enhanced Hammer of the Ancient, |  Core Skill Core Skill |
Rallying Cry Level 1, Enhanced Rallying Cry, Tactical Rallying Cry, Challenging Shout Level 1, Enhanced Challenging Shout,  Imposing Presence Level 3, Imposing Presence Level 3,  Martial Vigor Level 3 Martial Vigor Level 3 |  Defensive Skill Defensive Skill |
War Cry Level 1, Enhanced War Cry, Mighty War Cry,  Aggressive Resistance Level 3, Aggressive Resistance Level 3,  Prolific Fury Level 3 Prolific Fury Level 3 |  Brawling Skill Brawling Skill |
 Pit Fighter Level 3, Pit Fighter Level 3,  Thick Skin Level 1, Thick Skin Level 1,  Counteroffensive Level 3 Counteroffensive Level 3 |  Weapon Mastery Skill Weapon Mastery Skill |
Wrath of the Berserker, Prime Wrath of the Berserker, Supreme Wrath of the Berserker,  Wallop Level 3, Wallop Level 3,  Brute Force Level 3 Brute Force Level 3 |  Ultimate Skill Ultimate Skill |
 Unbridled Rage Unbridled Rage |  Key Passives Key Passives |
Weapon Expertise – The Barbarian Specialization
Weapon Expertise is a set of benefits tied to which weapons you use as a Barbarian. To unlock your Expertise, simply hit Level 5 and the tab below will be made available. Simply by using a certain weapon type, you will begin to gain ranks with that weapon as you fight. The ranks are from 0 to 10 and will level up moderately quickly as your character gains experience. Once your expertise hit rank 10, you will be maxed out on the benefit for using that weapon with your skills. Just a reminder, to swap your assigned weapon to the skill you are using go to your Skill selection list (not skill tree) and you will see the how to switch it (Middle mouse button on PC.) At Level 15, you will unlock the Masters of Battle quest. This quest will be available in the township of ‘Ked Bardu’ from the Forgemaster Gerti. Upon completing this quest you will unlock the Technique slots as seen below, this will offer you an additional permanent bonus from one of the weapons regardless of whether you have it equipped to a skill or not.
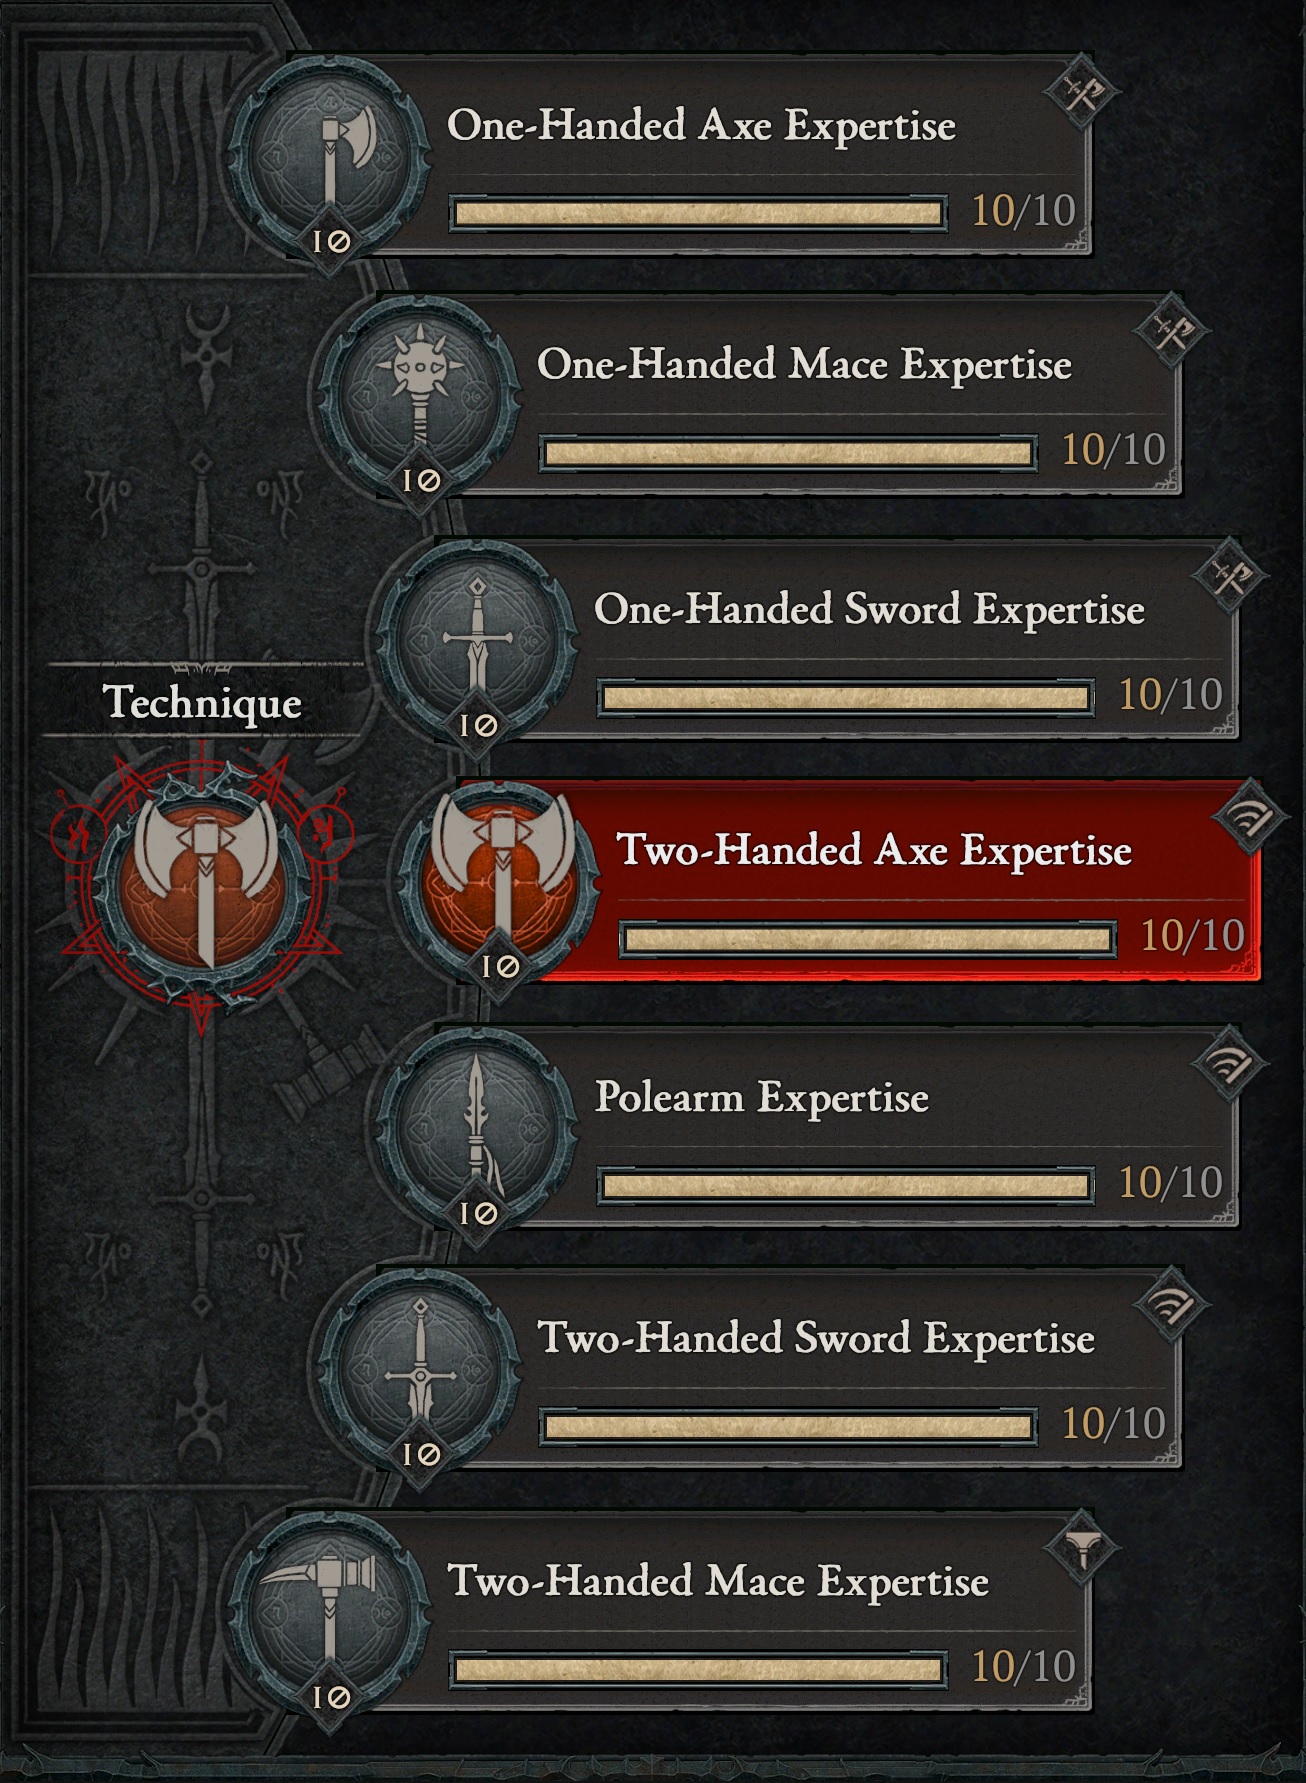
For the Shout HotA build, we will be focused on using the expertise of Two-Handed Axe for the bonus Vulnerable damage.
Weapon Selection
Barbarians have an unique mechanic in Diablo 4 where you can assign a weapon type to certain skills. This is a critical component for all builds to function properly, and failure to match your weapon to the proper skill may cause the build to perform poorly. For this build, we will be assigning the following weapons to our skills:
- Hammer of the Ancients – Bludgeoning
 Lunging Strike – Slashing
Paragon Points
We recommend using these Legendary Nodes and Rare Glyphs to truly take this build into the endgame. Note that each Rare Glyph’s information listed below is for the Level 21 version.
| Rare Node | Effect |
|---|---|
 Territorial Territorial | – For every 5 Dexterity purchased within range, you deal +[10.0]% increased damage to Close targets. – Additional Bonus unlocked after 25 Dexterity points are purchased in the glyph’s range: You gain 15% Damage Reduction against Close enemies. |
 Crusher Crusher | – For every 5 Strength purchased within range, you deal +[5.3]% increased damage while wielding a Mace – Additional bonus unlocked after 40 Strength points are purchased in the glyph’s range: While wielding a Mace, you deal 30%[x] increased Overpower damage. |
| – For every 5 Core Stats purchased within range, you gain + [2]% increased damage. – Additional Bonus Grants +50.0% bonus to all Rare nodes within range. Bonus increases by 10% every 10 levels. | |
| Ire | – For every 5 Strength purchased within range, you deal +[5.3]% increased damage while Berserking. – Additional Bonus unlocked after 40 Strength points are purchased in the glyph’s range: While Berserking, you take 10% reduced damage from Elites. |
| Might | – Grants + [125%] bonus to all Magic nodes within range. – Additional Bonus unlocked after 40 Strength points are purchased in the glyph’s range: You deal x8% increased damage while wielding Two-Handed weapons. |
| Marshal | – Grants +[125%] bonus to all Magic nodes within range. – Additional Bonus unlocked after 40 Strength points are purchased in the glyph’s range: After casting a Shout Skill, the active Cooldown of every other Shout Skill is reduced by 1.2 seconds. |
| – Killing a Bleeding enemy has 10% chance to grant Berserking for 5 seconds. Your damage is increased by x25% of your Damage while Berserking bonus. | |
| – Each time you make an enemy Vulnerable, your damage is increased by 10% for 5 seconds. Overpowering a Vulnerable enemy grants an additional x10% bonus for 5 seconds. |
Let’s break down each of these beneficial Nodes and where our Paragon Points are positioned in each of the Paragon Boards we use. This part of the build is presented in order of importance, so if you do not have enough Paragon Points for use in your Paragon Tree, just slowly work towards each step.
Starting Board

- Path up the left side and head up towards the open glyph slot, taking
 Tenacity and the Magic Nodes around it for the bonus in Life and Armor.
 - Loop around to the right hand side of the board and take the Rare Node
 Brawn. This node will give us a small increase to our Maximum Life and Physical damage bonus.
 - Next, path towards the glyph slot and insert
 Crusher, this glyph will grant us increased damage with maces and a bonus to our Overpower.
 - Take the Rare Nodes
 Iron Strength, these will gives us another some flat armor increases.
 - Head to the top of the board and attach our next Paragon Board, Carnage.
Carnage

- Now go straight to the open glyph slot and insert
 Tears of Blood into the glyph slot. As you can see above we will take this entire board, to maximize our glyph damage potential.
 - Next we will take both Rare Nodes inside the glyph radius,
 Brash and
  Fierce, these nodes will give us increased Damage while Berserking and Damage Reduction against Close Enemies.
 - Take the path to the left hand side of the board and pick up the Rare Node Enraged.
- Finally, use the left hand-side connection point to attach the next Paragon Board, Blood Rage.
Blood Rage

- Now path towards the open glyph slot, inserting Ire into the slot. This boost our damage while Berserking and grant us Damage Reduction while Berserking.
- Inside the glyph radius pick up the Rare node
 Grit to boost our Damage Reduction against Bleeding Enemies.
 - Head to the Legendary Node Blood Rage and take it. This will help with our Berserking sustain and a small damage boost.
- We will also be the Rare node Enraged for boost to our Berserking.
- Now go back to the Carnage Paragon Board and take the right hand connection point and attach Warbringer.
Warbringer

- Take the pathway upwards and pick up the Rare Node
 Core Reserve and only take the Magic Nodes shown above.
 - Path towards the open glyph and insert
 Territorial into the slot. This glyph will help us against Close Enemies with a damage increase and Damage Reduction.
 - Inside the Glyph radius take both Rare Nodes,
 Conditioned and
  Raw Power, these Nodes will grant you an increased Berserking Damage and give you an increased Damage Reduction for Close Enemies.
 - Head towards the Rare node Hungering Fury and take it, including the Magic Nodes around it.
- Finally, path towards the top of the Paragon Board and attach Bone Breaker.
Bone Breaker

- Take the Rare Node Vigor along the pathway to the open glyph slot.
- Head towards the open glyph slot and insert Marshal, this will boost all the magic nodes inside the glyph radius.
- Take the other Rare Node
 Brutality for the increase in Overpowered damage.
 - Path to the left side of the board and attach the Paragon Board Decimator.
Decimator

- Now take the path to the open Glyph slot and insert Might, this will increase our damage while two-handed weapons and boost the Rare nodes inside the glyph radius.
- Next, take the Rare Node
 Arrogance for the increased Damage Reduction from Vulnerable Enemies.
 - Lastly, we take the Legendary Node
 Decimator for the bonus to Overpower hits against Vulnerable enemies.
 - This completes the Paragon Tree for this build.
Paragon board images courtesy of d4builds.gg.
Mechanics and Playstyle
The opening mechanic on this build is to literally smash a pack of enemies in a single blow. However, you need to have built up your Fury using Rallying Cry and War Cry to start Berserking. Start to use ![]() Lunging Strike to get healing and Critical Strikes will extend your Berserking. We then bring out your
Lunging Strike to get healing and Critical Strikes will extend your Berserking. We then bring out your ![]() Hammer of the Ancients to smack down the enemy, using up your Fury as much as you can. Our Fury generation should be quite high with all our shouts running, but we do have the option of activating Wrath of the Berserker and take them down any Elites or Bosses quickly. Overall, this is a brawling style of gameplay, grouping up packs of enemies while you position yourself to strike all of them together. It may take some getting used to, but eventually, you will naturally charge through packs of enemies while you spam your targeted Hammer of the Ancients. To get Overpower hits you can use some of the triggers below:
Hammer of the Ancients to smack down the enemy, using up your Fury as much as you can. Our Fury generation should be quite high with all our shouts running, but we do have the option of activating Wrath of the Berserker and take them down any Elites or Bosses quickly. Overall, this is a brawling style of gameplay, grouping up packs of enemies while you position yourself to strike all of them together. It may take some getting used to, but eventually, you will naturally charge through packs of enemies while you spam your targeted Hammer of the Ancients. To get Overpower hits you can use some of the triggers below:
- The Unique amulet, Banished Lord’s Talisman, which after you spend 300 Fury your next Hammer of the Ancients will Overpower.
- Earthstriker’s Aspect grants us an Overpower strike after 8 weapon swaps.
Berserking
Being in a state of Berserking is a critical component of this build. We mainly trigger the state through our War Cry and Wrath of the Berserker. The secret to keeping us in Berserking is the use of  Relentless Berserker’s Aspect. This Aspect has a Lucky hit chance to extend our Berserking duration, as you increase your power and Critical Strike Chance this will become very easy to maintain. We also use the Legendary Node on our Paragon board Blood Rage to add to our Berserking sustain.
Defensive Aspects
Aspect of Berserk Ripping adds Bleeding to all targets and grants us increased Damage Reduction against Bleeding Enemies through our Paragon Tree. The Bleeding effect occurs automatically while you are Berserking, you don’t need to trigger anything or do anything special. While there will be some adjustment to keeping your Berserking going, with a decent amount of duration on your items you will find this to become very routine.
We also you Fortification to add another layer of health to ourselves from two of our Shout augments, Strategic Rallying Cry and Mighty War Cry. Being Fortified is further enhanced through our Paragon Tree. This effect happens naturally through the course of gameplay and will be constantly topped off. Lastly, we have Challenging Shout. This skill is used for those crazy situations when you need a huge boost of Damage Reduction to deal with a sudden rush of enemies or spike in damage taken.
Gear Choice and Stat Priority
As you begin to farm in World Tier 3 and 4, Rare and Legendary item drops will begin to appear with some regularity, depending on your luck. We recommend saving the targeted Legendary items that have the needed Legendary aspects listed below. We also recommended to keep multiple copies of the build’s Aspects in your Stash for future upgrades.
As for the Rare items, you will need to inspect each one for targeted affixes for use in each specific slot and do your best to match the recommended rolls. We have listed our targeted affixes in order of importance. Check the chart below and make note of what affixes you are searching for when you see a Rare gear piece drop.
Season 2 Update (1.2.0): Critical Strike Damage and Vulnerable Damage affixes are changed to be additive with other damage increases. All additive damage increases of the same amount are equal in value, as long as their conditions are active.
| Gear Slot | Targeted Affixes |
|---|---|
| Helm | |
| Chest | 1. Total Armor 2. Damage Reduction 3. Damage Reduction while Fortified 4. Maximum Life 5. Damage Reduction from Close Enemies |
| Gloves | 1. Critical Strike Chance 2. Attack Speed 3. Ranks of Hammer of the Ancients4. Strength 5. Lucky Hit Chance |
| Pants | |
| Boots | 1. Movement Speed 2. Resistances 3. Fury Reduction Cost 4. Strength |
| Amulet | |
| Rings | 1. Critical Strike Chance 2. Max Fury 3. Maximum Life 4. Overpower Damage 5. Critical Strike Damage |
| Weapons | 1. Strength 2. All Stats 3. Core Skill Damage 4. Overpower Damage 5. Critical Strike Damage 6. Damage to Close Enemies |
Please note that these affixes are you need to survive in this Endgame dungeon, you can stray from the recommended affixes, but the build may suffer. You have been warned.
A final point on acquiring the right Affixes and Legendary Aspects, use your Obols to target farm them. Obols are awarded from many different activities in the game, you will always stockpiling them until you hit your maximum. Instead of just randomly spending them on a random pick, use them to target what you might be missing from this build. It is a great way to target a specific slot of loot and find what you need.
If you are interested in checking out a new tool for gambling Obols check out this link below from Icy Veins.
Obol Gambling Optimization ToolLegendary Aspects and Unique Items for Abattoir of Zir
Below you will find the optimal setup for Legendary Aspects for the Shout HotA build. Each aspect is listed with its matching gear slot. Do your best to keep each aspect in the slot it was posted with.
Listed below are all the best-in-slot Aspects found on Legendary items that are important for the Shout HotA build. Aspects from the Codex of Power can be used if you cannot find the proper Legendary drops, but they have weaker effects. Extract Aspects from lower level Legendary items and imprint them onto better Rare items with preferred stats. The endgame itemization goal will be to imprint Aspects with the best values Ancestral Rare items with Item Power above or as close to 800, then upgrade them through the Blacksmith.
| Gear Slot | Legendary Aspect | Legendary Aspect Power |
|---|---|---|
| Helm | ||
| Chest |  Aspect of Might Aspect of Might | Basic Skills grant 20% Damage Reduction for [2.0-6.0] seconds. |
| Gloves | Aspect of Berserk Ripping | Whenever you deal direct damage while Berserking, inflict [20-30%] of the Base damage dealt as additional Bleeding damage over 5 seconds. |
| Pants | ||
| Boots | Relentless Berserker’s Aspect | Lucky Hit: Damaging an enemy with a Core Skill has up to a [22 – 40%] chance to extend the duration of Berserking by 2 seconds. Double this duration if it was a Critical Strike. |
| Amulets(50% bonus) | ||
| Ring | Aspect of Echoing Fury | Your Shout Skills generate [2.0-4.0] Fury per second while active. |
| Ring | Bold Chieftain’s Aspect | Whenever you cast a Shout Skill, its Cooldown is reduced by [1.0-1.9] seconds per Nearby enemy, up to a maximum of 6 seconds. |
| Bludgeoning Weapon (200% bonus) | Edgemaster’s Aspect | Skills deal up to [10- 20%] increased damage based on your available Primary Resource when cast, receiving the maximum benefit while you have full Primary Resource. |
| Slashing Weapon (200% bonus) | Aspect of Limitless Rage | Each point of Fury you generate while at Maximum Fury grants your next Core Skill [1-2%] increased damage, up to [15-30%] . |
| Dual-wield weapon 1 | Aspect of Ancestral Force | Hammer of the Ancients quakes outwards, dealing [32-50]% of its damage to enemies. |
| Dual-wield weapon 2 | Earthstriker’s Aspect | After swapping weapons 8 times, your next attack will Overpower and deal [30-50%] increased Overpower damage. |
Gems
Listed below are the best gems to socket into gear for each slot type.
- Weapon:
 Royal Ruby increases our Overpower Damage.
 - Armor: Royal Ruby for Maximum Life.
- Jewelry:
 Royal Diamond for All Resistances, however, certain bosses may require you to switch to their corresponding resistances.
Elixirs and Health Pots
Listed below are the best Elixirs to consume for Abattoir of Zir, ranked by importance. Elixirs that are not available at the Alchemist can only be found as drops. Open Splitting Steel and Mystery Chests in Helltides to farm non-craftable Elixirs.
 Heady Iron Barb Elixir (non-craftable): Essential to cap Armor against high level enemies, especially in higher AoZ Tiers. Alternatively, Heady Iron Barb Elixir can be crafted at the Alchemist.
 Elixir of Combatant Fortune (non-craftable): Lucky Hit Chance provides more chances to hit with our Skills.
 Heady Crushing Elixir (craftable): Increases our Overpower damage for our build.
- Heady Precision Elixir (non-craftable): Provides the highest source of Critical Strike Chance from an Elixir, if not already capped at 100%. Alternatively, Heady Precision Elixir can be crafted at the Alchemist.
Return to the Alchemist again when you reach Level 20, 30, 45, 60, 70, 80 and 90, to upgrade your potion. The extra healing is essential to survival.
Changelog
- December 13th 2023: Build Creation for Abattoir of Zir.
