


In the new Lord of Hatred expansion, effective leveling methods for Necromancers are still quite limited. Leveling using Core Skills (e.g., ![]() Blight,
Blight, ![]() Sever,
Sever, ![]() Bone Spear, and the long-time favourite
Bone Spear, and the long-time favourite ![]() Blood Surge) feels a bit better, thanks to overhauled Basic Attacks and new Essence management options in Skill Tree, but still often feels lacking.
Blood Surge) feels a bit better, thanks to overhauled Basic Attacks and new Essence management options in Skill Tree, but still often feels lacking.
Affordable crafting now allows you to maintain multiple Essence per Second affixes on gear at any time. However, it is still undermined by poor access to Legendary Aspects, which include the easiest and most significant sources of Attack Speed, Resource Generation and utility needed to enable many synergies.
For new players, we strongly recommend using the Summoner Leveling Build, before transitioning to one of our end-game build guides:
- Forgiving about skipping gear upgrades sometimes
- Almost no resource management required
- Solved mobility issues
- Natural transition into various endgame Minion builds
- Minions are not the sharpest tools in the shed
- A lot of power locked behind few Legendary Aspects
- Not optimal for speedfarming
For players who prefer to engage in combat themselves over supporting the Minion army, the Lord of Hatred expansion introduced Skill Tree and Book of the Damned changes, which allow the Blood Lance Leveling Build not just to be viable, but thriving in the early game without any prerequisites:
- Efficient at clearing density
- Solved mobility issues
- Extremely easy to operate
- A lot of power locked behind few Legendary Aspects
- Often requires crafting to improve Essence generation
Players who are used to crafting or manipulating gear from the earliest stages of the game can take advantage of the Blood Blight Leveling Build and its superior weapon damage scaling:
- A lot of power locked behind few Legendary Aspects
- Very high weapon damage % conversion
- Solved mobility issues
- A lot of power locked behind few Legendary Aspects
- Blight area of effect is on small side
- Often requires crafting to improve Essence generation
Check the Season Checklist for some valuable tips and tricks for the current Season of Diablo 4.
General Leveling Tips
World Tier Selection
The recommended World Tier to start in is Hard. This will provide you with the smoothest and fastest leveling experience.
If you prefer the added challenge, it is possible to start in Expert difficulty without ruining your experience completely, but the extra experience from monsters does not make up for the increased time it takes to kill them. At Expert and Penitent difficulties, the gear quality obtained won’t improve noticeably either, at least until approaching level cap. Generally, this results in a much slower and clunkier leveling process, while Elite, Boss and Seasonal enemies will either pose an actual threat or end up in 5-minute slugfests.
Quantity over quality is the road to success in leveling. Move up through World Tiers only when you no longer struggle in Helltides and Seasonal content in the next tier.
Acquiring a Mount
Getting a mount is an important step in your leveling journey, since Sanctuary is vast and Necromancer is the slowest of all classes. We generally recommend saving your world explorations (such as unlocking Waypoints) until after you obtain it. Seasonal characters have immediate access to mounts at level 1, if you have previously completed the main campaign on any character and chose to “Skip Campaign” during character creation. For more details, read our mount guide.
Mercenaries
During the Vessel of Hatred campaign, you unlock Mercenaries to assist you. Leveling them up evenly and building up Mercenary Rapport while bartering for Aspect Caches or specific Legendaries is a great way to obtain specific slot Legendary Aspects early. It becomes even more lucrative due to lower ![]() Pale Mark prices at lower levels and the current Legendary gear during leveling.
Pale Mark prices at lower levels and the current Legendary gear during leveling.
Merchants
Until now, merchants were used almost exclusively to sell junk, but after the Lord of Hatred release, not only did prices become fair, but stock became more relevant to your current level and sometimes included rarities, like Legendary gear, even at early levels. It is always worth checking vendors during every trip to the town.
Helltides
Helltides were an outstanding way to powerlevel any seasonal character, but in the Lord of Hatred expansion, they are more tame until you level them up through the new War Plans system. It is still fairly lucrative if you focus on completing Whisper objectives there, farming Blood Maiden, Doomsayers, Spires and World Events. Helltides remain a great source for obtaining missing Tempering recipes, Runes, various content Keys and crafting materials. For more details, read our comprehensive Helltides guide.
Necromancer’s Resources
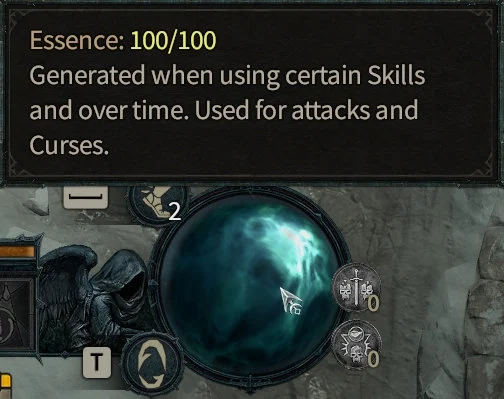
Necromancers have three different resources: Essence, Corpses and Blood Orbs. Efficient management of these resources can make or break the build’s performance.
Essence is the primary resource for the Necromancer and is comparable to the primary resource of other classes. It naturally refills extremely slowly over time, but can also be replenished by Basic Skills (e.g., ![]() Hemorrhage,
Hemorrhage, ![]() Reap, etc.), Essence per Second gear affixes, Lucky Hit Restore effects and various Resource category Legendary Aspects. Essence is the cost of most of your skills.
Reap, etc.), Essence per Second gear affixes, Lucky Hit Restore effects and various Resource category Legendary Aspects. Essence is the cost of most of your skills.
The secondary Necromancer resource is Corpses. Corpses come by from fallen enemies, are generated by skill upgrades (e.g., ![]() Reap,
Reap, ![]() Sever, etc.), or some Legendary Aspects (e.g.,
Sever, etc.), or some Legendary Aspects (e.g.,  Aspect of Hewed Flesh,
  Aspect of Hardened Bones).
Corpses have a wide variety of uses: from using them as a fuel to augment different abilities (e.g., ![]() Fel Gluttony,
Fel Gluttony, ![]() Bone Storm
Bone Storm ![]() Duration Increase), activating powerful buffs (e.g.,
Duration Increase), activating powerful buffs (e.g., ![]() Flesh-eater), raising
Flesh-eater), raising ![]() Skeleton Warriors and
Skeleton Warriors and ![]() Skeleton Mages, or simply detonating those with
Skeleton Mages, or simply detonating those with ![]() Corpse Explosion.
Corpse Explosion.
Blood Orbs can be created and consumed by any Necromancer, but Blood Skills excel at it. Blood Orbs are pick-up healing items generated by various skill effects (e.g., ![]() Hemorrhage,
Hemorrhage, ![]() Blood Orb,
Blood Orb, ![]() Life Tap) and Legendary Aspects (e.g.,
Life Tap) and Legendary Aspects (e.g.,  Aspect of Transfusion, Aspect of the Embalmer). Primarily, they serve their obvious purpose – healing the Necromancer and his Minions for 15% Maximum Life, while activating powers that are conditioned by the amount of life healed recently. Alternatively, Blood Orbs can fuel the Cooldown Reduction engine through Fastblood Aspect or provide direct damage (e.g.,
 ![]() Blood Maiden,
Blood Maiden, ![]() Cruor’s Embrace).
Cruor’s Embrace).
Book of the Dead
The Book of the Dead is the Necromancer’s unique class mechanic. It unlocks for free at Level 5 and will unveil more minion types and specializations as you level up.
You can customize your army to suit your playstyle at any time or sacrifice any or all minion types for powerful passive buffs to yourself and your remaining minions:
- Level 5:
 Skeleton Warrior – Skirmishers [Bone]
 - Passive: 30% increased damage, but have 15% reduced Life
- Option #1: 2 additional Skirmisher Warriors and aggressive behaviour right after summoning.
- Option #2: Apply Vulnerable and 50% Slow on hit for 4 seconds.
- Sacrifice: Critical Strike Chance is increased by 10%[+], but summon amount is reduced by 50%.
- Passive: 30% increased damage, but have 15% reduced Life
- Level 8: Skeleton Warrior – Defenders [Blood]
- Passive: 15% increased Life
- Option #1: Defenders gain 3481 Thorns and the ability to Taunt enemies for 6 seconds. When Defenders are damaged, their bones splinter for 50% of their Thorns to nearby enemies.
- Option #2: 10% chance to form a Blood Orb when dealing damage.
- Sacrifice: 40%[+] Resistance to All Elements, but summon amount is reduced by 50%.
- Passive: 15% increased Life
- Level 12: Skeleton Warrior – Reapers [Darkness]
- Passive: Special wind-up attack every 10 seconds
- Option #1: Wind-up attacks reduce one of your active Cooldowns by 3 seconds and form a corpse.
- Option #2: 50%[x] increased damage and 15% chance to Stun for 1 second.
- Sacrifice: 15%[x] increased damage, but summon amount is reduced by 50%.
- Passive: Special wind-up attack every 10 seconds
- Level 5:
 Skeleton Mage – Shadow [Darkness]
 - Passive: Shadow Damage type
- Option #1: Deal an additional 100% Corrupting damage over 6 seconds.
- Option #2: Bolts grant you and the Shadow Mage a Barrier for 3% of your Maximum Life for 4 seconds, up to 30%.
- Sacrifice: Essence Regeneration is increased by 20%[+] and your maximum Essence is increased by 20, but summon amount is reduced by 50%.
- Passive: Shadow Damage type
- Level 18: Skeleton Mage – Cold [Darkness]
- Passive: Cold Damage type
- Option #1: Initial projectile forks into 2 on impact. Enemies hit are Weakened for 4 seconds.
- Option #2: Cold Mage occasionally casts Blizzard that deals 200% Cold damage over 6 seconds and Chills for 6% per second. Enemies damaged by Cold Mages are Vulnerable for 4 seconds.
- maSacrifice: 20%[x] increased damage to Vulnerable enemies, but summon amount is reduced by 50%.
- Passive: Cold Damage type
- Level 22: Skeleton Mage – Bone [Bone]
- Passive: Heavy damage at the cost of their own Life
- Level 8:
 Golem (Bone) [Bone]
 - Ability: Taunts enemies, forcing them to attack the Golem
- Option #1: Activating your Golem’s ability causes it to shed 5 corpses.
- Option #2: When your Bone Golem takes damage, once every 3 seconds, it unleashes Bone Spikes, dealing 250% damage and making enemies Vulnerable for 4 seconds.
- Sacrifice: 10%[+] increased Attack Speed, but Golem does 50%[x] less damage.
- Ability: Taunts enemies, forcing them to attack the Golem
- Level 28: Golem (Blood) [Blood] (after “Call of the Underworld” quest)
- Ability: Drains Life from nearby enemies to heal and bolster itself
- Option #1: Drains life from your other Minions, increasing their Maximum Life by 5% and damage by 5%[x] per Minion drained for 20 seconds, up to 50% increased Maximum Life and 50%[x] increased damage.
- Option #2: Activating your Golem’s ability Fortify you for 10% of your Maximum Life for each enemy it drains.
- Sacrifice: Maximum Life is increased by 20%[x], but Golem does 50%[x] less damage.
- Ability: Drains Life from nearby enemies to heal and bolster itself
- Level 32: Golem (Iron) [Darkness] (after “Call of the Underworld” quest)
- Ability: Slams the ground and Stuns enemies.
- Option #1: Every Iron Golem attack causes a shockwave, dealing 125%[x] damage to the primary enemy and to enemies behind them.
- Option #2: Slam attack also pulls in enemies, and its size is increased by 50%.
- Sacrifice: 15%[x] increased Critical Strike Damage, but Golem does 50%[x] less damage.
- Ability: Slams the ground and Stuns enemies.
Minions have a 20% base Lucky Hit Chance and inherit 100% of your character stats and buffs they can use, e.g., Maximum Life, Attack Speed, Critical Strike Chance, Shadow Damage, etc.
Attributes and Skills
The four core attributes benefit each of the five classes in slightly different ways. Intelligence, being the Necromancer’s primary attribute, scales all of the Necromancer’s damage.
| Attribute | Effect 1 per 100 | Effect 2 per 100 | Effect 3 per 100 |
|---|---|---|---|
| Intelligence | +12.5%[x] Skill Damage | +5% All Resistances | |
| Willpower | +3% Resource Generation | +10% Healing Received | +25% Overpower Damage |
| Dexterity | +2% Critical Strike Chance | +0.6% Dodge Chance | |
| Strength | +200 Armor |
Generally, attributes other than Intelligence are taken only to meet attribute requirements for Paragon Rare Nodes to activate secondary effects.
For a detailed list of Necromancer skills, refer to our Necromancer Skills guide.
In-Game Activities
Finish the storyline to unlock the various endgame activities in Diablo 4. Follow the yellow-marked quests, and you should have no trouble finding your way.
Keep in mind that after you complete the main storyline, the game becomes quite open-ended. This leaves you with options to either choose which activities to tackle and in what order yourself (depending on your goals – such as leveling Paragon as quickly as possible, pushing The Tower or The Pit, farming Mythic Uniques, etc.), or to use the new War Plans system added in Lord of Hatred expansion.
War Plans allow you to pre-plan your activities for the near future from a selection of random options. If you stick to the plan, not only will you be rewarded, but you will also be able to customize the content itself. The more you engage with and master each type of content, the more radical changes and greater rewards you can opt into.
That said, in the sections that follow, we have prepared a quick list of the most noteworthy activities you can engage in.
Tree of Whispers
The Tree of Whispers, located in Hawezar, rewards you for completing bounties scattered across the Sanctuary. These profitable activities grant a significant amount of experience, gold and items, and because they appear in so many zones, they pair perfectly with other events and endgame pursuits.
The Tree of Whispers also serves as one of your first Nightmare Sigils sources – the items required to activate Nightmare Dungeons, one of the core activities.
For more information, refer to our Tree of Whispers guide.
Nightmare Dungeons
Nightmare dungeons are the original endgame activity in Diablo 4 and still hold great relevance. They are a reliable source of gold, experience, Boss Summoning materials, ![]() Obducite for masterworking, and even Mythic Uniques – if you’re lucky enough to obtain a Mythic Prankster Key.
Obducite for masterworking, and even Mythic Uniques – if you’re lucky enough to obtain a Mythic Prankster Key.
Once you receive your first Sigil (likely from the Tree of Whispers), you can start running Nightmare Dungeons, which will drop more Sigils – meaning you should never really run out.
For more information, refer to our Nightmare Dungeons guide.
Helltides
Helltides appear on the map for players in any World Tier, taking over large swathes of land for one hour. During this time, monsters killed in the affected area drop a special temporary currency – Aberrant Cinders, that can be used to unlock chests found in the Helltide area.
While Helltides are available on the lowest World Tiers for extremely efficient leveling, they are most effective for endgame progression once you reach Torment+ World Tiers.
Helltides are one of the very few places where you can reliably obtain large quantities of ![]() Forgotten Souls, a crafting material to manipulate Ancestral gear at the Occultist.
Forgotten Souls, a crafting material to manipulate Ancestral gear at the Occultist.
For more information, refer to our Helltides guide.
Legion Events and World Bosses
Legion events and World Bosses are always marked on the map beforehand, and these are good activities to engage in early Torment Tiers, since they reward potentially good items, can summon Treasure Goblins or Grotesque Debtors, as well as fairly good experience. Simply go to the marked area on the map when the timer is approaching zero and join the other players for the event.
The Pit
The Pit is another type of endgame content, similar to Diablo 3’s Greater Rifts, which can be entered through a portal that is opened by a pillar located in Cerrigar. It is also the way to level up the Glyphs that are inserted into your Paragon board, which is crucial for increasing character power.
For more information, refer to our Pit of the Artificers guide.
Infernal Hordes
The Infernal Hordes is a wave-based endgame activity, first introduced in Season 5. To face the Infernal Hordes and enter the Realm of Hatred, you need an Infernal Compass, which can be acquired through various endgame activities such as defeating endgame bosses, Helltides, Whispers, Nightmare Dungeons, and so on. Infernal Compasses will scale with your World Tier.
For more information, refer to our Infernal Hordes guide.
Kurast Undercity
Kurast Undercity, introduced in the Vessel of Hatred expansion, is a time attack dungeon scenario where Tributes are offered, and Bargains struck to target specific rewards like runes, XP, or specific types of gearing. To unlock the Undercity, reach Level 20, have the Vessel of Hatred expansion, and summon the Spirit Flame in the Nahantu region. It has become an important destination for the predetermined target farming of crafting materials, especially those needed for Horadric Cube recipes.
For more information, refer to our Kurast Undercity guide.
The Tower
The Tower is a multi-stage timed dungeon inspired by Diablo 3 Greater Rifts. Unlike The Pit, it lacks elements of randomness or rewards, aside from cosmetics, your position on the Leaderboard and bragging rights. Your placement on the Leaderboard is determined by the highest Tower Tier you complete and your final completion time.
For more information, refer to our Tower guide.
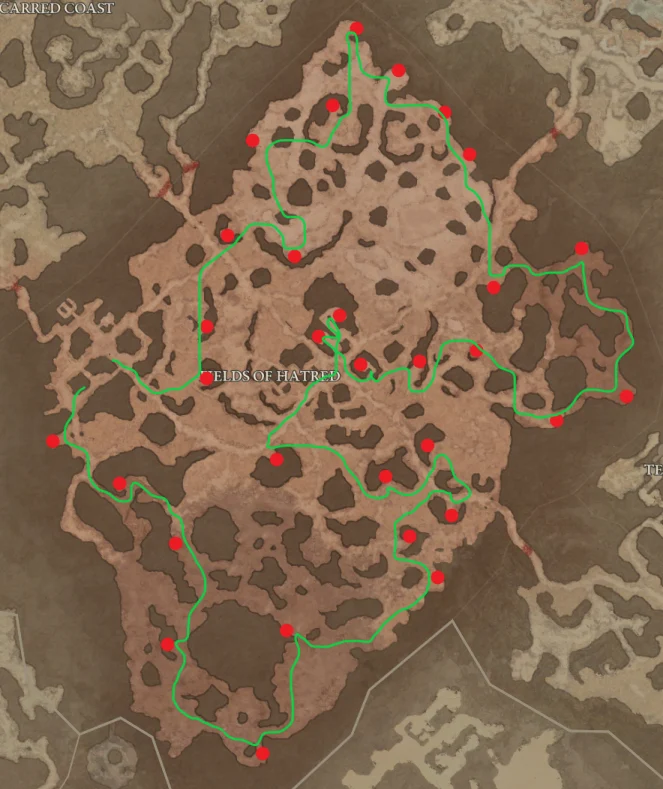
Baleful Chests in Fields of Hatred
One of the sneaky ways to get some easy gear is to open Baleful Chests in the Fields of Hatred. This method is especially effective right after ascending into Torment tiers to get the first Ancestral Legendary weapon, which makes a world of difference. Results may vary, depending on PvP activity and other players farming the chests too, but rewards are usually worth the time spent. If other players’ activity bothers you, it’s always worth trying to change your server layer by relogging or adjusting cross-play settings.
To open Baleful Chests, you must be Bloodmarked (PvP enabled) via the Emote Wheel (default bind ‘E’ for PC or ‘D-Pad Up’ for controller). Locations of Baleful Chests can be found on third-party interactive maps, and routes can be planned accordingly – something like this:
Seasonal Activities
Seasons come with various events with supplemental power systems, secondary reputation tracks, and world events. Check our updated Seasonal Hub for general season theme information every season.
Changelog
- April 26th, 2026: Guide updated for Lord of Hatred expansion.
- March 10th, 2026: Guide updated for Season 12.
- December 11, 2025: Guide updated for Season 11.
- September 22nd, 2025: Guide updated for Season 10.
- June 25th, 2025: Guide updated for Season 9.
- April 27th, 2025: Guide updated for Season 8
- January 19th, 2025: Guide updated for Season 7.
