


This is a legacy build that is not viable for the current version of Diablo 4, and which we do not recommend using. It only exists for documentation purposes.
Build Introduction
This is your comprehensive guide for building a wild man who hurls chained spears to drag enemies to their death with a single swing of a bloody axe. Welcome to our build guide for Steel Grasp Rend Barbarian! This build is simple and easy to keep control of enemies, running across the map while pulling enemies with  Steel Grasp and then gutting each of them with a devastating bleed from
  Rend. This build is non-stop action as you gather groups of enemies and bleed them of their life, leaving them behind as you sprint towards your next pack of victims. With both strong defensive and offensive capabilities, this build great for both solo play or in a group.
Our guide will cover all basic mechanics and deep dive into the optimal setup for skills, paragon and gear for the build. Further down below, you will find a supporting YouTube video as well to showcase the build in action.
This build is a variant of the Rend Barbarian. To access the original version of the build, click the button below:
Strengths and Weaknesses
- Huge AoE Bleeds
- Easy Berserking uptime
- Great defenses
- Constant movement helps to avoid crowd control
- Fury management
- Bleeds take time to kill
- Positional gameplay is very important
To see how this build compares to the other builds on our site, you can check out our build tier lists.
Build Requirements
This build utilizes two required Uniques and four Legendary Aspects. The Legendary Aspects you will need are listed below and are required to make the build work at its most basic level. These Aspects are all non-codex, which means you will need to find them on a Legendary Item and then imprint them onto specific gear.
 Ancients’ Oath
 Weapon Master’s Aspect
 Accelerating Aspect
 Bold Chieftain’s AspectAspect of Limitless Rage
Note – Aspect of Limitless Rage is available from the Season 2 Journey Chapter 4 reward.
To even begin this build, we recommend you have these four Aspects ready for imprinting at a minimum. For the build it become fully functional, we recommend you have all the Legendary Aspects listed further in this guide for the build to work optimally.
Season of the Construct
Season 3 Patch Updates
The following list details the changes in the Season 3 Update (Patch 1.30) that may pertain to Barbarians.
Passives
- Gushing Wounds
- Bonus bleed amount increased from 115% to 140%.
- Overpower explosion damage increased from 70% to 85%.
- Weapon Expertise
- Expertise leveling has been cut by 50%.
Paragon
- Marshal Glyph
- Now reduces the cooldown of every non-Shout skill by 4 seconds, instead of every other Shout skill by 1.2 seconds.
Aspects
- Resource Aspect of Echoing Fury
- You now generate 6–10 Fury per second while any Shout skill is active, instead of 2–4 Fury per second for each Shout skill active.
- Offensive Aspect of Limitless Rage
- Damage bonus now has a 5-second duration to be used.
Seneschal Construct Companion Powers
The Season 3 theme introduces a Seneschal Construct Companion that can deal damage or provide support to complement your character. Equip the Seneschal with two Governing Stones to activate their abilities, and then link them to three Tuning Stones each to augment the abilities. There are 12 different Governing Stones and 27 different Tuning Stones that can be found in Vaults scattered across Sanctuary. Fuse together duplicate stones to level them up, increasing the potency of Governing Stones or adding augments to Tuning Stones.
Listed below are the general recommended Governing Stones and their linked Tuning Stones for Barbarians, ranked by importance.
- Tempest: Electrically charge an enemy causing it to deal damage to themselves and 1 additional enemy each second over 5 seconds. If the enemy is killed, Tempest spreads to another enemy gaining 2 additional seconds and 20%[x] bonus damage. These bonuses are also applied if Tempest is reapplied onto the same enemy.
- Evernight: The supported Skill grants you +4 to all Skills when used for 2.0 seconds.
- Resource Support: Player gains an amount of Primary Resource when the supporting Skill first deals damage.
- Efficiency Support: When the supporting skill deals damage, you gain Critical Strike Chance to the same targets hit.
- Swift Support: The supported Skill gains 40% Attack Speed bonus.
- Flash of Adrenaline: Administers a quick flash of adrenaline into the player, granting bonus damage for a duration.
- Genesis: Increase the effectiveness of the supported Skill by 150%.
- Safeguard Support: When used, the supported Skill grants Damage Reduction to you.
- Tactical Support: Decrease the cooldown of the supported Skill.
- Duration Support: Supported Skills have their durations increased.
Video Guide
Please note that since this written build guide is ever-evolving and videos cannot easily be updated, the below video should serve as more of a guideline, whereas the written guide will always have the most accurate information.
Skill Tree Points and Skill Bar
Rend  Flay Steel Grasp
  Rallying Cry
  Challenging Shout
  War Cry
 Follow the points allocated in the image above for the complete 58 point build. The additional 10 skill points are completed using the Renown system.
| Priority Skills | Cluster |
|---|---|
| Flay Level 1, Enhanced Flay, Battle Flay |  Basic Skill Basic Skill |
| Rend Level 5, Enhanced Rend, Violent Rend |  Core Skill Core Skill |
Rallying Cry Level 1, Enhanced Rallying Cry, Tactical Rallying Cry, Challenging Shout Level 1, Enhanced Challenging Shout,  Imposing Presence Level 3, Imposing Presence Level 3,  Martial Vigor Level 3 Martial Vigor Level 3 |  Defensive Skill Defensive Skill |
War Cry Level 1, Enhanced War Cry, Mighty War Cry,  Booming Voice Level 3, Booming Voice Level 3,  Raid Leader Level 3, Raid Leader Level 3,  Aggressive Resistance Level 3, Aggressive Resistance Level 3,  Prolific Fury Level 3 Prolific Fury Level 3 |  Brawling Skill Brawling Skill |
Steel Grasp Level 1, Enhanced Steel Grasp, Fighter’s Steel Grasp,  Pit Fighter Level 3, Pit Fighter Level 3,  No Mercy Level 3, No Mercy Level 3,  Hamstring Level 1, Hamstring Level 1,  Cut to the Bone Level 3, Cut to the Bone Level 3,  Thick Skin Level 1, Thick Skin Level 1,  Defensive Stance Level 1, Defensive Stance Level 1,  Counteroffensive Level 3 Counteroffensive Level 3 |  Weapon Mastery Skill Weapon Mastery Skill |
 Heavy Handed Level 3 Heavy Handed Level 3 |  Ultimate Skill Ultimate Skill |
 Gushing Wounds Gushing Wounds | Key Passives |
Weapon Expertise – The Barbarian Specialization
Weapon Expertise is a set of benefits tied to which weapons you use as a Barbarian. To unlock your Expertise, simply hit Level 5 and the tab below will be made available. Simply by using a certain weapon type you will begin to gain ranks with that weapon as you fight. The ranks are from 0 to 10 and will level up moderately quickly as your character gains experience. Once your expertise hit rank 10, you will be maxed out on the benefit for using that weapon with your skills. Just a reminder, to swap your assigned weapon to the skill you are using go to your Skill selection list (not skill tree) and you will see how to switch it (Middle mouse button on PC.) At Level 15, you will unlock the Masters of Battle quest. This quest will be available in the township of ‘Ked Bardu’ from the Forgemaster Gerti. Upon completing this quest you will unlock the Technique slots as seen below, this will offer you an additional permanent bonus from one of the weapons regardless of whether you have it equipped to a skill or not.
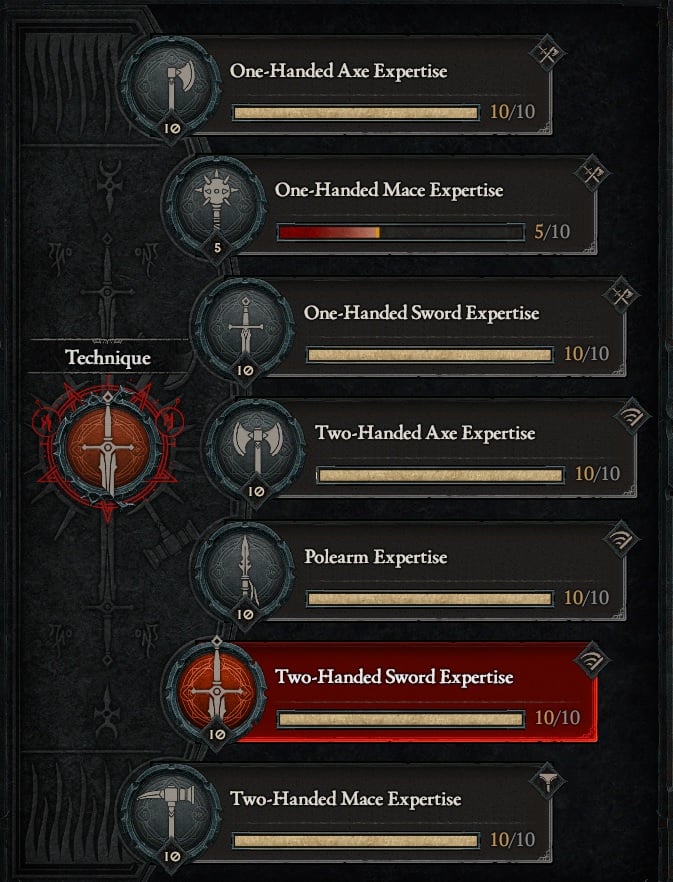
For the Steel Grasp Rend build, we will be focused on using the expertise of Two-Handed Sword for the bonus.
Weapon Selection
Barbarians have an unique mechanic in Diablo 4 where you can assign a weapon type to certain skills. This is a critical component for all builds to function properly, and failure to match your weapon to the proper skill may cause the build to perform poorly. For this build, we will be assigning the following weapons to our skills:
Paragon Points
We recommend using these Legendary Nodes and Rare Glyphs to truly take this build into the endgame. Note that each Rare Glyph’s information listed below is for the Level 21 version.
| Rare Node | Effect |
|---|---|
 Disembowel Disembowel | – For every 5 Willpower purchased within range, you deal +[8%] increased Bleeding damage. – Additional Bonus unlocked after 25 Willpower points are purchased in the glyph’s range: Killing a Bleeding enemy has a 10% chance to reduce the cooldown of your Non-Ultimate active skills by 1 second. |
| Undaunted | – For every 5 Willpower purchased within range, you deal + [8%] increased damage while Fortified. – Additional Bonus unlocked after 25 Dexterity points are purchased in the glyph’s range: You gain 10% Damage Reduction the more Fortify you have. |
 Marshal Marshal | – Grants +[125%] bonus to all Magic nodes within range. – Additional Bonus unlocked after 40 Strength points are purchased in the glyph’s range: After casting a Shout Skill, the active Cooldown of every non-Shout Skill is reduced by 4 seconds. |
 Exploit Exploit | – For every 5 Dexterity purchased within range, you deal +[8]% increased damage to Vulnerable targets. – Additional Bonus unlocked after 25 Dexterity points are purchased in the glyph’s range: When an enemy is damaged by you, they become Vulnerable for 3 seconds. This cannot happen more than once every 20 seconds per enemy. |
| Territorial | – For every 5 Dexterity purchased within range, you deal +[10]% increased damage to Close targets. – Additional Bonus unlocked after 25 Dexterity points are purchased in the glyph’s range: You gain 10% Damage Reduction against Close enemies. |
| Might | – Grants + [125%] bonus to all Magic nodes within range. – Additional Bonus unlocked after 40 Strength points are purchased in the glyph’s range: You deal x8% increased damage while wielding Two-Handed weapons. |
| Wrath | – For every 5 Dexterity purchased within range, you deal +[15%] increased Critical Strike Damage. – Additional Bonus unlocked after 25 Dexterity points are purchased in the glyph’s range: Skill that Critical Strike generate 3 Fury. |
Let’s break down each of these beneficial Nodes and where our Paragon Points are positioned in each of the Paragon Boards we use. This part of the build is presented in an order of importance, so if you do not have enough Paragon Points for use in your Paragon Tree, just slowly work towards each step.
Starting Board
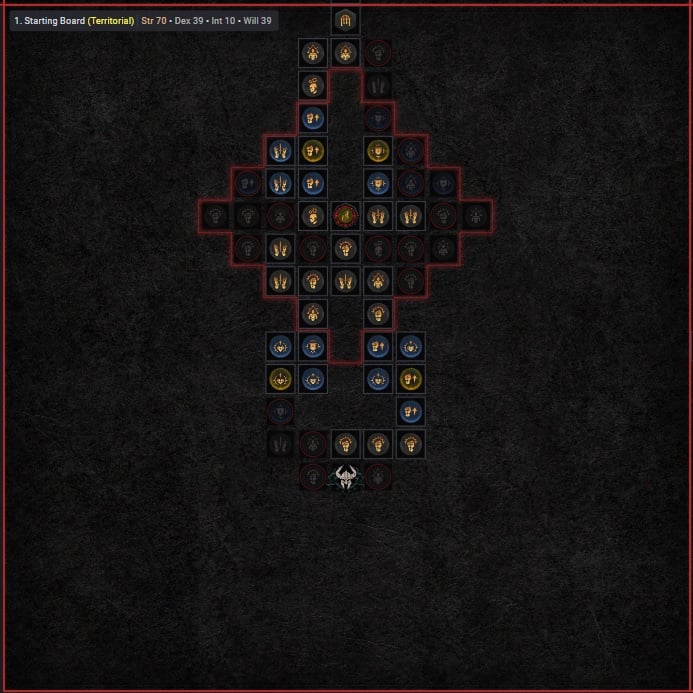
- Take the pathway up the right hand side of the board towards the open Glyph slot.
- Along route pick up the Rare Node
 Brawn, this will boost our flat damage and offer us an increase to Maximum Life.
 - Insert the Glyph Territorial, and take the Dexterity nodes shown to get the bonus. This will help us fight against Close enemies.
- Inside the Gylph radius we will take both Rare Nodes,
 Iron Strength and Raw Power.
 - Now move back down the board and take the Rare Node
 Tenacity for the Armor and increase to Maximum Life.
 - Finally, path towards the connection point at the top of the board and attach our next Paragon Board, Decimator.
Decimator
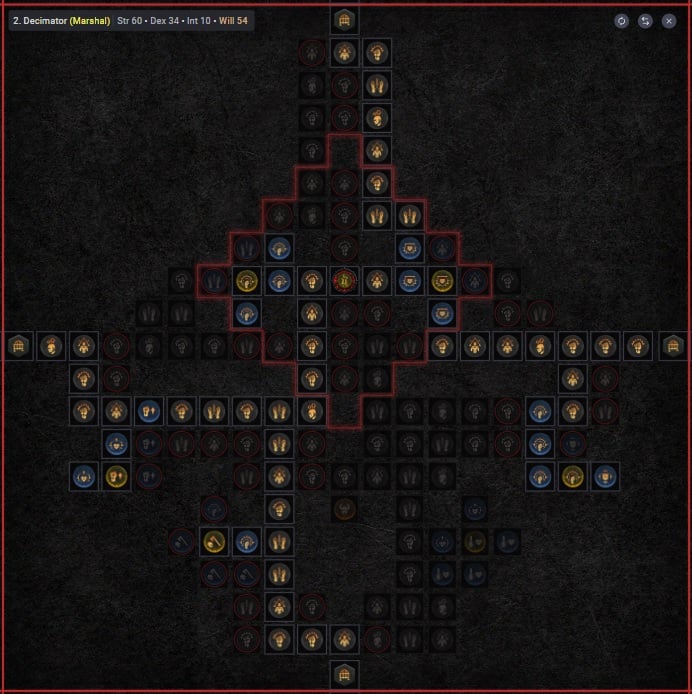
- Head towards the open Glyph slot and pick up the Rare Node
 Destroyer. This Node and the two Magic Nodes chosen with it will increase our damage with Vulnerable Damage and Two-Handed Slash Damage.
 - Take the pathway left and pick up the Rare Node Brawn for the Physical Damage increases. Continue along the pathway and take the left connection point for use later.
- Now head to the Glyph slot and insert Marshal, this Glyph will amplify all the Magic Nodes around it as well as give us a benefit to cooldowns on non-Shout skills.
- Select the two Rare Nodes inside the Glyph radius,
 Arrogance and Demolish. These will increase our damage to Vulnerable enemies and increase our damage reduction while fighting them.
 - Now head towards the right hand side of the board and pick up the Rare Node Pillage, before you select the attachment point. This Node focuses on Vulnerable Damage increases.
- Now attach our next Paragon Board, Carnage.
Carnage
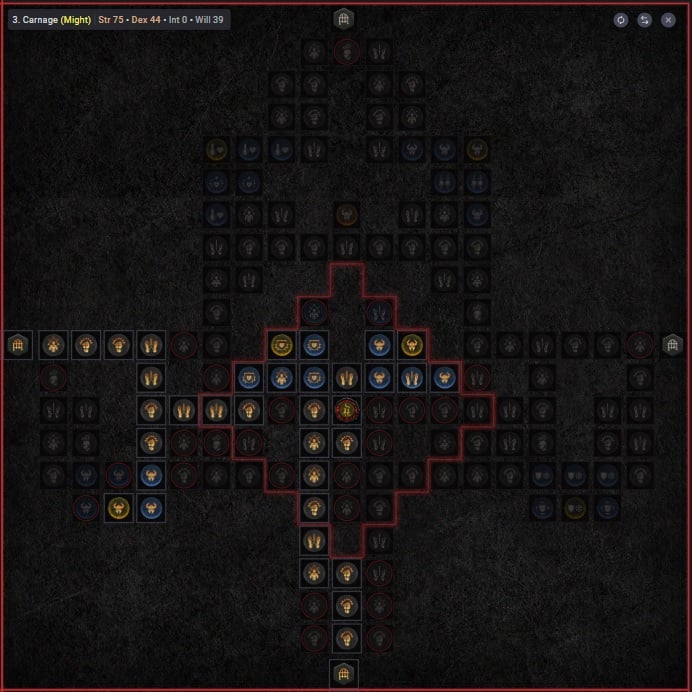
- Take the pathway towards the Glyph slot and pick up the Rare Node
 Enraged and the Magic Nodes around it.
 - Now insert Might into the Glyph slot. This Glyph will boost the Magic Nodes within the radius and grants us more Two-handed weapon damage.
- Inside the Glyph radius take both Rare Nodes,
 Brash and Fierce, these Nodes will grant you an increased Berserking Damage and give you an increased Damage Reduction from Close Enemies.
 - Path towards the bottom of the paragon board and attach the next board, Warbringer.
Warbringer
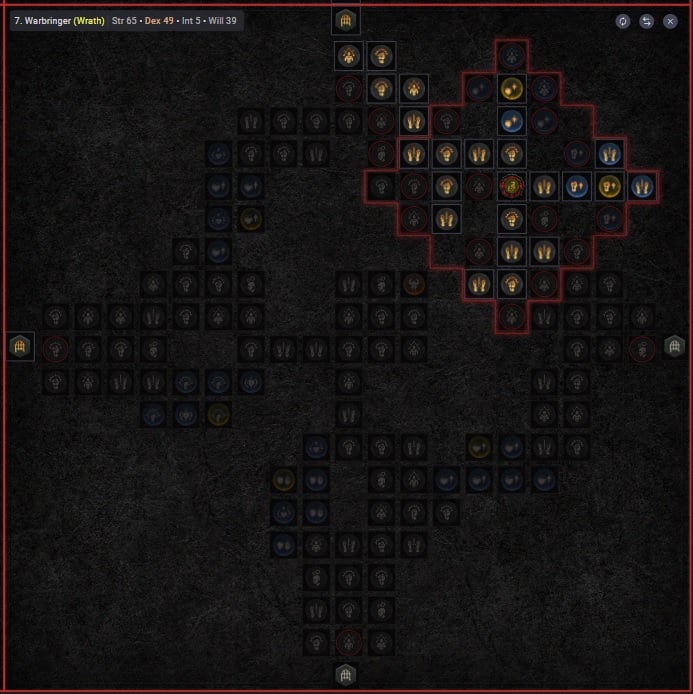
- Head to the Glyph slot and insert Wrath, for the increased Critical Strike Damage and the bonus Fury for each Critical Strike.
- Take the both Rare Nodes, Raw Power and
 Conditioned, for the increased Physical Damage and Resistances.
 - Now that his paragon board is complete, head back to the paragon board Decimator and head to the topside of the board to add Weapons Master.
Weapons Master
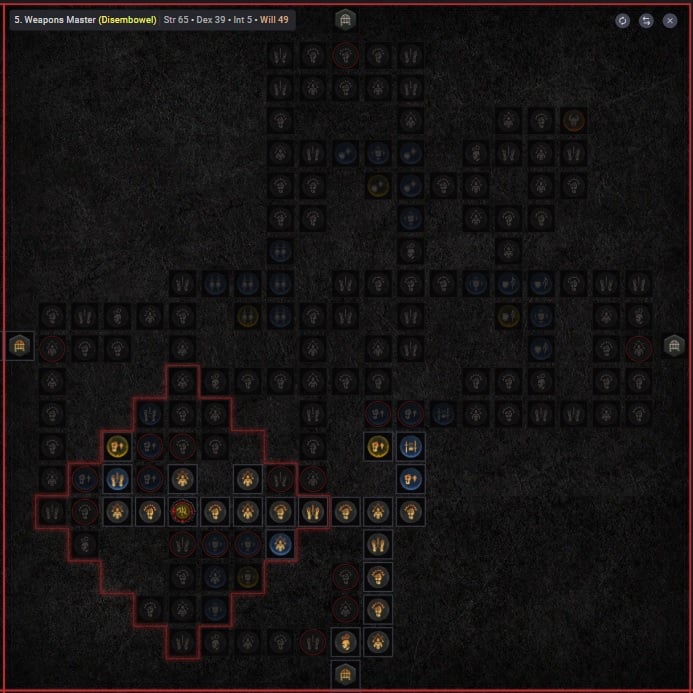
- Head towards the Rare Node Brute, for the Physical Damage and increased Attack Speed.
- Now path over to the open Glyph slot and insert Disembowel, this will increase our Bleeding damage but more importantly, we will get a chance to lower our Cooldown for our Non-Ultimate skills for every bleeding enemy we kill.
- Lastly, take the single Rare Node Raw Power, to boost your Physical Damage.
- This board is completed, head back to the paragon board Decimator and take the path to the left hand side of the board to attach Hemorrhage.
Hemorrhage
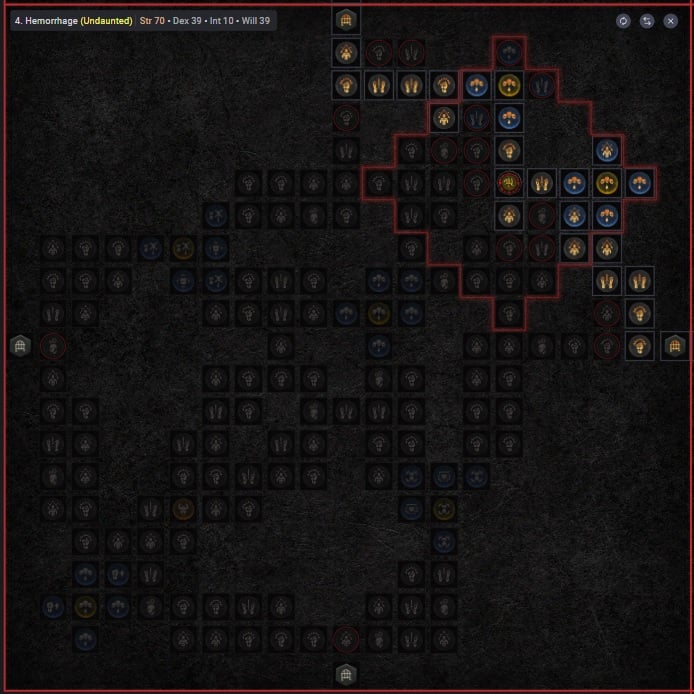
- Take the pathway to the open Glyph slot, picking up the Rare Node
 Grit along the way to increase your Damage Reduction against Bleeding targets.
 - Insert Undaunted into the Glyph slot and take the need Willpower nodes to activate the bonus.
- Now take the other Rare Node in the Glyph radius, Butcher, to increase our Physical Damage over Time damage.
- Head to the top of the board and attach the final paragon board, Bone Breaker.
Bone Breaker
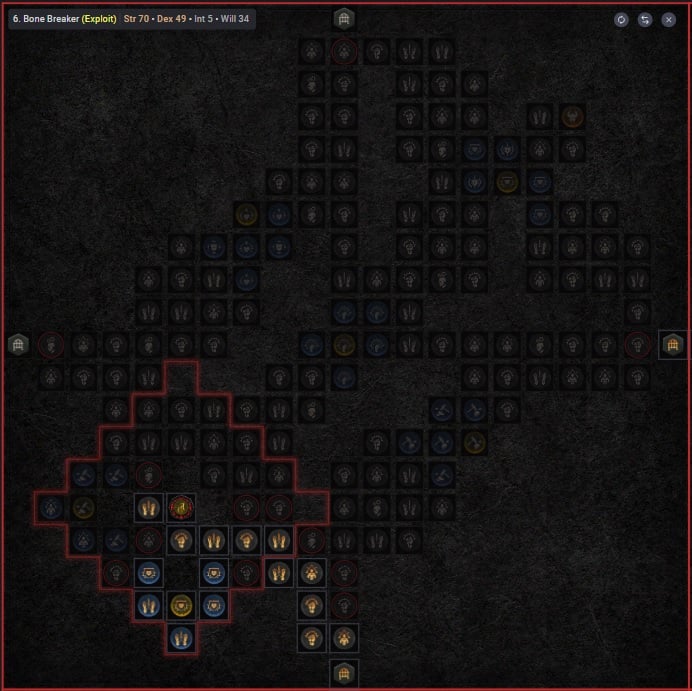
- Head towards the open glyph slot and insert Exploit, this will increase our damage to Vulnerable Enemies.
- Be sure to take the
 Dexterity nodes shown above to get your bonus on Exploit.
 - Lastly, take the Rare Node inside the bottom of the glyph radius, Vigor, to increase our Damage Reduction against Healthy Enemies.
- This completes the Paragon Tree for this build.
Paragon board images courtesy of d4builds.gg.
Mechanics and Playstyle
This build has a very simple yet rewarding gameplay loop, collect enemies with Steel Grasp (the Unique Ancients’ Oath will help gather more targets) and once they are collected hit them with your Rend. Now run off to the next pack, leaving your enemies behind you to bleed to death. The rotation of these two skills may seem simple, but everything comes down to where you position yourself for the Steel Grasp pull. All of our increases to damage (Berserking, Close enemies, Buffs from our Shouts, etc.) happens in a very small window of time, designed to all stack up right before you use Rend. Mastering this will ensure you can chew through enemies at top speed and continue to charge forward while your enemies die behind you.
Berserking
This buff is almost always activated on our character due Steel Grasp and War Cry. These two skills along with Relentless Berserker’s Aspect should keep you in a Berserking state the majority of the time.
Shouts
Our two main offensive Shouts, Rallying Cry and War Cry, are the life blood to this build. Not only do they feed our damage with Berserking and Fury, they also work together to keep our cooldowns low, so we can continue to use our Steel Grasp to pull mobs towards us. Our Challenging Shout can also help us bridge the gap on any needed Cooldown Reduction, but can be used for primarily tanking our opponents.
Flay
Flay is our basic attack and can be weaved into combat as you do your skill rotations with Steel Grasp and Rend. This gives us the benefit of increasing our Bleeding damage after we strike with it, but also keeps enemies Vulnerable as we prepare to use our Rend skill.
Gear Choice and Stat Priority
As you begin to farm in World Tier 3 and 4, Rare and Legendary item drops will begin to appear with some regularity depending on your luck. We recommend saving the targeted Legendary items that have the needed Legendary aspects listed below. We also recommended to keep multiple copies of the build’s Aspects in your Stash for future upgrades.
As for the Rare items, you will need to inspect each one for targeted affixes for use in each specific slot and do your best to match the recommended rolls. We have listed our targeted Affixes in order of importance. Check the chart below and make note of what Affixes you are searching for when you see a Rare gear piece drop.
Season 2 Update (1.2.0): Critical Strike Damage and Vulnerable Damage affixes are changed to be additive with other damage increases. All additive damage increases of the same amount are equal in value, as long as their conditions are active.
| Gear Slot | Targeted Affixes |
|---|---|
| Helm | 1. Cooldown Reduction 2. Rank Up Steel Grasp3. Strength 4. Maximum Life 5. All Stats |
| Chest | 1. Damage Reduction from Close Enemies 2. Damage Reduction while Fortified 3. Damage Reduction 4. Maximum Life 5. Strength |
| Gloves | 1. Critical Strike Chance 2. Rank Up Rend3. Strength 4. Attack Speed 5. Physical Damage over Time 6. Lucky Hit Chance |
| Pants | 1. Damage Reduction while Fortified 2. Damage Reduction from Close Enemies 3. Damage Reduction while Injured 4. Maximum Life 5. Strength 6. Berserking Duration |
| Boots | 1. Movement Speed 2. Strength 3. Damage Reduction while Injured 4. Berserking Duration 5. All Stats |
| Amulet | 1. Cooldown reduction 2. Damage Reduction while Injured 3. Movement Speed 4. Rank Up Cut to the Bone5. Damage Reduction 6. Strength % |
| Rings | 1. Critical Strike Chance 2. Maximum Life 3. Core Skill Damage 4. Critical Strike Damage 5. Damage to Close Enemies 6. Lucky Hit Chance |
| Weapons | 1. Strength 2. Damage to Close Enemies 3. Core Skill Damage 4. Critical Strike Damage 5. Damage while Berserking 6. All Stats |
Please note that these Affixes are the recommended picks, but that is simply our opinion. Other Affixes could certainly work instead of the ones listed above, but may not be optimal.
- Ranks up for select skills.
- Cooldown Reduction – Keeping Steel Grasp and Shouts as low as possible.
- Strength – this stats multiples our overall damage.
A final point on acquiring the right Affixes or Legendary Aspects, use your Obols to target farm them. Obols are awarded from many different activities in the game, you will always stockpiling them until you hit your maximum. Instead of just randomly spending them on a random pick, use them to target what you might be missing from this build. It is a great way to target a specific slot of loot and find what you need.
If you are interested in checking out a new tool for gambling Obols check out this link below from Icy Veins.
Obol Gambling Optimization ToolLegendary Aspects
Listed below are all the best-in-slot Aspects found on Legendary items that are important for the Steel Grasp Rend build. Aspects from the Codex of Power can be used if you cannot find the proper Legendary drops, but they have weaker effects. Extract Aspects from lower level Legendary items and imprint them onto better Rare items with preferred stats. The endgame itemization goal will be to imprint Aspects with the best values Ancestral Rare items with Item Power above or as close to 800, then upgrade them through the Blacksmith. Each aspect is listed with its matching gear slot. Do your best to keep each aspect in the slot it was posted with.
| Gear Slot | Legendary Aspect | Legendary Aspect Power |
|---|---|---|
| Helm | Weapon Master’s Aspect | Your Weapon Mastery Skills have an additional Charge. Lucky Hit: Damaging an enemy with a Weapon Mastery Skill has up to a [32-50%] chance to Stun them for 2 seconds. |
| Chest |  Aspect of Might Aspect of Might | Basic Skills grant 20% Damage Reduction for [2.0-6.0] seconds. |
| Gloves | Aspect of Berserk Ripping | Whenever you deal direct damage while Berserking, inflict [20-30%] of the Base damage dealt as additional Bleeding damage over 5 seconds. |
| Pants | Iron Blood Aspect | Gain [2.0-4.0%] Damage Reduction for each Nearby Bleeding enemy up to [10-20%] maximum. |
| Boots | Relentless Berserker’s Aspect | Lucky Hit: Damaging an enemy with a Core Skill has up to a [22-40%] chance to extend the duration of Berserking by 1 second. Double this duration if it was a Critical Strike. |
| Amulets (50% bonus) | Aspect of Disobedience | You gain [0.6-1.1]% increased Armor for 4 seconds when you deal any form of damage, stacking up to [36-66]%. |
| Ring | Aspect of Echoing Fury | You generate [6.0-10.0] Fury per seconds while any Shout skill is active. |
| Ring | Bold Chieftain’s Aspect | Whenever you cast a Shout Skill, its Cooldown is reduced by [1.0-1.9] seconds per Nearby enemy, up to a maximum of 6 seconds. |
| Bludgeoning Weapon(200% bonus) | Aspect of Limitless Rage | Each point of Fury you generate while at Maximum Fury grants your next Core Skill [1-2%] increased damage, up to [15-30%]. |
| Slashing Weapon (200% bonus) | Ancients’ Oath | |
| Dual-wield weapon 1 | Accelerating Aspect | Critical Strikes with Core Skills increase your Attack Speed by [15-25]% for 5 seconds. |
| Dual-wield weapon 2 | Edgemaster’s Aspect | Skills deal up to [10- 20%] increased damage based on your available Primary Resource when cast, receiving the maximum benefit while you have full Primary Resource. |
Unique Items
This build utilizes the unique two-handed axe: Ancients’ Oath.
Uber Uniques
The chart below is our recommendation for Uber Uniques that will work within this build. However, all Uber uniques are extremely powerful and can shine in different situations. Good Hunting!
| Uber Uniques | Recommended(Y/N) | Replaces |
| No | ||
| Yes | Weapon Master’s Aspect to your Boot Slot | |
| No | ||
| No | ||
| Yes | Accelerating Aspect will be dropped | |
| No | ||
| No |
Gems
Listed below are the best gems to socket into gear for each slot type.
- Weapon:
 Royal Amethyst for the Damage over time increases.
 - Armor:
 Royal Ruby for Maximum Life.
 - Jewelry:
 Royal Diamond for All Resistances, however, certain bosses may require you to switch to their corresponding resistances.
Elixirs and Health Pots
Visit the Alchemist in any main town to craft helpful Elixirs that increase stats, and experience gain for 30 minutes. Make sure to forage plants and pick up the necessary crafting materials during your adventures; they randomly spawn around the world. Use an Elixir providing any Resistance you need most, or the ![]() Assault Elixir to increase Attack Speed.
Assault Elixir to increase Attack Speed.
Return to the Alchemist again when you reach Level 20, 30, 45, 60, 70, 80 and 90, to upgrade your potion. The extra healing is essential to survival.
Changelog
- January 30th 2024: Marshal Glyph changes.
- January 21st 2024: Season 3 speculative changes.
- October 26th 2023: Build Revmaped for Season 2.
- October 13th 2023: Build Adjusted to prepare for Season 2 launch.
- August 8th 2023: Added notes about Patch 1.1.1.
- August 5th 2023: Malignant Heart and Paragon updated for clarity.
- July 27th, 2023: Build creation Season 1.
