


This is a legacy build that is not viable for the current version of Diablo 4, and which we do not recommend using. It only exists for documentation purposes.
Build Introduction
This is your comprehensive guide for building a howling Werewolf who can conjure poisonous tornadoes, spreading plague to every enemy that stands before them. Once the poison hits critical mass, this Werewolf pounces, exploding the stacks of poison to deal massive amounts of damage. This build can easily push Nightmare Dungeons, defeat Helltides and crush World bosses.
Our guide will cover all basic mechanics and deep dive into the optimal setup for skills, Paragon and gear for the build. Further down below, you will find a supporting YouTube video as well to showcase the build in action.
Strengths and Weaknesses
- Amazing DPS on single targets
- Can be played without a generator
- Very strong defensive layers
- Fast clear
- Resource management
- Can be locked down by crowd control
To see how this build compares to the other builds on our site, you can check out our build tier lists.
Build Requirements
 Tempest Roar
 Stormchaser’s AspectDire Wolf’s AspectAspect of the Blurred Beast
Season of the Construct
Season 3 Patch Updates
The following list details all changes of Season 3 that may pertain to Druids.
Aspects
- Aspect of the Blurred Beast
- Previous: While dashing, Shred seeks out Nearby Poisoned enemies instantly dealing 70–100% of the Poisoning damage to them.
- New: While dashing, Shred seeks out Nearby Poisoned enemies and deals 20–40%[x] increased damage to them.
- Aspect of Retaliation
- Bonus damage reduced from 20–40% to 20–30%.
Seneschal Construct Companion Powers
The Season 3 theme introduces a Seneschal Construct Companion that can deal damage or provide support to complement your character. Equip the Seneschal with two Governing Stones to activate their abilities, and then link them to three Tuning Stones each to augment the abilities. There are 12 different Governing Stones and 27 different Tuning Stones that can be found in Vaults scattered across Sanctuary. Fuse together duplicate stones to level them up, increasing the potency of Governing Stones or adding augments to Tuning Stones.
Listed below are the general recommended Governing Stones and their linked Tuning Stones for Druids, ranked by importance.
- Lightning Bolt: Launch a bolt of Lightning at the target dealing damage. Arcs to other targets dealing a portion of the original damage.
- Evernight: The supported Skill grants you +4 to all Skills when used for 2.0 seconds.
- Resource Support: Player gains an amount of Primary Resource when the supporting Skill first deals damage.
- Efficiency Support: When the supporting skill deals damage, you gain Critical Strike Chance to the same targets hit.
- Arcing Support: The supported Skill can hit additional enemies.
- Flash of Adrenaline: Administers a quick flash of adrenaline into the player, granting bonus damage for a duration.
- Genesis: Increase the effectiveness of the supported Skill by 150%.
- Safeguard Support: When used, the supported Skill grants Damage Reduction to you.
- Tactical Support: Decrease the cooldown of the supported Skill.
- Duration Support: Supported Skills have their durations increased.
Video Guide
Please note that since this written build guide is ever-evolving and videos cannot easily be updated, the below video should serve as more of a guideline, where as the written guide will always have the most accurate information.
Skill Tree Points and Skill Bar
 Shred
Shred  Tornado
  Cyclone Armor
  Grizzly Rage
  Hurricane
  Blood Howl
 Follow the points allocated in the image above for the complete 58 point build. The additional 10 skill points are completed using the Renown system.
| Priority Skills | Cluster |
|---|---|
 Claw Level 1, Enhanced Claw Claw Level 1, Enhanced Claw |  Basic Skill Basic Skill |
Shred Level 5, Enhanced Shred, Primal Shred, Tornado Level 4, Enhanced Tornado,  Predatory Instinct Level 3, Predatory Instinct Level 3,  Heart of the Wild Level 1, Heart of the Wild Level 1,  Wild Impulses Level 3 Wild Impulses Level 3 |  Core Skill Core Skill |
Blood Howl Level 1, Enhanced Blood Howl, Preserving Blood Howl,  Ancestral Fortitude Level 3, Ancestral Fortitude Level 3,  Vigilance Level 3 Vigilance Level 3 |  Defensive Skill Defensive Skill |
 Elemental Exposure Level 1, Elemental Exposure Level 1,  Endless Tempest Level 3, Endless Tempest Level 3,  Neurotoxin Level 1, Neurotoxin Level 1,  Envenom Level 3, Envenom Level 3,  Toxic Claws Level 3 Toxic Claws Level 3 |  Wrath Skill Wrath Skill |
| Grizzly Rage, Prime Grizzly Rage, Supreme Grizzly Rage, |  Ultimate Skill Ultimate Skill |
| Key Passives |
Boons – The Druid Specialization
Boons are additional buffs provided to the Druid class as part of their specialization. To unlock your Boons, you will need to complete a simple quest on the west side of the map in the stronghold of “Tur Dulra”. This becomes available at Level 15 and should be completed as soon as possible. The Boon mechanic allows you to pick a single buff from each of the corresponding master animals and the addition of a second Boon buff from a chosen master animal you select.

Once you are in the endgame and have completed the skill tree from the previous section, utilize the following set of Boons for the best results.
| Boon Name | Master Animal | Effect |
|---|---|---|
| Wariness | Deer | Take 10% reduced damage from Elites |
| Iron Feather | Eagle | Gain x14% Maximum Life |
| Swooping Attacks | Eagle | Gain +10% Attack Speed |
| Calamity | Wolf | Extend the duration of Ultimate Skills by 25% |
| Calm Before the Storm | Snake | Lucky Hit: Nature Magic Skills have up to a 10% chance to reduce the Cooldown of your Ultimate Skill by 2 seconds. |
Staying in ![]() Grizzly Rage as much as possible is critical to not only our survival, but also our damage. Two the boons listed above are going to directly support our Ultimate durations and Cooldown. First, we use the boon Calamity to help extend our Grizzly Rage by 25%. Next, the boon Calm Before the Storm going to constantly tick down our Grizzly Rage‘s Cooldown. We also have the the benefit of
Grizzly Rage as much as possible is critical to not only our survival, but also our damage. Two the boons listed above are going to directly support our Ultimate durations and Cooldown. First, we use the boon Calamity to help extend our Grizzly Rage by 25%. Next, the boon Calm Before the Storm going to constantly tick down our Grizzly Rage‘s Cooldown. We also have the the benefit of ![]() Flickerstep to help lower our Cooldown even further.
Flickerstep to help lower our Cooldown even further.
Paragon
We recommend using these Legendary Nodes and Rare Glyphs to truly take this build into the endgame. Note that each Rare Glyph’s information listed below is for the Level 21 version.
| Rare Node | Effect |
|---|---|
 Werewolf Werewolf | – For every 5 Willpower purchased within range, you deal +[6.5]% increased damage while in Werewolf form. – Additional Bonus unlocked after 40 Willpower points are purchased in the glyph’s range: You gain 10% damage reduction while in Werewolf form. |
 Undaunted Undaunted | – For every 5 Intelligence purchased within range, you deal +[10]% increased damage while Fortified. – Additional Bonus unlocked after 25 Intelligence points are purchased in the glyph’s range: You gain up to 10% Damage Reduction the more Fortify you have. |
 Territorial Territorial | – For every 5 Dexterity purchased within range, you deal +[10]% increased damage to Close targets. – Additional Bonus unlocked after 25 Dexterity points are purchased in the glyph’s range: You gain 10% Damage Reduction against Close enemies. |
| Fang and Claw | – Grants +[150]% bonus to all Magic nodes within range. – Additional Bonus unlocked after 40 Willpower points are purchased in the glyph’s range: While in Werewolf or Werebear form, Close enemies take 12%[x] increased damage from you. |
| – Grants +[125]% bonus to all Rare nodes within range. – Additional Bonus unlocked after 25 Intelligence points are purchased in the glyph’s range: You and your Companions deal x10% increased Non-Physical damage. | |
| Spirit | – For every 5 Dexterity purchased within range, you deal +[20]% increased Critical Strike Damage. – Additional Bonus unlocked after 25 Dexterity points are purchased in the glyph’s range: Critical Strikes increase the damage an enemy takes from you by x2% for 20 seconds, up to x12%. |
| – For every 5 Dexterity purchased within range, you deal +[10%] increased damage to Poisoned targets. – Additional Bonus unlocked after 25 Dexterity points are purchased in the glyph’s range: Poisoning damage effects last x33.3% longer. | |
| – Storm Skills deal increased damage equal to x20% of your Damage vs Close and Damage vs Distant bonuses. | |
| – Critical Strikes with Werewolf Skills restore 2 Spirit. |
Let’s break down each of these beneficial Nodes and where our Paragon Points are positioned in each of the Paragon Boards we use. This part of the build is presented in order of importance, so if you do not have enough Paragon Points for use in your Paragon Tree, just slowly work towards each step.
Starting Board
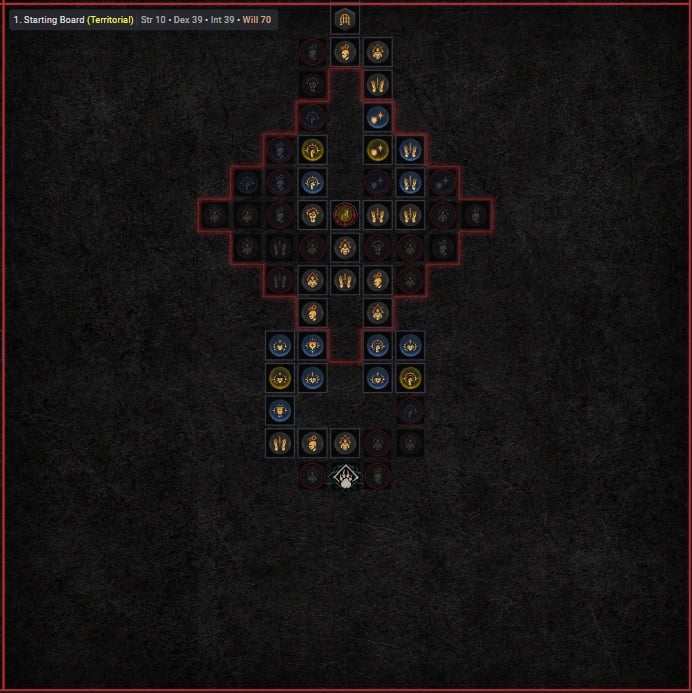
- Begin with by up the left hand side of the board to get the Rare node
 Tenacity, to boost our Armor and Maximum Life.
 - Now loop over to the Rare Node
 Prime, to boost raw Damage.
 - Go to the open glyph slot and insert Territorial. This will increase our Damage and Damage Reduction for Close Enemies.
- Select both Rare Nodes inside the Glyph radius,
 Impel and
  Resolve. This will grants us bonus Damage and Resistances.
 - Finally, head towards the top of the Paragon Board and attach Thunderstruck.
Thunderstruck
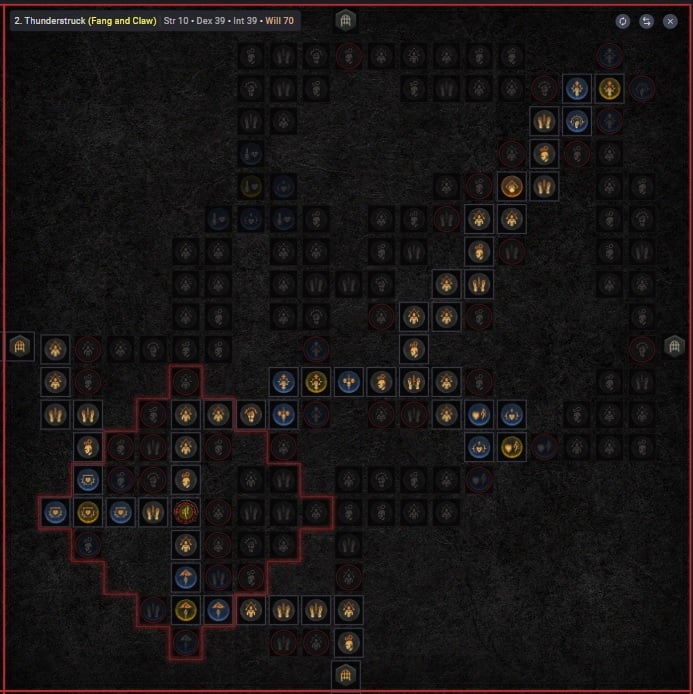
- Path towards the open glyph slot, picking up the Rare node
 Stormcaller along the way.
 - Now go to the open glyph slot and insert
 Fang and Claw. This will boost the Magic Nodes inside the glyph radius and increase our Damage to Close Enemies.
 - Take the other Rare node inside the glyph radius,
 Hubris, helping our Damage Reduction against Vulnerable Enemies.
 - Path on the right hand side of the glyph radius, up to the Rare nodes,
 Deluge and
  Lightning Resilience, these will increase our damage output and our Resistances.
 - Now take the Legendary Node
 Thunderstruck and the final Rare node
  Tempest.
 - Now head to the left hand side of the board to the connection point and attach Heightened Malice.
Heightened Malice
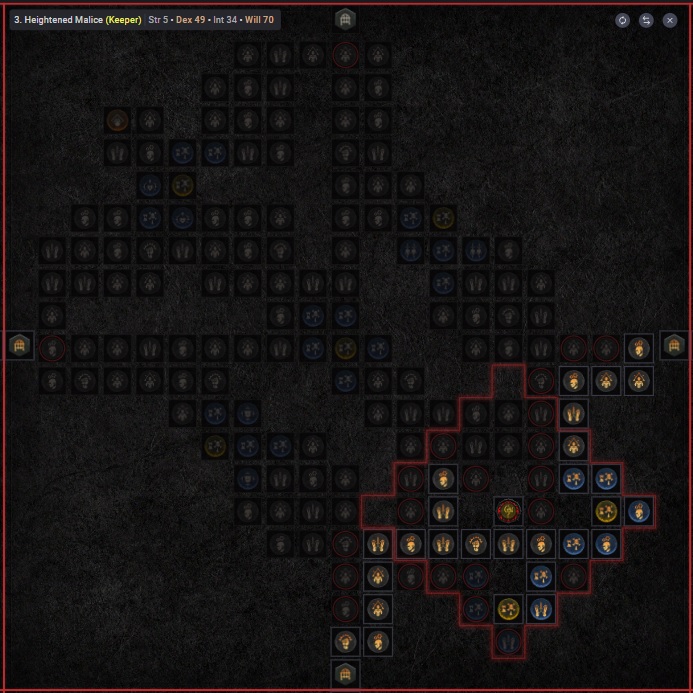
- Head to the open glyph slot picking up
 Nature-born along the way. This will help us against Poisoned Enemies with increased Damage Reduction.
 - Insert
 Keeper, remember to take enough
  Intelligence nodes needed for the bonus as shown above.
 - Now path towards bottom of the glyph radius and take the Rare Node Sinking Fangs, this will boost our Damage against Poisoned Enemies.
- Continue up along the path to the top of the board and attach Constricting Tendrils.
Constricting Tendrils
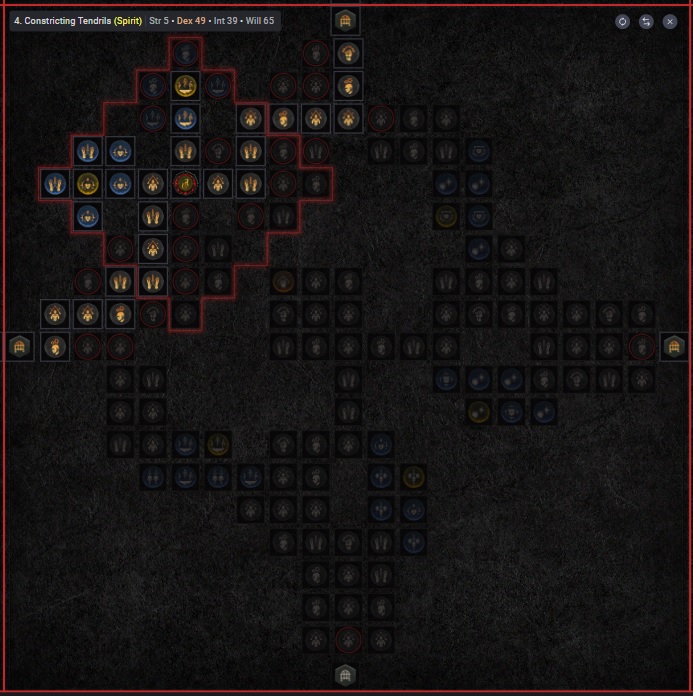
- Take the pathways to the open glyph slot and insert
 Spirit for the boost to our Critical Strike Damage.
 - Now take both Rare nodes inside the glyph radius,
 Nature’s Will and Courage, these will boost our Nature Damage and Maximum Life.
 - Now head to the left hand side connection point and attach Inner Beast .
Inner Beast
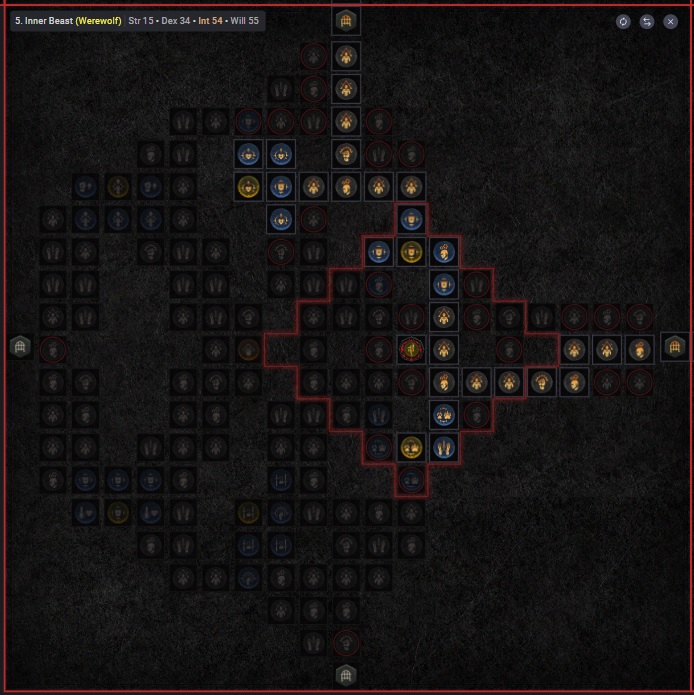
- Head towards the open glyph slot and insert the Werewolf glyph. This will increase our Damage while in Werewolf form.
- Now take the Rare nodes inside the glyph radius,
 Shapeshifter and
  Determination, these will increase our damage for Shapeshifted Skills and grant us bonus Armor.
 - Now take the Rare Node Tenacity for more bonus Armor and Maximum Life.
- Now head to the top of the board and attach Ancestral Guidance to the top connection point.
Ancestral Guidance
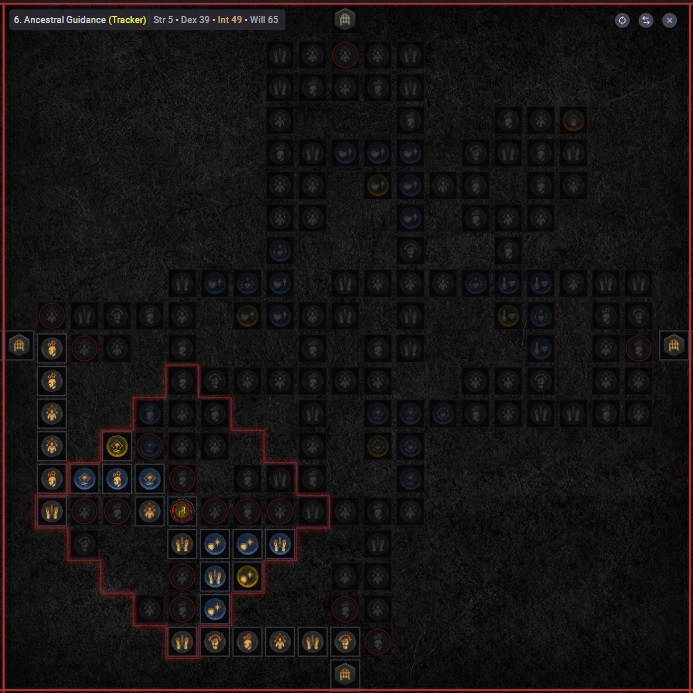
- Head to the open glyph slot and insert Tracker, granting us increased damage to Poisoned Enemies.
- Now take the two Rare Nodes
 Resolve and
  Harmony, with their corresponding Magic Nodes. These two nodes amplify our Resistances and Core Skill Damage.
 - Head to the left hand connection point and and attach our final board Lust for Carnage.
Lust for Carnage
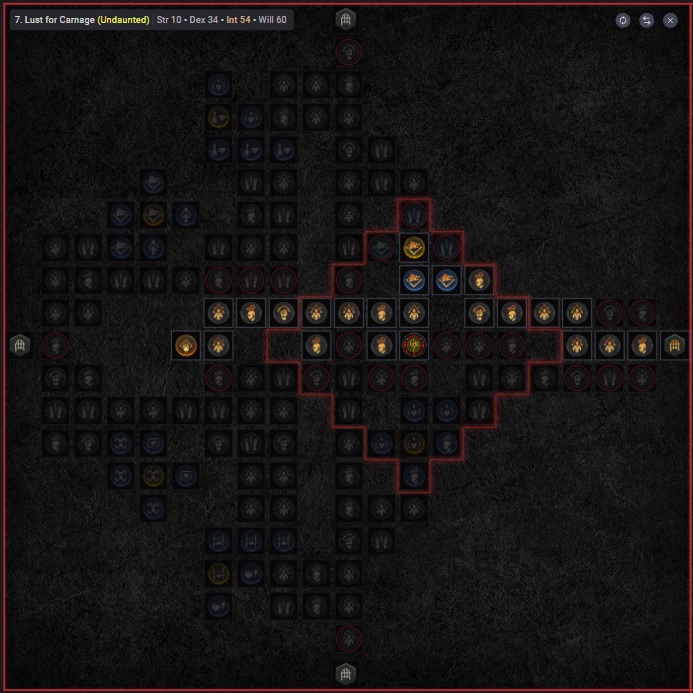
- Path along to the Rare Node
 Feral for the increased Werewolf Skill Damage.
 - Head to the open glyph slot and insert Undaunted into the glyph slot for the increase to Damage and Damage Reduction against Close Enemies.
- Go take the Legendary Node Lust for Carnage, this is extremely important for Spirit regeneration.
- This completes the Paragon Tree for this build.
Paragon board images courtesy of d4builds.gg.
Mechanics and Playstyle
This build combines two of our most powerful builds together into a deadly combo, synergizing our Poison Shredder build and our Tornado Werewolf build. This exceptional blend of power can mow down pack of enemies with Tornadoes then strike down any Elite or Boss with Shred. The Aspect of the Blurred Beast is the secret to this exploding formula, using Tornado to spread poison through Critical Strikes with Toxic Claws.
The playstyle for this build is simple: activate Grizzly Rage and start making Tornadoes. These will clear most of the trash mobs on the map as you move around. Once you run into an Elite or Boss, hit them with a good series of Tornadoes and stack your poisons with each Critical Strike. Use your dodge skill move away from them and dash back towards with Shred to trigger the Aspect of the Blurred Beast. This will detonate the poison stacks and deal all of their damage at once. Rinse and repeat this technique until they are dead, usually once with elites and a couple of times for a heavy Boss. The longer you cast Tornadoes against a target, the more poison stacks we will build, creating bigger damage instances for Shred. We will also be using ![]() Hurricane to help hit enemies for more Spirit and
Hurricane to help hit enemies for more Spirit and ![]() Cyclone Armor to help keep us in the fight, pushing enemies back away from us.
Cyclone Armor to help keep us in the fight, pushing enemies back away from us.
Now that you understand the skill rotation and benefits, let’s look at some of the additional benefits our skills provide while using certain Legendary Aspects.
Grizzly Rage
This skill is paramount to the build; you cannot push endgame content without an effective setup to use with your ![]() Grizzly Rage. To facilitate this, we will equip two specific aspects: Aspect of the Rampaging Werebeast and Dire Wolf’s Aspect.
Grizzly Rage. To facilitate this, we will equip two specific aspects: Aspect of the Rampaging Werebeast and Dire Wolf’s Aspect.
First, Dire Wolf’s Aspect alters the werebear-only skill to be performed as a Werewolf, offering Movement Speed instead of Damage Reduction, as well as a huge amount of Spirit Cost Reduction. This reduction is one of the main keys to us being able to spam ![]() Tornado. Next, Aspect of the Rampaging Werebeast focuses on extending the uptime for our Grizzly Rage. We also can use our
Tornado. Next, Aspect of the Rampaging Werebeast focuses on extending the uptime for our Grizzly Rage. We also can use our ![]() Flickerstep to lower our cooldown as we dash through packs of enemies. With smart play we can keep our Grizzly Rage cooldown at a minimum.
Flickerstep to lower our cooldown as we dash through packs of enemies. With smart play we can keep our Grizzly Rage cooldown at a minimum.
Hurricane
Hurricane is used in this build to keep up our Spirit generation with a decent amount of Lucky Hit Chance and constant ring of damage against any enemies that approach you. This includes Critical Strikes which will instantly fill your Spirit bar as you slam into a group of enemies with your Hurricane. Do your best to keep this skill activated at all times.
Overall, the build’s playstyle is simple to follow: build up your Spirit to maximum and pop Grizzly Rage, then start to spread your poisons with Tornado spam. Use your defensive skills to keep yourself standing strong and then perform targeted strikes against enemies with Shred. All of our Critical Strikes will work together with our Boons to keep our Grizzly Rage Cooldown at a minimum, and keep us generating Spirit. Don’t forget to be using your Hurricane at all times for the easy Spirit increases.
Gear Choice and Stat Priority
As you begin to farm in World Tier 3 and 4, Rare and Legendary item drops will begin to appear with some regularity depending on your luck. We recommend saving the targeted Legendary items that have the needed Legendary Aspects listed below. We also recommended to keep multiple copies of the build’s Aspects in your Stash for future upgrades.
As for the Rare items, you will need to inspect each one for targeted affixes for use in each specific slot and do your best to match the recommended rolls. We have listed our targeted affixes in order of importance. Check the chart below and make note of what affixes you are searching for when you see a Rare gear piece drop.
Season 2 Update (1.2.0): Critical Strike Damage and Vulnerable Damage affixes are changed to be additive with other damage increases. All additive damage increases of the same amount are equal in value, as long as their conditions are active.
| Gear Slot | Targeted Affixes |
|---|---|
| Helm | Tempest Roar |
| Chest | 1. Total Armor 2. Damage Reduction from Close Enemies 3. Damage Reduction from Enemies that are Poisoned 4. Maximum Life 5. Damage Reduction |
| Gloves | 1. Critical Strike Chance 2. Rank up Shred3. Rank up Tornado4. Attack Speed 5. Lucky Hit Chance 6. Critical Strike Damage with Werewolf Skills |
| Pants | |
| Boots | |
| Amulet | 1. Cooldown reduction 2. Spirit Cost Reduction 3. Rank up Toxic Claws4. Willpower 5. Damage Reduction while Injured |
| Rings | 1. Critical Strike Chance 2. Maximum Life 3. Critical Strike Damage 4. Damage To Close Enemies |
| 2-Handed Weapon | 1. Willpower 2. All Stats 3. Damage to Close Enemies 4. Critical Strike Damage |
If you are struggling with Spirit, you can add Resource Generation on your rings.
These Affixes are the recommended picks, but that is simply our opinion. Other Affixes could certainly work instead of the ones listed above, but may not be optimal. Also, there are several very specific affixes that are required to make the build work, particularly around Spirit generation, they are as follows:
A final point on acquiring the right Affixes or Legendary Aspects – use your Obols to target farm them. Obols are awarded from many different activities in the game, you will always stockpiling them until you hit your maximum. Instead of just randomly spending them on a random pick, use them to target what you might be missing from this build. It is a great way to target a specific slot of loot and find what you need.
If you are interested in checking out a new tool for gambling Obols check out this link below from Icy Veins.
Obol Gambling Optimization ToolLegendary Aspects
Listed below are all the best-in-slot Aspects found on Legendary items that are important for the Wolf-Nado Druid build. Aspects from the Codex of Power can be used if you cannot find the proper Legendary drops, but they have weaker effects. Extract Aspects from lower level Legendary items and imprint them onto better Rare items with preferred stats. The endgame itemization goal will be to imprint Aspects with the best values Ancestral Rare items with Item Power above or as close to 800, then upgrade them through the Blacksmith. Each aspect is listed with its matching gear slot. Do your best to keep each Aspect in the slot it was posted with.
| Gear Slot | Legendary Aspect | Legendary Aspect Power |
|---|---|---|
| Helm | ||
| Chest |  Aspect of Disobedience Aspect of Disobedience | You gain [0.25 – 0.50%] increased Armor for 4 seconds when you deal any form of damage, stacking up to [15.00 – 30.00%]. |
| Gloves | Aspect of Retaliation | Your Core Skills deal up to [20-40%] increased damage based on your amount of Fortify. |
| Pants | ||
| Boots | ||
| Amulets(50% bonus) | Dire Wolf’s Aspect | Grizzly Rage now Shapeshifts you into a Dire Werewolf. As a Dire Werewolf you gain [15-25%] Movement Speed instead of Damage Reduction and [30-50%] Spirit cost reduction bonus. In addition, kills Heal you for 10% of your Maximum Life |
| Ring | Aspect of the Rampaging Werebeast | The duration of Grizzly Rage is increased by [1-5] seconds. In addition, Critical Strikes while Grizzly Rage is active increase your Critical Strike Damage by 10% for the duration. |
| Ring | Stormchaser’s Aspect | Tornado will seek up to [1-3] targets. |
| 2-Handed Weapon | Aspect of the Blurred Beast | While dashing, |
Dire Wolf’s Aspect on the Amulet slot for the bonus to Spirit Reduction costs.Uber Uniques
The chart below is our recommendation for Uber Uniques that will work within this build. However, all Uber uniques are extremely powerful and can shine in different situations. Good Hunting!
| Uber Uniques | Recommended(Y/N) | Replaces |
| No | ||
| No | ||
| No | ||
| No | ||
| No | ||
| Yes | Aspect of the Blurred Beast will be moved to the glove slot | |
| No |
Gems
Listed below are the best gems to socket into gear for each slot type.
- Weapon:
 Royal Emerald for critical strike damage to Vulnerable enemies.
 - Armor:
 Royal Ruby for Maximum Life.
 - Jewelry:
 Royal Skull for the bonus Armor.
Elixirs and Health Pots
Visit the Alchemist in any main town to craft helpful Elixirs that increase stats, and experience gain for 30 minutes. Make sure to forage plants and pick up the necessary crafting materials during your adventures; they randomly spawn around the world. Use an Elixir providing any Resistance you need most, or the ![]() Assault Elixir to increase Attack Speed.
Assault Elixir to increase Attack Speed.
Return to the Alchemist again when you reach Level 20, 30, 45, 60, 70, 80 and 90, to upgrade your potion. The extra healing is essential to survival.
Changelog
- January 20th 2024: Season 3 speculative changes.
- December 11th 2023: Revamped Build.
- October 13th 2023: Build Adjusted to prepare for Season 2 launch.
- August 8th 2023: Added notes about Patch 1.1.1.
- August 4th, 2023: Malignant Hearts and Paragon updated for clarity.
- August 2nd, 2023: Build creation Season 1.
