





 Talebound Talent Calculator
Introduction
This guide is intended to provide a comprehensive description of the encounter with Omnotron Defense System in Blackwing Descent. It is targeted at anyone who desires to understand the fight mechanics.
This guide is updated for World of Warcraft WoD 6.1.2.
The Omnotron Defense System is one of the first two encounters in Blackwing Descent, both of which need to be defeated for the raid to gain access to the other bosses. This is not a gear check of any sort, but is meant to test the awareness and reaction time of your raid.
General Information
Health Pool
Omnotron Defense System's shared health pool is as follows:
- in 10 man-difficulty: 25.7M;
- in 25 man-difficulty: 79.3M.
Enrage Timer
The Omnotron Defense System has no enrage timer.
Raid Composition
The following raid compositions are advised:
- in 10-man difficulty: 2 tanks, 2/3 healers, 5/6 dps;
- in 25-man difficulty: 2 tanks, 6/7 healers, 16/17 dps in 25.
Overview of the Fight
This fight is a council type encounter, where you will be faced with four construct bosses, who from this point on will be called "trons". The trons have a shared health pool. Two of the four trons will be active at any one time (with the exception of the pull, when only one will be active).
Detailed Explanation of the Tron Rotation
To understand the interaction of the mechanics present in this encounter and how to handle them it is first imperative that you understand the basic principles that determine which trons you are facing.
Each tron has an energy bar which serves as a counter. A tron activates with 100 energy and deactivates when he reaches 0 energy. The energy of a tron decreases steadily over time from 100 to 0. This process takes exactly 90 seconds, regardless of any player action. A new tron becomes active each time the energy bar of a currently active tron reaches 50, thus every 45 seconds. The order of activation of the trons is random the first time that the encounter is engaged in the lockout, all subsequent attempts following the activation pattern of the first attempt.
The image below illustrates this sequencing:
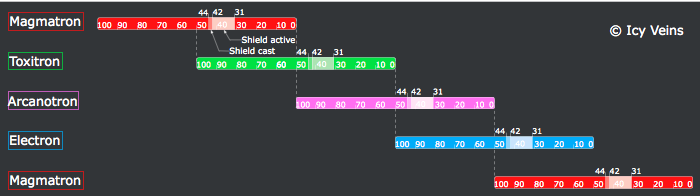
The complexity and difficulty of this fight stems not from each of the individual trons' mechanics, but from the dynamic interaction between them and the confusion that this can cause for unprepared raids and less reactive players.
Summary of Abilities
Each tron has his own set of abilities, in effect only while the tron is active. Each tron has a shield mechanic, which is cast when he reaches 45 energy (shortly after a new tron activation) and lasts for 10 seconds or until broken. In addition to their shields, the trons have two other abilities each, which they cast regularly.
Magmatron
Magmatron is the fire tron and his abilities are:
 Barrier - this is Magmatron's shield, which he casts at 45 energy and
has a duration of 10 seconds. If broken, it results in a large amount of
raid-wide fire damage.
 Incineration Security Measure - this is a powerful AoE fire damage
ability that the tron casts at regular intervals and is unavoidable by anyone
in the raid (except by use of invulnerabilities). Magmatron will cast this
ability 3 times while he is active.
 Acquiring Target - this is Magmatron's most deadly ability, which
targets a raid member and after 4 seconds channels a beam of fire directed
towards that person for 4 seconds. It is unavoidable through movement by the
targeted raid member. Magmatron will cast this ability twice while he is
active.
Toxitron
Toxitron is the nature/poison tron and his abilities are:
 Poison Soaked Shell - this is Toxitron's shield, which he casts at 45
energy and has a duration of 10 seconds. Anyone attacking him during this time
will receive stacks of
 Soaked in Poison.
 Chemical Bomb - Toxitron creates a poison cloud at a targeted
location, causing anyone within the cloud to take 50% increased damage.
Toxitron will cast this ability 3 times while he is active.
 Poison Protocol - Toxitron channels this spell for 10 seconds,
creating 3 adds on 10 man and 5 on 25 man which will fixate on random raid
members and follow them until killed or until they reach their target.
Upon reaching their target, they explode dealing massive damage in a small
radius (and effectively killing everyone in range). Toxitron will cast this
ability twice while he is active.
Arcanotron
Arcanotron is the arcane tron and his abilities are:
 Power Conversion - this is Arcanotron's shield, which he casts at 45
energy and has a duration of 10 seconds. Any damage done to Arcanotron during
this time will increase his magic damage output as well as increase his cast
speed.
 Arcane Annihilator - Arcanotron casts this spell frequently while
active, including while he is shielded. It targets random raid members and can
be interrupted.
 Power Generator - this is a swirling void zone placed on the ground
under Arcanotron, which increases the damage dealt by anyone standing in it by
50%, and provides 250 mana every 0.25 seconds. Arcanotron will cast three Power
Generators while he is active.
Electron
Electron is the electric tron and his abilities are:
 Unstable Shield - this is Electron's shield, which he casts at 45
energy and has a duration of 10 seconds. Damage done during this time can cause
a powerful AoE raid-damaging ability.
 Electrical Discharge - this is a chain-lightning type ability, which
requires the raid to be spread out while Electron is active to minimize damage
taken. It chains to a maximum of 3 enemies. This ability is on a 5 second
cooldown.
 Lightning Conductor - places a debuff on a random raid member which
causes them to deal damage in area around them for 10 seconds. Electron
will cast this ability 4 times while he is active.
Dealing with Abilities
Especially for raids learning the encounter or who are not yet at a point of gear or skill where it becomes trivial, it is imperative to stop attacking the trons when they are shielded as soon as possible. If Magmatron and Electron's shields are broken, the damage will, most often, wipe the raid. Arcanotron's buff from attacking the shield can be purged or spellstolen, and the debuff that Toxitron places on raid members attacking his shield can be dispelled, but it adds extra strain on the healers. Because the trons have a shared health pool, and the shields always become active at the same time as a new tron, it's advisable for your raid to simply switch DPS to the newly activated trons.
Magmatron
Magmatron's Incineration Security Measure is a rather powerful AoE fire
damage ability which hits the raid regularly while he is active, and it is
damage that the healers must simply heal through. Damage reducing
cooldowns, such as  Devotion Aura or
 Power Word: Barrier,
can be alternated to help mitigate the damage. Healing the damage from this
ability is easier if your raid is stacked together.
Magmatron's Acquiring Target, however, can cause problems if your raid
is stacked. The tron will target a random raid member (can be anyone, including
either of the two tanks) and after 4 seconds will begin channeling fire damage
onto them for 4 seconds. This damage must be healed through, although it can be
fully
avoided (indeed, the tron will simply stop casting the spell) through use of
invulnerabilities and its damage can and should be greatly reduced through use
of other damage reduction cooldowns. Below you will find a list of abilities
useful against Acquiring Target.
Complete damage removal:
 Divine Shield for Paladins;
 Ice Block and
 Invisibility for Mages;
 Feign Death and Deterrence for Hunters;
 Vanish and
 Cloak of Shadows for Rogues.
Significant damage reduction:
 Dispersion for Priests;
 Icebound Fortitude and
 Anti-Magic Shell for Death Knights;
 Divine Protection for Paladins;
 Survival Instincts or
 Barkskin for Druids;
 Shield Wall for Warriors.
The most important aspect of Acquiring Target is that it is a
cone-shaped ability, which will damage anyone who is located between Magmatron
and his target, as well as anyone in the immediate vicinity of the target. If
the target moves while the spell is channeling or is being cast, Magmatron's
fire will follow them around. For these reasons, it is important that whoever
is targeted by this ability quickly positions themselves in such a way as not
to damage anyone else, and other raid members (especially tanks and melee DPS)
need to be mindful of this as well and adjust their position accordingly.
Toxitron
Toxitron's Chemical Bomb is fairly harmless in itself, but can cause
damage spikes for anyone careless enough to be inside it and be targeted by
one of the other trons' abilities. A good use of the poison cloud is to have
your tank(s) position the trons inside it and thus cause them to take 50%
increased damage.
Poison Protocol, Toxitron's second non-shield mechanic, can be
extremely deadly if not dealt with appropriately. The tron will summon 3 adds
in 10 player mode and 5 in 25 player mode twice during his active period, and
these must be
focused down and killed by the DPS immediately. Upon spawning, the adds will
fixate on random raid members (they can target anyone except for Toxitron's
tank) and begin to chase them, detonating on contact with their Fixate target.
It is noteworthy that each add will only detonate when reaching its designated
target, and not when coming in contact with other players, including melee
classes.
When detonating, the
subsequent explosion will deal a massive amount of damage in a small radius
around the target the add was chasing thus potentially causing several deaths.
For this reason, it is
important that melee DPS and the other tron's tank move away from Toxitron
until the adds have chosen their targets. The adds can be slowed through most
means, and they should be killed with priority. Whoever is being chased by the
adds needs to be extremely careful, and run away from the adds until they
are dead.
Arcanotron
Arcanotron's Arcane Annihilator is one of the major causes for raid
wipes on this encounter, and is a mechanic that requires constant attention
while this tron is active. Arcanotron will target random raid members with
this spell, and unless interrupted, will cause very high amounts of
unpredictable damage to the raid. It is advised to have another dedicated
interrupter for this ability in addition to Arcanotron's tank. While Arcanotron
is shielded, any attacks will increase his magic damage done and reduce the
cast time of Arcane Annihilator, making it harder to interrupt. Because
Shamans and Mages can purge and spellsteal the buff respectively, it is advised
to have them handle interrupts during his shield. This is also a good idea
because Shamans and mages can interrupt with ease without needing to attack
their target, thus not cause any additional stacks.
Power Generator is absolutely essential to defeating this encounter,
and your healers should make extensive use of the mana regeneration that it
offers. All raid members should attempt to make use of the extra damage dealt
bonus of it, but should be ready to leave it at a moment's notice if they are
targeted by Magmatron's Acquiring Target or if Electron becomes active. Power
Generator is always spawned under Arcanotron, and healers and DPS who are in a
Generator
which is about to expire should move to Arcanotron and be prepared for the next
one. Tanks should make sure to move trons out of Power Generator to avoid
granting the tron increased damage done but should keep them close enough to
the generator to allow melee DPS to attack the tron as well as to reduce the
required amount of running from healers and DPS wishing to enter the next
generator.
Electron
While Electron is active, your raid should be spread out to avoid splashing
damage from both Electrical Discharge and Lightning Conductor. The
only raid members who should not spread out are your healers, in case there is
any Power Generator available. If this is the case, your healers must be
very quick to move out if they are targeted by Lightning Conductor.
Strategy
As mentioned earlier, the complexity of this encounter stems from the interaction between the trons (and their respective abilities), and the key to defeating it is to understand correct positioning and reaction to abilities during any of the possible tron combinations. A few general points must be made about this encounter, after which the above-mentioned combinations will be analyzed in depth.
Firstly, the trons reset if they are targeting players who have left the combat area (thus, players who have passed the doorway), so unless you want to reset the encounter on purpose, avoid leaving the room.
Secondly, it is crucial to be aware of which tron will become active next; this is indicated by a beam of light targeting the upcoming tron (red beam for Magmatron, blue beam for electron, pink beam for Arcanotron and green beam for Toxitron). Knowing which tron will activate next allows your raid to take precautionary measures (such as spreading out beforehand).
Magmatron and Toxitron
This particular tron combination is not too problematic. Your ranged DPS
and healers can be stacked together without any difficulty, but should be
prepared to move out of Chemical Bomb, as being affected by it while also
taking damage from Incineration Security Measure can cause a wipe. If your
raid is choosing to stack during this time, healing will be much easier, and
provided reasonable reaction from your Acquiring Target target, movement
will be kept at a minimum. Toxitron's adds should be dealt with, of course,
with priority.
Magmatron and Electron
This tron combination causes very high amounts of raid damage, and will
strain your healers more than any other. You will want your raid spread out at
least 8 yards apart at all times while Electron is active to minimize the
damage from Electrical Discharge, but this will lower the efficiency of
AoE healing abilities during Incineration Security Measure, so plan
accordingly (single target heal where needed, use of raid cooldowns or personal
cooldowns). If your raid is spread out, Lightning Conductor should not
pose too many problems (though whoever is targeted should still be mindful of
their position). If Acquiring Target targets someone who is in the middle
of your spread-out raid, it can easily lead to multiple people being hit, so be
careful.
Magmatron and Arcanotron
A less raid-damaging combination, this promotes stacking inside
Power Generator for your entire raid, but again, players targeted by
Acquiring Target should be ready to move out at a moment's notice.
Interrupting Arcanotron's Arcane Annihilator remains a priority, as
coupled with the damage from either of Magmatron's abilities, it can quickly
lead to a death.
Toxitron and Electron
This is a fairly trivial combination to deal with. Your raid should be
spread out to avoid damage from Electron's abilities, which also leads to
fewer people needing to move out of Chemical Bomb. Toxitron's adds should,
of course, be dealt with switfly.
Toxitron and Arcanotron
Since there is no raid damage going out during this phase at all, assuming
that Arcane Annihilator is properly interrupted, it is safe for your raid
to stack in Power Generator even if while there you are also targeted by
Chemical Bomb. Toxitron's adds should, as usual, be killed quickly.
Electron and Arcanotron
The final combination of trons you can be faced with requires you to be
spread
out for most of the phase because of Electron's abilities. Yours healers should
make maximum use of Power Generator, and simply heal through any
Electrical Discharge damage on themselves. If a healer is affected by
Lightning Conductor, it is imperative that they move out as soon as
possible.
Tips and Tricks
The trons do not reset aggro when they go inactive, so after the first cycle, threat on the newly activated trons is not a problem - however on the very first activation of each tron, the tanks should be on their toes to make sure healers do not get killed.
You can maximize your raid's DPS on this fight through multiple means:
- keeping the active tron inside Chemical Bomb (while ensuring that the
tank is outside of it).
- keeping the active tron close to a Power Generator (close enough for
the melee to attack it) but outside of it.
- attacking Arcanotron while he is shielded and then having Mages spellsteal
his stacks of
 Converted Power;
- allowing your DPS players to stack Soaked in Poison on themselves for
extra damage done (though they should make sure that there aren't too many
stacks around the raid to make healing too strenuous).
The ideal time for Heroism/Time Warp/Bloodlust is either when a combination of the above has been attained (such as debuffed boss and buffed raid) or simply at the pull, when focusing on a single tron and a limited set of abilities will allow your raid to remain stationary and do more damage.
Learning the Fight
Since there is no mechanic in this encounter that requires high damage output from your raid (with the obvious exception of Toxitron's adds - but that is more about control and reaction than about raw dps numbers) and there is no enrage timer, it is a feasible strategy to use extra healers while learning the encounter. In 10 man, using a 4th healer can often make a huge difference in how well your raid can handle the extra damage taken from abilities being improperly dealt with. In 25 man, using 8 or even 9 healers can work.
Obviously, this will lead to a much slower kill, but will provide a lot more learning time for people to become accustomed with the various abilities.