Necromancer Wraithlord Army Endgame Build for Last Epoch (Patch 1.0)
Build Introduction
Summon the Wraithlord, a ghoulish commander of Wraiths that scale off your own
![]() Summon Wraith spell. The Wraithlord will summon an army of Wraiths for you
that will seek out enemies and destroy them on sight. Obliterate enemies with up
to 20 Wraiths using the Helmet that David Harbour helped create!
Summon Wraith spell. The Wraithlord will summon an army of Wraiths for you
that will seek out enemies and destroy them on sight. Obliterate enemies with up
to 20 Wraiths using the Helmet that David Harbour helped create!
 Low Mana requirements
- Low input requirements; build is accessible for all types of players
- Wraiths are very safe to be around and form a front-line of defense

 For optimal damage, aggressive playstyle is required with
  Transplant and
  Harvest
- Reliant on Wraiths for damage, player has no way of dealing damage themselves

Skill Selection
This build focuses on summoning an army of Wraiths to do your bidding, prioritizing
the damage of your summoned normal Wraiths rather than the damage output coming from the
Wraithlord himself. In order to facilitate this, the build scales Wraiths through
![]() Summon Wraith and uses
Summon Wraith and uses ![]() Dread Shade on the Wraithlord himself to create an
aura that buffs the gaggle of Wraiths as they go from mob to mob.
Dread Shade on the Wraithlord himself to create an
aura that buffs the gaggle of Wraiths as they go from mob to mob.
Don't get confused, although the Wraithlord is the one summoning these Wraiths,
you are still in control as the summoner. ![]() Harvest is used as a way to conduct
the Wraiths, forcing them to prioritize targets you slash at, as well as significantly increasing
the Wraith's Critical Strike Chance when you yourself land a crit with Harvest.
Harvest is used as a way to conduct
the Wraiths, forcing them to prioritize targets you slash at, as well as significantly increasing
the Wraith's Critical Strike Chance when you yourself land a crit with Harvest.
![]() Transplant and
Transplant and ![]() Bone Curse are taken mostly for quality of life enhancements,
allowing for better mobility, but also applying Marked For Death on all enemies hit
when you arrive.
Bone Curse are taken mostly for quality of life enhancements,
allowing for better mobility, but also applying Marked For Death on all enemies hit
when you arrive.

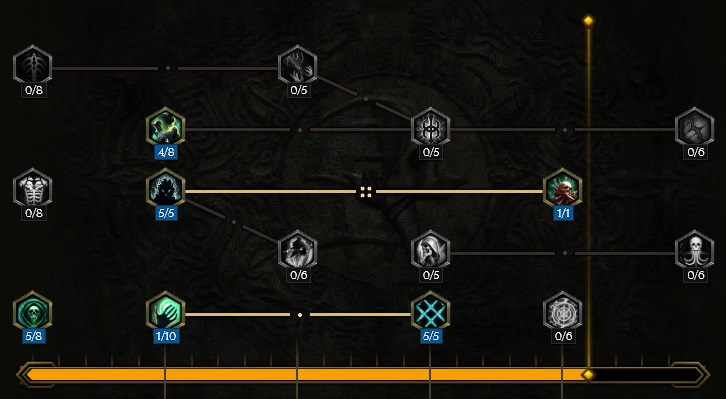
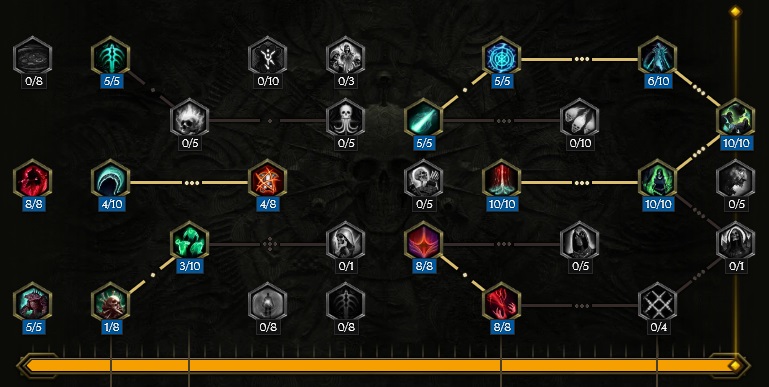
Class and Skill Passive Trees
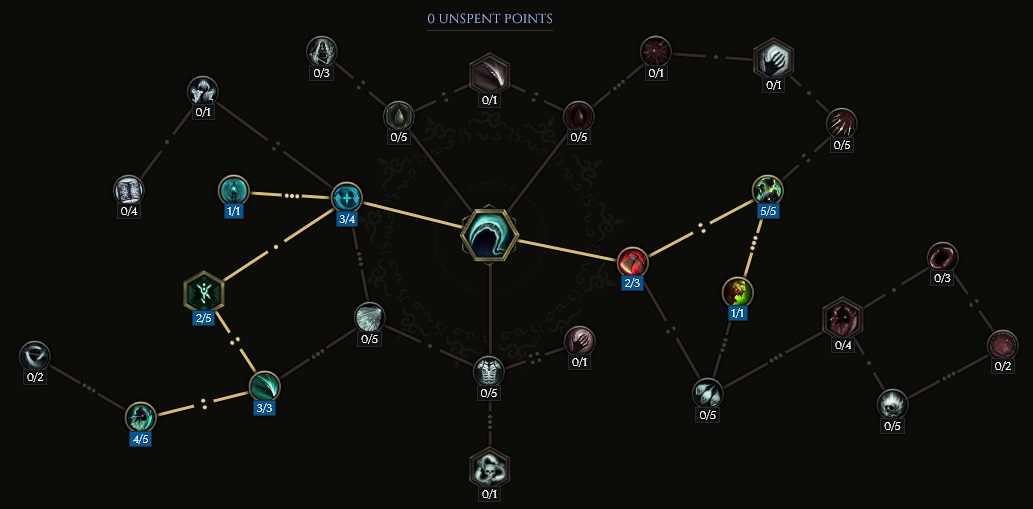
Our base class is Acolyte, which fills the role of mixed spell caster and minion summoner in Last Epoch. Upon finishing Act 1 in the campaign, your character will be offered an opportunity to select an Advanced Mastery. Each base class has three possible Masteries to choose from. For Acolyte, you can choose between Passive Trees for Lich, Necromancer, and Warlock. Upon selecting a Mastery and placing 20 Passive Points into the Mage Tree, you'll then be able to place Passive Points into the Mastery Trees.
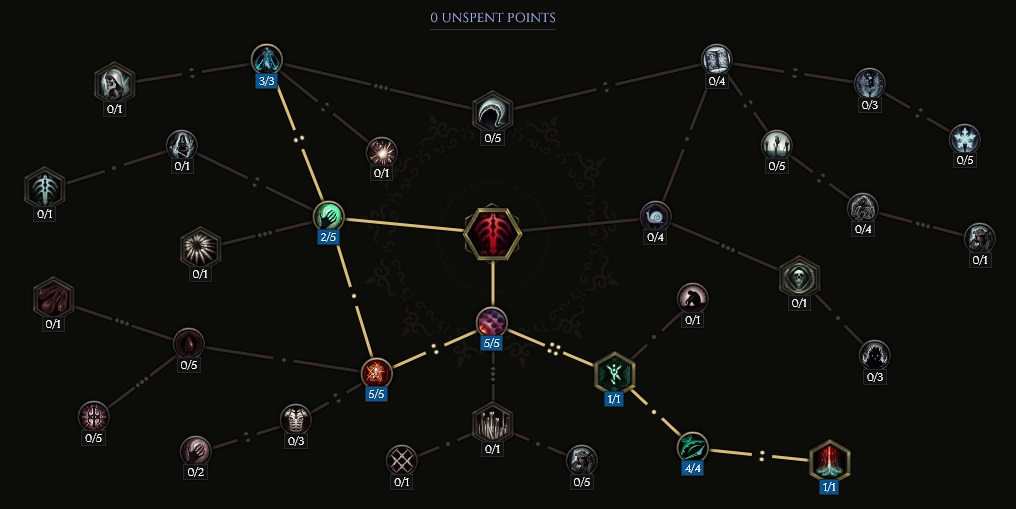
Necromancer is the Advanced Class used for this build, and also where the majority of our Passive Points will come from. The Necromancer Tree will focus around picking nodes that increase our minion's Attack Speed, Critical Strike Chance and Critical Multipliers. There are a few points placed in order to boost the defensive layers of the Wraiths, however these are minimal and just enough to make sure the Wraiths are not one-shot, as Wraith's have natural Health Decay when summoned, and the Wraithlord will continually summon more when they disappear, keeping you capped at near 100% uptime. For personal defenses, nodes are taken in both Acolyte and Necromancer in order to build Ward Retention.
Acolyte Passive Points
- 5 points into Forbidden Knowledge: Boost to Necrotic Resistance and Intelligence.
- 5 points into Dark Rituals: Taken specifically for Minion Attack Speed.
- 4 points into Stolen Vitality: Increased Minion Health, but also boosts Vitality.
- 1 point into Mania of Mortality: Traversal node.
- 5 points into Unnatural Preservation: Taken for Ward Retention, but also supplies important Resistances.
Our base class is Acolyte, which fills the role of mixed spell caster and minion summoner in Last Epoch. Upon finishing Act 1 in the campaign, your character will be offered an opportunity to select an Advanced Mastery. Each base class has three possible Masteries to choose from. For Acolyte, you can choose between Passive Trees for Lich, Necromancer, and Warlock. Upon selecting a Mastery and placing 20 Passive Points into the Mage Tree, you'll then be able to place Passive Points into the Mastery Trees.
Necromancer is the Advanced Class used for this build, and also where the majority of our Passive Points will come from. The Necromancer Tree will focus around picking nodes that increase our minion's Attack Speed, Critical Strike Chance and Critical Multipliers. There are a few points placed in order to boost the defensive layers of the Wraiths, however these are minimal, as Wraith's have natural Health Decay when summoned, and the Wraithlord will continually summon more when they disappear, keeping you capped at near 100% uptime. For personal defenses, nodes are taken in both Acolyte and Necromancer in order to build Ward Retention.
Necromancer Passive Points
- 8 points into Risen Army: Minion Damage and Attack Speed.
- 5 points into Grave Thorns: Huge boost to minion survivability with Health and Armor.
- 1 point into Blood Armor: Traversal node.
- 5 points into Reclamation of Souls: Ward Retention and additional Ward when a Wraith dies.
- 4 points into Cursed Blood: Increases the Necrotic Damage for Wraiths.
- 3 points into Mortal Tether: 45% Health increase for Minions.
- 4 points into Aegisfall: Provides 100% chance for Wraiths to Shred Armor on hit.
- 5 points into Frantic Summons: Minion Attack Speed boost.
- 8 points into Tyrant: 24% increased Health, converted into Ward due to low life.
- 8 points into Cling To Life: Vitality, used for Ward, and extra Resistances for Wraiths.
- 10 points into Moonlight Pyre: Added Necrotic Damage for Wraiths.
- 5 points into River of Bones: Adds Critical Strike Chance and Leech for Wraiths.
- 6 points into Heresy: Boosts our Intelligence and Minion Critical Strike Chance.
- 10 points into Rite of Undeath: Major increases to Resistances and Necrotic Damage for minions.
- 10 points into Blades of the Forlorn: Critical Multipler for Minions.
In this section, we will break down each skill and highlight the key passives we have selected to make the skill shine in the build. While some of these skills do allow for some variation to exist depending on your own custom choices, we recommend utilizing the skill trees as presented until you have a strong understanding of the build itself.
Summon Wraith
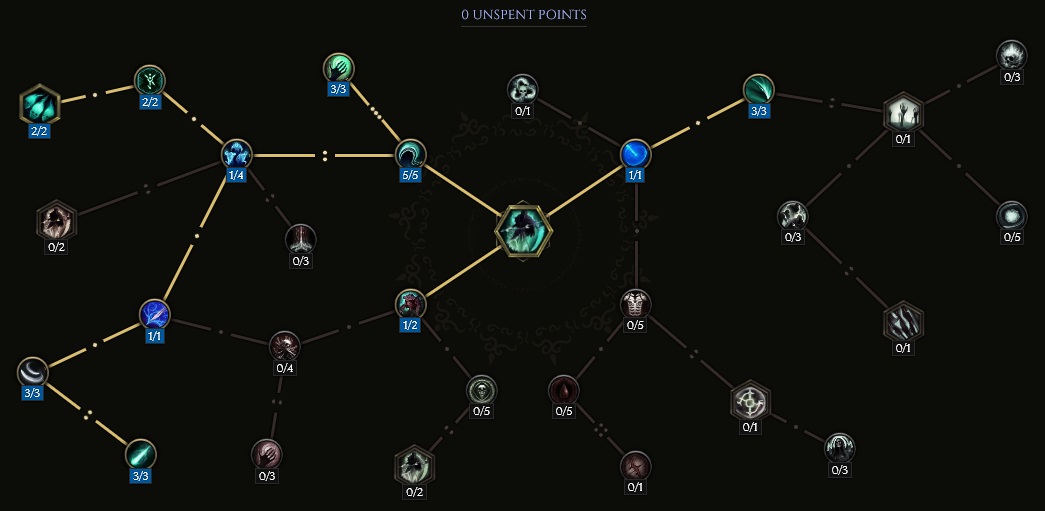
![]() Summon Wraith will no longer summon actual Wraiths with this build due to Wraithlord's Harbor. Instead, you now have access to
the Wraithlord, which is a Minion that will summon Wraiths for you, and these Wraiths scale off your own
Summon Wraith Passive Tree. While the Wraithlord himself can attack with Necrotic Beams, this build instead utilizes
the ability for the Wraithlord to summon up to 20 Wraiths to decimate enemies with Melee attacks. As such, this skill
will be used to increase the Melee capabilites for the Wraiths as much as possible, as well as adding in additional
Wraiths to be summoned by the Wraithlord.
Summon Wraith will no longer summon actual Wraiths with this build due to Wraithlord's Harbor. Instead, you now have access to
the Wraithlord, which is a Minion that will summon Wraiths for you, and these Wraiths scale off your own
Summon Wraith Passive Tree. While the Wraithlord himself can attack with Necrotic Beams, this build instead utilizes
the ability for the Wraithlord to summon up to 20 Wraiths to decimate enemies with Melee attacks. As such, this skill
will be used to increase the Melee capabilites for the Wraiths as much as possible, as well as adding in additional
Wraiths to be summoned by the Wraithlord.
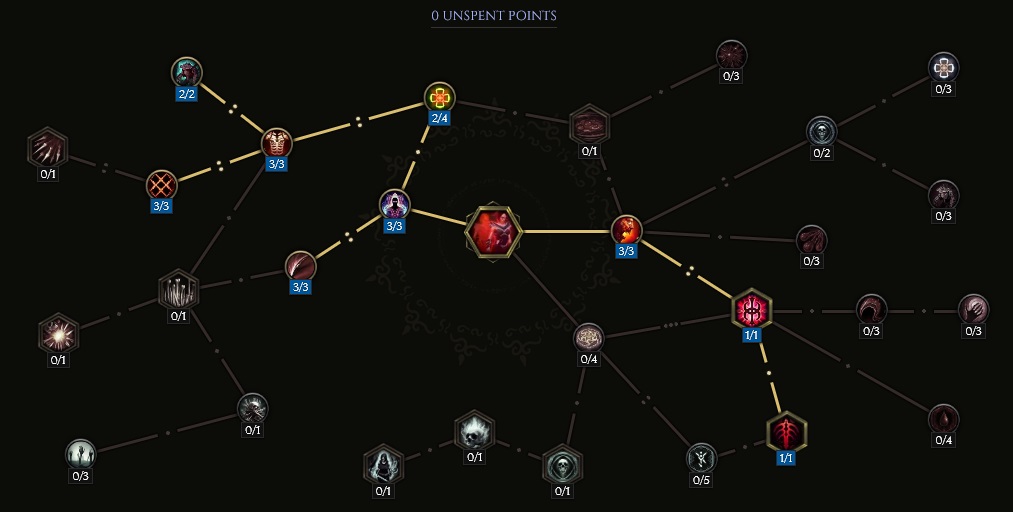
Order of Skill Points
- 5 points into Reapers: Adds 20 Necrotic Damage base to Wraiths.
- 3 points into Necrotic Hunger: More Necrotic Damage and allows Wraiths to Leech Health with Necrotic Damage.
- 1 point into Wraith Bringer: Traversal node. We will not be summoning except for the initial summon for the Wraithlord.
- 2 points into Fallen Reclamation: Increases Wraith Movement Speed.
- 2 points into Covenant of Souls: Adds two Wraiths to your maximum Wraith pool.
- 1 point into Spirit Link: Adds base Critical Strike Chance to Wraiths.
- 3 points into Dawn of the Fall: Adds further base Critical Strike Chance for Wraiths, and they now Leech from Critical Damage.
- 3 points into Dusk of the Living: Adds Critical Multiplier for Wraith hits.
- 1 point into Locus Of Resurrection: Traversal node.
- 3 points into Dark Scythe: Wraiths get 30% extra Attack Speed.
In this section, we will break down each skill and highlight the key passives we have selected to make the skill shine in the build. While some of these skills do allow for some variation to exist depending on your own custom choices, we recommend utilizing the skill trees as presented until you have a strong understanding of the build itself.
Dread Shade
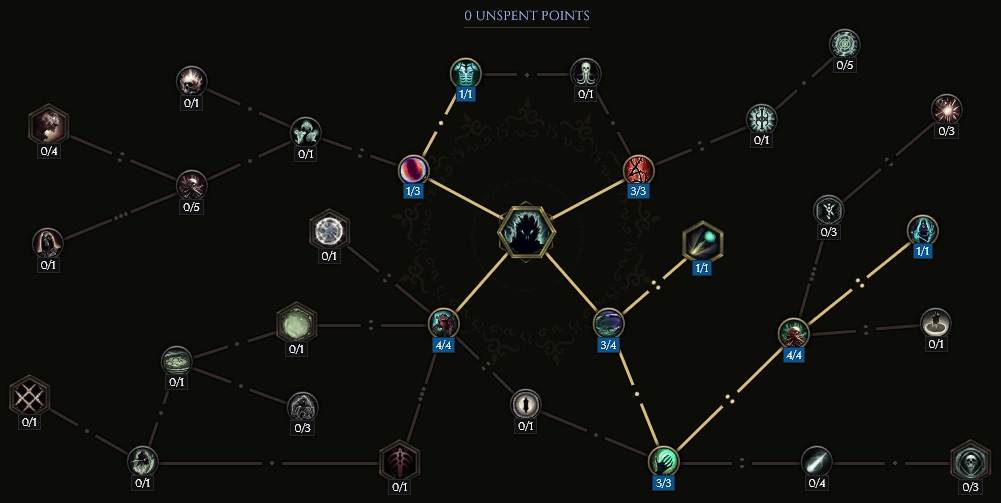
![]() Dread Shade's purpose for this build is to create an aura off the Wraithlord to boost the damage
of all nearby Wraiths. We limit the Dread Shade to one active at all times, remove the decay, and then use it to increase
damage, Attack Speed and Necrotic Damage for all affected Minions.
Dread Shade's purpose for this build is to create an aura off the Wraithlord to boost the damage
of all nearby Wraiths. We limit the Dread Shade to one active at all times, remove the decay, and then use it to increase
damage, Attack Speed and Necrotic Damage for all affected Minions.
Order of Skill Points
- 3 points into Spectral Presence: Increases the area for Dread Shade's effect by 75%.
- 1 point into Lone Watcher: Dread Shade no longer drains Health, but is limited to once instance being active.
- 3 points into Dying Coven: Increases the Attack Speed of all nearby Wraiths.
- 4 points into Grim Fate: Increases the area of Dread Shade and Minions within its range gain 100% more damage.
- 1 point into Symbiotic Apparition: You now also gain the effects of Dread Shade.
- 4 points into Lingering Doom: Adds 12 Necrotic Damage to all nearby Minions.
- 1 point into Wisdom of the Dead: Traversal node.
- 1 point into Martyrdom: Scales the Armor of all nearby Minions by your own Vitality.
- 3 points into Flesh Harvest: Increases all buffs within this tree scaling off missing Health. This is perfect for Wraiths, as they have natural Health Decay.
In this section, we will break down each skill and highlight the key passives we have selected to make the skill shine in the build. While some of these skills do allow for some variation to exist depending on your own custom choices, we recommend utilizing the skill trees as presented until you have a strong understanding of the build itself.
Harvest
![]() Harvest is used in the same fashion a maestro would conduct their band. In this build, Harvest
is used to direct Minions to attack, but also operates as a way to boost the Wraith's Critical Strike Chance when
we ourselves land a critical hit. This does require us to be within melee range, so keep that in consideration when
attempting to get this buff onto the Wraiths. While aggressive gameplay is encouraged, you don't want to die while
trying to get a melee hit off.
Harvest is used in the same fashion a maestro would conduct their band. In this build, Harvest
is used to direct Minions to attack, but also operates as a way to boost the Wraith's Critical Strike Chance when
we ourselves land a critical hit. This does require us to be within melee range, so keep that in consideration when
attempting to get this buff onto the Wraiths. While aggressive gameplay is encouraged, you don't want to die while
trying to get a melee hit off.
Order of Skill Points
- 2 points into Finality: Adds Kill Threshold, but mainly for traversing the tree.
- 5 points into Legion of the Lich: When you crit, your Minions also gain an increase in Critical Strike Chance.
- 1 point into Undead Harvest: Minions will now prioritize the targets you strike with Harvest, as well as increasing the damage the enemies hit take by your Minions.
- 3 points into Mind Harvest: Using Harvest now grants Ward when it hits a Cursed enemy.
- 1 point into Mirror Soul: Grants additional Ward based on your maximum Health.
- 2 points into Symbol of Loss: Traversal node.
- 3 points into Spectral Whetstone: Adds base Critical Strike Chance.
- 4 points into Learned Weakness: Adds Increased Crit Chance when you hit a Cursed enemy with Harvest.
In this section, we will break down each skill and highlight the key passives we have selected to make the skill shine in the build. While some of these skills do allow for some variation to exist depending on your own custom choices, we recommend utilizing the skill trees as presented until you have a strong understanding of the build itself.
Bone Curse
![]() Bone Curse boosts the damage Wraiths deal by afflicting enemies hit with Shred Armor
and Marked For Death. While it would be wise to reapply it manually if needed, this build automates
Bone Curse with
Bone Curse boosts the damage Wraiths deal by afflicting enemies hit with Shred Armor
and Marked For Death. While it would be wise to reapply it manually if needed, this build automates
Bone Curse with ![]() Transplant, allowing for more aggressive and mobile gameplay and avoiding the cast time associated
with Bone Curse itself. On top of this, Bone Curse comes with a Kill Threshold of 12%, which becomes increasingly more
valuable the higher in Corruption you go.
Transplant, allowing for more aggressive and mobile gameplay and avoiding the cast time associated
with Bone Curse itself. On top of this, Bone Curse comes with a Kill Threshold of 12%, which becomes increasingly more
valuable the higher in Corruption you go.
Order of Skill Points
- 5 points into Conflation: Forced for pathing, but increases the size of Bone Curse, making it beneficial.
- 1 point into Sigil of Mortality: Marks enemies for death for 2 seconds.
- 4 points into Reaper's Mark: Doubles the duration for Mark for Death to 4 seconds.
- 1 point into Misery: Converts Bone Curse into Necrotic Damage.
- 5 points into Defile Defenses: Applies Shred Armor stacks on application of Bone Curse.
- 2 points into Iron Maiden: Bone Curse now deals more damage. Taken to path to the next node.
- 3 points into Brittle Bones: 12% Kill Threshold.
In this section, we will break down each skill and highlight the key passives we have selected to make the skill shine in the build. While some of these skills do allow for some variation to exist depending on your own custom choices, we recommend utilizing the skill trees as presented until you have a strong understanding of the build itself.
Transplant
![]() Transplant is more than just a mobility skill; it automates
Transplant is more than just a mobility skill; it automates ![]() Bone Curse,
applies Bone Armor, and activates Haste and Frenzy. Since this build is
played at near 0 Health anyway, Transplant costs next to nothing to use. Once casted, Transplant
will provide an extra 15 Melee Damage to all Minions.
Bone Curse,
applies Bone Armor, and activates Haste and Frenzy. Since this build is
played at near 0 Health anyway, Transplant costs next to nothing to use. Once casted, Transplant
will provide an extra 15 Melee Damage to all Minions.
Order of Skill Points
- 3 points into Acolyte's Fervor: Grants Haste and Frenzy on Transplant usage.
- 1 point into Reign of Blood: Traversal node.
- 1 point into Doom Bringer: Automates
 Bone Curse, which allows us to apply Marked For Death when using Transplant.
 - 3 points into Fleeting Form: Reduced cooldown.
- 3 points into Marrow Blades: Adds 15 Melee Damage to Wraiths.
- 2 points into Anemia: Traversal node.
- 3 points into
 Bone Armor: Allows for safety when playing a bit more risky by adding Armor and Damage Reduction when Transplant is used.
 - 2 points into Apostasy: Increases Bone Armor's duration by 50%.
- 2 points into Plated Bone: Bone Armor effects are increased by 20%. (This was removed, points will be redistributed when the build is updated.)
Build Mechanics and Playstyle
The playstyle for this build is traditional Minion gameplay, where your Minions do the majority of the work
for you while you keep buffs up to ensure they're doing consistent damage. ![]() Dread Shade should be kept up on
the Wraithlord permanently, as this is buffing all nearby Wraiths. If you're able to play more aggressively,
using
Dread Shade should be kept up on
the Wraithlord permanently, as this is buffing all nearby Wraiths. If you're able to play more aggressively,
using ![]() Transplant to drop
Transplant to drop ![]() Bone Curse on top of enemies is deal as this applies Marked For Death
on them and also boosts Minion Melee Damage by 15.
Bone Curse on top of enemies is deal as this applies Marked For Death
on them and also boosts Minion Melee Damage by 15.
Overall, the gameplay loop for this build is very hands off. Your only real goal is just to not die, as the Wraithlord will do all the summoning for you. Wraiths generated count as your own Minions, not the Wraithlords; this is great, because if the Wraithlord dies, he won't take all the Wraiths with him. Simply resummon him and move along. Since your only job is to not die, we've gone low life to generate Ward to keep us safe. To further facilitate this, Ambitions of an Erased Acolyte is used in the relic gear slot, which takes a portion of the Health from slain enemies and converts it to Ward.
Aberrant Call is how we are able to summon so many Wraiths, however it does come with a slight downside. Minions lose 6% of their Health per second. We don't care much about the Wraiths themselves due to Health Leech and the fact the Wraithlord summons extremely fast, but we do care about the Wraithlord's Health. To combat this Health drain, Flat Minion Health Regen is used on the belt. This keeps the Wraithlord slightly below half Health, and allows him to tank a few hits without being one-shot.
Equipment and Gear Affixes
For this build, we will be focusing on several main affixes for each piece of non-unique gear, as well as working towards acquiring the specific Uniques needed to make this build operate correctly. Our equipment will focus on these specific affixes for the Implicits and Modifier stats.
| Gear Slot | Implicits | Modifiers |
|---|---|---|
| Staff | Aberrant Call | Legendary Potential Minion Melee Damage, Minion Bow Damage Minion Melee Damage, Minion Spell Damage |
| Head | Wraithlord's Harbor | Legendary Potential Increased Critical Strike Chance, Increased Minion Critical Strike Chance Intelligence |
| Amulet | Increased Minion Damage Increased Minion Critical Strike Chance |
Prefixes Increased Minion Damage Increased Minion Health Suffixes Health Cold Resistance |
| Chest | Exsanguinous | Legendary Potential Intelligence Increased Critical Strike Chance, Increased Minion Critical Strike Chance |
| Belt | Poison Resistance Cold Resistance |
Prefixes Increased Minion Damage Minion Health Regen Suffixes Critical Strike Avoidance Hybrid Health |
| Gloves | Frostbite Shackles | Legendary Potential Current Health Lost per Second, Missing Health Gained as Ward per Second |
| Rings | Increased Minion Damage Minion Critical Strike Multiplier Increased Minion Health |
Prefixes Increased Minion Damage Intelligence Suffixes Health Needed Resistances |
| Rings | Increased Minion Damage Minion Critical Strike Multiplier Increased Minion Health |
Prefixes Increased Minion Damage Intelligence Suffixes Health Needed Resistances |
| Feet | Last Steps of the Living | Legendary Potential Hybrid Health Increased Minion Damage, Minions Teleported around you after you use a Traversal Skill |
| Relic | Ambitions of an Erased Acolyte | Weaver's Will Cold Resistance Fire Resistance |
A loot filter made specifically for the gear table above may be copied by pressing the button below. Once in the Loot Filter portion of the in-game menu, choose the "Paste Clipboard Contents" option to import the code.
Copy Loot Filter to Clipboard
Uniques
The items listed below have either been selected in order to make the build function, or to provide defensive layering in order to climb Corruption.
Wraithlord's Harbor
Wraithlord's Harbor: Allows you to summon the Wraithlord, that will now summon Wraiths for you. This helmet actually has two ways it can be used; the first being that the Wraithlord can be scaled up and uses a Necrotic Beam to annihilate targets, and the second is how it's used in this build, as a way to create an army of Wraiths. This helmet can be farmed in the Monolith Timeline "The Black Sun" Unique or Set Rewards.
Exsanguinous
Exsanguinous: One part of how we will generate Ward, this chest piece drains Health while converting the amount of missing Health we have into Ward. This unique chest piece can be target farmed in the Monolith Timeline "Blood, Frost, and Death".
Last Steps of the Living
Last Steps of the Living: Just as Exsanguinous does, these boots also drain Health in exchange for supplying Ward for the amount of missing Health. When both of these items are combined, they will be converting around 30% of your Health per second into Ward. Target farm on the Monolith Timeline "Blood, Frost, and Death".
Aberrant Call
Aberrant Call: This staff is an extremely important aspect to the build, and without it you likely won't get very far. This is how we summon so many Wraiths. The range on the Wraith Count roll is rather wide, from 6 to 12, so ideally you roll somewhere on the high end of this. Low rolls may have differing performance from what is expected in this guide. This staff can be target farmed in the Monolith Timeline "The Stolen Lance" Unique or Set Rewards.
Frostbite Shackles
Frostbite Shackles: These gloves are the reason why we scale so aggressively into Cold Resistance, as they provide a large amount of Ward Retention, which allows our low life items to scale our Ward even higher. These gloves are a rare drop from Frost Lich Formosus which is the Boss from the Monoloth Timeline "Blood, Frost, and Death".
Ambitions of an Erased Acolyte
Ambitions of an Erased Acolyte: This is a Weaver's Will item, but the unique affix that allows us to absorb a portion of enemies' Health on death, then convert it to Ward, is massive. It also enables us to gain an extra Skill Point for every skill in the build. This can be farmed in the Monolith Timeline "The Last Ruin".
Idols
Idol slots are gained through the campaign, unlocking small bonuses and unique affixes for the player to discover and augment their builds with. The Idol screen consists of a grid system for the player to fill out with different sized Idols, eventually filling in every part of the grid. As the Idol shape increases (1x1, 1x2, 1x3, 1x4, etc.) the stronger an affix you might find for your build.
Nearly every Idol slot should be filled with either Large or Stout Idols, focusing on Health gains and Ward Retention. Reserve a single Large Immortal Idol for Chance to Marked for Death on Minion Hit to enable Wraiths to apply Curse.
Blessing
Blessings are permanent buffs that are applied to your character. These come in two different powers, Standard and Grand. Grand blessings are significantly stronger than the Standard Blessings. In total, there are 10 Blessing Slots, one for each Monolith Timeline. When you complete a Monolith and defeat the final boss you will be awarded a choice of three blessing with a random value.
| Blessing Name | Affix | Timeline |
|---|---|---|
| Void Resistance | The Black Sun | |
| Lightning Resistance | Ending the Storm | |
| Cold Resistance | The Age of Winter | |
| Critical Strike Avoidance | Reign of Dragons | |
| Increased Minion Damage | Spirits of Fire |
Normally the Resistance Blessings are left open, however this build wants to stack Cold Resistance, which limits how and where we can cap Resistances. It is advised to follow the above Resistances as they're presented.
Changelog
- 13 Mar. 2024: Build Planner added.
- 28 Feb. 2024: Guide added.

GhazzyTV is a professional content creator that knows all about theory crafting builds in Path of Exile and Last Epoch and has been teaching players how to build their characters for over 9 years. He is a huge Blizzard fan with thousands of hours invested into Diablo 3 and 4 and is a frequent World of Warcraft Classic player. His builds will be helpful content for new players and veterans alike. You can find his PoE Vault Guide Hub here and his LE Guide Hub here. You can follow him on Twitch, YouTube or Twitter.
- Last Epoch Season 4: Shattered Omens Adds Corruption Crafting, a New Pinnacle Boss, and More!
- Delaware Courts Just Proved Last Epoch’s Real Risk Isn’t Failure, But Success
- Last Epoch’s New Paradox: From “All Future Content Free” to Paid Classes
- Last Epoch Confirms Paid DLC Classes With Free Expansion
- Last Epoch Season 3 Overhauls Skills, UI, Monster Behavior & More
- Last Epoch Season 3 Adds Smarter Minions & Big Changes
- Lich & Necromancer Get New Skill, Buffs, and Dark New Builds in Last Epoch!
- Last Epoch Season 3 Explores the Ancient Era!