Paladin Aurelis' Judgement Endgame Build for Last Epoch (Patch 1.1)
Welcome to our Last Epoch Paladin Aurelis' Judgement build guide for the Sentinel class. Here you will learn everything about the Paladin play style, passives, skills, strengths, and weaknesses to conquer the world of Eterra.
Build Introduction
Smite legions of foes and watch them sizzle before you.
Using ![]() Smite as the main driver. Using
Smite as the main driver. Using ![]() Healing Hands we are immune while dashing across
the battlefield. Using
Healing Hands we are immune while dashing across
the battlefield. Using ![]() Multistrike, we will apply massive amounts of Lightning Damage directly, and
overtime with Healing Hands. Any foe that manages to get close will need to deal with
The Aurelis, where the might of the gods will once again step in and lend a deathly hand.
Multistrike, we will apply massive amounts of Lightning Damage directly, and
overtime with Healing Hands. Any foe that manages to get close will need to deal with
The Aurelis, where the might of the gods will once again step in and lend a deathly hand.
 Massive critical strikes
- Visually pleasing
- Simple skill rotations and mobility
- Simple bossing mechanics

 Must learn to manage Mana gain/loss
- Heavy gearing requirements
- Less defensive than other Sentinel Builds

Skill Selection
Our skill selection for this build focuses on amplifying our damage for ![]() Smite
with ample Critical Strike Multiplier while using the ever-powerful
Smite
with ample Critical Strike Multiplier while using the ever-powerful ![]() Holy Aura to keep us
protected and amplifying damage further. Our passives push an incredible amount of Critical
Strike Avoidance as well as our Endurance. This melee pseudo-caster will hand out heaps of damage,
but is also capable of taking hits and healing the damage taken just as quickly.
Holy Aura to keep us
protected and amplifying damage further. Our passives push an incredible amount of Critical
Strike Avoidance as well as our Endurance. This melee pseudo-caster will hand out heaps of damage,
but is also capable of taking hits and healing the damage taken just as quickly.

Class and Skill Passive Trees
Our base class is the Sentinel, which acts as a generic melee fighter. Our character will be offered an opportunity to select an Advanced Mastery once we have completed the first act of the campaign. Each base class has three possible masteries to choose from. For the Sentinel, we have access to the Mastery Tree Passives for Void Knight, Paladin and Forge Guard. Upon selecting a Mastery and placing 20 Passive Points into the Sentinel Tree, you'll then be able to place Passive Points into the Mastery Trees.
For the Aurelis' Hands build, we will be picking Paladin as our advanced class. We will utilize the majority of our
Passive Points in the Paladin Passive Tree, targeting augments for ![]() Smite damage
and boosting survivability. Each of the Passive Trees and their points are broken down below.
Smite damage
and boosting survivability. Each of the Passive Trees and their points are broken down below.
Sentinel Passive Points
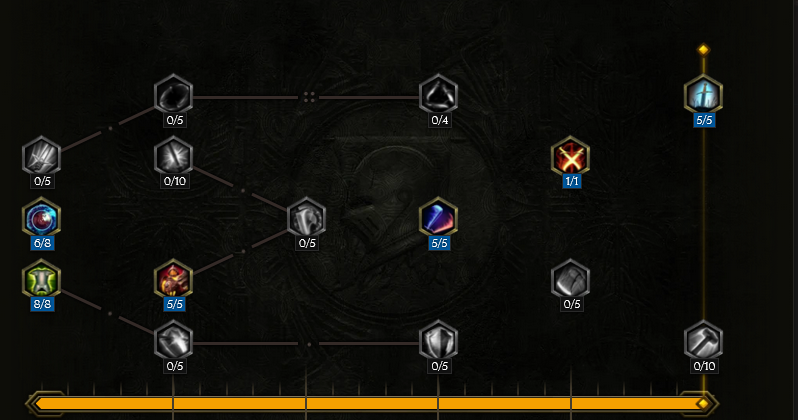
- 6 points into Juggernaut: Stat and Resistance increases.
- 5 points into Armour Clad: Increased Armor and Damage Reduction from nearby enemies.
- 8 points into Fearless: Increases our base Health and Health Regen.
- 5 points into Time and Faith: This node is variable, and can be decreased if necessary by adding points to Juggernaut. We need to find a balance in Mana gain and usage in order to make the best use from our Devotion.
- 1 point into Gladiator: This allows us to equip a sword in our off-hand.
- 5 points into Blademaster: This node can be saved for the end of the build if you notice attack speed is 'good enough' for bossing. It is only with bossing that this node becomes more prevalent.
Our base class is the Sentinel, which acts as a generic melee fighter. Our character will be offered an opportunity to select an Advanced Mastery once we have completed the first act of the campaign. Each base class has three possible masteries to choose from. For the Sentinel, we have access to the Mastery Tree Passives for Void Knight, Paladin and Forge Guard. Upon selecting a Mastery and placing 20 Passive Points into the Sentinel Tree, you'll then be able to place Passive Points into the Mastery Trees.
For the Aurelis' Hands build, we will be picking Paladin as our advanced class. We will utilize the majority of our
Passive Points in the Paladin Passive Tree, targeting augments for ![]() Smite damage
and boosting survivability. Each of the Passive Trees and their points are broken down below.
Smite damage
and boosting survivability. Each of the Passive Trees and their points are broken down below.
Paladin Passive Points
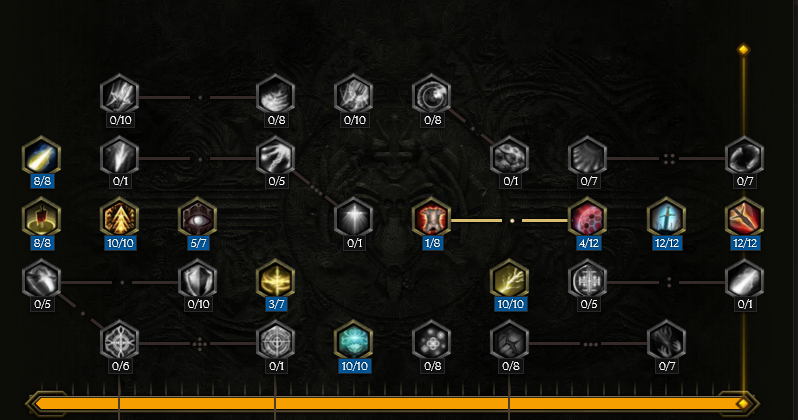
- 8 points into Conviction: Provides Damage Penetration and Damage increases.
- 8 points into Defiance: Increases Elemental Resistances and Attunement.
- 10 points into Valor: We add a large chunck of base HP and Healing effectiveness.
- 5 points into Blinding Light: We add 25% Blind Chance, which increases our
 Smite Damage
and add 10% to our endurance.
Smite Damage
and add 10% to our endurance. - 3 points into Holy Icon: Increases Healing effectiveness, gives base Health, and Necrotic Resistance.
- 10 points into Dedication: Gives base Attunement and Mana Regen.
- 1 points into Faith Armour: Increases our Armor and Critical Strike Avoidance.
- 4 point into Prayer Aegis: Adds base Health, Endurance Threshold, and provides Haste when we are below the Threshold.
- 10 points into Holy Precision: Increases Critical Strike Chance with Spells and Critical Multiplier with Lightning Damage.
- 12 points into Reverence of Duality: Increases to Health, Damage, Healing Effectiveness and Mana.
- 12 points into Light of Rahyeh: Increase our lightning damage and Movement Speed significantly.
In this section, we will break down each skill and highlight the key passives we have selected to make the skill perform as best as possible in the build. While some of these skills do allow for some variation to exist depending on your own custom choices, we recommend utilizing the skill trees as presented until you have a strong understanding of the build itself.
Healing Hands

![]() Healing Hands will be automated on our attacks. These attacks will add several stacks of Electrify
with increased damage, and will cause it to spread. This is additive to the Electrify from our Aurelis. This will
also be our movement skill.
Healing Hands will be automated on our attacks. These attacks will add several stacks of Electrify
with increased damage, and will cause it to spread. This is additive to the Electrify from our Aurelis. This will
also be our movement skill.
Order of Skill Points
- 4 points into Cleric's Hammer: This will cause healing hands to hit with our attacks from
 Multistrike.
 - 1 point into Searing Light: Traversal Node.
- 2 points into Cleric's Wrath: This causes Healing Hands to do 60% more damage, from our 3 total buff tagged skills. (Healing Hands, Symbols of Hope, and Holy Aura)
- 4 points into Consecrated Storm: This will cause Healing Hands to apply Electrify.
- 4 points into Holy Winds: This increased our lightning damage over timem and causes Electrify to spread.
- 2 points into Virtue of Patience: This adds more damage to our Healing Hands.
- 1 point into Purity of Thought: This reduces the cost of Healing Hands.
- 1 point into Rahyeh's Chariot: This allows us to use Healing Hands as a movement skill.
- 1 point into Sun Shroud: We are immune while traveling with Healing Hands.
In this section, we will break down each skill and highlight the key passives we have selected to make the skill perform as best as possible in the build. While some of these skills do allow for some variation to exist depending on your own custom choices, we recommend utilizing the skill trees as presented until you have a strong understanding of the build itself.
Smite

![]() Smite is the light show that will cause the demise of our enemies. We do not have use it on the bar, as it is not necessary to directly cast this skill.
Smite is the light show that will cause the demise of our enemies. We do not have use it on the bar, as it is not necessary to directly cast this skill.
Order of Skill Points
- 5 points in Blinding Flash: Gives us a chance to Blind enemies, dealing 50% more damage to Blinded enemies.
- 2 points in Piety: Adds a chance to Electrify enemies.
- 1 point in Order of Lagon: Converts the skill to Lightning Damage.
- 1 point in Unbalanced Scale: Adds Lightning bolt to Smite, hitting three nearby enemies.
- 5 points in Sacrifice: 250% damage boost at a cost of 15% Health.
- 5 points in Atonement: Removes 100% of the Health cost associated with
 Sacrifice.
 - 3 points in Conviction: Increases Smite's base Critical Strike Chance.
- 4 points in Deep Impact: Boosts Smite's Critical Strike Multiplier by 100%.
Due to our gear, we have more points than the standard allocation of 20 points. Pulling 3 Points from Blinding Flash and 3 points from Deep Impact will alleviate this.
In this section, we will break down each skill and highlight the key passives we have selected to make the skill perform as best as possible in the build. While some of these skills do allow for some variation to exist depending on your own custom choices, we recommend utilizing the skill trees as presented until you have a strong understanding of the build itself.
Multistrike

![]() Multistrike with Healing Hand will mop up swaths of enemies. The mechanic of 'Additional Swords' or 'Armaments' does not apply to singular targets. However, the implicits for the Aurelis
allow Smite to proc when attacking a boss or rare with Multistrike. Upon gaining the functionality, the player
will learn to engage with
Multistrike with Healing Hand will mop up swaths of enemies. The mechanic of 'Additional Swords' or 'Armaments' does not apply to singular targets. However, the implicits for the Aurelis
allow Smite to proc when attacking a boss or rare with Multistrike. Upon gaining the functionality, the player
will learn to engage with ![]() Multistrike, depending on the specific situation. Each Armament will act as a cast of
Multistrike, depending on the specific situation. Each Armament will act as a cast of ![]() Smite,
and each cast of Smite will hit multiple targets. This is scaled to have a total of five Armaments, which is equivalent to five casts of
Smite,
and each cast of Smite will hit multiple targets. This is scaled to have a total of five Armaments, which is equivalent to five casts of ![]() Smite. The distancing is what matters here, being far will cast Smite, being close will not.
Smite. The distancing is what matters here, being far will cast Smite, being close will not.
Order of Skill Points
- 1 point into Way of the Sword: Increases the duration of Armaments.
- 4 points into Guarding Stance: Gives 120 Armor per stack (maximum of five) which gives us 600 Armor.
- 1 point into Flanking Strikes: You will always have at least one armament when using Multistrike.
- 1 point into Hallowed Arsenal: Each Armament Sword, is converted to a cast of Smite.
- 2 points into Bladed Focus: When at 0 mana, you will convert the stack of Armaments into Mana. Note: This node may not be needed if you have ample mana regeneration. Simply move these 2 points into Guarding Stance and Way of the Sword.
- 3 points into Relentless Advance: Increases the Attack Speed of Multistrike by 15%.
- 3 points into Determination: This is a node to move further in the tree.
- 4 points into Sweeping Blows: This allows your now converted Armaments to be able to cast Smite at targets further away.
- 1 points into Victory Strikes: This gives you +1 to your currect stack of Armaments if you kill with Multistrike or the associated Smite casts.
- 1 point into Perfect Steel: This node gives you +1 to max Armaments.
- 1 point into Doctrine of the Anvil: This node gives you +1 to max Armaments at the expense of Attack Speed.
Due to our gear, we have more points than the standard allocation of 20 points. Pulling 1 Point from Sweeping Blows and 1 point from Guarding Stance will alleviate this.
In this section, we will break down each skill and highlight the key passives we have selected to make the skill perform as best as possible in the build. While some of these skills do allow for some variation to exist depending on your own custom choices, we recommend utilizing the skill trees as presented until you have a strong understanding of the build itself.
Holy Aura
This is a skill that offers both a passive bonus, but also an amplified version when the skill is activated. We focus on using this as a damage amplification skill on high-health targets like bosses or elites. We also boost the skills passive capability to add to our defensive layers. The base skill, will give you a passive 30% increase to damage and 15% elemental resistance; when activated these bonuses will double.
Order of Skill Points
- 5 points into Shelter from the Storm: Increases Resistances and Endurance.
- 2 points into Vital Boon: Increases Health Regen.
- 1 point into Purification: Grants Cleanse on skill activation.
- 2 points into Call To Arms: Increases passive gain for Physical Damage.
- 3 points into Fanaticism: Increases passive gain for Attack Speed and Cast Speed.
- 4 points into True Strike: Increases passive gain for Critical Chance.
- 3 points into Extreme Zeal: Increases passive gain for Critical Multiplier.
In this section, we will break down each skill and highlight the key passives we have selected to make the skill perform as best as possible in the build. While some of these skills do allow for some variation to exist depending on your own custom choices, we recommend utilizing the skill trees as presented until you have a strong understanding of the build itself.
Symbols of Hope

![]() Symbols of Hope will be used to passively add damage to our build. It will also add defesive posturing with Healing
effectiveness. A player can "Burn" his mana by constantly recasting this skill, in order to gain major bonuses from Devotion.
Symbols of Hope will be used to passively add damage to our build. It will also add defesive posturing with Healing
effectiveness. A player can "Burn" his mana by constantly recasting this skill, in order to gain major bonuses from Devotion.
Order of Skill Points
- 4 points in Empowering Symbols: Gain 20% increased damage for each sigil active.
- 1 point in Last Wish: You have a small chance to automatically summon a sigil on kill.
- 2 points in Iron Symbols: Gain 30 Endurance Threshold per active sigil.
- 4 points in Enduring Hope: Symbols have increased duration.
- 1 point in Tetragram: Add 1 to the maximum number of symbols you can have active.
- 4 points in Invigorate: Gain 24% increased Healing Effectiveness per active sigil.
- 3 points in Quiet Mind: Symbols cost less mana to cast.
- 1 point in Polygram: Add 1 to the maximum number of symbols you can have active.
Build Mechanics and Playstyle
This build uses ![]() Healing Hands to move around the battlefield. Spam
Healing Hands to move around the battlefield. Spam
![]() Symbols of Hope as much as you can, keeping your Mana at a manageable amount,
but low enough to benefit from the huge damage boost you gain from unique
amulet Devotion.
Symbols of Hope as much as you can, keeping your Mana at a manageable amount,
but low enough to benefit from the huge damage boost you gain from unique
amulet Devotion. ![]() Multistrike your enemies down, until desired results.
Multistrike your enemies down, until desired results.
The Aurelis' Hands build uses two specific uniques that capitalize our ![]() Smite Damage.
Smite Damage.
- Devotion: Which allows us to have +1 Spell Damage per missing 5 Mana from our Mana Pool.
- Aurelis: Gives us the ability to automatically cast Smite and apply several
stacks of Electrify with melee attacks with massive amounts of penetration for Electrify.
As mentioned prior, the key to exploiting these effects is
to keep your Mana as low as you can. The good news is if you over spend
your Mana, ![]() Multistrike can give you enough Mana at anytime during a boss fight.
While bossing, you can be less concerened about balancing Mana.
Multistrike can give you enough Mana at anytime during a boss fight.
While bossing, you can be less concerened about balancing Mana. ![]() Healing Hands will apply
ample amounts of hard hitting Electrify, while of course, your Aurelis will still be laying down its own Smite as well.
Healing Hands will apply
ample amounts of hard hitting Electrify, while of course, your Aurelis will still be laying down its own Smite as well.
Equipment and Gear Affixes
For this build, we will be focusing on several main affixes for each piece of non-unique gear, as well as working towards acquiring the specific Uniques needed to make this build operate correctly. Our equipment will focus on these specific affixes for the Implicits and Modifier stats.
| Gear Slot | Implicits | Modifiers |
|---|---|---|
| Main Weapon (Wand) | Spell Damage Mana - Mana Cost for Spells |
Prefixes Increased Spell Critical Strike Chance Mana/Increased Mana Regeneration Suffixes Chance to Shock Lightning Penetration/Minion Lightning Penetration |
| Off-hand Weapon (Sword) | Aurelis | Prefixes Spell Damage Critical Strike Multiplier |
| Head | Armor Critical Strike Multiplier |
Prefixes +% Mana Flat Mana Suffixes +% Armor +% Health |
| Chest | Armor Increased Critical Strike Chance |
Prefixes +% Mana Flat Mana Suffixes Armor/Reduced Bonus Damage Taken from Critical Strikes Increased Health |
| Gloves | High Armor Armor Mitigation also applies to DoT |
Prefixes Increased Melee Attack Speed Flat Mana Suffixes Hybrid Health Flat Health |
| Ring | Critical Strike Chance | Prefixes Increased Lightning Damage Mana Regen Suffixes Needed resistances Health |
| Ring | Critical Strike Chance | Prefixes Increased Lightning Damage Mana Regen Suffixes Needed resistances Health |
| Amulet | Devotion | Prefixes Spell Critical Strike Chance Critical Strike Multiplier |
| Belt | Armour | Prefixes Increased Lightning Damage Mana Regen Suffixes Hybrid Health +% Health |
| Feet | Movement Speed Reduced Bonus Damage Taken from Critical Strikes |
Prefixes Movement Speed Attunement Armor Suffixes Hybrid Health Health |
| Relic | Increased Armor Void Resistance |
Prefixes Level of Smite Increased Mana Regen Suffixes Health Needed Resistance |
A loot filter made specifically for the gear table above may be copied by pressing the button below. Once in the Loot Filter portion of the in-game menu, choose the "Paste Clipboard Contents" option to import the code.
Copy Loot Filter to Clipboard
Uniques
Now, let's look at the required Uniques for this build.
Devotion
Devotion: Plays a critical role in the build working effectively.
As we have previously mentioned in this build, we must maintain a low Mana amount to truly
maximize this builds power. This amulet is part of that reason; as our Mana is lower we gain
Spell Damage for each five Mana missing. This why not only do we want our regeneration to be just
barely enough, to stabilize our low Mana pool and hold it in place while we spam Cast ![]() Symbols of Hope.
We also want as big a Mana pool as possible to gain as much Spell Damage from the same level of Mana.
This amulet can be target farmed on the Monolith Timeline "Age of Winter" from the "Unique or Set Amulet"
echo rewards. If you get this item with Legendary Potential try to add Flat Mana and/or Spell Critical Strike Chance or Multiplier to it.
Symbols of Hope.
We also want as big a Mana pool as possible to gain as much Spell Damage from the same level of Mana.
This amulet can be target farmed on the Monolith Timeline "Age of Winter" from the "Unique or Set Amulet"
echo rewards. If you get this item with Legendary Potential try to add Flat Mana and/or Spell Critical Strike Chance or Multiplier to it.
Aurelis
Aurelis: This enables us to engage with packs or bosses with just an attack with ![]() Multistrike. This adds up to +2
skill points to both Multistrike and Smite. It will also stack Electrify when hit with Multistrike, adding to the stacks already
being applied by Smite, but with up to 84% penetration. It adds lightning spell damage to all attacks as well, making this a perfect choice
for Smite. This can be target farmed on the Monolith timeline "The Reign of Dragons"
from the "Unique Sword or Dagger" echo rewards. If you get this item with Legendary Potential add Spell Damage and/or Critical Strike Multiplier to it.
Multistrike. This adds up to +2
skill points to both Multistrike and Smite. It will also stack Electrify when hit with Multistrike, adding to the stacks already
being applied by Smite, but with up to 84% penetration. It adds lightning spell damage to all attacks as well, making this a perfect choice
for Smite. This can be target farmed on the Monolith timeline "The Reign of Dragons"
from the "Unique Sword or Dagger" echo rewards. If you get this item with Legendary Potential add Spell Damage and/or Critical Strike Multiplier to it.
Idols
Idol slots are gained through the campaign, unlocking small bonuses and unique affixes for the player to discover and augment their builds with. The Idol screen consists of a grid system for the player to fill out with different sized idols, eventually filling in every part of the grid. As the Idol shape increases (1x1, 1x2, 1x3, 1x4, etc.) the stronger an affix you might find for your build.
For this particular build, we will be focusing on a Large Rahyeh Idol
(1x3) that will add damage to our ![]() Smite along with some flat Health.
These Idols are 1x3s and are class specific to Sentinels. They can roll up
to 54% increased damage with Smite, so try to find the highest roll
possible. The other idols used to fill in the rest of the grid are going to
be focused on flat Health.
Smite along with some flat Health.
These Idols are 1x3s and are class specific to Sentinels. They can roll up
to 54% increased damage with Smite, so try to find the highest roll
possible. The other idols used to fill in the rest of the grid are going to
be focused on flat Health.
Blessing
Blessings are permanent buffs that are permanently applied to your character. These come in two different powers, Standard and Grand. Grand blessings are significantly stronger than the Standard Blessings. In total, there are 10 Blessing Slots, one for each Monolith Timeline. When you complete a Monolith and defeat the final boss you will be awarded a choice of three Blessing with a random value.
| Blessing Name | Affix | Timeline |
|---|---|---|
| +% Critical Strike Chance | The Black Sun | |
| + Total Mana | Ending the Storm | |
| % Increased Armor | The Age of Winter | |
| +# Armor | Spirits of Fire | |
| +#% All Resistances | Reign of Dragons |
The Blessings listed above cover the most important slots, with the remaining Blessing Slots being filled with whatever the player may be lacking for stats.
Changelog
- 19 Mar. 2024: Reworked for 1.0. Added Healing Hands, Sigils of Hope. Changed Base Weapon, Affix Swaps.
- 21 Jan. 2024: Loot Filter added.
- 01 Jan. 2024: Guide added.

GhazzyTV is a professional content creator that knows all about theory crafting builds in Path of Exile and Last Epoch and has been teaching players how to build their characters for over 9 years. He is a huge Blizzard fan with thousands of hours invested into Diablo 3 and 4 and is a frequent World of Warcraft Classic player. His builds will be helpful content for new players and veterans alike. You can find his PoE Vault Guide Hub here and his LE Guide Hub here. You can follow him on Twitch, YouTube or Twitter.
- Last Epoch Season 4: Shattered Omens Adds Corruption Crafting, a New Pinnacle Boss, and More!
- Delaware Courts Just Proved Last Epoch’s Real Risk Isn’t Failure, But Success
- Last Epoch’s New Paradox: From “All Future Content Free” to Paid Classes
- Last Epoch Confirms Paid DLC Classes With Free Expansion
- Last Epoch Season 3 Overhauls Skills, UI, Monster Behavior & More
- Last Epoch Season 3 Adds Smarter Minions & Big Changes
- Lich & Necromancer Get New Skill, Buffs, and Dark New Builds in Last Epoch!
- Last Epoch Season 3 Explores the Ancient Era!