Ashes of Creation Cleric Leveling Guide
Learn everything you need to know to level your Cleric the fastest and most efficient way possible! This guide will provide everything you need to reach the maximum level and kickstart your endgame journey in Ashes of Creation. We cover talent builds, group compositions, leveling tips, and much more!
The Cleric Leveling Experience
![]() Welcome to the ultimate Ashes of Creation leveling guide for Clerics! Whether you're playing solo or in
a group, this guide covers everything you need to efficiently level your Cleric to level 25 as quickly as
possible. Unlike many MMOs, Ashes of Creation does not have a linear one-size-fits-all leveling experience.
The game's dynamic world progression means that your leveling journey will vary depending on how developed
your server is. A player starting on day one will have access to fewer resources, weaker crafted gear, and
more contested grinding spots compared to someone starting weeks or months later, when better gear, optimized
farming routes, and more lucrative grinding areas are available.
Welcome to the ultimate Ashes of Creation leveling guide for Clerics! Whether you're playing solo or in
a group, this guide covers everything you need to efficiently level your Cleric to level 25 as quickly as
possible. Unlike many MMOs, Ashes of Creation does not have a linear one-size-fits-all leveling experience.
The game's dynamic world progression means that your leveling journey will vary depending on how developed
your server is. A player starting on day one will have access to fewer resources, weaker crafted gear, and
more contested grinding spots compared to someone starting weeks or months later, when better gear, optimized
farming routes, and more lucrative grinding areas are available.
Despite being a support-focused archetype, the Cleric is actually one of the best solo leveling classes in the game. Unlike in many MMOs where healers struggle to kill efficiently, Clerics in Ashes of Creation excel at sustained combat, using strong AoE healing, and consistent damage to survive against large groups of enemies. They can level quickly without relying on a party, but they truly shine in a group setting, where they enable their teammates to pull large numbers of enemies and clear them with minimal downtime.
Leveling Tips
Whether you're leveling solo or in a group, following these handful of tips and tricks will make your leveling process more enjoyable, faster, safer, efficient faster, and efficient.
Group Composition
While Clerics are one of the strongest solo classes in Ashes of Creation, capable of sustaining themselves and handling large groups of enemies alone, they shine brightest in a well-coordinated group. An optimized party allows Clerics to not only heal but fully utilize their offensive toolkit, enabling the entire group to pull and clear large packs of enemies quickly and efficiently. If your goal is to level as fast as possible, a carefully built group is essential, both for survival and maximizing experience per hour.
The ideal 8-man composition for leveling should always include two Clerics. Having a pair of Clerics ensures consistent healing coverage, lets each healer manage their mana more efficiently, and allows for larger and riskier pulls, which are key to fast progression. Beyond Clerics, the foundation of a strong group should include:
- 1 Tank – A proper tank is crucial for safely managing threat and controlling large groups of enemies, allowing Clerics to focus on healing and offensive support without being overwhelmed by aggro.
- 1-2 Bards – Bards provide essential buffs, crowd control, utility, and party wide mana regeneration making it so fights can be shorter, safer, and you're not havign to rest between pulls as offten. Also if only one cleric is available, a second Bard can easily fill the role of off-healer.
- 3-4 DPS – Damage dealers should primarily be Mages, whose high AoE damage enables rapid clearing of mob packs. At least two Mages are recommended to ensure groups are burned down efficiently. Fighters serve as excellent secondary DPS, bringing melee cleave and crowd control, while Rangers can add flexible ranged support, though they may struggle early on without solid gear.
While this composition is considered optimal, it's flexible enough to adjust based on availability and preference. If necessary, one Cleric or Bard can be swapped out for an additional DPS, especially if your party is having trouble finding these extra support classes or you feel like damage throughput is more critical than sustain. However, dropping below two Clerics often means a higher workload on the Cleric in yuor party which can lead to slowing down to manage healing and mana more often, ultimately reducing efficiency.
Consumables
Consumables play a vital role in keeping you efficient and prepared as you level your Cleric. Whether you're grinding solo or supporting a group, the right consumables can make a significant difference in both survival and performance. While Clerics have excellent healing and sustain on their own, consumables provide crucial backup when things get hectic or when you need that extra push to handle bigger pulls and harder fights.
That said, it's important to note that the types of consumables available to you will heavily depend on the current state of the server. Early in a server's life, especially during launch, you'll have access to only the most basic crafted items. As the server progresses, and more Nodes level up, artisan buildings are constructed, and crafting becomes widespread, a much broader range of powerful consumables will become available. For the sake of this guide, we'll focus on the essentials you can expect to have in a fresh server environment. If you're leveling later in the server's lifespan, always check the Marketplace and crafting vendors for better options that may be available.
Here's a breakdown of some key consumables that every Cleric should carry while leveling:
 Rations – Restores 3% Health and 3% Mana over 20 seconds when seated. While Clerics
naturally have strong healing, Rations are great for recovering outside of combat without burning your
mana pool on self-heals. Cheap, easy to stock up on, and essential for long grinding sessions.
Rations – Restores 3% Health and 3% Mana over 20 seconds when seated. While Clerics
naturally have strong healing, Rations are great for recovering outside of combat without burning your
mana pool on self-heals. Cheap, easy to stock up on, and essential for long grinding sessions. Fruit Salad – Grants +20 Magical Power for 1 hour. As a Cleric, boosting your Magical
Power directly increases both your healing output and damage, making this an absolute must-have.
Always ensure you're running this buff while grinding to maximize efficiency.
Fruit Salad – Grants +20 Magical Power for 1 hour. As a Cleric, boosting your Magical
Power directly increases both your healing output and damage, making this an absolute must-have.
Always ensure you're running this buff while grinding to maximize efficiency.- Apprentice / Journeyman Health Potions – Instant healing potions with a 2-minute cooldown. These can be life-saving in situations where you get caught mid-cast or when healing abilities are on cooldown. Important note: Health and Mana potions share a cooldown, so plan accordingly and don't rely on potions as your primary sustain, think of them as an emergency button.
- Scroll of Intelligence – Boosts Intelligence for 3 hours, which directly increases your healing and radiant spell damage. Especially valuable when focusing on high-output healing or contributing to group DPS.
 Novice Scroll of Adventuring Experience – Grants +1% bonus adventuring experience
on all kills. While this may seem small, when used consistently during grinding, the bonus adds up
over time. Always pop one of these when you're setting out for a long grinding session.
Novice Scroll of Adventuring Experience – Grants +1% bonus adventuring experience
on all kills. While this may seem small, when used consistently during grinding, the bonus adds up
over time. Always pop one of these when you're setting out for a long grinding session.
As a final note, remember that you can only have one active scroll buff at a time, so choose the one that best fits your immediate goal (e.g., more healing/damage, or more experience). Being prepared with a stack of consumables allows you to stay out grinding longer, pull more mobs without fear, and reduce downtime significantly, key factors in leveling quickly and efficiently as a Cleric.
TL;DR: Always keep Rations and Fruit Salad on you, keep an eye out for healing potions and Intelligence/Constitution scrolls, and pop XP scrolls when grinding. Plan around what your server currently offers, if you're on a newer server, stick to these basics, and if you're on a more progressed server, look for advanced consumables to give you an edge.
Positioning
Good positioning is everything for a Cleric, both for your survival and for maximizing your effectiveness. Whether you're supporting a group or grinding alone, knowing where to stand and how to approach each fight is what separates a great Cleric from an average one.
When playing in a group, your job is to stay out of danger while keeping your team alive. Position yourself behind the frontline, typically behind your tank and melee DPS, and avoid clustering too closely with other ranged players to reduce the risk of getting caught in AoE effects. From this position, you'll be able to monitor your party's health and freely cast heals and supportive abilities without constantly repositioning or drawing unnecessary aggro. As one of the highest priority targets for enemies, standing too close to the front line, or even midline, can easily get you focused, interrupting your casts and potentially getting you killed, which can quickly collapse an entire pull. Always maintain line of sight to the tank and your other group members, and never overextend unless you're following up with an emergency heal or rez, and even then, get in and out quickly.
For solo play, positioning becomes a game of careful engagement and sustained control. Start by using your ranged abilities to pull enemies toward you, this gives you control over the flow of the fight and lets you set the pace. Once engaged, switch to your melee weapon (typically a Scepter and Focus combo) to maximize cleave potential, healing yourself through any chip damage you take while steadily wearing enemies down. Clerics excel at surviving over long fights, and good positioning lets you leverage this natural sustain. Avoid getting surrounded by too many enemies at once, unless you've planned the pull and have cooldowns ready to manage the incoming damage. Position yourself so you can always create distance if needed, think about where you'll kite if a pull gets out of hand.
Skill Points Matter
As you level your new player, it can be easy to only focuse on your class abilities, and while building out your healing and utility skills is critical, it's a mistake to ignore your weapon and stamina skill trees. These easy to overlooked trees offer some of the most impactful passive bonuses for a any class, and properly investing in them will dramatically improve your damage, survivability, and overall efficiency in combat.
Weapon skill trees directly enhance the tools you'll use most, whether that's boosting your output through your Scepter, or increasing the effectiveness of a Spellbook when you're weaving in damage. These points often improve auto-attack speed, mana recovery, and crowd control effects, all essential for keeping up your rotations and dealing with constant pulls. Stamina trees, on the other hand, will give you important boosts to resource sustain and defensive stats, which makes a huge difference in those long, sustained fights where you're having to both move around and taking hits.
One of the biggest mistakes players make while leveling is failing to keep up with these passive trees and leaving valuable stat boosts on the table. As a support archetype that thrives on outlasting enemies and keeping a group alive, every edge in sustain and survivability counts. Make it a habit to regularly check for available points and allocate them as you level, you'll notice the difference your healing and damage. Properly invested, these trees make you a more self-sufficient, durable, and effective Cleric, whether you're solo or supporting a group.
PvP Flagging and Healing in Combat
Understanding how PvP flagging works is essential for any Cleric looking to level efficiently, and avoid costly mistakes. You can manually flag yourself for PvP at any time by pressing Alt + F, but it's important to recognize when and why you should, and shouldn't, do so while leveling.
First and foremost, if your goal is to level quickly and efficiently, avoid unnecessary PvP. While fighting other players can be fun, it's almost never worth the time loss and risk of death during the leveling process. Getting dragged into PvP, especially losing, can set you back in experience, force you to repair gear, and result in Glint and item losses if you die while flagged.
One of the biggest mistakes a Cleric can make in PvP situations is forgetting that you cannot heal flagged allies unless you are flagged yourself. If your party engages in PvP and you remain unflagged, your healing spells will only bounce back to you, leaving your allies to die. This is especially critical in lawless zones, where everyone is flagged by default. As a support class, knowing when to flag and when to stay neutral is as important as knowing when to heal. If you're in a group that's flagged or entering a PvP-heavy area, make sure you flag with them so you can function as their lifeline, or stay out of harm's way entirely if your group is avoiding conflict.
Additionally, be careful when looting fallen players. Looting another player's dropped items will automatically flag you for PvP for 90 seconds, even if you weren't planning to engage. This can open you up to attacks from opportunistic players, so be mindful before grabbing gear off a corpse especially in contested zones.
Important: Killing an unflagged player, someone without a PvP icon (purple sword), will immediately mark you as Corrupted, triggering severe debuffs and penalties, including massive stat reductions and the risk of dropping equipped gear when you die. If you value your leveling progress, avoid attacking non-flagged players at all costs..
Managing Storage and Inventory
As you level and defeat enemies, your inventory will quickly fill with Glint, materials, and loot. While this may sound like a good thing at first, a cluttered inventory becomes a serious problem when you're deep into grinding sessions, especially if you're pulling large groups of mobs and trying to keep pace with an efficient group.
For Clerics, staying organized is even more important. Since you are often a prime target for both mobs and other players, and frequently having to manage both healing and combat responsibilities, the last thing you want is to be caught mid-pull realizing your bags are full or worrying about potential item loss if you die. Remember, dying in Ashes of Creation will cause you to drop roughly 25% of your gathered materials and permanently destroy another 25%, making proper inventory management not just a matter of convenience, but a necessity for long-term progression.
To avoid this, make a habit of routinely checking your Materials tab and making trips back to your nearest node to deposit materials safely. This is especially true for Glint, which is both valuable and at risk of being lost if you fall in battle. Fortunately, Glint can be consolidated to save space, just right-click stacks of 10 Glint of the same quality to combine them into higher-tier versions. This simple trick can free up much-needed bag space, especially during longer leveling sessions or when you're running deep in contested grinding zones.
Best Leveling Commissions
Although Ashes of Creation features a variety of quests and commissions, it's crucial to understand that in the current Alpha Two testing, traditional questing is not the most efficient way to level. While some early quests, including commissions, can give you a small boost of experience and some starting Glint, they will only take you so far. At best, this might get you to around level 7 to 10. But make no mistake, mob grinding in high-density zones is by far the fastest and most effective way to reach level 25. If your goal is to level quickly, especially as a Cleric, you should prioritize mob grinding over quests.
That said, for those who want a small jumpstart or need some early Glint to gear up, a handful of early commissions and quests may be worth doing, but only if they align with your path or are immediately accessible. You should never go out of your way or linger in an area just to finish a commission, especially those requiring you to hunt a specific named NPC. Waiting on respawns is an enormous waste of time and will only slow your progress. If a named enemy isn’t up, move on, there are plenty of other ways to gain experience faster and more efficiently.
If you are leveling with a fully optimized 8-man group, and following the strategies outlined in this guide, you should be able to reach level 25 within roughly 48 hours of actual playtime. Staying focused on grinding, minimizing downtime, and only picking up commissions when they naturally align with your grinding path will ensure you’re leveling at peak efficiency. Remember, never let a commission distract you from the main goal; steady, consistent grinding.
Cleric Leveling
This leveling guide is tailored specifically for players already familiar with the Cleric class. If you’re new to the class or unsure how to fully leverage its toolkit, it is highly recommended reviewing the PvE Cleric Guide on Icy Veins for an in-depth breakdown of abilities, resource mechanics, rotations, and class synergies.
Ashes of Creation does not follow a linear leveling path. There is no guaranteed "best" location to grind at any given time. Instead, the most efficient path forward is the one you and your group can control. Popular mob zones will often be heavily contested, and you should expect to fight for your space, sometimes quite literally. Knowing when to move, when to stand your ground, and how to manage group PvP are just as important as healing and support.
It's also crucial to understand how the experience and loot scaling system works. Enemies will only provide experience and drop rewards if they are within a 9-level range above or below your character. Additionally, you’ll receive the best rewards when fighting mobs as close to your level as possible. Group composition matters too; if you're grouped with players significantly higher than you, your experience gain will be reduced.
Grind Zone Legend
Below is a map showing recommended grind locations based on level ranges. Use this key to identify each area's optimal level range:
- Level 1–10: Light Blue Zones
- Level 10–15: Dark Blue Zones
- Level 15–20: Red Zones
- Level 20+: Pink Zones
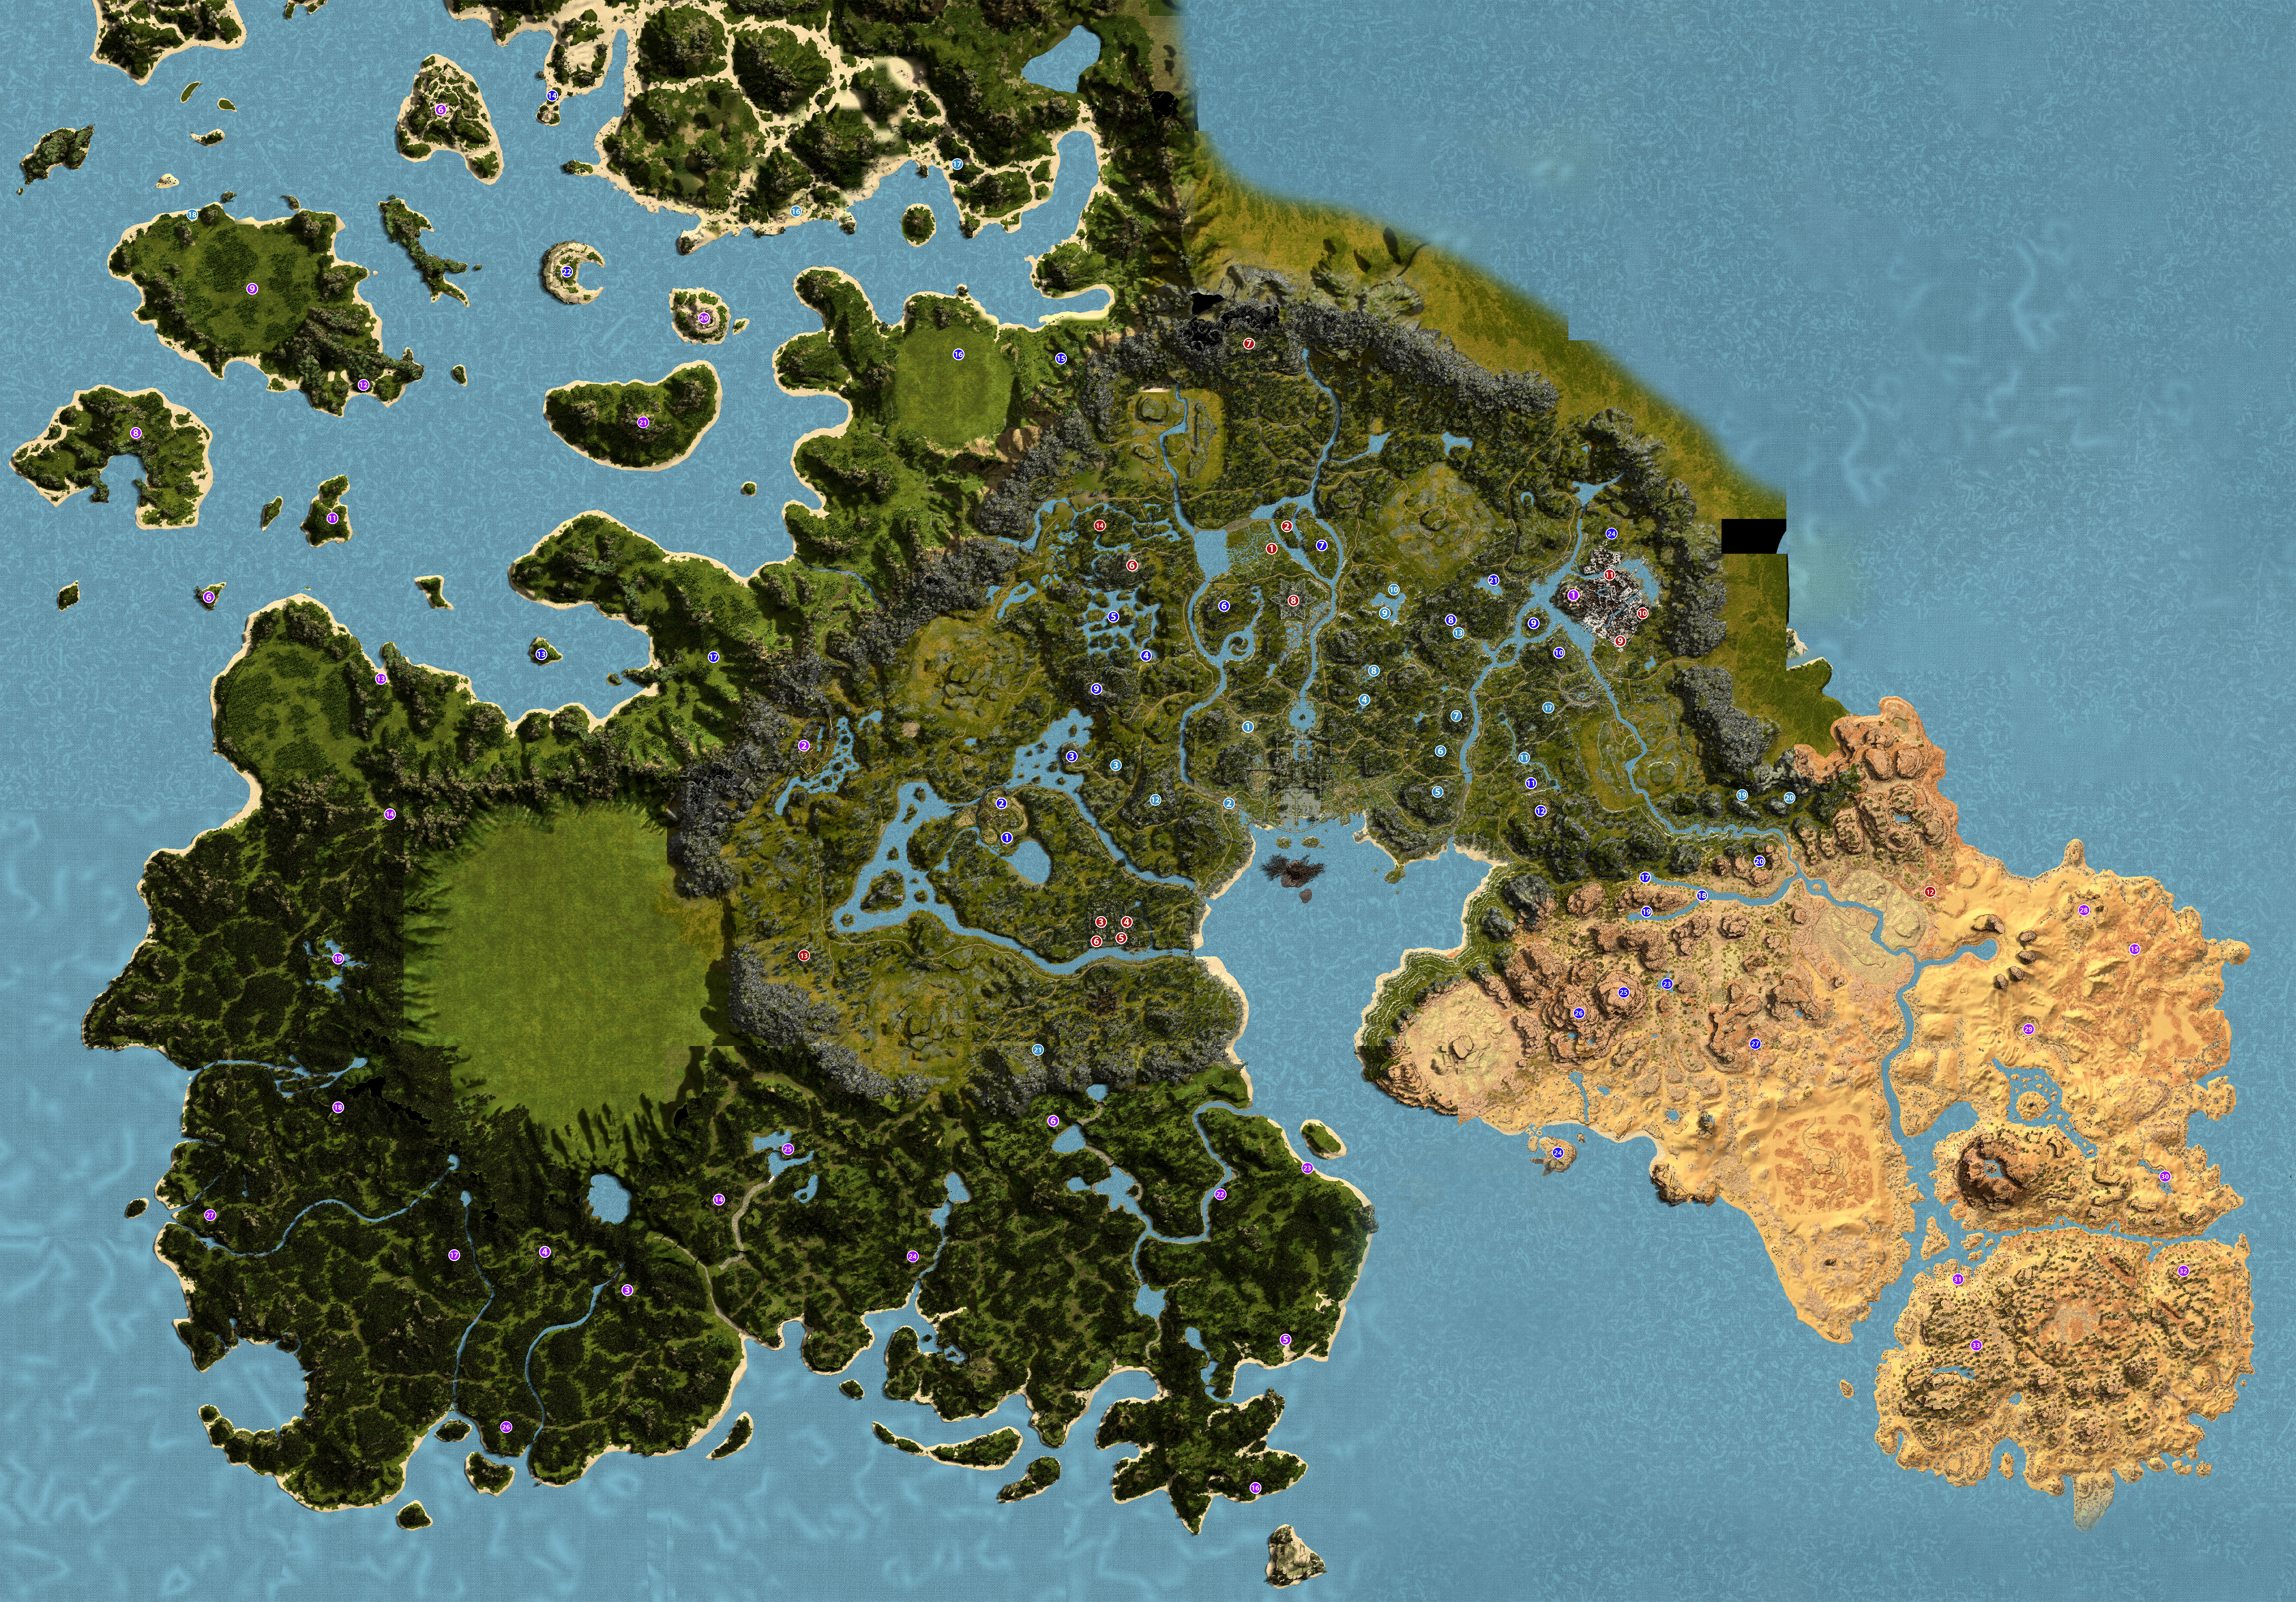
When selecting a grind location, prioritize areas with a high concentration of mobs that your party can efficiently cleave through using AoE abilities. As a general rule, you should aim to farm mobs that are as high over your current level as your group can comfortably handle. This maximizes both experience and loot gains while keeping your pace efficient.
Changelog
- 05 May 2025: Guide created.
This guide has been writen and reviewed by Yokai Theater, who has been testing the Cleric ever since Alpha 0. He is currently an officer of Enveus, and has been a member of the Ashes of Creation comunity since 2017, being one of the origenal Phoenix Initiative members. You can often find him streaming over on his Twitch or follow him over on his YouTube.
- What is Ashes of Creation? The Current State of the Game.
- Ashes of Creation’s Harbinger Update is Looking Massive
- Ashes of Creation’s Summoner Testing Begins
- Sport Fishing is Coming to Ashes of Creation
- Ashes of Creation Summoner Preview
- 7 Tips When Playing Ashes of Creation Solo
- The Future of Gear Sets in Ashes of Creation
- Ashes of Creation’s Upcoming Harbinger System