Ashes of Creation Rogue Leveling Guide
Learn everything you need to know to level your Rogue the fastest and most efficient way imaginable! This guide will show you all that you need in order to get to the max level and begin your end game in Ashes of Creation. This includes talent builds, group comps, leveling tips annd more!
The Rogue Leveling Experience
![]() Hello and welcome to the ultimate leveling guide for the Rogue archetype! Inside this guide
we'll cover everything you need to know while you level your Rogue to level 25. Note that the
level cap upon release of the game is 50, however currently during this testing period the
level cap is 25, which can still take over 100 hours! As your character progresses, there are many
things you can do while leveling to make your journey go much smoother, regardless if you're
leveling solo or in a group. Here are a few of the best ways to be most efficient with your
time, and maximize the overall experience gained.
Hello and welcome to the ultimate leveling guide for the Rogue archetype! Inside this guide
we'll cover everything you need to know while you level your Rogue to level 25. Note that the
level cap upon release of the game is 50, however currently during this testing period the
level cap is 25, which can still take over 100 hours! As your character progresses, there are many
things you can do while leveling to make your journey go much smoother, regardless if you're
leveling solo or in a group. Here are a few of the best ways to be most efficient with your
time, and maximize the overall experience gained.
This guide includes separate tips and tricks for every single level dependent on if you're in a group or not. As a Rogue, your leveling experience will be quite drastically different than other the other archetypes in the game. Rogues have undoubtedly the most crowd control, or CC, (pending Summoner) in the game and can be the most frustrating archetype to play against, while also the only archetype that has True Stealth. They can put out lots of burst damage, DoT damage, and have relatively high mobility ingrained into their kit making them one of the most versatile archetypes to play.
While this game is made to play with friends and not really tailored for the solo adventurer, Rogue is actually one of the best solo levelers in the game. While it's not extremely easy to pull multiple mobs as a Rogue, you can easily find ways to sustain your way through enemies with a lot of HP and are higher level than you for the most part which will grant a lot of experience. Let's not forget that you can limit test frequently by starting to pull a mob and escape just about any encounter if it becomes too dangerous by going stealth to avoid that nasty experience debt.
Group Leveling
Learn more about the most efficient way to level as a Rogue within a group in Ashes of Creation! Using the scrolling feature below, select your level and unlock a list of best practices on how to level, including recommended skills, leveling locations, tips and more.
Set the slider to your level, but expect information from the previous level bracket to disappear at specific thresholds. This is done to make the information on the page more condensed and easier to read.
Important note: While this guide only has a section for group leveling, the solo leveling advice would be the same. However, it's highly suggested to level in a group, since solo leveling in the current iteration of the game is a miserable experience for most classes. While Rogue can solo level, you will still level more efficiently in a group than solo. You may have sustain and a good overall kit for soloing mobs, but you're still squishy and you will need gear in order to breeze through PvE in Ashes of Creation. Without gear, it's extremely difficult, and the best way to gear up is in higher risk and more dangerous areas with groups. So don't gain unnecessary experience debt and hold onto your glint and find a guild or some friends to play with!
Move the slider below to make the guide update to your level!
Don't Forget Your Starter Quests!
As you log in for your first time, directly in front of you is a guard that will give you a quest called "Welcome to Verra". This is just a breadcrumb quest that will lead to some free, easy experience in a bit, just by talking to a few NPC's. Scattered all along the floor and walls by that entrance next to that quest you picked up is a bunch of starter weapons. You want to look for the Rusty Greatsword, Unadorned Daggers, Splintered Longbow, and Splintered Shortbow. You already start with a Unadorned Daggers, so once you grab your secondary weapon, you are good to start off on your journey! Figure out what weapons you like the most by killing Sickly Goblins in the starter area to see what you prefer, but as a general note: you will probably be using a Longbow in your final build, so you may want to start leveling a Longbow regardless if you like other weapon types.
Intrepid has been working on the First Time User Experience (FTUE) a lot and you can essentially level 1-10+ strictly through questing. Whether you choose the Riverlands of the ruins of the Aelan Empire or the Anvils of the Dwarven Empire starter location you will have quests that you can take in order to level relatively quickly.
As you level you will find gear or buy gear that will be better, but for now this is what you got! Just walk out the door and kill some goblins as you make your way to Lionhold. Once you've arrived, start "The Sweat of your Brow" which will reward you with a free horse as a mount. This quest is very easy to do and is all done in the town, he just asks you to go around gathering and crafting some stuff. Here is a great video you can use as a reference on how to get your first mount for free.
Once you hit Level 2 you get your first skill point and can get your first new Ability! The way Abilities work in Ashes of Creation is based off your archetype's base power. For Rogue it is Physical, so make sure when you're looking at gear that you are looking for Physical Power gear. Physical Power is increased by the Strength stat as well, but a lot of the time Strength is a bit of a bait stat. Always look for Physical Power before looking at Strength increase.
Here is the hard part; picking your first ability. The Rogue class is pretty overloaded early with good abilities it can make the choice hard. Thankfully, you can respec at any time so you can test them out.
Adjust the level Slider to follow along with which abilities you should be taking as you level up!
 Flurry
 Acrobatic Strike
 Lacerate
 Feint
Feint Soothing Shadows
 Withering Poison
 Sap
Sap Thrash
 Doublestrike
 Expanded Toolbelt
 Smoke Bomb
 Shadow Cascade
 Ruthless
 Kick
Kick Thump
Thump Throw
Throw Umbral Cloak
 Shadow Step
 Ethereal
 Grappling Hook
 Unstable Compound
- Ricochet
 Caltrops
 Foreshadowing
The table below will adjust based on your level, providing you with a quick at-a-glance list of information for your level range. Notes have been included under the table to clear up any confusion or to add extra detail.
IMPORTANT NOTE: These spots will be available in the Riverlands, but as the game progresses and the Anvil's starting area comes online and PvE balancing starts coming online, this is subject to change for Phase 3. The guide will be updated as more information comes along.
Be wary of strictly following these locations as players — especially at launch — will group to some of these places and you may need to find another grindspot. There are plenty of places in Verra to explore that are not listed here that you can find a suitable replacement!
| Levels | Best Location | Pref Mob | Food | Scroll |
|---|---|---|---|---|
|
||||
|
| Levels | Best Location | Pref Mob | Food | Scroll |
|---|---|---|---|---|
|
||||
|
||||
|
||||
|
| Levels | Best Location | Pref Mob | Food | Scroll |
|---|---|---|---|---|
|
||||
|
||||
|
||||
|
||||
|
| Levels | Best Location | Pref Mob | Food | Scroll |
|---|---|---|---|---|
|
||||
|
||||
|
||||
|
||||
|
||||
|
| Levels | Best Location | Pref Mob | Food | Scroll |
|---|---|---|---|---|
|
||||
|
||||
|
||||
|
||||
|
| Levels | Best Location | Pref Mob | Food | Scroll |
|---|---|---|---|---|
|
||||
|
||||
|
||||
|
||||
|
Make sure you're grabbing Embersprings as you go along your journey!
Early Game Ability Selection
![]() Flurry should be the first ability you level as you get
three charges and they increase your attack speed allowing for more ability casts early
and it does not interrupt your weapon combo. This allows you to learn how to weave in your
weapon combo finishers and see how your auto attacks work early. If you care more about AoE,
then you may want
Flurry should be the first ability you level as you get
three charges and they increase your attack speed allowing for more ability casts early
and it does not interrupt your weapon combo. This allows you to learn how to weave in your
weapon combo finishers and see how your auto attacks work early. If you care more about AoE,
then you may want ![]() Lacerate instead. Out of all of the abilities listed,
Lacerate instead. Out of all of the abilities listed, ![]() Throw
might be the strongest, but it pulls extra mobs that can kill you and may be dangerous early on
in the leveling process. You have to be extremely careful when mobs pulling mobs with it
because it bounces dangerously far.
Throw
might be the strongest, but it pulls extra mobs that can kill you and may be dangerous early on
in the leveling process. You have to be extremely careful when mobs pulling mobs with it
because it bounces dangerously far.
![]() Acrobatic Strike will strike your target three times,
generate Advantage, and give you a CC ability early. You could get
Acrobatic Strike will strike your target three times,
generate Advantage, and give you a CC ability early. You could get ![]() Kick, but most mobs
this early in the leveling process don't need to be kicked for any mechanic and you won't
be PvPing anyways. You can replace it with either
Kick, but most mobs
this early in the leveling process don't need to be kicked for any mechanic and you won't
be PvPing anyways. You can replace it with either ![]() Lacerate for AoE damage or
Lacerate for AoE damage or
![]() Feint as it can grant you "Guile". This gives you 20% evasion and is an Advantage generator
on your next weapon combo finisher, pairing well with
Feint as it can grant you "Guile". This gives you 20% evasion and is an Advantage generator
on your next weapon combo finisher, pairing well with ![]() Flurry.
Flurry.
Early Gear, Consumables, and Glint
Once you reach level 5 or so, it's highly suggested to head out to the Laboratory, Smithy, and the Cookhouse to buy some gear and consumables. If you're hurting on money, then just spend 10-15 minutes cutting down every tree and picking every plant you see and just go vendor them. There's also some quick and easy World events that happen all over the place that you should do if you they happen to be live when you pass by. These are shared progress with every player who's doing the event, which makes the events go by pretty fast, but also provides you with a large chunk of experience, as well as a chunk of much needed Glint.
Unlocking Second Tier Talents
You've reached the second tier of your talent tree! From here on your choices as a Rogue don't get easier as there are still a lot of good options. Feel free to test different abilities as you're leveling.
![]() Soothing Shadows is a great way to regen between pulls,
but feel free to avoid this if you're in a party with a tank and healers and go into more
damage with
Soothing Shadows is a great way to regen between pulls,
but feel free to avoid this if you're in a party with a tank and healers and go into more
damage with ![]() Thrash. Once you spec into
Thrash. Once you spec into ![]() Thrash you can do a nice combo
with
Thrash you can do a nice combo
with ![]() Flurry and learn to weave in your auto attacks between abilities and finish
your weapon combo. However, you can just spam between the two buttons too!
Flurry and learn to weave in your auto attacks between abilities and finish
your weapon combo. However, you can just spam between the two buttons too!
Rogue Poisons
| Sustain | Damage | Heal-Cut | Utility |
|---|---|---|---|
We suggest using ![]() Withering Poison for adding
in extra party damage with the "weakening" debuff, but a good second choice would be
Withering Poison for adding
in extra party damage with the "weakening" debuff, but a good second choice would be
![]() Draining Poison for constant uptime and sustain. There are few PvE mobs that
will require Heal-Cut and choosing
Draining Poison for constant uptime and sustain. There are few PvE mobs that
will require Heal-Cut and choosing ![]() Chilling Poison could get in the way of the
snare debuff that Mages heavily rely on while you're in a party and doesn't provide much for
solo gameplay either.
Chilling Poison could get in the way of the
snare debuff that Mages heavily rely on while you're in a party and doesn't provide much for
solo gameplay either.
Around Levels 8–10 you should probably have your poison
and ![]() Sap for more health regeneration and damage output. Stacking your poison is
vital and you will basically only use
Sap for more health regeneration and damage output. Stacking your poison is
vital and you will basically only use ![]() Sap if you have max poison stacks to generate
extra Advantage. You can generate poison faster with the help of your
Sap if you have max poison stacks to generate
extra Advantage. You can generate poison faster with the help of your ![]() Flurry/
Flurry/![]() Thrash
combo. You can earn the most damage output possible with weaving in auto attacks between
each ability usage since both of those abilities do not cancel your weapon attack combos.
Simply wait a second in between each ability usage for max damage unless you're really
counting on the health regeneration from
Thrash
combo. You can earn the most damage output possible with weaving in auto attacks between
each ability usage since both of those abilities do not cancel your weapon attack combos.
Simply wait a second in between each ability usage for max damage unless you're really
counting on the health regeneration from ![]() Sap and need to dump everything quickly
for quick poison stacking.
Sap and need to dump everything quickly
for quick poison stacking.
Mid-Game Leveling Talent Selection
Once you hit Level 10 you will have most of your core abilities from the first and second tier. Once again, Ashes of Creation will be a game that you have to adapt to your surroundings, what and who you are playing against among other variable factors. Guides like this are just to help you get a baseline. You may have to respec based on what you're facing and you should be adaptable as a Rogue being one of the most versatile archetypes in the game in terms of playstyle and options.
![]() Expanded Toolbelt is by far your most important talent
on the tree. You get two poisons, two sleep darts, two smoke bombs, two grapple hooks,
two caltrops, two shurikens tosses, and pretty much two of everything. While
Expanded Toolbelt is by far your most important talent
on the tree. You get two poisons, two sleep darts, two smoke bombs, two grapple hooks,
two caltrops, two shurikens tosses, and pretty much two of everything. While ![]() Padded Toolbelt
can be an option for ganking players or getting away from danger, to me it is never more
viable than
Padded Toolbelt
can be an option for ganking players or getting away from danger, to me it is never more
viable than ![]() Expanded Toolbelt. The added utility is too good. Even if you don't
have any other tools other than your poisons, it is the best first option because having
two charges of your poison is really good for keeping poison uptime on your target.
Expanded Toolbelt. The added utility is too good. Even if you don't
have any other tools other than your poisons, it is the best first option because having
two charges of your poison is really good for keeping poison uptime on your target.
![]() Smoke Bomb will be your next best ability as it allows
you to recast your stealth ability inside, granting you an Advantage generator, and reduces
the cooldown to go back into stealth immensely! Not to mention the evasion it gives you is
very strong in both PvE and PvP. Remember, mobs will de–aggro off of you if you go invisible
and step outside of your smoke bomb but they won't if you stay inside of it and attack quickly.
You will be able to re–up your
Smoke Bomb will be your next best ability as it allows
you to recast your stealth ability inside, granting you an Advantage generator, and reduces
the cooldown to go back into stealth immensely! Not to mention the evasion it gives you is
very strong in both PvE and PvP. Remember, mobs will de–aggro off of you if you go invisible
and step outside of your smoke bomb but they won't if you stay inside of it and attack quickly.
You will be able to re–up your ![]() Soothing Shadows this way to give you regen in combat.
Soothing Shadows this way to give you regen in combat.
![]() Shadow Cascade is the Rogue's "Ultimate Ability".
This is the "Omae wa mou shindeiru" slice you into pieces like Rurouni Kenshin and become the
anime katana master you've always wanted to be type of ability. It can only be used while you
have a stack of Advantage and will consume it. It exposes all enemies that are already Poisoned,
and all targets hit suffer Bleeding. If they are below 50% HP then they suffer Hemorraging. This
ability is pairs incredibly well with prepping your poison, using
Shadow Cascade is the Rogue's "Ultimate Ability".
This is the "Omae wa mou shindeiru" slice you into pieces like Rurouni Kenshin and become the
anime katana master you've always wanted to be type of ability. It can only be used while you
have a stack of Advantage and will consume it. It exposes all enemies that are already Poisoned,
and all targets hit suffer Bleeding. If they are below 50% HP then they suffer Hemorraging. This
ability is pairs incredibly well with prepping your poison, using ![]() Throw, and hitting
all targets before hitting them with the imaqtpie classic "Nothing personnel, kid" and dashing
through them.
Throw, and hitting
all targets before hitting them with the imaqtpie classic "Nothing personnel, kid" and dashing
through them.
Mid-Game Leveling Locations
As for where to level, once Level 10 you can do one of two things,
depending on if you are solo or in a group. If in a group, aim for Halls of Judication, or
Oakenbane Keep. These will be much more experience and drops much more Glint and gear than if
solo, with the downside of finding a group and dealing with other human beings. However it is
100% worth it! Even when solo grinding, make the time to go spend an hour or so in Halls to get
gear upgrades, like the ![]() Flayer's Fleshripper from the Boss NakNak or find Gnashgut of
Hearthsong for the easiest ways to obtain it. But if those guys are flooded with people, try
Oakenbane for Slayer Draags, Rhaags, or Slaags. Or simply, buy one off the market after running
some glint via crates and/or caravans. If you're solo and just looking for XP, shardlings and
scorpion broodlings in the desert are easy to solo. As well as otters in the Riverlands, and
crabs in the Tropics. However, gear drops primarily from humanoid creatures. So if you can,
try to kill humanoids and get lower tier gear drops and focus on named mobs for rare materials
for crafters as villages and towns are built.
Flayer's Fleshripper from the Boss NakNak or find Gnashgut of
Hearthsong for the easiest ways to obtain it. But if those guys are flooded with people, try
Oakenbane for Slayer Draags, Rhaags, or Slaags. Or simply, buy one off the market after running
some glint via crates and/or caravans. If you're solo and just looking for XP, shardlings and
scorpion broodlings in the desert are easy to solo. As well as otters in the Riverlands, and
crabs in the Tropics. However, gear drops primarily from humanoid creatures. So if you can,
try to kill humanoids and get lower tier gear drops and focus on named mobs for rare materials
for crafters as villages and towns are built.
Late-Game Leveling Selection
The great and bad thing about Rogue is there are a lot of options you can spec into. Level 16-20 is a good area to experiment with and respec for the situations you're putting yourself in. We can't tell you what is "best" in this area because everything is situational; it depends on content you're planning on playing against, or if it requires multiple talent points.
Once you hit this level you pretty much have your core abilities
and require two talent points for the beneficial passives for your abilities like
![]() Shadow Step needing
Shadow Step needing ![]() Ethereal for the CC break in PvP and
Ethereal for the CC break in PvP and ![]() Sleep Dart
wanting
Sleep Dart
wanting ![]() Anemia in order to not cancel the Incapacitated status effect
whenever you bleed an opponent.
Anemia in order to not cancel the Incapacitated status effect
whenever you bleed an opponent.
While you're waiting for the two extra talent points you can add more
into abilities you haven't skilled before or take ![]() Grappling Hook for more mobility.
Grappling Hook for more mobility.
These abilities will be your core for the most part that allows you the most versatility and can handle most situations with Advantage generators, consumers, and finishers and moving forward you can focus on more utility.
For utility spells you can look at the following.
These options allow you to focus on your defensives or allow you to have a second option with poisons. Generally, the second poison is not necessary and you can use that extra talent point for something else, but if you do decide to spec into a secondary poison, Withering Poison is a good option as it gives you the greatest effects as previously discussed in the poison section.
For your primary choice in utilities, take either ![]() Adrenaline
or
Adrenaline
or ![]() Foreshadowing.
Foreshadowing.
![]() Adrenaline will grant you a burst of movement speed and
some extra stamina for ganking in PvP giving you that extra mobility you otherwise
wouldn't have in order to stick to your opponent or make a quick escape.
Adrenaline will grant you a burst of movement speed and
some extra stamina for ganking in PvP giving you that extra mobility you otherwise
wouldn't have in order to stick to your opponent or make a quick escape.
A highly underrated ability for both PvE and PvP and one of my personal
favorites is ![]() Unstable Compound. This ability procs off you or your party's auto attack
finisher and if you have
Unstable Compound. This ability procs off you or your party's auto attack
finisher and if you have ![]() Expanded Toolbelt you can
Expanded Toolbelt you can ![]() Throw your shurikens back
to back and it will proc off the first shuriken.
Throw your shurikens back
to back and it will proc off the first shuriken. ![]() Throw is probably one of your highest
damage abilities, has one of the fastest cast times, and paired with
Throw is probably one of your highest
damage abilities, has one of the fastest cast times, and paired with ![]() Unstable Compound
it can do a lot of damage in an AoE—which Rogue severely lacks. To add even more AoE you
can also use
Unstable Compound
it can do a lot of damage in an AoE—which Rogue severely lacks. To add even more AoE you
can also use ![]() Ricochet to hit more targets. It is generally not worth picking up
Ricochet to hit more targets. It is generally not worth picking up ![]() Ricochet
unless you are confident in large pulls and not pulling extra mobs, or in PvP where you want to
hit as many targets as possible anyways.
Ricochet
unless you are confident in large pulls and not pulling extra mobs, or in PvP where you want to
hit as many targets as possible anyways.
Another class favorite utility is ![]() Caltrops. This is generally rated
lower than
Caltrops. This is generally rated
lower than ![]() Foreshadowing, but Caltrops can be useful and can do a lot of damage if
used properly. For PvE you won't find a lot of usage as mobs won't be running through
them often if your tank is keeping aggro. They also only proc a singular stack of poison, so it's
not quite effective for poison stacking either. However, they do provide some good zone control
and anti-dive for PvP when you throw them down on your own feet.
Foreshadowing, but Caltrops can be useful and can do a lot of damage if
used properly. For PvE you won't find a lot of usage as mobs won't be running through
them often if your tank is keeping aggro. They also only proc a singular stack of poison, so it's
not quite effective for poison stacking either. However, they do provide some good zone control
and anti-dive for PvP when you throw them down on your own feet.
![]() Foreshadowing will be another Advantage generator for you to
build up more of your extremely valuable class resource by finishing an auto attack finisher
every time you exit stealth. This ability pairs well with
Foreshadowing will be another Advantage generator for you to
build up more of your extremely valuable class resource by finishing an auto attack finisher
every time you exit stealth. This ability pairs well with ![]() Smoke Bomb as it will greatly
enhance your Stealth cooldown. You can even use it at range as long as you stay inside of the
smoke for both PvP and PvE as it doesn't distinguish between melee or ranged.
Smoke Bomb as it will greatly
enhance your Stealth cooldown. You can even use it at range as long as you stay inside of the
smoke for both PvP and PvE as it doesn't distinguish between melee or ranged.
It isn't worth picking up ![]() Sleep Dart unless you have two talent
points for
Sleep Dart unless you have two talent
points for ![]() Anemia, as it will allow you to CC others while you have your bleeds up.
This talent is primarily only used for PvP and will rarely help you in PvE unless you over pull
and are trying to help your tank out.
Anemia, as it will allow you to CC others while you have your bleeds up.
This talent is primarily only used for PvP and will rarely help you in PvE unless you over pull
and are trying to help your tank out.
Now that we've highlighted the abilities that are good to choose from, we will cover the ones that are left out.
There is some reason to pick ![]() Agile, but in actual gameplay
it's very difficult to execute the combos that you can do and even while in melee it can mess
up what you are trying to accomplish. It requires high execution to use this ability properly
so while it isn't worthless, keep in mind it's harder to execute than other options. It essentially
acts the same as Ranger's
Agile, but in actual gameplay
it's very difficult to execute the combos that you can do and even while in melee it can mess
up what you are trying to accomplish. It requires high execution to use this ability properly
so while it isn't worthless, keep in mind it's harder to execute than other options. It essentially
acts the same as Ranger's
![]() Disengage while in melee range of your target. This can allow for some combos using
Disengage while in melee range of your target. This can allow for some combos using
![]() Shadow Step building an Advantage generator to proc
Shadow Step building an Advantage generator to proc ![]() Ruthless abilities or in
combination with
Ruthless abilities or in
combination with ![]() Acrobatic Strike. There are a myriad of possibilities, and if you choose
to use this ability it is worth the time to practice using it properly.
Acrobatic Strike. There are a myriad of possibilities, and if you choose
to use this ability it is worth the time to practice using it properly.
While ![]() Death's Mark sounds like a good ability, there are some
major downsides to using it. Not only do you take 10% more damage while your mark is active,
but you give away your target as well. The person you
Death's Mark sounds like a good ability, there are some
major downsides to using it. Not only do you take 10% more damage while your mark is active,
but you give away your target as well. The person you ![]() Death's Mark will have an icon above
their head and be notified you are targeting them. You will then have 60 second window to
execute your opponent to reset the cooldown and heal you for 50% of your target's max health,
or your max health, whichever is lower. This would be good in PvE if you didn't have to use it
while in
Death's Mark will have an icon above
their head and be notified you are targeting them. You will then have 60 second window to
execute your opponent to reset the cooldown and heal you for 50% of your target's max health,
or your max health, whichever is lower. This would be good in PvE if you didn't have to use it
while in ![]() Stealth requiring you to either, not be tanking, or use it while in
Stealth requiring you to either, not be tanking, or use it while in ![]() Smoke Bomb
AND moving 15m away in order to
Smoke Bomb
AND moving 15m away in order to ![]() Death's Mark. It is an extremely inconvenient pattern which
also makes
Death's Mark. It is an extremely inconvenient pattern which
also makes ![]() Cold Embrace just as difficult to proc even with
Cold Embrace just as difficult to proc even with ![]() Shiver Vapor just making
both of these talent points very un–intuitive. However with good coordination with other classes and choosing
Shiver Vapor just making
both of these talent points very un–intuitive. However with good coordination with other classes and choosing ![]() Padded Toolbelt you can make the ability work.
With Phase 3 TTK being a bit lower, this ability may make a comeback for PvP. Stay tuned.
Padded Toolbelt you can make the ability work.
With Phase 3 TTK being a bit lower, this ability may make a comeback for PvP. Stay tuned.
![]() Trounce is probably one of the worst
abilities to pick. Due to it consuming Advantage and giving very little return—making it
the most high cost, low reward ability on the tree. Having
Trounce is probably one of the worst
abilities to pick. Due to it consuming Advantage and giving very little return—making it
the most high cost, low reward ability on the tree. Having ![]() Flurry or
Flurry or ![]() Thrash
having AoE is almost never worth the added benefit of consuming one stack of your Advantage,
especially if you're running
Thrash
having AoE is almost never worth the added benefit of consuming one stack of your Advantage,
especially if you're running ![]() Ruthless.
Ruthless.
Note: It's not necessary to go to any Point of Interest (PoI) at any particular point in your journey. The world is a dungeon and you can explore many spots. As Intrepid is developing the game, you may find better grind spots where less players are leveling. Even if they're not the most experience, you may just do better in a spot that's less optimal but has less competition, especially on launch.
Hitting Level 25
Congratulations on hitting the current max level in the Ashes of Creation Alpha! If you skipped ahead to the end there's some important information on the slider you might have missed, so be sure to go back and check to make sure you didn't miss anything!
Going forward, it is in your best interest to read up on end game guides to better adjust your build for the new options available. Continue on to either our PvE or PvP guide to learn how to best excel with a max level character in Verra.
Grind Zone Legend
Below is a map showing recommended grind locations based on level ranges. If the locations we listed above are too hotly contested, this map can be used to find other, smaller locations that may suit your needs better. Use the following key to identify each area's optimal level range.
- Level 1–10: Light Blue Zones
- Level 10–15: Dark Blue Zones
- Level 15–20: Red Zones
- Level 20+: Pink Zones
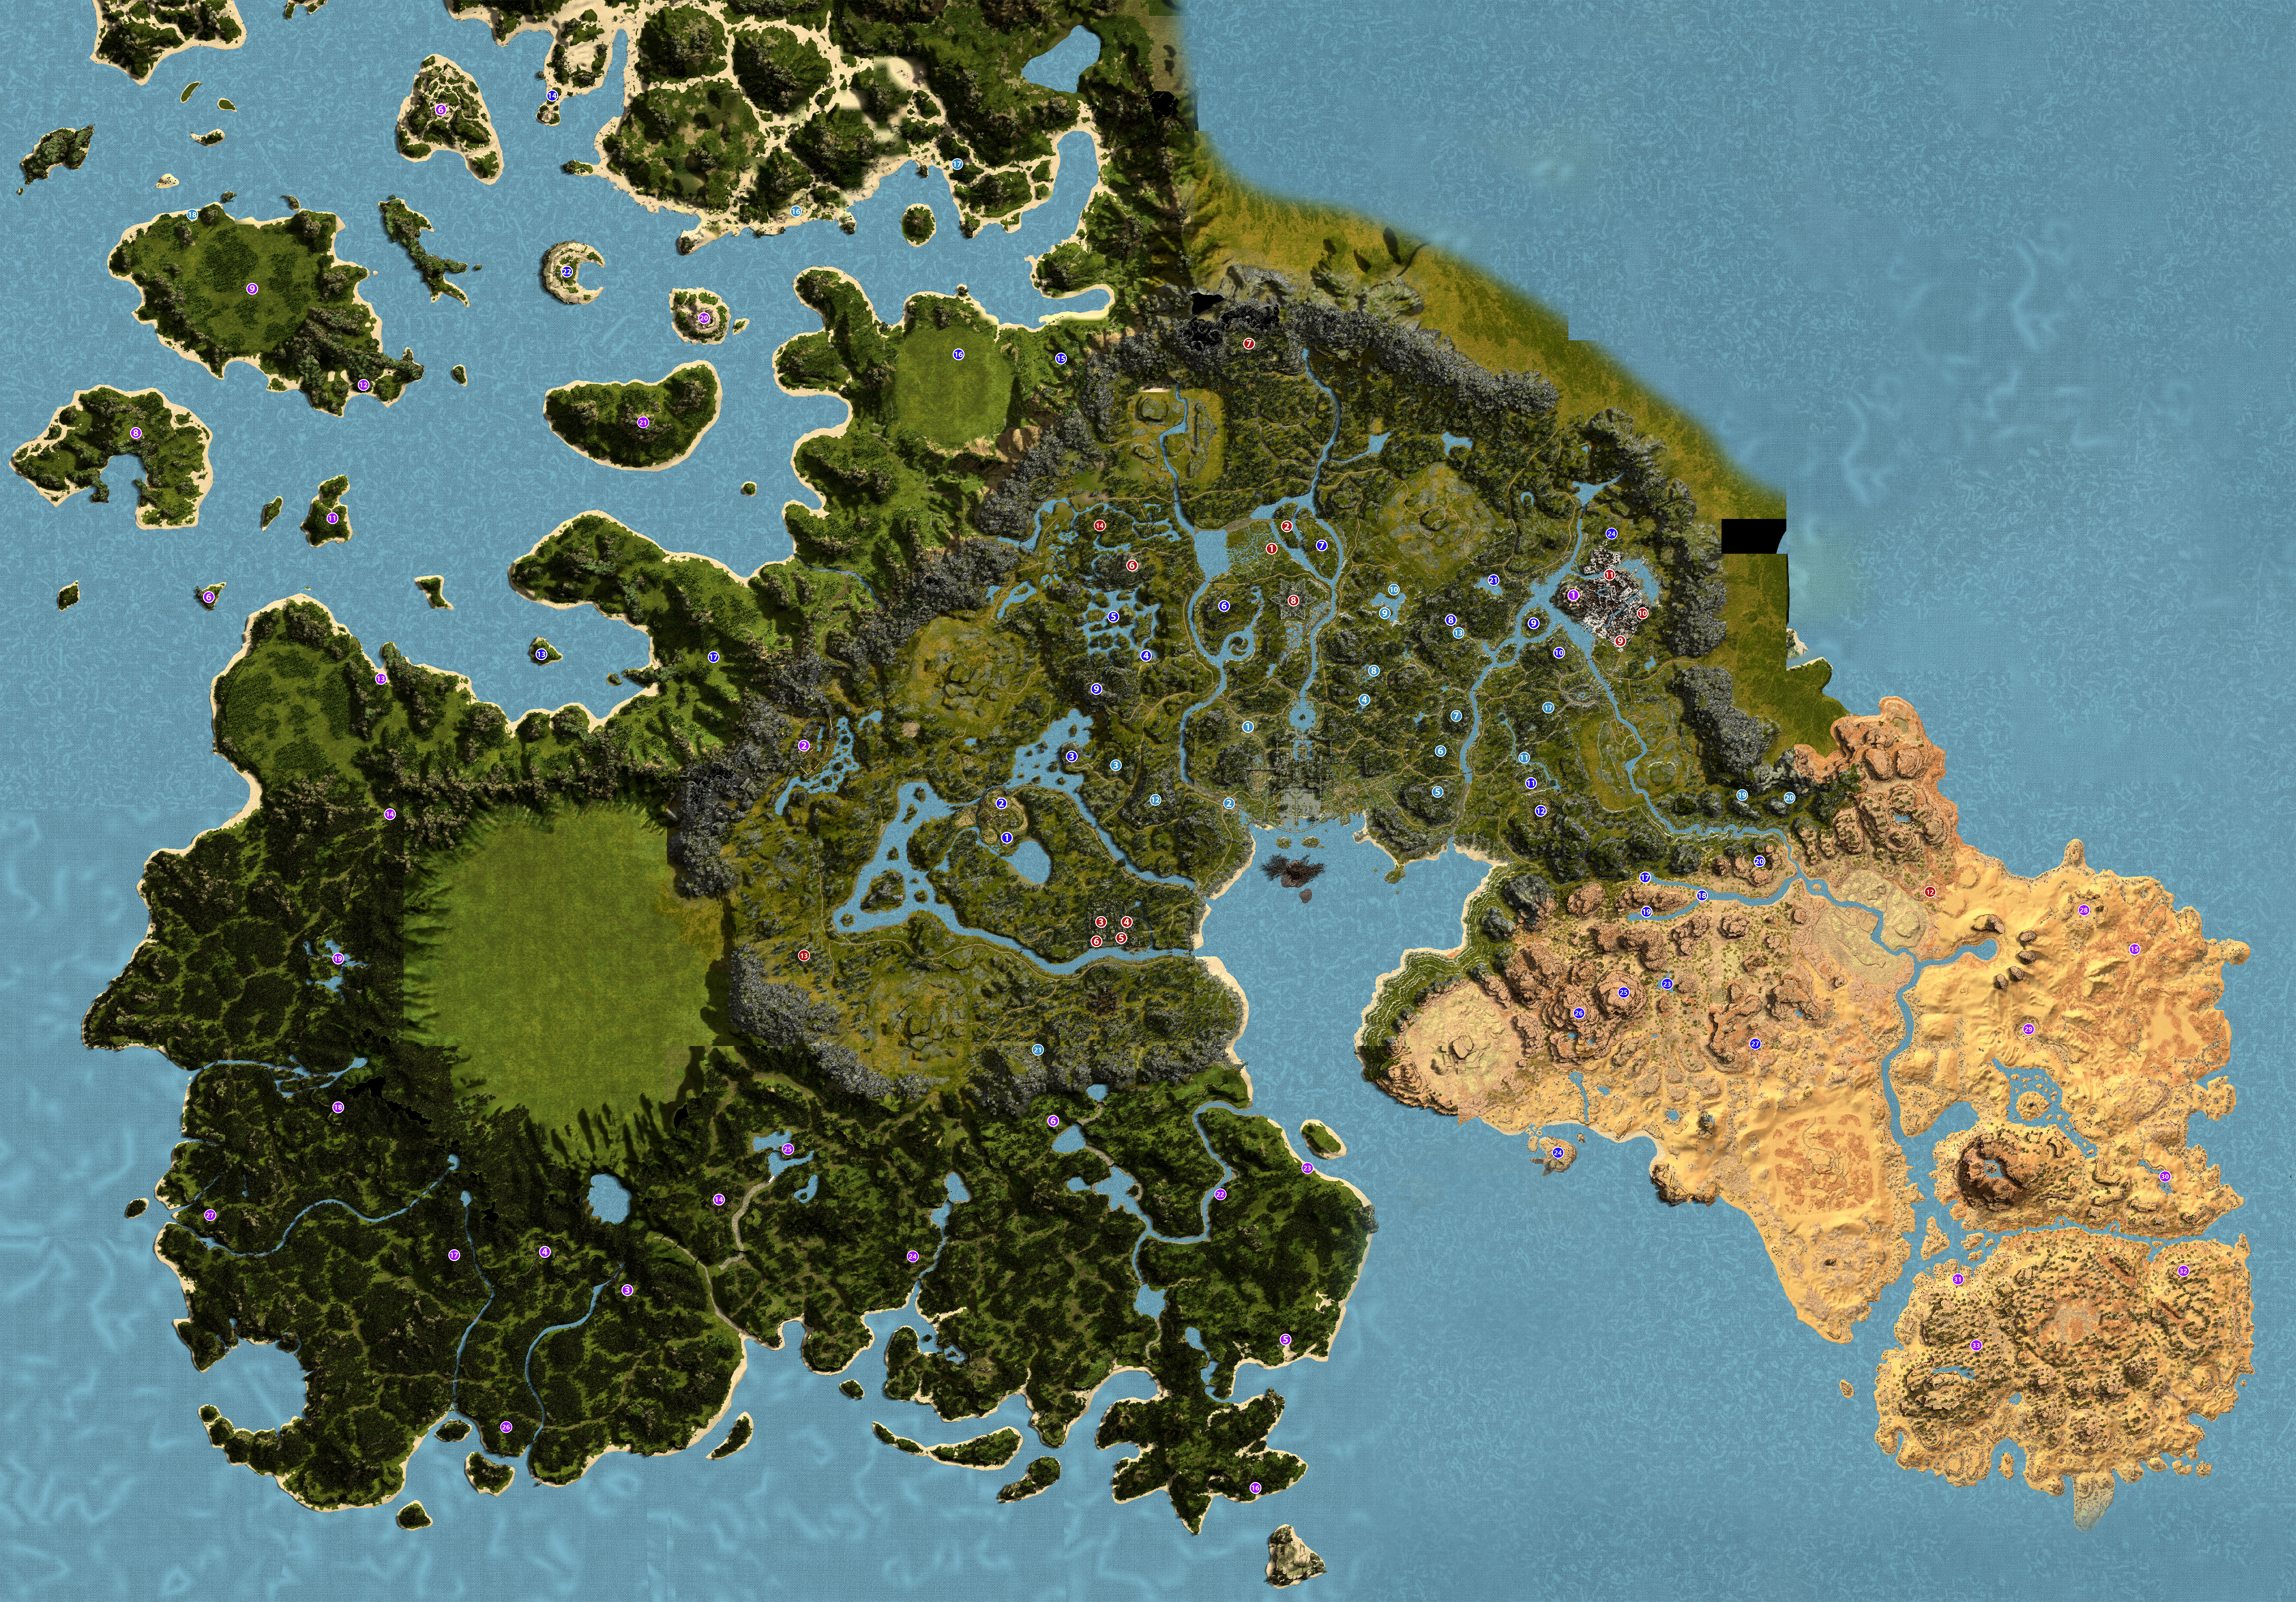
When selecting a grind location, prioritize areas with a high concentration of mobs that your party can efficiently cleave through using AoE abilities. As a general rule, you should aim to farm mobs that are as high over your current level as your group can comfortably handle. This maximizes both experience and loot gains while keeping your pace efficient.
Gear Suggestions
While on your leveling journey, you will be wanting to keep a look out for all types of gear. These can drop off mobs, bought off vendors and even crafted throughout all levels. While armor is important, since it makes you less squishy on an already really squishy archetype, it also proves stats that will help you do some more damage. But the most important part of your gear is your weapons. They carry an extraordinarily high percentage of your Physical Power. If you ever feel like you're lacking damage, the first item to replace is your weapons. Remember: your ranged and melee weapon both provide Physical Power to your character and your abilities do a % damage to your Physical Power. That is why you will see some Rogues with Greatswords instead of Daggers. Below is a brief overview of some of the quick and easy gear you can pick-up while leveling to be as efficient as possible.
The gearing itself isn't confusing, but the weapon system can be, since we have so many options and different trees for the weapons. To keep this super simple, just equip whatever gives you the most Physical Power. Care about nothing else but that until after you have reached level 25 and start hitting Diminishing Returns. You have three choices for ranged weapons: Longbow(two-hander), Shortbow (two-hander) and a Wand (one-hander, so you use an Energy Focus in your offhand with it). Each of them fire differently, have various ranges, and have different weapon finishers. There are some arguments for an Energy Spellbook for ranged AoE mob grinding, but since you are a melee archetype as a Rogue and Energy Spellbooks are very off–meta.
Best Rogue Gear (Levels 1 - 9)
Once you reach Level 5 and completed some of the early quests to get your mount and start your beginning commissions and quests to possibly start getting your Sanctus Tokens for Starter Gear, you'll want to at least start aiming to get better weapons:
| Item Name | Location | Level Requirement |
|---|---|---|
| Weaponsmithing Craft | Level 1 | |
| Weaponsmithing Craft | Level 1 | |
| Muckmaw the Flayer | Level 1 | |
| Carpentry Craft | Level 1 | |
| Carpentry Craft | Level 1 |
While in previous phases most of the gear would be dropped from mobs while leveling, however it seems like drop rates have fallen quite a bit. Most of your drops will come from humanoids like goblins, highwaymen, pirates, minotaurs, and surprisingly crabs (which are not humanoid, we know). You can still farm these mobs through your leveling process but you may need to take some breaks and craft weapons by gathering materials and finding someone who is an artisan of the craft you would like to make. This is why we suggest you find a guild you may like and join them as they will tend to have organized crafters to help you on your journey.
You can also gain gear via some of the starting quests (for now this is just the Riverlands. If you would like to see how to do those quests, RitchieSH made a fantastic guide on how to receive all the Sanctus Tokens for the Surplus Equipment Vendor. While the Sanctus Tokens no longer exist, you still get gear from the quest lines and are worth doing.
The items listed above are some quick and easy items to pick up to help kick-start your leveling journey. You will pick-up additional gear naturally as you start progressing towards level 10. If you're lucky, you'll get some lucky armor or wand and book drops! Also if you have the gold, make sure to check out the Marketplace located in different towns that players may have posted that you can buy for cheap.
Best Rogue Gear (Levels 10 - 19)
As you continue to level, you may come across certain weapons and gear that could maximize your overall damage potential. There are a few specific items that drop from certain locations that may be worth grinding for to make your leveling experience a bit easier (especially if you are leveling solo). The list of items below are considered some of the best options you can pick up once you hit level 10. You can find these things out in the world, or to make it even easier you can just farm the materials up and have someone craft it. The higher quality materials, the higher quality the piece of gear or weapon will be, the more stats you will receive from it. Additionally, once an item reaches a certain quality, it will sometimes unlocks additional stats. The gear listed below is some of the best options you can pick up at level 10. It's set to rare quality, which is blue gear. It goes goes without saying that you want to aim for the highest quality, so if you're getting anything crafted, make sure to get the high quality gear!
Early in the phase, crafting is not available, since it takes quite a bit of time to unlock the Journeyman Stations. Not only that, but recently Intrepid removed all the gear outside of Copper gear off the vendors and you now need to get Surplus Coins from quest rewards to purchase middle gear or LV 10 gear from the vendor next to the General Goods Vendor in every Node.
Best Rogue Gear (Level 20 - 25)
Once you hit level 20, you can gain access to some of the most powerful gear and weapons in the game. As soon as you hit level 20, it's suggested to replace your level 10 gear with as many of the items listed below as possible. These can be farmed by killing the mobs that drop them, or you can get them crafted. It's suggested to get as high as quality materials as you can and get this list crafted as soon as you can. Make sure to check out the Marketplace if you got some gold, as it can be exrememly easy and sometimes cheap to buy some of the materials needed to craft your end game gear.
Important note: The higher quality a piece of gear or weapon is, the more stats you will receive from it. Additionally, once an item reaches a certain quality, it sometimes unlocks additional stats. The gear listed below is some of the best options you can pick up at level 20. It's all set to Heroic Gear, which is a strong breakpoint in this game. It's okay if you can't get the Heroic quality crafted, just try to get as close as you can to it, or even higher if you can! Epic and Legendary gear is far superior to the Heroic and lower qualities.
If you are able to craft (or have a friend that can craft these items), it is highly recommended to go that route rather than trying to get lucky with picking up these items from mobs. There's still a chance of getting a majority of these items from mobs, but if you want to guarantee certain qualities, crafting is the best approach (Mobs items drop up to Heroic at best—but more-than-likely they will be Uncommon or Rare—so if you want the BEST OF THE BEST, you'll have to find the recipes and craft them into Legendary gear when Nodes gain access to the stations.
Please note: If you can afford to, it's highly suggested that you also use
![]() Journeyman Enchanting Scrolls to enchant your Level 20 gear, which will
greatly boost your stats even further. The more you enchant a specific item, the more
expensive it gets as you upgrade it.
Journeyman Enchanting Scrolls to enchant your Level 20 gear, which will
greatly boost your stats even further. The more you enchant a specific item, the more
expensive it gets as you upgrade it.
| Item Name | Location | Level Requirement |
|---|---|---|
| Crafting and/or dropped in Steelbloom from 19+ Highwaymen. | Level 20 | |
| Crafting and/or dropped in Steelbloom from 19+ Highwaymen. | Level 20 | |
| Crafting and/or dropped in Steelbloom from 19+ Highwaymen. | Level 20 | |
| Crafting and/or dropped in Steelbloom from 19+ Highwaymen. | Level 20 | |
| Crafting and/or dropped in Steelbloom from 19+ Highwaymen. | Level 20 | |
| Crafting and/or dropped in Steelbloom from 19+ Highwaymen. | Level 20 | |
| Crafting and/or dropped in Steelbloom from 19+ Highwaymen. | Level 20 | |
| Crafting and/or dropped in Steelbloom from 19+ Highwaymen. | Level 20 | |
| New Aela Citizens Cloak | Purchased from the Node Citizen Reputation Vendor or Marketplace. | Level 20 |
| Crafting and/or dropped from many Level 19+ mobs in Steelbloom at lesser quality. | Level 20 | |
| Crafting and/or dropped from many Level 19+ mobs in Steelbloom at lesser quality. | Level 20 | |
| Crafting and/or dropped from many Level 19+ mobs in Steelbloom at lesser quality. | Level 20 | |
| Weaponsmith Journeyman Crafting. | Level 20 | |
| Sunfire Shortbow | Carpentry Journeyman Crafting | Level 20 |
The items listed above showcases some of the best gear options for the general Rogues starting at Level 20 and end game. Currently Steelbloom just has a really good set for raising Physical Power, but it does lack Magic Defense, so it may be better to gear with more medium pieces in your build. For example getting a Bloodrunner set would be better, but it's much more difficult to get your hands on. However, based on your overall gameplay, there may be other items that you may prefer. If you would like a more detailed look at what stats you are trying to hit before reaching the Diminishing Returns, check out the PvE and PvP section!
Leveling Tips
Regardless of if you're in a group while leveling, or solo, there are a handful of tips and tricks that will make your leveling process more fun and efficient. These best practices can be found below.
Scrolls
There many types of scrolls in the game that gives you a variety of different types of buffs.
Some give a minor amount of experience, such as the ![]() Novice Scroll of Adventuring Experience
which now gives you an additional 16% exp for 5 minutes on all experience gained. This might
be the biggest change for Phase 3, so now you can stock up on commissions or completing
processing materials before using the scroll in order to gain a massive increase in experience
gained.
Novice Scroll of Adventuring Experience
which now gives you an additional 16% exp for 5 minutes on all experience gained. This might
be the biggest change for Phase 3, so now you can stock up on commissions or completing
processing materials before using the scroll in order to gain a massive increase in experience
gained.
the ![]() Novice Scroll of Strength which gives
you some Strength, boosting your damage, since your abilities and weapon damage come from your
Strength stat! Don't make the mistake of thinking Dexterity will help you much in Ashes of
Creation. However, make sure to pick up some scrolls and use them often! They are relatively
cheap and extremely useful early.
Novice Scroll of Strength which gives
you some Strength, boosting your damage, since your abilities and weapon damage come from your
Strength stat! Don't make the mistake of thinking Dexterity will help you much in Ashes of
Creation. However, make sure to pick up some scrolls and use them often! They are relatively
cheap and extremely useful early.
Consumables
It's always a good idea to carry along consumables with you as you level, such as ![]() Rations
providing HP/Mana regen if you sit and eat it and
Rations
providing HP/Mana regen if you sit and eat it and ![]() Fresh Salad which gives you 275 Physical
Power Rating, as food grants small but useful buffs for an hour. Make sure to have these on you
at all times! Health and/or Mana Potions share cooldown with each other, so you can only use one
at a time!
Fresh Salad which gives you 275 Physical
Power Rating, as food grants small but useful buffs for an hour. Make sure to have these on you
at all times! Health and/or Mana Potions share cooldown with each other, so you can only use one
at a time!
Positioning
Positioning as a Rogue is critical! Starting at level one you gain the passive ability
![]() Ambusher which grants you 10% bonus crit chance when standing behind your target. There
will be cases where you cannot gain this passive, but generally, you would like to position
behind your enemies for extra crit chance and in some cases gain extra damage from abilities
like
Ambusher which grants you 10% bonus crit chance when standing behind your target. There
will be cases where you cannot gain this passive, but generally, you would like to position
behind your enemies for extra crit chance and in some cases gain extra damage from abilities
like ![]() Stab, when behind turns into Backstab, and does even more when you have
"Advantage"—more on advantage in the next section.
Stab, when behind turns into Backstab, and does even more when you have
"Advantage"—more on advantage in the next section.
Beyond positioning behind your target, the best place to be as a Rogue is within melee to
get off a lot of your abilities. This can be a dangerous place to be if you are a glass
cannon rogue. Later when we cover gearing, we'll talk about ways to combat those dangers
and throughout the leveling process you will see that there are ways to syphon back health
through certain abilities, like ![]() Sap, or
Sap, or ![]() Soothing Shadows.
Soothing Shadows.
Group Composition
While you're free to play the game how you want, with whoever you want, there will be a best comp for Rogues that players should abide by if they want to play efficiently. For the perfect mix, you will want to aim to have the following.
- Tank
- 1–2 Cleric(s)
- 1–2 Bard(s)
- 3–4 DPS archetypes
You will want the Tank so they can keep the aggro, one-two healers with the Clerics,
a mana Bard, optional Bard for DPS or Healing melodies, and the rest is up to you when
it comes to DPS Archetypes. Ranger, Mage, and Fighter all have good AoE and can help
the leveling process. Rogue tends to have less AoE but still provide useful damage,
have good crowd control, and enough AoE with melee cleaves and ![]() Lacerates to
benefit any party looking for an extra DPS. Luckily Ashes of Creation has an abundance of
support classes that DPS aren't oversaturated like other MMOs at the moment.
Lacerates to
benefit any party looking for an extra DPS. Luckily Ashes of Creation has an abundance of
support classes that DPS aren't oversaturated like other MMOs at the moment.
Players do tend to dislike Rogues, as you are generally putting yourself into an easier position to die (melee range) and have less AoE damage that some other archetypes like Ranger or Mage. However, your single target damage is by far the best, so if there are some high HP priority targets, it is good to have a Rogue in the party to focus them down. Not only that, but you provide a lot of CC for interrupts, silences, snares, etc. for your party when your tank is inevitably sleeping on the job.
Skill Points
It's important to know that as your character progresses, you don't only unlock points to be used for your class skill tree, but also points towards separate skill trees for each of your melee and ranged weapon and your passive stamina tree. Be sure to invest points into these areas to enhance your overall leveling experience! This means taking the AoE skills more often than not.
Glint
Glint in money in this game and extrememly important. You need it to sell for gold which is then used to purchase commodities. As you kill more mobs and players, you'll obtain quite a bit of Glint and it's easy to forget about. After a few hours of leveling, you might find yourself sitting on a ton of glint. Make sure to take a break from leveling every so often and hit the closest town and put all your Glint in the storage so you won't lose it! A note about selling it, it's always good to sell your glint if you need gold to repair. That's it though. Glint is a major end game currency since the best way to get gold is to run Caravans, which you need Glint and only Glint to purchase the commodities that you'll be transporting for Gold. So don't hastily vendor all your Glint; instead save it and only vendor when you truly need gold and cannot wait. The gold return on selling Glint is atrocious.
Flagging for PvP
You should always be aware of your PvP status while leveling, and how exactly it works. Players can manually turn on their PvP mode by clicking Alt+F--not to be confused with Alt+F4--allowing them to attack other player. As a Rogue, you may be a bloodthirsty player in an open world PvP game. However, you should be aware of the dangers when entering PvP in Ashes of Creation. There are three common states of a player:
- Non-combatant
- This is also labeled as a "green" player, however the nameplate in-game will be the default color: white and will not have a flagging marker on the nameplate itself to players outside of your party/raid. This is the default state a player can be in. As of Phase 3, non-combatants are no longer able to be CC'd. They have not issued an attack on another player; therefore they are a non-combatant. Note: that you can flag for PvP and still be a non-combatant. Just because you press Alt+F or see that someone is flagged, does not mean they have entered a PvP state. It just means that they are ready for combat in the open world. You will see an image of crossed swords below your, or your target's, health bar when flagged for PvP.
 Combatant
- These players are referred to as "purple" players. This means after flagging for PvP AND doing damage to another player—regardless of their combat state—you will enter this state. This means, if another player attacks you while you are flagged, they will be a combatant; however, you will still be a non-combatant. You will be able to tell by their nameplate changing colors and they will have a purple symbol next to it.
 Corrupted
- When a player enters a corrupted state, they are "red" or Corrupted. This means a Combatant, or purple player, has killed a non-combatant, or green player, without the non-combatant attacking back. So be careful when attacking players in the open world. The penalties for being corrupted are severe. You may take 4% more experience debt upon death and lose more materials than normal, as well as dropping equipped items and gear. Taking gear off in a corrupted state does not save your gear either.
Exceptions: If both players are in a combatant state, then you will receive less experience debt upon death than normal and drop less materials. You will also not drop equipped gear if both parties are in a combatant state. Upon killing the other combatant you will not become corrupted. After some time (subject to change) you will again return to a non-combatant state.
Changelog
- 08 Jul. 2025: Guide created.
Llewd Lloyd is a long-term Ashes of Creation tester and content creator with 5,000+ hours into the game since Alpha 1. He has played every archetype to max level and has specialized in Rogue. He plays for one of the most accomplished guilds in Ashes of Creation, POLAR, and has shoutcasted all of their PvP tournaments to date. He streams on Twitch and posts content on YouTube.
- Ashes of Creation’s Summoner Testing Begins
- Sport Fishing is Coming to Ashes of Creation
- Ashes of Creation Summoner Preview
- 7 Tips When Playing Ashes of Creation Solo
- The Future of Gear Sets in Ashes of Creation
- Ashes of Creation’s Upcoming Harbinger System
- Ashes of Creation: 9 Tips for Beginners
- Launch of Ashes of Creation Alpha Two Phase Three