

The Stone Guard Detailed Strategy Guide (Heroic Mode included)

Introduction
This guide is intended to provide a comprehensive description of the encounter with The Stone Guard in Mogu'shan Vaults. It is targeted at anyone who desires to understand the fight mechanics.
This guide is updated for World of Warcraft WoD 6.1.2.
The Stone Guard is the first encounter in the Mogu'shan Vaults raid instance. The encounter is most likely the first you will experience in Tier 14 raiding, and while its mechanics are not overly complex, it is still quite challenging.
On normal mode, the fight will mostly test your raid's ability to switch targets and to react to simple mechanics, all while maintaining solid healing.
General Information
| Difficulty | Guardians' Health | Enrage Timer | Raid Composition | ||
|---|---|---|---|---|---|
| Tanks | Healers | DPS | |||
| 10-man | 130M | 7 minutes | 2 | 2-3 | 5-6 |
| 10-man heroic | 235M | 7 minutes | 2 | 3 | 5 |
| 25-man | 365M | 7 minutes | 3 | 6-7 | 15-16 |
| 25-man heroic | 769M | 7 minutes | 3 | 6 | 16 |
| LFR | 212M | Unknown | 2 | 6 | 17 |
Loot
Armor
| Item Name | Armor | Slot | Main Stats |
|---|---|---|---|
| Cloth | Hands | Intellect | |
| Cloth | Legs | Intellect/Spirit | |
| Leather | Waist | Intellect | |
| Leather | Legs | Agility | |
| Head | Intellect | ||
| Wrists | Agility | ||
| Plate | Feet | Intellect | |
| Plate | Waist | Strength/Dodge | |
| Plate | Feet | Strength/Mastery |
Weapons
| Item Name | Type | Main Stats |
|---|---|---|
| One-Hand Dagger | Agility |
Amulets and Cloaks
| Item Name | Type | Main Stats |
|---|---|---|
| Amulet | Strength/Dodge | |
| Cloak | Intellect/Spirit |
Overview of the Fight
This encounter consists in a single phase that repeats until you defeat the 4 Quilen Guardians that make up The Stone Guard:
- Amethyst Guardian;
- Cobalt Guardian;
- Jade Guardian;
- Jasper Guardian.
The Guardians have a shared health pool, and each Guardian has its own individual energy bar. The Guardians gain energy when they are close to other Guardians, and when a Guardian reaches maximum energy, it unleashes a very damaging, raid-wide attack. Each Guardian has its own version of this maximum-energy attack; these attacks are called Overloads. Fortunately, at any given time, one of the Guardians is also providing protection to the raid from its own maximum-energy attack, in the form of a 90% damage reduction from that attack.
Therefore, the main objective of the encounter is to control the order in which the Guardian's energy bars fill up, by moving them close to, and away from other Guardians, depending on which Guardian is applying the debuff.
A few seconds after a Guardian uses its maximum-energy attack, a new Guardian will start applying its debuff, and it is this Guardian that you must get to maximum energy.
This cycle continues until you defeat the Guardians.
Additionally, the Guardians have a few damaging abilities, which we will also detail.
Finally, note that in 10-man and LFR, only 3 of the 4 Guardians are active (which of the 4 are active is chosen at random each lockout), while in 25-man all 4 are always active.
Video by Inner Sanctum
25-man Normal kill
25-man Heroic kill
Energy Generation
In their normal state, the Guardians are affected by ![]() Solid Stone,
which causes them to take 90% reduced damage, and not generate any energy. This
buff is removed if a Guardian is within 12 yards of another Guardian.
Solid Stone,
which causes them to take 90% reduced damage, and not generate any energy. This
buff is removed if a Guardian is within 12 yards of another Guardian.
While a Guardian has the Solid Stone effect, their current energy decreases slowly over time.
When they are within 12 yards of each other, the Guardians generate energy at a rate of approximately 1.7 per second, regardless of what actions your raid takes. As we mentioned above, it will be your goal throughout the fight to often move Guardians together, and then apart, in order to control their energy generation.
Abilities
Besides ![]() Solid Stone, mentioned above, all the Guardians have
an ability called
Solid Stone, mentioned above, all the Guardians have
an ability called ![]() Rend Flesh. Rend Flesh is a bleed effect that each
Guardian applies on its tank. It lasts 15 seconds and deals a moderate amount
of physical damage. This bleed effect does not stack. Overall, it is not
problematic.
Rend Flesh. Rend Flesh is a bleed effect that each
Guardian applies on its tank. It lasts 15 seconds and deals a moderate amount
of physical damage. This bleed effect does not stack. Overall, it is not
problematic.
In addition to this, each Guardian has its own set of 3 abilities. While these are different for each Guardian, they can easily be categorised as follows (Amethyst abilities are only used by the Amethyst Guardian, and so on).
 Amethyst Pool,
  Cobalt Mine,
  Jade Shards,
  Jasper Chains
are damaging abilities. Throughout the fight, the Guardians will
regularly attempt to damage one or more raid members with these abilities.
Jasper Chains
are damaging abilities. Throughout the fight, the Guardians will
regularly attempt to damage one or more raid members with these abilities. Amethyst Petrification,
  Cobalt Petrification,
 Jade Petrification and
  Jasper Petrification are the Petrification
abilities that one (and only one) of the Guardians will use per cycle. These
abilities apply a stacking debuff to the raid (it takes the form of a resource
bar that fills up to 100). If the Guardian manages to stack this debuff fully,
the raid will become paralyzed. The Petrification is broken by the Guardian's
Overload (explained below). Petrification also greatly reduces the damage
done by the respective Guardian's Overload. For example,
Amethyst Petrification only reduces the damage done by
Jasper Petrification are the Petrification
abilities that one (and only one) of the Guardians will use per cycle. These
abilities apply a stacking debuff to the raid (it takes the form of a resource
bar that fills up to 100). If the Guardian manages to stack this debuff fully,
the raid will become paralyzed. The Petrification is broken by the Guardian's
Overload (explained below). Petrification also greatly reduces the damage
done by the respective Guardian's Overload. For example,
Amethyst Petrification only reduces the damage done by
 Amethyst Overload, but not the damage done by
  Cobalt Overload.
- Amethyst Overload, Cobalt Overload,
 Jade Overload and
  Jasper Overload are the Overload abilties
that the Guardians will use when they reach maximum energy. An Overload deals
damage to the raid, stops the Guardian from casting petrification, and removes
the Petrification debuff from the raid.
Jasper Overload are the Overload abilties
that the Guardians will use when they reach maximum energy. An Overload deals
damage to the raid, stops the Guardian from casting petrification, and removes
the Petrification debuff from the raid.
Damaging Abilities
- Amethyst Pool is cast by the Amethyst Guardian. It is a void zone,
placed at a random raid member's location, that inflicts Shadow damage ever
second to everyone inside it. It lasts 1 minute and 20 seconds, and it is cast
roughly once every 5-10 seconds.
- Cobalt Mine is cast by the Cobalt Guardian. It is a cobalt shard
launched at a random raid member's location. After 3 seconds, the shard
becomes active, and any player who comes within 7 yards of it causes it to
detonate, dealing Arcane damage to all allies within 7 yards, also rooting
them for 6 seconds. This is ability is cast every 10 seconds.
- Jade Shards is cast by the Jade Guardian. It is a raid-wide nuke,
dealing a small amount of Nature damage to all players. This spell is cast
every 10 seconds.
- Jasper Chains is cast by the Jasper Guardian. It links two random
raid members together (indicated graphically by chains). If the two players
are more than 10 yards apart from one another, the chains deal Fire damage to
them every second. The damage is increased by 15% (10% in LFR) for each second
that the two players are more than 10 yards apart, and being more than 10
yards apart for 15 seconds removes the chains. Note that this effect is
cumulative, meaning that you do not need to be apart for 15 continuous seconds;
for each second that you are apart you get a stack of an otherwise harmless
debuff, and at 15 stacks the chains are broken. The spell is cast roughly every
10 seconds.
Petrification
Petrification is an ability that Guardians possess, but only one of the Guardians can cast its Petrification ability at one time. It is a stacking debuff (although it appears on players' screen as a distinct resource bar) that is applied on the entire raid. Petrification reduces the target's movement speed with each stack. If the debuff reaches maximum, it paralyzes its targets.
- Petrification has a maximum capacity of 100, and it takes around 80 seconds for it to reach maximum capacity.
- Petrification is cast for the first time 5 seconds into the fight, and again 5 seconds after each Petrification ends.
- A random Guardian is selected to cast Petrification each time, and the same Guardian cannot cast petrification twice in a row. There seems to be a tendency for the Guardian with the lowest energy to be chosen to petrify the raid, but we cannot confirm this.
- While Petrification is stacking on players, they take 90% reduced damage
from the school of damage belonging to the respective Guardian
- Amethyst Petrification: Shadow;
- Cobalt Petrification: Arcane;
- Jade Petrification: Nature;
- Jasper Petrification: Fire.
- Reaching maximum Petrification can only be prevented by the Guardian's
Overload (see below), and not by another Guardian's Overload. For example,
Cobalt Overload does not remove Amethyst Petrification.
- Reaching maximum Petrification causes all players to become unable to move or act. They continue to take damage, meaning that it always leads to a wipe.
It is important to differentiate between the two Petrification states:
- The first represents the fact that one of the Guardians is applying the debuff to the raid, reducing damage taken from their school of damage.
- The second represents Petrification at maximum capacity, when the raid is stunned. This second effect must always be avoided.
Overload
Overload is the final ability of the Guardians. Overload is only cast when the Guardian reaches 100 energy. It deals a large amount of damage of the Guardian's school, and stops Petrification.
- Amethyst Guardian casts Amethyst Overload.
- Cobalt Guardian casts Cobalt Overload.
- Jade Guardian casts Jade Overload.
- Jasper Guardian casts Jasper Overload.
5 seconds after Overload breaks a Petrification, a new Petrification begins. An Overload from a Guardian other than the one who is currently petrifying the raid will have no effect whatsoever on the Petrification.
Strategy
The strategy for defeating The Stone Guard revolves around two concepts:
- Each Guardian who casts Petrification must overload (reach 100 energy) before he finishes petrifying.
- Do not allow Overloads to take place without the respective Guardian's
Petrification being active. For example, Amethyst Overload should not
happen without the raid being protected by Amethyst Petrification.
This means that the Guardians will have to often be moved close and away from one another, in such a way that the petrifying Guardian is always within 12 yards of another Guardian (so that he gains energy, in order to overload). At the same time, you should minimise the amount of energy that non-petrifying Guardians get, by rotating which of them is in close proximity of the petrifying Guardian.
We detail this in a dedicated section.
Positioning
 In 10-man and LFR, you should have two locations for tanking the
Guardians. In one location, your off-tank should keep a Guardian that is
not casting petrification, while in the other, your main tank should keep the
petrifying Guardian together with the lowest-energy Guardian.
In 10-man and LFR, you should have two locations for tanking the
Guardians. In one location, your off-tank should keep a Guardian that is
not casting petrification, while in the other, your main tank should keep the
petrifying Guardian together with the lowest-energy Guardian.
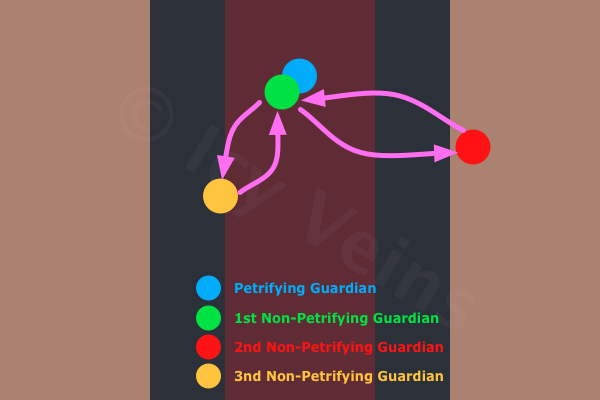 In 25-man, you should have three tanking locations. This will allow you to
only have two Guardians (of the 4 active) gain any energy. This requires
using 3 tanks.
In 25-man, you should have three tanking locations. This will allow you to
only have two Guardians (of the 4 active) gain any energy. This requires
using 3 tanks.
The Guardians only have to be more than 12 yards apart in order not to gain energy, so it is advised not to have the two tanking locations too far apart.
The rest of your raid members should stand close together near the center of the room. There are two important positioning challenges for your raid members.
- Raid members must be quick to move out of Amethyst Pool whenever it
spawns underneath them.
- Raid members must be quick to move away from Cobalt Mines when they
are placed next to them.
Finally, ![]() Jasper Chains also requires that the affected raid members
move, which can cause some interactions with the abilities mentioned above,
although it should not be problematic.
Jasper Chains also requires that the affected raid members
move, which can cause some interactions with the abilities mentioned above,
although it should not be problematic.
None of the other abilities of the Guardians pose any positional problems.
It is important to keep in mind that as Petrification stacks higher and higher, movement speed is progressively reduced. This makes moving out Amethyst Pools or away from Cobalt Mines more difficult.
Taunting and Positioning the Guardians
The energy generation of the Guardians is determined entirely by their positioning, so it is up to the tanks to make sure that the strategy of the encounter is executed properly. We believe that it is optimal, for several reasons, for the tanks to remain stationary in the pre-assigned tanking locations, and to simply perform taunt switches between them, whenever a Guardian must be moved.
Tanks must expect to taunt Guardians roughly every 20 seconds, which is neither problematic in terms of the cooldown of taunt, nor in terms of the diminishing returns of taunt.
The tanking locations we provided in the previous section are approximate,
of course, since tanks will sometimes have to move, due to the location of
![]() Amethyst Pools or other damaging abilities.
Amethyst Pools or other damaging abilities.
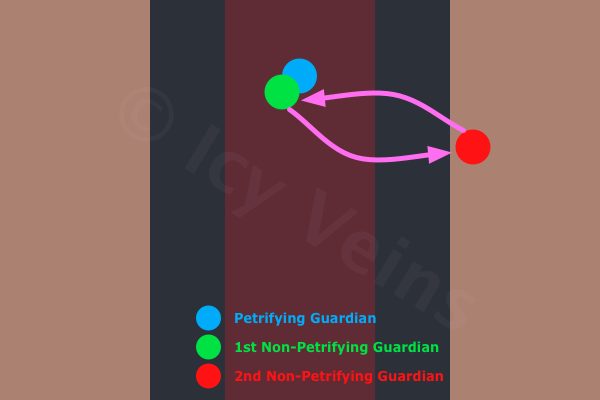
Guardian Energy Management
The principle for managing the energy of Guardians optimally can best be summarised as always have the petrifying Guardian next to the Guardian with the lowest amount of energy.
The best strategy is to rotate the Guardians, always moving the petrifying Guardian next to the lowest non-petrifying Guardian. The ideal time to move the Guardians is every 25 energy in 25-man, and every 50 energy in 10-man and LFR.
Naturally, when you find yourself in a situation where the energy of the non-petrifying Guardian you are currently using is less than or equal to the energy of the other non-petrifying Guardian(s), you should maintain the status-quo, for convenience. This is because you will need to choose a non-petrifying Guardian to gain more energy than the other(s) anyway, so it might as well be the one you are currently next to.
Dealing with Mechanics
The encounter checks if your raid members are able to react accordingly to a number of abilities, while maintaining the required amounts of DPS, HPS, and threat. In this section, we will go through each ability and the way in which it should be dealt with.
Amethyst Pool
![]() Amethyst Pool is simply avoided by stepping out of it. As the fight
goes on, the floor of the room will become increasingly covered by the pools,
but finding safe spots should not be an issue.
Amethyst Pool is simply avoided by stepping out of it. As the fight
goes on, the floor of the room will become increasingly covered by the pools,
but finding safe spots should not be an issue.
This ability can interact with ![]() Cobalt Mine, which can root players in
place. We will detail this in the section below.
Cobalt Mine, which can root players in
place. We will detail this in the section below.
Cobalt Mine
![]() Cobalt Mine should be avoided by moving away from the crystal
shard. However, since the floor of the room can become quite crowded, your raid
may opt to detonate some mines on purpose (while making sure that no one
except the detonating player is within 7 yards of the crystal).
Cobalt Mine should be avoided by moving away from the crystal
shard. However, since the floor of the room can become quite crowded, your raid
may opt to detonate some mines on purpose (while making sure that no one
except the detonating player is within 7 yards of the crystal).
When the Mine is detonated, it damages and roots all players within 7 yards
of it. The root effect lasts for 6 seconds, and is dispellable. The root effect
can interact negatively with ![]() Amethyst Pools, preventing players from
moving out of the pool. In this case, healers should be quick to dispel and
heal the affected players.
Amethyst Pools, preventing players from
moving out of the pool. In this case, healers should be quick to dispel and
heal the affected players.
The ideal time to detonate the Cobalt Mines is when Cobalt Petrification is being cast, since this reduces the damage that they deal by 90%, making them practically harmless.
If the room becomes too crowded with all the Cobalt Mines, and you cannot
wait for a Cobalt Petrification, certain players can detonate them on purpose
and take minimal damage. Ideal examples are Hunters using
Deterrence, Shadow Priests using ![]() Dispersion, or any other
classes with immunities or large damage reduction abilities. Make sure that no
one else is within 7 yards of a mine that is about to be detonated.
Dispersion, or any other
classes with immunities or large damage reduction abilities. Make sure that no
one else is within 7 yards of a mine that is about to be detonated.
Jasper Chains
![]() Jasper Chains links two random players together. In order for the chains
to disappear, the players must stand 10 yards away from each other for 15
seconds. However, standing at this distance causes the chains to deal
damage to the two players, so this is not always the best option.
Jasper Chains links two random players together. In order for the chains
to disappear, the players must stand 10 yards away from each other for 15
seconds. However, standing at this distance causes the chains to deal
damage to the two players, so this is not always the best option.
There is no other way to get rid of the chains.
We advise your raid to implement a "buddy system" for handling the Jasper Chains. In short, the system relies on not breaking the Jasper Chains that link two players, and having the two players stand close to each other for the rest of the fight. This is made possible by the fact that there is a limit to how many chains can be active at one time (3 in 10-man; unknown yet in 25-man), meaning that your raid will only have to control a few buddy pairs.
The system we propose works as follows. Every time two players are linked by chains, they become each other's buddy. The two players should always stand next to each other (within 10 yards), and move together throughout the remainder of the fight.
Since it is problematic if a healer and a melee DPS are linked together,
undesirable links can be broken while there is a ![]() Jasper Petrification
going on (since the damage the chains deal will be vastly reduced). Your raid
can continue to do this until favourable links are formed (melee DPS with melee
DPS, healer with ranged DPS).
Jasper Petrification
going on (since the damage the chains deal will be vastly reduced). Your raid
can continue to do this until favourable links are formed (melee DPS with melee
DPS, healer with ranged DPS).
Alternatively, it is possible for your raid to pre-assign buddies, and break all chains (during Jasper Petrification) that do not correspond to these buddies. This is easier to organize beforehand, but it may result in too much confusion during the encounter.
As we mentioned earlier in the guide, the linked players do not need to spend 15 consecutive seconds apart - this effect is cumulative, so they can simply move in and out of range of each other and still eventually break the chains.
Sources of Damage
Healers will have to contend with the following sources of damage:
- Steady tank damage from melee attacks and the
 Rend Flesh
bleed.
Rend Flesh
bleed. - Regular raid-wide damage from Jade Shards.
- Random avoidable single or multiple target damage to players from
Cobalt Mine.
- Avoidable damage from players standing in the void zones created by
Amethyst Pool.
- Varying damage from Jasper Chains, depending on the strategy your
raid is using.
- High raid-wide damage from overloads, each time a Guardian reaches 100 energy (roughly 200,000 damage after reductions).
A situation of particular interest occurs when a player is rooted by
![]() Cobalt Mine while inside a void zone from
Cobalt Mine while inside a void zone from ![]() Amethyst Pool. In this
case, that player must quickly be dispelled so that he can move out.
Amethyst Pool. In this
case, that player must quickly be dispelled so that he can move out.
Cleaving and Multi-Dotting
Since two Guardians will always be tanked together, classes with cleave effects (Arms Warriors, Combat Rogues) or DoTs (Warlocks, Shadow Priests, Balance Druids) can boost their (and the raid's) DPS greatly by taking advantage of the situation.
These techniques are highly advised, especially since the Guardians have a shared health pool.
When to Use Heroism/Bloodlust/Time Warp
The fight does not have different phases, nor does its difficulty change
as it goes on. Therefore, you should use
![]() Heroism/
Heroism/![]() Bloodlust/
Bloodlust/![]() Time Warp at the start of the fight, to
maximise the benefit of players' potions and initial cooldowns.
Time Warp at the start of the fight, to
maximise the benefit of players' potions and initial cooldowns.
Learning the Fight
As the encounter is stable in difficulty, and no new phases are unlocked by reaching a certain stage of the fight, the best way for your raid to learn the fight is to ensure that everyone understands fully how to handle each of the mechanics individually.
- Players must move out of Amethyst Pool;
- Players must move away from Cobalt Mine;
In addition to this, all that your raid must know is what the basic mechanics of the fight are (Guardian energy generation, petrification and overloads).
Heroic Mode
The Heroic mode of The Stone Guard is an introductory Heroic mode, probably the first one your raid will attempt in Tier 14. While the encounter is quite difficult (as all Heroic modes are), it is also reasonably accessible for a well geared and well coordinated group. Moreover, the encounter will be easy for your raid to learn, as it does not differ greatly from the Normal mode version.
Differences from Normal Mode
As mentioned, the fight does not differ greatly from Normal mode. Your raid will have to contend with increased health and damage from the bosses, as well as with a few new fight mechanics.
Increased Damage
In Heroic mode, the Guardians all have greatly increased health pools. This aspect turns the fight into somewhat of a DPS race, but this is made trivial by the Heroic-only mechanic of the encounter.
In addition to this, every single mechanic in the encounter deals significantly more damage than in Normal mode. This includes the melee attacks of the Guardians.
New Mechanics
The novelty of the Heroic mode of the encounter stems from the interaction between your raid, the tiles that make up the room's floor, and several crystals that are present in the room. By executing the strategy properly, your raid will benefit from a buff that will greatly increase your DPS and Spirit, allowing you to better handle the boss' increased health and damage.
In order to obtain this buff, several of your raid members will have to interact with crystals present around the room, and subsequently stand on specific areas of the floor.
For each active Guardian, there is a crystal located in the room. In 10-man, where only 3 Guardians are active, there are only 3 crystals. These crystals are unattackable, and they do nothing on their own. When a raid member interacts with a crystal (by clicking it in melee range), they (the raid member) gains a debuff. This debuff deals damage to the affected raid member, but it also allows them to subsequently buff the raid. The debuff depends on which crystal the raid member interacts with, but the only difference between the crystals is the school of magic damage that they deal.
- Living Amethyst Crystal applies
 Living Amethyst.
 - Living Cobalt Crystal applies
 Living Cobalt.
 - Living Jade Crystal applies
 Living Jade.
 - Living Jasper Crystal applies
 Living Jasper.
Interacting with a crystal, therefore, adds the respective debuff to the player. The debuff lasts 30 seconds, and starts out with a number of stacks when it is first applied (10 stacks in 10-man, and 7 stacks in 25-man). These stacks are progressively lost. For each stack, the player takes a small amount of damage every second. Even though the damage dealt per stack is rather low, the players will take high damage after having just clicked the crystals, since the stacks will be at their highest.
The next part of the mechanics involves the floor tiles. Whenever a raid member who is affected by a debuff from a crystal walks on a floor tile, this tile becomes energized, and a stack of their debuff is removed. Indeed, there are two types of floor tiles, according to the in-game classification.
- White Floor Tiles are the all of the tiles that make up the floor of the room. This excludes the central area, which is of a darker colour, and is also partly covered by a carpet. White Floor Tiles do not do anything on their own; this is the default state of the floor, which is modified by debuffed players stepping on them.
- Energized Tiles are White Floor Tiles that have been stepped
on by players affected by a debuff from a crystal. Energized Tiles glow
brightly, and for each one your raid gains a stack of
 Energized Tiles.
- Energized Tiles increases the damage done and Spirit of all your raid
members by 1% per stack. The buff has a 10-minute duration, however all the
current Energized Tiles are reset by the bosses when they reach 75% and 40%
health.
Finally, the energy of Guardians no longer decreases when they have the
![]() Solid Stone effect active.
Solid Stone effect active.
Strategy
The strategy for the Heroic mode is very simple and straightforward. In addition to performing all of the Normal mode tasks, the heroic strategy can be easily summarised.
- Have several raid members take the debuffs from the crystals, and energize White Floor Tiles around the room.
- Stop energizing tiles at around 100 stacks of Energized Tiles, and
simply focus on DPS the bosses.
- After the Energized Tiles are reset at 75% and 40%, re-energize them until you have about 100 stacks of Energized Tiles.
Energizing Tiles
For the most part, it is the task of your DPS players to energize the floor
tiles, since tanks and healers cannot move freely (due to the importance of
performing their own roles). The number of DPS players who will go around
energizing floor tiles depends on how well your raid can cope with the damage
that these players will take from their respective debuffs, but the faster
you reach your desired level of ![]() Energized Tiles, the better.
Energized Tiles, the better.
To remind you, at full stacks (10 in 10-man, and 7 in 25-man), the affected raid members will be taking around 60,000 damage per second. Therefore, coupled with the damage that the tanks are taking, this results in a lot of damage that must be healed. Therefore, you will need to judge how many players you can afford to have energizing tiles, based on your own experiences. In any case, the players who are energizing tiles can use their own defensive cooldowns to help mitigate the damage.
Additionally, it may be possible for healers to help out with energizing tiles, which can be useful.
Finally, do not forget that floor tiles will have to be re-energized at 75% and 40% of the bosses' health.
To avoid confusion, there are a few aspects we would like to mention regarding the practice of energizing tiles.
- It is not feasible (or required) to only use the crystal of the currently petrifying Guardian. Even though this will greatly reduce the damage that players take from interacting with the crystals, it will result in far too slow energizing of the tiles.
- In order to energize a tile, as mentioned above, all you must do is to run over it.
- As a point of reference, 100 energized tiles are less than half of the room's tiles.
Other Concerns
Aside from energizing the floor tiles, nothing is different from the Normal mode of the encounter. Keep in mind, however, that all mechanics are far more punishing in Heroic mode, and your raid will have to execute the strategy flawlessly in order to succeed.
Achievement: Must Love Dogs
The ![]() Must Love Dogs achievement is part of the
Must Love Dogs achievement is part of the
![]() Glory of the Pandaria Raider meta achievement. It is a very simple
achievement for your raid. It simply requires that each one of your raid
members is accompanied by a canine non-combat pet (companion) when
defeating The Stone Guard.
Glory of the Pandaria Raider meta achievement. It is a very simple
achievement for your raid. It simply requires that each one of your raid
members is accompanied by a canine non-combat pet (companion) when
defeating The Stone Guard.
We currently know of the following viable canine companions (based on a comment on Wowhead):
 Perky Pug (easily obtained as a reward for completing roughly 25
heroic dungeon through the Dungeon Finder Tool);
Perky Pug (easily obtained as a reward for completing roughly 25
heroic dungeon through the Dungeon Finder Tool); Core Hound Pup (obtained by anyone who attaches a Blizzard
Authenticator to their account);
Core Hound Pup (obtained by anyone who attaches a Blizzard
Authenticator to their account); Curious Wolvar Pup (a reward from the Children's Week world
event);
Curious Wolvar Pup (a reward from the Children's Week world
event); Worg Carrier (a drop from Quartermaster Zigris in Blackrock
Spire);
Worg Carrier (a drop from Quartermaster Zigris in Blackrock
Spire); Fox Kit (small drop chance from Baradin Foxes in Tol Barad
Peninsula).
Fox Kit (small drop chance from Baradin Foxes in Tol Barad
Peninsula).
Concluding Remarks
This concludes the guide to defeating The Stone Guard. As you can see, the encounter is quite straightforward, and it acts well as an introductory fight to the raid instance, and raiding in general in Tier 14. If you have any feedback, questions or suggestions, or if you simply wish to share your experiences on this fight with us and the rest of the community, we invite you to contact us on our forums, or by e-mail.