Ashes of Creation Bard Leveling Guide
Learn everything you need to know to level your Bard the fastest and most efficient way possible! This guide will provide everything you need to reach the maximum level and kickstart your endgame journey in Ashes of Creation. We cover talent builds, group compositions, leveling tips, and much more!
The Bard Leveling Experience
![]() Welcome to the ultimate leveling guide for Bards! Inside this guide, we'll
cover everything you need to know while you level your Bard to Level 25,
which is the current level cap in Ashes of Creation. As you level up your character,
whether playing solo or in a group, there are several best practices to help you use
your time efficiently and maximize your overall experience gain. Below, we'll discuss
these strategies in detail.
Welcome to the ultimate leveling guide for Bards! Inside this guide, we'll
cover everything you need to know while you level your Bard to Level 25,
which is the current level cap in Ashes of Creation. As you level up your character,
whether playing solo or in a group, there are several best practices to help you use
your time efficiently and maximize your overall experience gain. Below, we'll discuss
these strategies in detail.
This guide provides tips and tricks tailored to various level ranges, different bard playstyles, and whether you're leveling solo or in a group. However, we will focus primarily on group leveling, since playing in a group is significantly more effective. Your entire skill set is designed to enhance and support a party, making you much more impactful when working with others. As such, leveling solo is highly inefficient and counterproductive for a Bard.
In its current state, the PvE content in Ashes of Creation is designed around group play. While this applies to all archetypes, it's especially true for the Bard. The Bard has numerous abilities that strengthen the group, but these don't translate into increased power when used solo.
However, if you've chosen the most group-dependent archetype and still wish to level solo, it's certainly possible. The Bard has decent damage and self-sustain, so solo leveling isn't terrible, but it will be noticeably slower compared to leveling in a group.
Group Leveling
Learn more about the most efficient way to level as a Bard within a group in Ashes of Creation! Using the scrolling feature below, select your level and unlock a list of best practices on how to level, including recommended skills, leveling locations, tips and more.
Set the slider to your level, but expect information from the previous level bracket to disappear at specific thresholds. This is done to make the information on the page more condensed and easier to read.
Important note: While this guide only has a section for group leveling, the solo leveling advice would be the same. However, it's highly suggested to level in a group, since solo leveling in the current iteration of the game is a miserable experience for most classes. While Rogue can solo level, you will still level more efficiently in a group than solo. You may have sustain and a good overall kit for soloing mobs, but you're still squishy and you will need gear in order to breeze through PvE in Ashes of Creation. Without gear, it's extremely difficult, and the best way to gear up is in higher risk and more dangerous areas with groups. So don't gain unnecessary experience debt and hold onto your glint and find a guild or some friends to play with!
Move the slider below to make the guide update to your level!
Don't Forget Your Starter Quest!
When you log in for the first time, you'll
see a guard directly in front of you who offers a quest called "Welcome to Verra".
This is a simple quest that leads to some quick and easy experience just by speaking to a few NPCs.
You can also go ahead and select your instrument (this is a cosmetic choice) and select to split ![]() Quick Wit into
Quick Wit into ![]() Mock and
Mock and ![]() Jest.
This should be done as Quick Wit is very buggy with certain settings
Jest.
This should be done as Quick Wit is very buggy with certain settings
Near the entrance where you picked up the quest, you'll find various starter weapons scattered along the floor and walls. Be sure to grab the Sceptre and Shield. Since you already start with a Musty Book, you're all set to begin your adventure! As you progress, you'll find or purchase better gear, but for now, this will do the job. Then, walk out the door and kill some goblins as you make your way to Lionhold. Once you've arrived, start "The Sweat of your Brow" which will reward you with a free horse as a mount. This quest is very easy to do and is all done in the town, he just asks you to go around gathering and crafting some stuff. Here is a great video you can use as a reference on how to get your first mount for free.
At Level 2, you can choose your first skills. Currently, respeccing
in Ashes of Creation is instant and free, so your choices aren't too dramatic, and you can always
respec depending on what you're doing. For example, our first skill choices include Melodies such as
![]() Cheerful Melody, which provides a healing and a healing boost to everyone in the party, and
Cheerful Melody, which provides a healing and a healing boost to everyone in the party, and
![]() Epic Melody, which increases movement speed.
Epic Melody, which increases movement speed.
Adjust the level Slider to follow along with which abilities you should be taking as you level up!
 Jest and
  Mock along with your favorite instrument
 Cheerful Melody
 Pensive Melody
 Shielding Dance
 Lovely Serenade
 Maddening Dance
 Nimble Dance
 Gambit
 Endless Jest
 Mesmerizing Dance
 Get Off The Stage
 Clever Retort
 Wonder
 Saga
Saga- Mighty Step
 Misdirection
 Anthem of Alacrity
- Avert Your Gaze
 Menacing Melody
 Music Mastery: Counterpoint
 Song Mastery: Dissonance
 Dance Mastery: Power
 Chilling Lament (AOE)
- Spirited Serenade
 Marionette
 Merriment
The table below will adjust based on your level, providing you with a quick at-a-glance list of information for your level range. Notes have been included under the table to clear up any confusion or to add extra detail.
IMPORTANT NOTE: These spots will be available in the Riverlands, but as the game progresses and the Anvil's starting area comes online and PvE balancing starts coming online, this is subject to change for Phase 3. The guide will be updated as more information comes along.
Be wary of strictly following these locations as players — especially at launch — will group to some of these places and you may need to find another grindspot. There are plenty of places in Verra to explore that are not listed here that you can find a suitable replacement!
| Levels | Best Location | Pref Mob | Food | Scroll |
|---|---|---|---|---|
|
||||
|
| Levels | Best Location | Pref Mob | Food | Scroll |
|---|---|---|---|---|
|
||||
|
||||
|
||||
|
| Levels | Best Location | Pref Mob | Food | Scroll |
|---|---|---|---|---|
|
||||
|
||||
|
||||
|
||||
|
| Levels | Best Location | Pref Mob | Food | Scroll |
|---|---|---|---|---|
|
||||
|
||||
|
||||
|
||||
|
||||
|
| Levels | Best Location | Pref Mob | Food | Scroll |
|---|---|---|---|---|
|
||||
|
||||
|
||||
|
||||
|
| Levels | Best Location | Pref Mob | Food | Scroll |
|---|---|---|---|---|
|
||||
|
||||
|
Make sure you're grabbing Embersprings as you go along your journey!
Early Game Ability Selection
![]() Cheerful Melody should be the first ability you take with an
option for
Cheerful Melody should be the first ability you take with an
option for ![]() Epic Melody while you are moving between locations on the map. For combat, though,
take
Epic Melody while you are moving between locations on the map. For combat, though,
take ![]() Cheerful Melody to help keep your party alive, bards in very early levels
are the best healers, therefore, most of our early abilities will focus on healing
and support.
Cheerful Melody to help keep your party alive, bards in very early levels
are the best healers, therefore, most of our early abilities will focus on healing
and support.
![]() Shielding Dance, a solid healing ability that applies a upfront
shield the first time is hits an ally and small heal every 1 second after to anyone in the AoE.
Paired with the single target heal of
Shielding Dance, a solid healing ability that applies a upfront
shield the first time is hits an ally and small heal every 1 second after to anyone in the AoE.
Paired with the single target heal of ![]() Lovely Serenade, we can keep almost any member alive.
You can swap targets mid cast to heal a different person on each tick of the cast. Level 3
will also grant us access to
Lovely Serenade, we can keep almost any member alive.
You can swap targets mid cast to heal a different person on each tick of the cast. Level 3
will also grant us access to ![]() Flourish which is bards main movement ability. It comes
with 2 charges and can be used while casting other abilites, this is extremely useful for dances
as it can extened there effective range greatly. Another thing we also need to track on bards
is enemy buffs, which can be purged by dancing on-top of them with
Flourish which is bards main movement ability. It comes
with 2 charges and can be used while casting other abilites, this is extremely useful for dances
as it can extened there effective range greatly. Another thing we also need to track on bards
is enemy buffs, which can be purged by dancing on-top of them with ![]() Maddening Dance.
Maddening Dance.
After hitting Level 5 we will unlock ![]() Resonant Weapon, due
to this new power and core play-style change we will be swapping to
Resonant Weapon, due
to this new power and core play-style change we will be swapping to ![]() Pensive Melody off of
Pensive Melody off of
![]() Cheerful Melody. To make use of
Cheerful Melody. To make use of ![]() Resonant Weapon we will need to hit,
combo finishers with our weapons auto-attacks after building up resonance. This can be built up by casting
abilities, instant-cast give 1 resonance and longer cast give 1 at the start and 1 at the end
of the cast, but be weary as resonance caps out at 10 stacks. Every finisher can consume
up to 3 resonance which will activate an effect based on which melody is active, for
Resonant Weapon we will need to hit,
combo finishers with our weapons auto-attacks after building up resonance. This can be built up by casting
abilities, instant-cast give 1 resonance and longer cast give 1 at the start and 1 at the end
of the cast, but be weary as resonance caps out at 10 stacks. Every finisher can consume
up to 3 resonance which will activate an effect based on which melody is active, for ![]() Pensive Melody
it will give mana to the party member with the lowest amount of mana.
Pensive Melody
it will give mana to the party member with the lowest amount of mana.
Early Gear, Consumables, and Glint
Once you reach Level 5 or so, it's highly suggested to head out to the Laboratory, Smithy, and the Cookhouse to buy some gear and consumables. If you're hurting on money, then just spend 10-15 minutes cutting down every tree and picking every plant you see and just go vendor them. There's also some quick and easy World events that happen all over the place that you should do if you they happen to be live when you pass by. These are shared progress with every player who's doing the event, which makes the events go by pretty fast, but also provides you with a large chunk of experience, as well as a chunk of much needed Glint.
Unlocking Second Tier Talents
You've reached the second tier of your talent tree! From here on your choices as a Bard don't get easier as there are still a lot of good options. Feel free to test different abilities as you're leveling.
![]() Nimble Dance and
Nimble Dance and ![]() Gambit round off our defensive abilities.
Gambit round off our defensive abilities.
![]() Nimble Dance gives two buffs; Nimble which is a 50% base evasion buff that makes enemies
miss attacks on your party/raid, and Pep that increases movement speed by 20% and acts as a strong offensive and defensive
buff.
Nimble Dance gives two buffs; Nimble which is a 50% base evasion buff that makes enemies
miss attacks on your party/raid, and Pep that increases movement speed by 20% and acts as a strong offensive and defensive
buff. ![]() Gambit is our emergency button and allows us to swap our health with another friendly target,
and apply Solace to the target who lost health, a 40% healing buff. This allow for an easy way to
save a tank in a big pull or save yourself after a misplay.
Gambit is our emergency button and allows us to swap our health with another friendly target,
and apply Solace to the target who lost health, a 40% healing buff. This allow for an easy way to
save a tank in a big pull or save yourself after a misplay.
![]() Mesmerizing Dance and
Mesmerizing Dance and ![]() Endless Jest also help fill out our kit
with a powerful AoE crowd-control and an extra charge of
Endless Jest also help fill out our kit
with a powerful AoE crowd-control and an extra charge of ![]() Quick Wit allowing for quick generation of
resonance stacks. I would suggest using
Quick Wit allowing for quick generation of
resonance stacks. I would suggest using ![]() Mesmerizing Dance as a defensive tool when party members are
taking high amounts of damage.
Mesmerizing Dance as a defensive tool when party members are
taking high amounts of damage.
Mid-Game Leveling Talent Selection
Once you hit Level 10 you will have most of your core abilities. Once again, Ashes of Creation will be a game that you have to adapt to your surroundings, what and who you are playing against among other variable factors. Guides like this are just to help you get a baseline. You may have to respec based on what you're facing and you should be adaptable as a Bard being the most versatile archetypes in the game in terms of playstyle.
![]() Get Off The Stage and
Get Off The Stage and ![]() Clever Retort start to fill in our crowd control,
giving us a knock-back and a silence respectivly. Using
Clever Retort start to fill in our crowd control,
giving us a knock-back and a silence respectivly. Using ![]() Get Off The Stage to corral mobs for the tank,
can set your groups clear speed apart from other less skilled bards.
Get Off The Stage to corral mobs for the tank,
can set your groups clear speed apart from other less skilled bards. ![]() Clever Retort is also great for
stopping dangerous cast, there are too many dangerous casters to list in this guide and you will need to learn them
and there abilites as you play.
Clever Retort is also great for
stopping dangerous cast, there are too many dangerous casters to list in this guide and you will need to learn them
and there abilites as you play.
![]() Wonder paired with
Wonder paired with ![]() Saga lets us stack three Mystery to
cast a
Saga lets us stack three Mystery to
cast a ![]() Saga that makes everyone near us in our party auto attack damage convert to mana. This is an
ability that needs to be vocalized to your party, for example prociding a countdown and allowing members to get into melee
range as the cleave in melee will boost even the most mana-starved players to full. Mystery also
buffs up our
Saga that makes everyone near us in our party auto attack damage convert to mana. This is an
ability that needs to be vocalized to your party, for example prociding a countdown and allowing members to get into melee
range as the cleave in melee will boost even the most mana-starved players to full. Mystery also
buffs up our ![]() Pensive Melody procs from
Pensive Melody procs from ![]() Resonant Weapon, as it gives 10% effect of mana
restoring effects per stack up to 3.
Resonant Weapon, as it gives 10% effect of mana
restoring effects per stack up to 3.
![]() Mighty Step buffs up our
Mighty Step buffs up our ![]() Shielding Dance giving it more
effective power but also helping generate resonance stacks in dangeous situations as each shield
fully used will give us a stack of resonance. We also gain
Shielding Dance giving it more
effective power but also helping generate resonance stacks in dangeous situations as each shield
fully used will give us a stack of resonance. We also gain ![]() Misdirection which can be used to
drop aggro mobs near you, very useful when body pulling things by accident, or used to break crowd control
debuff that are applied to you. Many mobs silence or stun you, this lets you break that debuff and continue playing.
This is extremely useful if you end up PvPing while leveling and is the main reason we take it this early.
Misdirection which can be used to
drop aggro mobs near you, very useful when body pulling things by accident, or used to break crowd control
debuff that are applied to you. Many mobs silence or stun you, this lets you break that debuff and continue playing.
This is extremely useful if you end up PvPing while leveling and is the main reason we take it this early.
Late-Game Leveling Selection
The great and bad thing about Bard is there are a lot of options you can spec into. Level 16-20 is a good area to experiment with and respec for the situations you're putting yourself in. We can't tell you what is "best" in this area because everything is situational; it depends on content you're planning on playing against, or if it requires multiple talent points. These are my personal preferences and reasons after thousands of hours.
![]() Anthem of Alacrity is a single target attack and cast speed steroid which is great
for pumping out resonance or throwing on an ally during a big pull to maximize output.
Anthem of Alacrity is a single target attack and cast speed steroid which is great
for pumping out resonance or throwing on an ally during a big pull to maximize output. ![]() Avert Your Gaze is
another great way to boost damage, applying shaken at the start of a pull to increase all physical dps. I also pick
up
Avert Your Gaze is
another great way to boost damage, applying shaken at the start of a pull to increase all physical dps. I also pick
up ![]() Menacing Melody to blend in some damage when mana is running full. This also works great with
Menacing Melody to blend in some damage when mana is running full. This also works great with
![]() Music Mastery: Counterpoint which allows you to keep up two melodies buff at onces. Just notes it gives
the resonance proc of the activly played melody. You can use
Music Mastery: Counterpoint which allows you to keep up two melodies buff at onces. Just notes it gives
the resonance proc of the activly played melody. You can use ![]() Fortissimo which is granted at Level 10,
this ability spends 5 Resonance but doubles the effect of any melodies currently buffing you and your party for
8 seconds. The last major offensive talent is
Fortissimo which is granted at Level 10,
this ability spends 5 Resonance but doubles the effect of any melodies currently buffing you and your party for
8 seconds. The last major offensive talent is ![]() Song Mastery: Dissonance which takes a bit of upkeep, but allows for
you to get three Discordant Notes when casting certain melodies and songs together. The ones that match up for us
are
Song Mastery: Dissonance which takes a bit of upkeep, but allows for
you to get three Discordant Notes when casting certain melodies and songs together. The ones that match up for us
are ![]() Menacing Melody and
Menacing Melody and ![]() Lovely Serenade, alongside
Lovely Serenade, alongside ![]() Pensive Melody and
Pensive Melody and ![]() Anthem of Alacrity.
These bounce between targets and it is not suggested using this if you are in a place where pulling extra mobs is
dangeous.
Anthem of Alacrity.
These bounce between targets and it is not suggested using this if you are in a place where pulling extra mobs is
dangeous.
![]() Anthem of Alacrity is a single target attack and cast speed steroid which is great
for pumping out resonance or throwing on an ally during a big pull to maximize output.
Anthem of Alacrity is a single target attack and cast speed steroid which is great
for pumping out resonance or throwing on an ally during a big pull to maximize output. ![]() Avert Your Gaze is
another great way to boost damage, applying shaken at the start of a pull to increase all physical dps. I also pick
up
Avert Your Gaze is
another great way to boost damage, applying shaken at the start of a pull to increase all physical dps. I also pick
up ![]() Menacing Melody to blend in some damage when mana is running full. This also works great with
Menacing Melody to blend in some damage when mana is running full. This also works great with
![]() Music Mastery: Counterpoint which allows you to keep up two melodies buff at onces. Just notes it gives
the resonance proc of the activly played melody. You can use
Music Mastery: Counterpoint which allows you to keep up two melodies buff at onces. Just notes it gives
the resonance proc of the activly played melody. You can use ![]() Fortissimo which is granted at Level 10,
this ability spends 5 Resonance but doubles the effect of any melodies currently buffing you and your party for
8 seconds. The last major offensive talent is
Fortissimo which is granted at Level 10,
this ability spends 5 Resonance but doubles the effect of any melodies currently buffing you and your party for
8 seconds. The last major offensive talent is ![]() Song Mastery: Dissonance which takes a bit of upkeep, but allows for
you to get 3 discordant notes when casting certain melodies and songs togethers. The ones that match up for us
are
Song Mastery: Dissonance which takes a bit of upkeep, but allows for
you to get 3 discordant notes when casting certain melodies and songs togethers. The ones that match up for us
are ![]() Menacing Melody and
Menacing Melody and ![]() Lovely Serenade, alongside
Lovely Serenade, alongside ![]() Pensive Melody and
Pensive Melody and ![]() Anthem of Alacrity.
These bonus between target and I don't suggest using this if you are in a place where pulling extra mobs is
dangeous.
Anthem of Alacrity.
These bonus between target and I don't suggest using this if you are in a place where pulling extra mobs is
dangeous.
These are the final skills, and almost all are up to playstyle and situation.
- Dance Mastery: Power
- Chilling Lament (AOE)
- Spirited Serenade
- Marionette
- Cheerful Melody
- Merriment
 Discordance
![]() Dance Mastery: Power gives a bonus to dance AoEs after using flourish.
Dance Mastery: Power gives a bonus to dance AoEs after using flourish.
![]() Chilling Lament (AOE) sends out a frontal cone to chill and weaken enemies.
Chilling Lament (AOE) sends out a frontal cone to chill and weaken enemies. ![]() Spirited Serenade
amplifies
Spirited Serenade
amplifies ![]() Lovely Serenade to gain a shield small shield on the first cast and 30% mitigation while that
shield is active. A third melody can truly round out the build
Lovely Serenade to gain a shield small shield on the first cast and 30% mitigation while that
shield is active. A third melody can truly round out the build ![]() Cheerful Melody lets you easily swap into
healer mod shooting off tons of healing with resonance procs and boosting all healing from you an other allies.
Cheerful Melody lets you easily swap into
healer mod shooting off tons of healing with resonance procs and boosting all healing from you an other allies.
![]() Merriment is a small boost to healing and defense by bolstering Glee, which is spread quickly
using
Merriment is a small boost to healing and defense by bolstering Glee, which is spread quickly
using ![]() Jest. Finally
Jest. Finally ![]() Discordance allows for easy stagger application and on demand damage.
Discordance allows for easy stagger application and on demand damage.
Hitting Level 25
Congragulations on hitting the current max level in the Ashes of Creation Alpha! Going forward, it is in your best interest to read up on end game guides to better adjust your build for the new options available. Continue on to either our PvE or PvP guide to learn how to best excel with a max level character in Verra.
Grind Zone Legend
Below is a map showing recommended grind locations based on level ranges. If the locations we listed above are too hotly contested, this map can be used to find other, smaller locations that may suit your needs better. Use the following key to identify each area's optimal level range.
- Level 1–10: Light Blue Zones
- Level 10–15: Dark Blue Zones
- Level 15–20: Red Zones
- Level 20+: Pink Zones
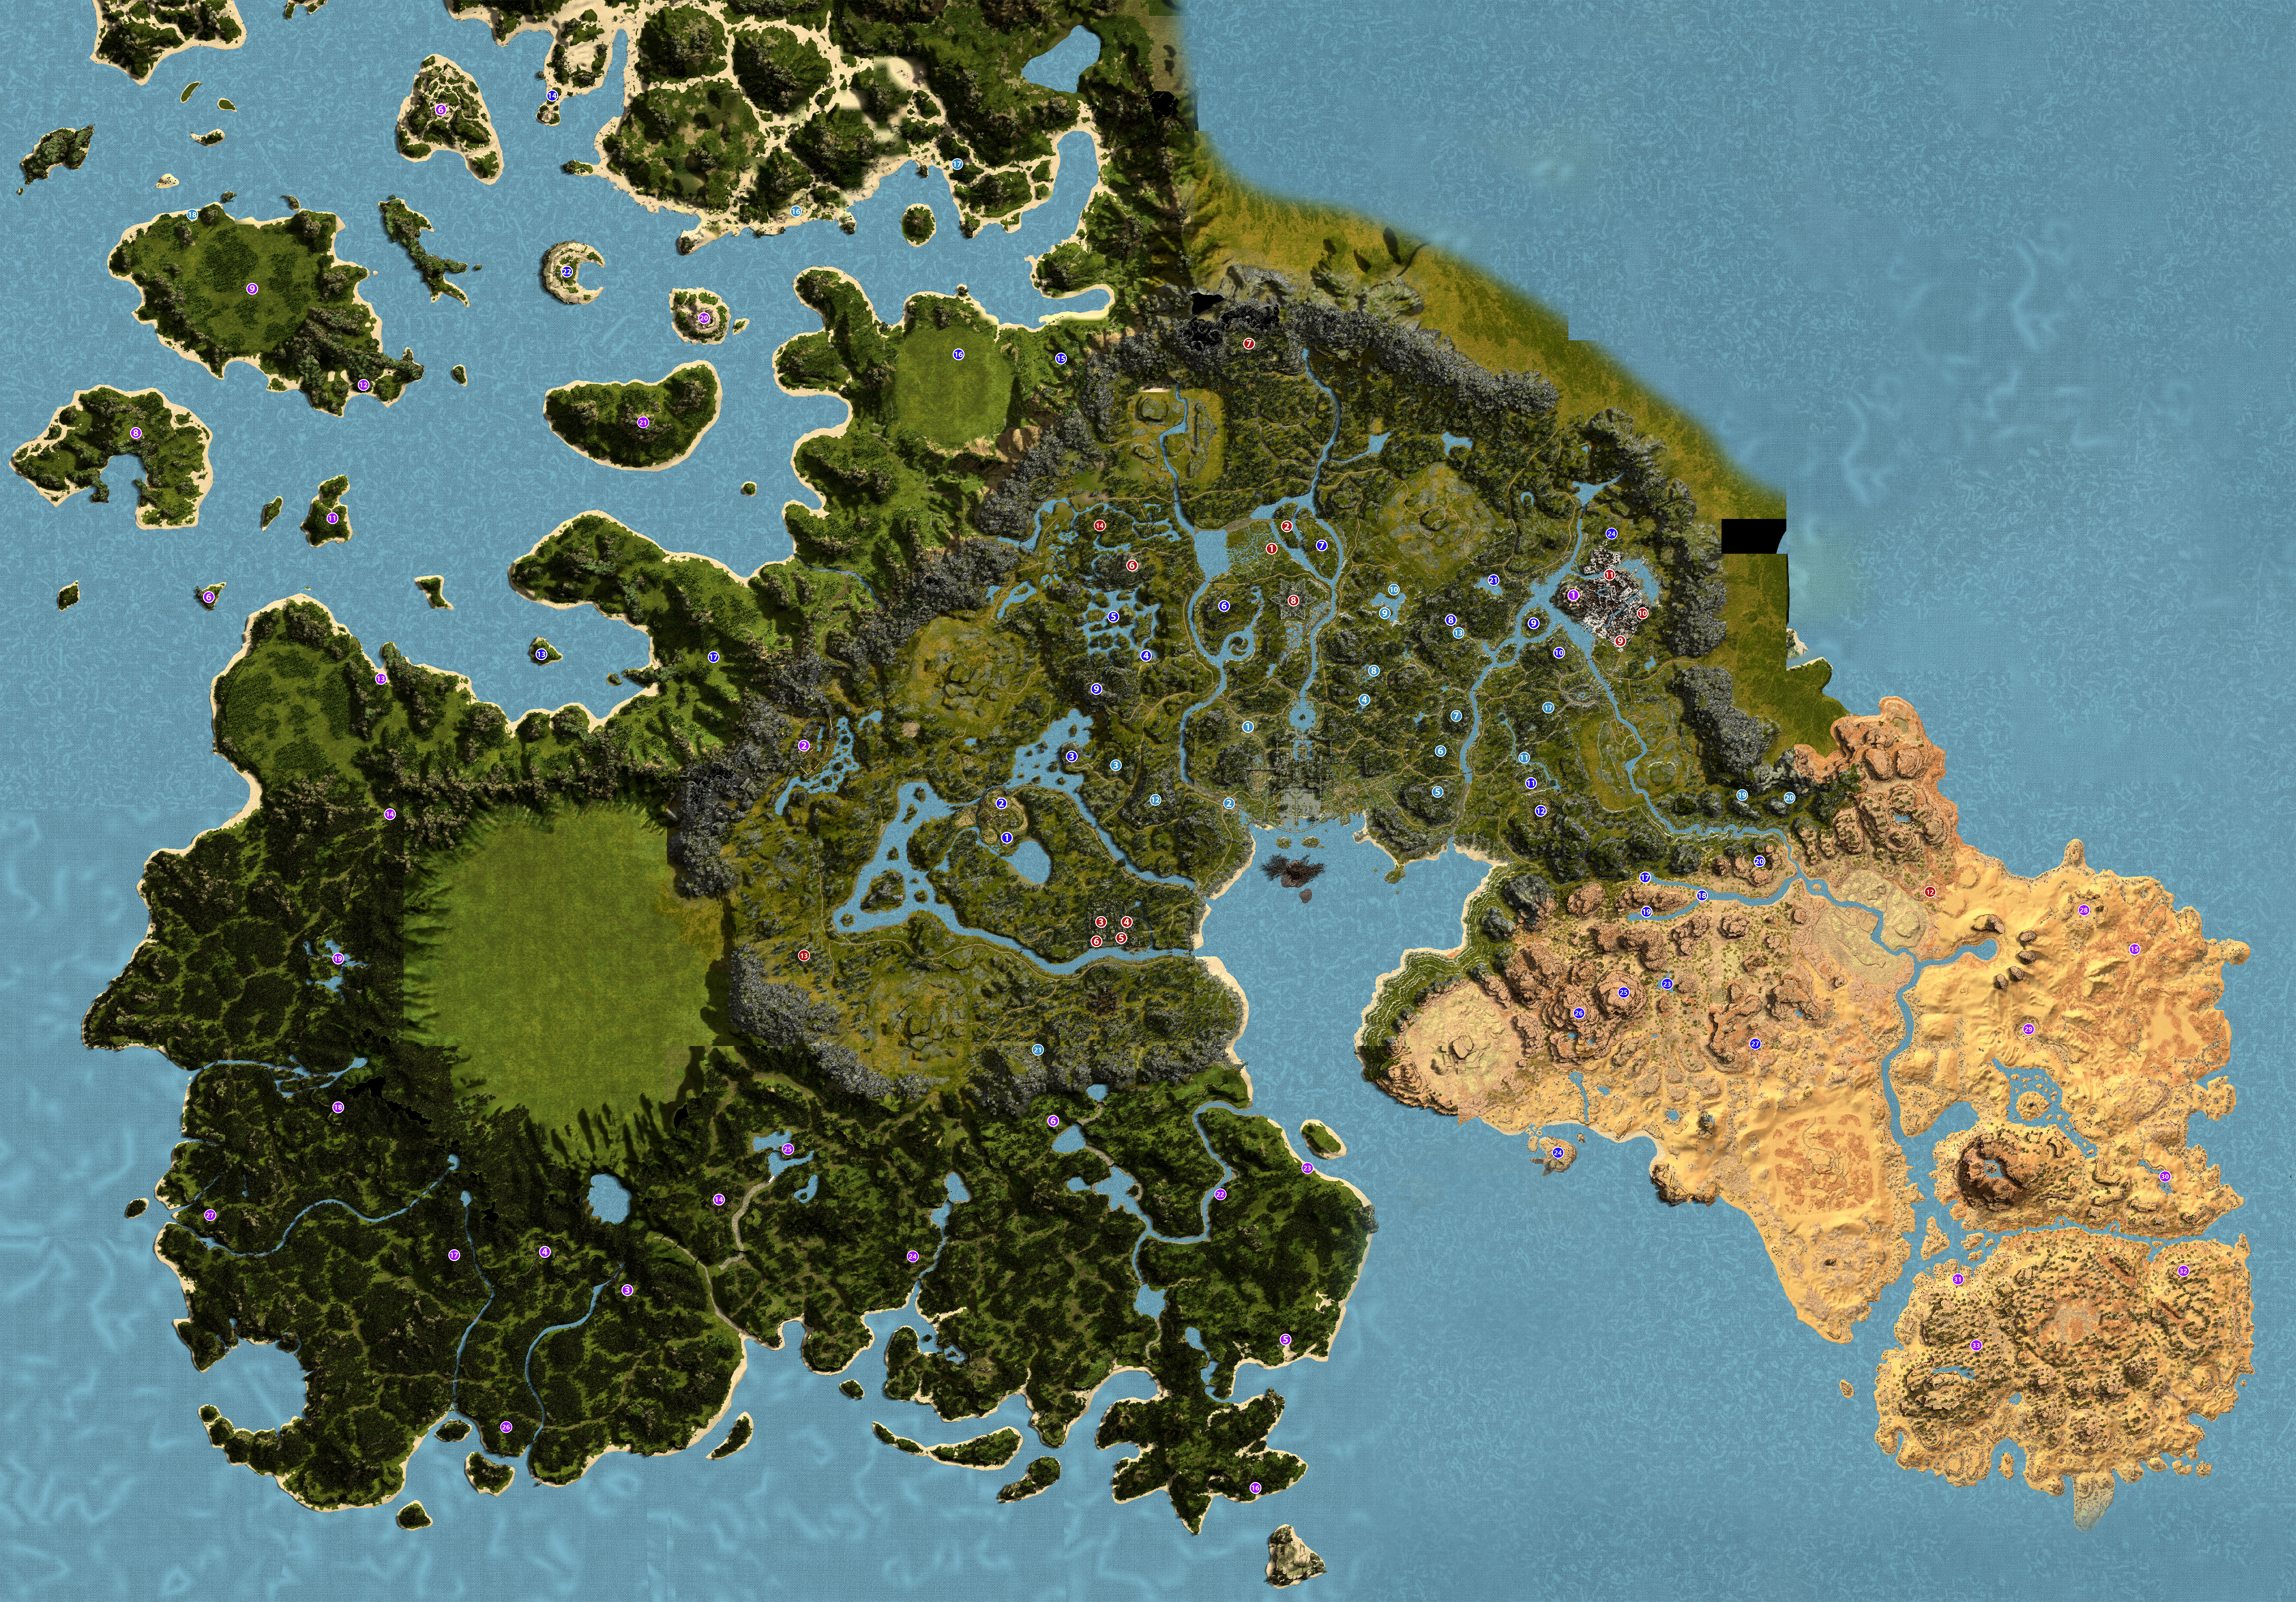
When selecting a grind location, prioritize areas with a high concentration of mobs that your party can efficiently cleave through using AoE abilities. As a general rule, you should aim to farm mobs that are as high over your current level as your group can comfortably handle. This maximizes both experience and loot gains while keeping your pace efficient.
Gear Suggestions
Gear is essential while leveling, and you should always be on the lookout for upgrades. You can find gear from mob drops, purchase it from vendors, or craft it throughout your journey.
- Armor is important, as it helps reduce your squishiness—especially crucial for a Bard, which is already a fragile archetype. It also provides valuable stats to slightly boost your damage.
- Weapons, however, are the real game-changer. They account for a massive portion of your Magical Power—up to 90%! This makes upgrading your weapons at each gear bracket absolutely critical for maintaining efficiency.
Below is a quick guide on some of the easiest and most effective gear upgrades you can pick up while leveling to keep your performance at its peak.
Gearing can seem confusing to a beginner, but it's pretty straightforward, at least for armor and jewelry. You first want to get anything at all, then prioritize anything that gives Intelligence, since for Bard, the Intelligence stat is everything. It increases both your damage and healing simultaneously. Anything else is not very relevant, especially defensive stats like Constitution, which scale poorly.
Apart from items with Intelligence, the second-best stat you're looking for is Wisdom, since it boosts casting speed. It doesn't really matter if an item is Light, Heavy, or Medium. A full Heavy set doesn't necessarily mean you're more tanky, as it's very weak against magic damage but strong against physical.
Overall, defensive stats in the game are currently unoptimized, so we recommend focusing on offensive stats.
Best Bard Gear (Level 1-9)
Once you reach Level 5 or so, you should head to the Laboratory to buy gear and consumables, as they provide a significant power spike. If you find that you're lacking gold to make these purchases, consider chopping down trees and vendoring the wood, or mining any resources you come across.
You can choose between a Wand and a Spellbook; both are decent options. However, for your melee weapon, you should definitely pick the Greatspellsword. Any extra gear you can get from the Textile Mill Vendor on the west side of Lionhold.
| Item Name | Location | Level Requirement |
|---|---|---|
| Laboratory Vendor (Flame and Formula) | Level 1 | |
| Laboratory Vendor (Flame and Formula) | Level 1 | |
| Smithy Vendor (Avons End) | Level 1 | |
| Laboratory Vendor (Avons End) | Level 1 | |
| Hideworks Vendor (Avons End) | Level 1 | |
| Hideworks Vendor (Avons End) | Level 1 |
The items mentioned above are great for giving your leveling journey a strong start. As you progress towards level 10, you'll naturally acquire more gear. With some luck, you might even get a nice armor, wand, or book drop! Additionally, if you have some extra gold, be sure to visit the Marketplace in various towns where players often post items that you can purchase at a good price.
Best Bard Gear (Level 10-19)
As you progress through your levels, you'll encounter weapons and gear that can significantly boost your Magic Power. Some items, which drop in specific locations, are worth farming along side leveling, especially if you're playing solo, as they can make leveling easier. These can either be found in the world or crafted by gathering the necessary materials. Keep in mind, the better the material quality, the higher the stats on the resulting gear. Also, higher-quality items may unlock additional bonuses. In the overall meta it is generally better to just push through until 20 before farming gear but as Phase 3 rolls out, list will come out for best gear to help power level.
Best in Slot
At Level 20, you gain access to the best-in-slot gear. Obtaining these items will be a lengthy process. You can start by obtaining some decent Level 20 gear through drops, but true min-maxing comes from crafting the highest quality versions, Heroic and Legendary quality. This requires a significant amount of time and teamwork from different types of crafters, as well as access to all the necessary crafting stations in the towns.
Head over to the Bard Best in Slot page to see what the best options are once you've hit Level 20.
Leveling Tips
Regardless of if you're in a group while leveling, or solo, there are a handful of tips and tricks that will make your leveling process more fun and efficient. These best practices can be found below.
Consumables
You should always carry ![]() Rations with you while leveling, as they provide
HP/Mana regeneration when consumed while sitting. Be sure to keep these on hand at all times!
Mana and health potions aren't necessary, as they share a cooldown and can only be used
one at a time.
Rations with you while leveling, as they provide
HP/Mana regeneration when consumed while sitting. Be sure to keep these on hand at all times!
Mana and health potions aren't necessary, as they share a cooldown and can only be used
one at a time.
Positioning
As a Bard, your positioning heavily depends on your group composition and the location
where you're grinding. Below, we'll cover the best strategies for positioning and leveling
with a premade group in detail. However, as a general rule when playing with random groups,
you should position yourself in the middle of the pack. This allows you to contribute DPS
while ensuring that everyone in your group benefits from ![]() Shielding Dance and
Shielding Dance and
![]() Nimble Dance—both essential for keeping the group alive during AoE farming.
Nimble Dance—both essential for keeping the group alive during AoE farming.
Group Composition
The best group composition for a Bard is, quite literally, any group. I cannot stress enough how much stronger a Bard is in a group setting— even a random group is still far better than leveling solo.
That said, if you have the option to min-max and build the ideal setup, the optimal composition would be:
This setup is the most effective for AoE farming in the game's toughest spots at the fastest pace, enabling incredibly efficient speed leveling provided the group is well coordinated.
- A Fighter are great at applying shaken and consistant cleave damage.
- A Mage supply the large burst of AoE damage needed to clear massive packs of enemies quickly.
- A Rogue brings consistant AoE damage from poisons and has access to a variety of debuffs to help weaken enemies.
- A Tank handles mob pulling and soaking damage.
- Two Clerics keeps the party alive and allow for large pulls.
- Two Bards push the limits of what's possible in AoE grinding, maximizing the group's efficiency, one bard to supply mana and the other to buff dps.
Glint
Glint is the primary currency in the game and is extremely important. You need it to exchange for gold, which is then used to purchase various commodities. As you farm mobs and defeat players, you'll accumulate a significant amount of Glint, and it's easy to lose track of how much you have. After a few hours of leveling, you might find yourself sitting on a large stash so be sure to take breaks and visit the nearest town to store your Glint safely to avoid losing it upon death.
When it comes to selling Glint, only do so if you absolutely need gold for repairs. Otherwise, it's best to hold onto it. Glint is a key endgame currency, as the most efficient way to earn gold is by running Caravans, which require Glint and only Glint to purchase the commodities you'll transport for profit. The exchange rate for selling Glint is terrible, so avoid vendoring it unless you have no other choice.
Flagging for PvP
You should always be aware of your PvP status while leveling, and how exactly it works. Players can manually turn on their PvP mode by clicking Alt+F--not to be confused with Alt+F4--allowing them to attack other player. As a Rogue, you may be a bloodthirsty player in an open world PvP game. However, you should be aware of the dangers when entering PvP in Ashes of Creation. There are three common states of a player:
- Non-combatant
- This is also labeled as a "green" player, however the nameplate in-game will be the default color: white and will not have a flagging marker on the nameplate itself to players outside of your party/raid. This is the default state a player can be in. They have not issued an attack on another player; therefore they are a non-combatant. Note: that you can flag for PvP and still be a non-combatant. Just because you press Alt+F or see that someone is flagged, does not mean they have entered a PvP state. It just means that they are ready for combat in the open world. You will see an image of crossed swords below your, or your target's, health bar when flagged for PvP.
 Combatant
- These players are referred to as "purple" players. This means after flagging for PvP AND doing damage to another player—regardless of their combat state—you will enter this state. This means, if another player attacks you while you are flagged, they will be a combatant; however, you will still be a non-combatant. You will be able to tell by their nameplate changing colors and they will have a purple symbol next to it.
 Corrupted
- When a player enters a corrupted state, they are "red" or Corrupted. This means a Combatant, or purple player, has killed a non-combatant, or green player, without the non-combatant attacking back. So be careful when attacking players in the open world. The penalties for being corrupted are severe. You may take 4% more experience debt upon death and lose more materials than normal, as well as dropping equipped items and gear. Taking gear off in a corrupted state does not save your gear either.
Exceptions: If both players are in a combatant state, then you will receive less experience debt upon death than normal and drop less materials. You will also not drop equipped gear if both parties are in a combatant state. Upon killing the other combatant you will not become corrupted. After some time (subject to change) you will again return to a non-combatant state.
This guide was created by Greek, a dedicated veteran of Ashes of Creation and World of Warcraft, with over 2,000 hours of experience mastering the Bard class. Known for his passion for speed leveling and min-maxing gear, Greek brings a wealth of knowledge to the table. Whether you are looking to optimize your build or just chat about strategy, he is always open to discussions on Discord (greek) or Twitch.
- Ashes of Creation’s Harbinger Update is Looking Massive
- Ashes of Creation’s Summoner Testing Begins
- Sport Fishing is Coming to Ashes of Creation
- Ashes of Creation Summoner Preview
- 7 Tips When Playing Ashes of Creation Solo
- The Future of Gear Sets in Ashes of Creation
- Ashes of Creation’s Upcoming Harbinger System
- Ashes of Creation: 9 Tips for Beginners