Spine of Deathwing Detailed Strategy Guide (Heroic Mode included)
Table of Contents
Introduction
This guide is intended to provide a comprehensive description of the encounter with Spine of Deathwing in Dragon Soul. It is targeted at anyone who desires to understand the fight mechanics.
This guide is updated for World of Warcraft WoD 6.1.2.
Spine of Deathwing is the 7th boss encounter of the Dragon Soul raid. It features the first part of the confrontation against Deathwing. After having defeated Warmaster Blackhorn, players are now parachuted off of the Skyfire and onto Deathwing's back.
Here, your raid must defeat several types of adds and perform various tasks in an effort to dislodge Deathwing's armor plates, weakening him for the final encounter, Madness of Deathwing.
General Information
Health Pool
| Difficulty | Corruptions | Corrupted Bloods | Hideous Amalgamations | Burning Tendons |
|---|---|---|---|---|
| 10-man | 442k | 166k | 7M | 2.9M |
| 10-man heroic | 800k | 300k | 9.8M | 12.6M |
| 25-man | 1.5M | 581k | 25M | 9.3M |
| 25-man heroic | 2.5M | 900kk | 30M | 39.3M |
| LFR | 1.2M | 440k | 19M | 7M |
Enrage Timer
The Spine of Deathwing encounter has no known soft or hard enrage timer.
Raid Composition
| Difficulty | Tanks | Healers | DPS |
|---|---|---|---|
| 10-man | 1-2 | 2-3 | 5-7 |
| 10-man heroic | 2 | 3 | 5 |
| 25-man | 2 | 5-6 | 17-18 |
| 25-man heroic | 2 | 6 | 17 |
| LFR | 1 | 5-6 | 18-19 |
Loot
Armor
| Item Name | Armor | Slot | Main Stats |
|---|---|---|---|
| Gloves of Liquid Smoke (LFR, Heroic) | Cloth | Hands | Intellect |
| Molten Blood Footpads (LFR, Heroic) | Leather | Feet | Agility |
| Belt of Shattered Elementium (LFR, Heroic) | Waist | Intellect/Spirit | |
| Gauntlets of the Golden Thorn (LFR, Heroic) | Plate | Hands | Intellect/Spirit |
| Backbreaker Spaulders (LFR, Heroic) | Plate | Shoulders | Strength/Mastery |
Trinkets
| Item Name | Type | Main Stats/Effect |
|---|---|---|
| Will of Unbinding (LFR, Heroic) | Trinket | Intellect |
| Heart of Unliving (LFR, Heroic) | Trinket | Spirit |
| Wrath of Unchaining (LFR, Heroic) | Trinket | Agility |
| Eye of Unmaking (LFR, Heroic) | Trinket | Strength |
| Resolve of Undying (LFR, Heroic) | Trinket | Dodge |
Overview of the Fight
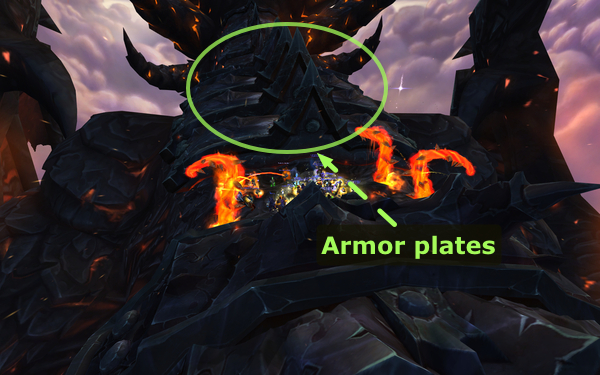 Spine of Deathwing is a single phase encounter that takes place on
Deathwing's back, as he is flying through the air. Your raid will need to
properly deal with several types of adds in order to pry up and remove
3 armor plates from Deathwing's back. The idea is to open a big enough
hole in Deathwing's armor, so as to give Thrall a clear shot with the Dragon
Soul.
Spine of Deathwing is a single phase encounter that takes place on
Deathwing's back, as he is flying through the air. Your raid will need to
properly deal with several types of adds in order to pry up and remove
3 armor plates from Deathwing's back. The idea is to open a big enough
hole in Deathwing's armor, so as to give Thrall a clear shot with the Dragon
Soul.
The armor plates can only be removed sequentially, as removing one enables the raid to reach the next one. This causes the fight to become increasingly harder, as the number of adds you need to deal with increases after an armor plate has been removed.
Enemies, Abilities and Their Interaction
During the fight, you will be faced with 4 types of adds: Corruptions, Hideous Amalgamations, Corrupted Bloods, and Burning Tendons. In order to pry up and remove the armor plates, you will need to properly combine the abilities of these adds.
You can also control Deathwing to some extent, forcing him to get rid of all the adds when you are starting to feel overwhelmed.
Corruption
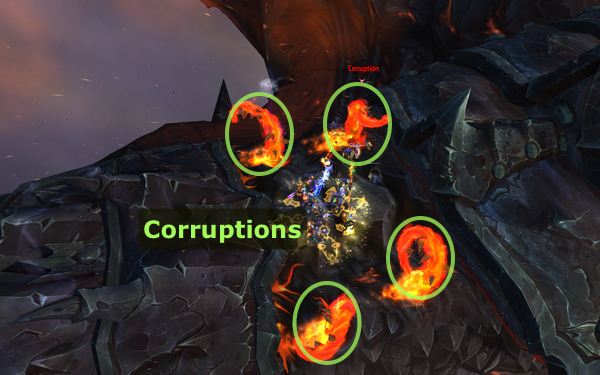 Corruptions are the first adds that you will see. They are stationary
tentacle adds that do not melee and cannot be tanked. At the start of the
encounter, there will be 4 Corruptions alive. As you can see in the screenshot,
they come out of holes in Deathwing's back. Each time one of
Deathwing's armor plates is removed, 2 new Corruptions will appear in the
newly revealed holes.
Corruptions are the first adds that you will see. They are stationary
tentacle adds that do not melee and cannot be tanked. At the start of the
encounter, there will be 4 Corruptions alive. As you can see in the screenshot,
they come out of holes in Deathwing's back. Each time one of
Deathwing's armor plates is removed, 2 new Corruptions will appear in the
newly revealed holes.
Killing Corruptions to Spawn Other Adds
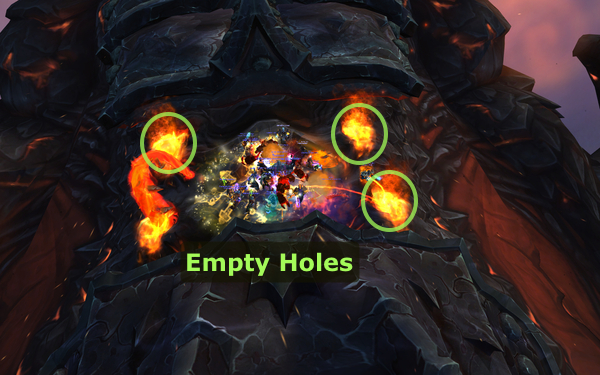 When a Corruption is killed, it leaves an empty hole in Deathwing's back,
from where 1 Hideous Amalgamation and 1 Corrupted Blood spawn.
Killing all the Corruptions will cause a new Corruption (and only one)
to spawn in one of the empty holes. The rule is that there will always be at
least one Corruption up, no matter what you do.
When a Corruption is killed, it leaves an empty hole in Deathwing's back,
from where 1 Hideous Amalgamation and 1 Corrupted Blood spawn.
Killing all the Corruptions will cause a new Corruption (and only one)
to spawn in one of the empty holes. The rule is that there will always be at
least one Corruption up, no matter what you do.
As we will explain in the strategy section, an important aspect of the fight is choosing how many Corruptions to kill and striking a balance between the damage done by the Corruptions and the damage done by the adds that spawn from the empty holes. This balance differs whether you play in 10-man, 25-man, or LFR difficulty.
Abilities
In LFR difficulty, the Corruptions are harmless and cast no abilities.
In 10-man and 25-man difficulty, the Corruptions have the following abilities:
 Searing Plasma is regularly cast by Corruptions. It places a debuff
on a random player (3 in 25-man difficulty). This debuff wears off after 5 minutes or after a certain
amount of healing has been absorbed (200,000 in 10-man difficulty and 300,000 in
25-man difficulty). While the debuff is active, it deals 10,000 Physical
damage to the target every 10 seconds.
Searing Plasma is regularly cast by Corruptions. It places a debuff
on a random player (3 in 25-man difficulty). This debuff wears off after 5 minutes or after a certain
amount of healing has been absorbed (200,000 in 10-man difficulty and 300,000 in
25-man difficulty). While the debuff is active, it deals 10,000 Physical
damage to the target every 10 seconds. Fiery Grip is a stun that the Corruption channels on a random player
for 30 seconds. During this time, the player also takes 60,000
Fire damage every 3 seconds. Damaging the Corruption for 20% of its health
breaks the channel.
Fiery Grip is a stun that the Corruption channels on a random player
for 30 seconds. During this time, the player also takes 60,000
Fire damage every 3 seconds. Damaging the Corruption for 20% of its health
breaks the channel.
Corrupted Blood
 Corrupted Blood are small adds that spawn from the holes in Deathwing's
back after a Corruption dies. These adds always respawn when the raid kills
them: the residue of a dead Corrupted Blood (not targetable or attackable) will
slowly make its way back to the nearest empty hole in Deathwing's back, where
it will form into a new Corrupted Blood.
Corrupted Blood are small adds that spawn from the holes in Deathwing's
back after a Corruption dies. These adds always respawn when the raid kills
them: the residue of a dead Corrupted Blood (not targetable or attackable) will
slowly make its way back to the nearest empty hole in Deathwing's back, where
it will form into a new Corrupted Blood.
Sometimes, extra Corrupted Bloods spawn from the empty holes for reasons that we have yet to understand. In any case, the raid eventually becomes overwhelmed by the number of Corrupted Bloods.
The only purpose of these adds is that, when they die, they leave a fire puddle. When a Hideous Amalgamation walks in this puddle, the puddle disappears and the Amalgamation receives a stack of a buff. This buff eventually enables the raid to pry up an armor plate (see the next section for more details).
When they die, in addition to this stacking buff, Corrupted Bloods deal a
small amount of Physical damage (13,000 in LFR difficulty,
10,000 in 10-man difficulty and 20,000 in 25-man difficulty) to all players
within 200 yards through ![]() Burst.
Burst.
Finally, Corrupted Blood have a normal aggro table and they deal weak melee attacks (about 5k every 2 seconds).
Hideous Amalgamation
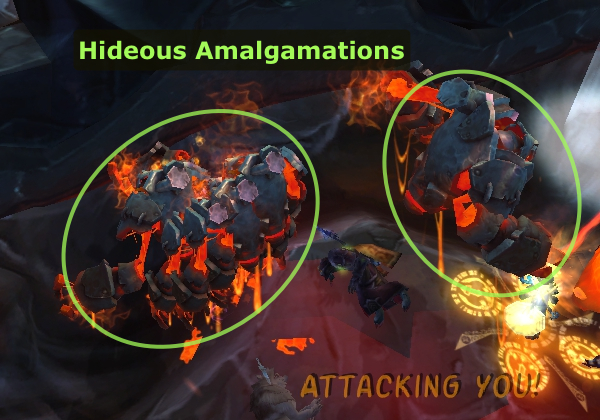 Hideous Amalgamations spawn each time a Corruption is killed.
This is a large add that has a normal aggro table and needs to be picked up
by the tanks, as it performs moderately strong melee attacks (15-20k every
2 seconds). These adds have three abilities,
all of which have a strong synergy with Corrupted Bloods, one of the
other types of adds.
Hideous Amalgamations spawn each time a Corruption is killed.
This is a large add that has a normal aggro table and needs to be picked up
by the tanks, as it performs moderately strong melee attacks (15-20k every
2 seconds). These adds have three abilities,
all of which have a strong synergy with Corrupted Bloods, one of the
other types of adds.
 Absorbed Blood is a stacking buff that the Amalgamation gains
each time it walks in the fire puddle left behind by the death of a
Corrupted Blood.
This buff increases the damage of the Amalgamation by 10% and its attack
speed by 20% per stack, and stacks up to 9 times.
Absorbed Blood is a stacking buff that the Amalgamation gains
each time it walks in the fire puddle left behind by the death of a
Corrupted Blood.
This buff increases the damage of the Amalgamation by 10% and its attack
speed by 20% per stack, and stacks up to 9 times. Superheated Nucleus is a buff that is applied on the Amalgamation when
it reaches 9 stacks of Absorbed Blood. It begins to pulse AoE Fire damage in an
area around it. This lasts until the Amalgamation is killed.
Superheated Nucleus is a buff that is applied on the Amalgamation when
it reaches 9 stacks of Absorbed Blood. It begins to pulse AoE Fire damage in an
area around it. This lasts until the Amalgamation is killed.-

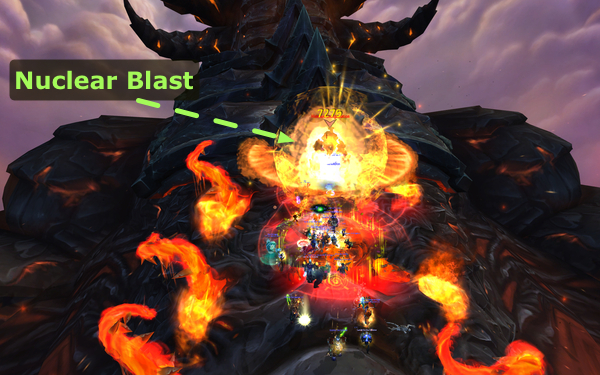
 Nuclear Blast is the explosion that follows the death of a Hideous
Amalgamation that has 9 stacks of Absorbed Blood.
Nuclear Blast is the explosion that follows the death of a Hideous
Amalgamation that has 9 stacks of Absorbed Blood.- The explosion deals a massive amount of Fire damage (243,750 in LFR and 350,000 in 10 and 25-man difficulty) to all players within 10 yards. This explosion has a 5 second cast time, during which the add does not move, allowing the tank and other players to get away from it.
- If the Amalgamation dies close to one of Deathwing's armor plates, it will weaken it, giving your raid a chance to remove it (see next section).
Armor Plate Removal
 The goal of the encounter is to remove the 3 armor plates marked as 1, 2, and 3,
in the screenshot on the left.
You need to remove them sequentially by repeating the same actions three times
in a row.
The goal of the encounter is to remove the 3 armor plates marked as 1, 2, and 3,
in the screenshot on the left.
You need to remove them sequentially by repeating the same actions three times
in a row.
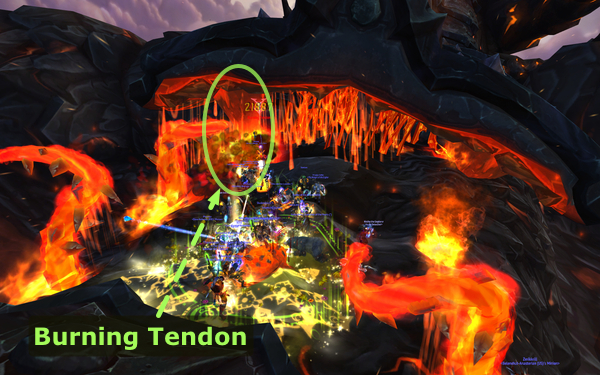 When a
 ![]() Nuclear Blast from a Hideous Amalgamation occurs close to an
armor plate, it weakens it, exposing an add called Burning Tendons,
which represents the remaining link between the armor plate and Deathwing. As
soon as it is exposed, this tendon starts casting
Nuclear Blast from a Hideous Amalgamation occurs close to an
armor plate, it weakens it, exposing an add called Burning Tendons,
which represents the remaining link between the armor plate and Deathwing. As
soon as it is exposed, this tendon starts casting ![]() Seal Armor Breach in
an attempt to reattach the armor plate to Deathwing.
Seal Armor Breach in
an attempt to reattach the armor plate to Deathwing.
![]() Seal Armor Breach has a 23 second cast time in 10-man and 25-man
difficulties and a 34 second cast time in LFR difficulty. If the raid kills the
add before the cast is over, then the armor plate will fly off, leaving the
raid to deal with the next one. Note that, by the time the Burning Tendon
becomes attackable, it will already have channeled its spell for 5 seconds.
Seal Armor Breach has a 23 second cast time in 10-man and 25-man
difficulties and a 34 second cast time in LFR difficulty. If the raid kills the
add before the cast is over, then the armor plate will fly off, leaving the
raid to deal with the next one. Note that, by the time the Burning Tendon
becomes attackable, it will already have channeled its spell for 5 seconds.
If the cast completes before the add is killed, Deathwing's armor will be reattached and players must start over. Note that the health of the Burning Tendon is not reset, so you can just finish it off at the second attempt.
Targeting the tendon will become increasingly difficult as there will be many nameplates on the screen by the end of the encounter. To prevent this problem from happening, DPS players should make a /tar burning macro that they can use in the 5 seconds that they have between the moment the tendon appears and the moment it becomes attackable.
Deathwing and the Barrel Roll
Despite the fact that you spend the entire duration of the fight on his back, Deathwing does not exist as an actual enemy unit that you can target and attack. However, there is one way that you can interact with him. If all the players in the raid stack on the same side of his back, this will cause Deathwing to perform a Barrel Roll (he will roll on himself), getting rid of all the Hideous Amalgamations (Corrupted Bloods remain attached), as well as all the raid members who are not glued to his back at the time. This is very useful if you start to get overwhelmed.
The easiest way to handle a Barrel Roll is to have the entire raid stack in
the same empty hole on Deathwing's back. In addition to triggering a Barrel
Roll, this will also grant players the ![]() Grasping Tendrils debuff. This
debuff slows player movement speed and
deals a very small amount of damage (6,000 in 10-man difficulty and 6,500 in
25-man and LFR difficulty) every 5.2 seconds and is removed by moving out of
the hole (something that raid members must only do after the Barrel Roll is
over).
Grasping Tendrils debuff. This
debuff slows player movement speed and
deals a very small amount of damage (6,000 in 10-man difficulty and 6,500 in
25-man and LFR difficulty) every 5.2 seconds and is removed by moving out of
the hole (something that raid members must only do after the Barrel Roll is
over).
Players under the effect of ![]() Fiery Grip (the stun that Corruptions
sometimes cast in 10 and 25-man difficulty) should not be freed, as being
affected by this ability makes them stay on Deathwing's back during the
Barrel Roll. Freeing them is indeed risky, as freed players then need to
run to an empty hole, something that they might not be able to do in time.
Fiery Grip (the stun that Corruptions
sometimes cast in 10 and 25-man difficulty) should not be freed, as being
affected by this ability makes them stay on Deathwing's back during the
Barrel Roll. Freeing them is indeed risky, as freed players then need to
run to an empty hole, something that they might not be able to do in time.
Strategy Summary
Removing any of the three armor plates requires the exact same actions from your raid. As you progress through the encounter, you will have to deal with more and more adds, thus increasing the damage to your raid. Indeed, since each armor plate removed exposes two new holes, your raid will slowly become overwhelmed by Hideous Amalgamations and Corrupted Bloods (or Corruptions if you choose not to kill them).
To remove an armor plate, your raid will need to do the following:
- Kill at least 1 Corruption in order to spawn at least 1 Hideous Amalgamation and 1 Corrupted Blood;
- Have the raid (tanks included) stack next to the armor plate.
- Bring a designated Hideous Amalgamation to low health (between 10% and 20%);
- Kill the Corrupted Blood(s) close to the designated Hideous Amalgamation
until reaching 9 stacks of Absorbed Blood;
- Finish off the designated Hideous Amalgamation next to the nearest armor plate
and have everyone move out (10 yards) to avoid being hit by
Nuclear Blast;
- Kill the Burning Tendons add before it finishes casting
 Seal Armor Breach
and reattaches the armor plate.
Seal Armor Breach
and reattaches the armor plate.
Recovery from Failure
If, for some reason, your raid kills the Hideous Amalgamation before it
reaches 9 stacks of ![]() Absorbed Blood, makes the Hideous Amalgamation detonate
too far from the armor plate, or fails to kill the Burning Tendons in
time, the fight is not over.
Absorbed Blood, makes the Hideous Amalgamation detonate
too far from the armor plate, or fails to kill the Burning Tendons in
time, the fight is not over.
Indeed, you can try to recover by killing the last remaining Corruption and starting over with the Hideous Amalgamation that will subsequently spawn.
Note on the Burning Tendons
If your raid fails to kill the Burning Tendons, the health of this add will not be reset when you pry the armor plate up again. Be aware of the fact that there are two Burning Tendons associated to each armor plate, one on the right and one on the left. Whichever you get depends on where the Hideous Amalgamation blew up. Therefore, you need to make sure that when going to finish the Burning Tendon, the Hideous Amalgamation blows up on the same side as previously.
LFR Strategy
In LFR, the fight is made considerably easier by the fact that Corruptions do not have any abilities. Therefore, the raid only needs to initially kill 1 Corruption. This significantly decreases raid damage and healers only need to worry about the damage that the Corrupted Bloods deal when they die.
For the first armor plate, simply kill 1 Corruption. Then use the single
Corrupted Blood (remember that it will keep respawning) to stack
![]() Absorbed Blood 9 times on the Hideous Amalgamation.
Absorbed Blood 9 times on the Hideous Amalgamation.
For the second armor plate, kill a second Corruption. This time, you will have 2 Corrupted Bloods so you will stack Absorbed Blood even faster on the new Hideous Amalgamation.
For the third armor plate, kill a third Corruption. This time, you will have 3 Corrupted Bloods so you will stack Absorbed Blood even faster than before on the new Hideous Amalgamation.
Keep in mind that a second Corrupted Blood sometimes spawns from empty holes after a varying amount of time. This means that you will probably finish the fight with more than 3 Corrupted Bloods up.
The main problem in LFR difficulty is players who accidentally kill extra Corruptions. Though, this is usually fixed after a few attempts.
10-man/25-man Strategy
In 10-man and 25-man difficulties, the Corruptions use
![]() Searing Plasma and
Searing Plasma and ![]() Fiery Grip, which will quickly overwhelm
the raid.
Fiery Grip, which will quickly overwhelm
the raid.
This complicates the encounter, so we decided to give you the simplest possible strategy for the fight before discussing ideas on how to customise it (mainly for preparing the Heroic mode version of the fight).
Initial Barrel Roll
Initially, your raid needs to kill 3 of the 4 Corruptions. We do not advise keeping all 3 resulting Hideous Amalgamations up, so force Deathwing to perform a Barrel Roll in order to get rid of them. After the Barrel Roll, spawn a new Amalgamation by killing the last Corruption.
Prying up the Armor Plate
With only one Hideous Amalgamation to deal with, simply apply the steps that we described above, in the Strategy Summary section. Also, you should keep in mind the following:
- DPS concerns
- In addition to dealing damage to the Hideous Amalgamation and killing
the Corrupted Bloods with AoE damage, a few designated DPS players
also need to sometimes deal damage to the remaining Corruption (for 20%
of its health) in order to stop Fiery Grip. Note that this should not
normally end up killing the Corruption.
- In addition to dealing damage to the Hideous Amalgamation and killing
the Corrupted Bloods with AoE damage, a few designated DPS players
also need to sometimes deal damage to the remaining Corruption (for 20%
of its health) in order to stop
- Tank concerns
- The first tank should take the Hideous Amalgamation and one or two Corrupted Bloods. The Amalgamation should be brought next to the armor plate, where it will eventually detonate.
- The second tank should take the rest of the Corrupted Bloods. If the DPS
players fail to keep the Corruption alive (when attacking it to stop
Fiery Grip), then the second tank needs to tank the resulting Hideous
Amalgamation away from the raid and leave all the Corrupted Bloods to the
first tank. The idea is to prevent Absorbed Blood from being applied by
mistake on the wrong Hideous Amalgamation.
- The raid can stack on the tank (or next to the tank). This is safe as Hideous Amalgamations do not cleave or perform any other abilities that may be hazardous to the raid. This also enables DPS players to damage them while AoE-ing down the Corrupted Bloods.
- Healer concerns
- Healers need to heal people affected by Searing Plasma in order to
remove the debuff.
- Healers should expect most of the damage to come from
 Burst, which
is dealt as a result of a Corrupted Blood dying.
Burst, which
is dealt as a result of a Corrupted Blood dying. - Tank damage will increase progressively, as the Hideous Amalgamation
gains more stacks of Absorbed Blood.
- Superheated Nucleus will deal a lot of damage.
Hideous Amalgamations cast this from the moment they reach 9 stacks of
Absorbed Blood to the moment they die.
- Healers need to heal people affected by
Removing the First Armor Plate
Once the Hideous Amalgamation has reached 9 stacks of ![]() Absorbed Blood,
it will begin pulsing AoE damage to your raid. It should be quickly finished
off. While it channels
Absorbed Blood,
it will begin pulsing AoE damage to your raid. It should be quickly finished
off. While it channels ![]() Nuclear Blast, all players should get at least 10
yards away from it.
Nuclear Blast, all players should get at least 10
yards away from it.
Provided that the Hideous Amalgamation was properly positioned, the nearest armor plate will be pried up and Burning Tendons will be exposed.
If the add is successfully killed, the armor plate will fly off, exposing 2 more holes on Deathwing's back, each containing one Corruption.
Removing the Second and Third Armor Plates
Removing the other two armor plates is a repetition of what you did for the first armor plate (including making Deathwing perform a Barrel Roll to get rid of the Hideous Amalgamations).
The only difference comes from the Corrupted Bloods. Their numbers
keep increasing throughout the fight. This increases the overall damage that
they deal both through their melee attacks and the ![]() Burst damage that they
deal to the entire raid upon dying.
Burst damage that they
deal to the entire raid upon dying.
To mitigate this, DPS players should make sure to only kill 9 Corrupted Bloods
for each armor plate. The rest of the Corrupted Blood should be left to attack
their tank as their weak melee attacks are more manageable than ![]() Burst.
Also, DPS players should not kill Corrupted Bloods too rapidly, as dealing
with Burst damage from all the Corrupted Bloods at the same time is very
dangerous.
Burst.
Also, DPS players should not kill Corrupted Bloods too rapidly, as dealing
with Burst damage from all the Corrupted Bloods at the same time is very
dangerous.
Cooldown Usage
During the fight, DPS players should keep their cooldowns for killing
the Burning Tendons (remember, there are 3 of them, one per armor plate) as
they should not be allowed to finish their cast of ![]() Seal Armor Breach and
reattach the armor plate. Since you need to properly balance DPS on the
3 tendons that you will have to kill, your raid can do the following:
Seal Armor Breach and
reattach the armor plate. Since you need to properly balance DPS on the
3 tendons that you will have to kill, your raid can do the following:
- use personal cooldowns on the first tendon;
- use
 Bloodlust/
 Heroism/
 Time Warp on the second tendon;
 - use personal cooldowns again on the third tendon.
Potions should be used on the first or the third tendon. Ideally, you will want half the DPS use their potion on the first tendon and the other half on the third tendon.
Variations and Training for Heroic Mode
This encounter can be done in many ways and the reason why we gave a single, specific strategy is that it is easier to devise a new strategy from an existing one rather than making it from scratch following general guidelines.
The strategy presented here can be tuned by simply using a different timing for the Barrel Roll(s) or by leaving more than one Corruption alive, depending on how easily your raid can handle the damage done by the adds.
Using 1 Tank in 10-man Mode
The Corrupted Bloods deal rather low melee damage to their current target and for this reason, you can choose to have a single tank take them all, in addition to also tanking the Hideous Amalgamations. Towards the end of the fight, when the number of Corrupted Bloods greatly increases, you can have Plate DPS (Death Knights, Warriors, and Paladins) or Feral Druids in Bear form taunt and tank them. This is not risky since the Corrupted Bloods deal rather low melee damage. Using only 1 tank will give your raid a better chance to kill the Burning Tendons in one pass.
Heroic Mode Training
One main reason for tuning the strategy is to make the fight harder and practice for the Heroic version of the fight, where the raid needs to kill as few Hideous Amalgamations as possible (for each Hideous Amalgamation killed, the maximum health of raid members decreases by 6%) and subsequently has to deal with much more raid damage.
The damage increases as the encounter progresses. Therefore, it might
be a good idea to spend as little time as possible removing the second
and third armor plates. To this end, you can start the fight by bringing 3
Hideous Amalgamations to low health with 7 or 8 stacks of ![]() Absorbed Blood.
Separate one from the others, get it to 9 stacks, pry up the first armor plate
and remove it. Then, repeat this for the second and third armor plates with
the remaining Hideous Amalgamations, while surviving the damage from the
additional Corruptions or the newly spawned Hideous Amalgamations.
Absorbed Blood.
Separate one from the others, get it to 9 stacks, pry up the first armor plate
and remove it. Then, repeat this for the second and third armor plates with
the remaining Hideous Amalgamations, while surviving the damage from the
additional Corruptions or the newly spawned Hideous Amalgamations.
After removing an armor plate, you get two new Corruptions. You can opt to kill only one of them so that you practice dealing with more Corruptions up, something that will most likely be required in Heroic mode to prevent the raid from having to kill Hideous Amalgamations.
Learning the Fight
The fight requires the raid to perform the same task three times in a row. Even if a tight enrage timer is introduced when patch 4.3 goes live, this will still leave plenty of time to practice on removing the first armor plate.
Once the raid is comfortable with the strategy for removing the first armor plate, the rest of the fight is very similar, just that the damage taken by the raid keeps increasing.
Heroic Mode
The Heroic mode of Spine of Deathwing makes for an extremely difficult encounter. Indeed, this fight is a clear step up in difficulty from all the other previous Dragon Soul encounters. Moreover, we believe it to be more difficult than Madness of Deathwing Heroic as well.
There are many small changes from the normal mode, all of which will be listed below. The difficulty, however, comes mostly from the ridiculous DPS requirement of the encounter.
Differences from Normal Mode
There are two categories of differences from normal mode:
- increased health and damage;
- new mechanics.
Increased Health and Damage
All the enemies in this encounter have their health values increased significantly from normal mode. The biggest increase is in the health of the Burning Tendons. These mobs now have such high health that your raid will find it impossible to kill them within a single exposed tendon phase. In fact, even killing a Burning Tendon during two exposed phases will require a very high amount of DPS.
All abilities in the encounter now deal more damage, as follows:
 Grasping Tendrils now deal 12,000 damage per second in
10-man difficulty and 13,000 damage per second in 25-man difficulty,
up from 6,000 and 6,500 respectively. Additionally, Grasping Tendrils
now slow movement speed by 50%, up from 35%.
Grasping Tendrils now deal 12,000 damage per second in
10-man difficulty and 13,000 damage per second in 25-man difficulty,
up from 6,000 and 6,500 respectively. Additionally, Grasping Tendrils
now slow movement speed by 50%, up from 35%.- Searing Plasma now deals 12,000 damage every 10 seconds, up
from 10,000. Additionally, it now absorbs 280,000 healing in 10-man
difficulty and 420,000 healing in 25-man difficulty, up from 200,000
and 300,000 healing respectively.
- Fiery Grip now deals 90,000 damage every 3 seconds, up from
60,000.
- Superheated Nucleus now deals 30,000 damage every 3 seconds in 10-man
difficulty and 35,000 damage every 3 seconds in 25-man difficulty,,
up from 15,000 and 17,500 respectively.
- Burst now deals 14,000 damage in 10-man difficulty and
28,000 damage in 25-man difficulty, up from 10,000 and 20,000 damage
respectively.
New Mechanics
In addition to the changes listed above, a few new mechanics exist in heroic mode:
 Degradation is a stacking debuff that is applied to
all raid members each time a Hideous Amalgamation is killed. The
debuff reduces the target's maximum health by 5% per stack. It has
an unlimited duration and it cannot be dispelled. Note that the debuff
is only applied when a Hideous Amalgamation is actually killed, and not
when they are disposed of through a Barrel Roll.
Degradation is a stacking debuff that is applied to
all raid members each time a Hideous Amalgamation is killed. The
debuff reduces the target's maximum health by 5% per stack. It has
an unlimited duration and it cannot be dispelled. Note that the debuff
is only applied when a Hideous Amalgamation is actually killed, and not
when they are disposed of through a Barrel Roll. Blood Corruption: Death is a dispellable debuff that will
regularly be placed on random raid members. It has a 15 second duration,
at the end of which it will wipe the raid. When the debuff is
dispelled, it jumps to another nearby target, retaining its remaining
duration. After a varying number of dispels, it will mutate into a
different debuff (
Blood Corruption: Death is a dispellable debuff that will
regularly be placed on random raid members. It has a 15 second duration,
at the end of which it will wipe the raid. When the debuff is
dispelled, it jumps to another nearby target, retaining its remaining
duration. After a varying number of dispels, it will mutate into a
different debuff ( Blood Corruption: Earth) when jumping to the next
target.
Blood Corruption: Earth) when jumping to the next
target.- Blood Corruption: Earth is almost identical to Blood
Corruption: Death. The only difference is that when this
debuff runs out, the target receives one or two stacks of
 Blood of Neltharion. The amount of stacks depends on how many seconds were
left on the Blood Corruption: Death debuff at the moment when it became
Blood Corruption: Earth. If Blood Corruption: Earth is dispelled several times,
it will mutate back into Blood Corruption: Death.
Blood of Neltharion. The amount of stacks depends on how many seconds were
left on the Blood Corruption: Death debuff at the moment when it became
Blood Corruption: Earth. If Blood Corruption: Earth is dispelled several times,
it will mutate back into Blood Corruption: Death.
- Blood of Neltharion is a beneficial stacking debuff that
reduces all damage taken by 20% per stack. It can stack up to a maximum of 2
times per player. This debuff's purpose is to counter the negative effects
from Degradation.
Strategy
The general strategy for the Heroic mode version of Spine of Deathwing can be presented as:
- Perform the same sequence of events as in normal mode (kill 3 Corruptions, perform a Barrel Roll, kill the 4th Corruption and so on);
- Dispel Blood Corruption: Death from players immediately;
- Do NOT dispel Blood Corruption: Earth from players;
- Get as much burst DPS as possible during the exposed tendon phases. Each Burning Tendons must die within 2 burn phases.
After your raid finishes the first burn phase of a tendon, you will have to
obtain another Hideous Amalgamation in order to repeat the process. Simply
kill another Corruption to obtain another Amalgamation. This will probably
happen anyway, since your raid will be damaging the existing Corruption to
break the ![]() Fiery Grip channels.
Fiery Grip channels.
Below, we will detail a few subtleties and tips.
Reaching 9 Stacks of Absorbed Blood
The Hideous Amalgamations melee for a very high amount in heroic
mode. As such, it is not advised to have them progressively stack the
![]() Absorbed Blood, as this means that your tank will have to handle
an Amalgamation with at least a small number of stacks (and thus
increased damage) for a long time.
Absorbed Blood, as this means that your tank will have to handle
an Amalgamation with at least a small number of stacks (and thus
increased damage) for a long time.
Instead, we recommend that the Corrupted Bloods be killed away from the Amalgamation, and that the tank simply pulls the Amalgamation over the dead bloods to instantly reach 9 stacks.
To make things even easier, you should tank the Amalgamation away from the armor plate, and have all the Bloods killed right next to the armor plate. This way, when the Amalgamation is low on health, the tank can simply pull it to the armor plate (where it will quickly reach 9 stacks) and then keep it there until its death.
Dispelling Blood Corruption
![]() Blood Corruption: Death generally must be dispelled 3-4 times
before it turns into
Blood Corruption: Death generally must be dispelled 3-4 times
before it turns into ![]() Blood Corruption: Earth. This means that the
15 second duration of the debuff should not be problematic if your
healers have a reasonable reaction time. This is not all, however, since it is
better to have Blood Corruption: Death turn into Earth when there is still a
lot of time left on the debuff (as this increases the chances of gaining
two stacks of
Blood Corruption: Earth. This means that the
15 second duration of the debuff should not be problematic if your
healers have a reasonable reaction time. This is not all, however, since it is
better to have Blood Corruption: Death turn into Earth when there is still a
lot of time left on the debuff (as this increases the chances of gaining
two stacks of ![]() Blood of Neltharion from it). For this reason, Blood
Corruption: Death should be dispelled with great urgency.
Blood of Neltharion from it). For this reason, Blood
Corruption: Death should be dispelled with great urgency.
It is very important to ensure that there is no chaotic dispelling
happening, as Blood Corruption: Earth must not be dispelled (except for the
situations described in the next paragraph). We recommend assigning one of the
healers to this dispelling duty. You should assign a back-up dispeller, as
well, since ![]() Fiery Grip can incapacitate a healer.
Fiery Grip can incapacitate a healer.
There are two situations where you want to dispel Blood Corruption: Earth:
- In the first part of the encounter, until both tanks (or at least the
off-tank) have 2 stacks of Blood of Neltharion. This will allow them to
more easily survive the very intense damage in the second part of the
encounter.
- When a player is affected by it while having 2 stacks of Blood of Neltharion (the maximum amount of stacks). In this case, you should dispel Blood Corruption: Earth, and have it jump to someone else who will be able to benefit from Blood of Neltharion.
As Blood of Neltharion effectively negates the effects of
![]() Degradation, your aim should be to have all of your raid members receive
stacks of this debuff. This is, as you can tell, largely out of your control,
since you cannot dictate who Blood Corruption: Earth will jump to. Dispelling
Blood Corruption: Earth from players who have sufficient stacks of Blood of
Neltharion is a means of guiding it in the right direction.
Degradation, your aim should be to have all of your raid members receive
stacks of this debuff. This is, as you can tell, largely out of your control,
since you cannot dictate who Blood Corruption: Earth will jump to. Dispelling
Blood Corruption: Earth from players who have sufficient stacks of Blood of
Neltharion is a means of guiding it in the right direction.
Tip for Blood Corruption
It is possible to control who gets ![]() Blood Corruption: Death or
Blood Corruption: Death or
![]() Blood Corruption: Earth. It will usually jump to players on the other
side of the spine, so have the tanks stand on the opposite side from everyone
else. This way, you will build up stacks of
Blood Corruption: Earth. It will usually jump to players on the other
side of the spine, so have the tanks stand on the opposite side from everyone
else. This way, you will build up stacks of ![]() Blood of Neltharion on your
tanks faster.
Blood of Neltharion on your
tanks faster.
Nuking the Burning Tendon
By far, the most difficult aspect of this encounter is killing the
Burning Tendon. Because of its much increased health, you will have to
kill 2 Hideous Amalgamations (to expose each tendon twice) for each
tendon, totaling 6 Hideous Amalgamations. Because of the
![]() Degradation debuff, you cannot afford to kill more.
Degradation debuff, you cannot afford to kill more.
The DPS requirement is very high, and players must try to maximise their output over an 18 second period of time (this is how long you have to DPS the tendon each time). Players should practice on the training dummies in order to understand the best rotation to use.
It is worth noting the value of the Valor Point trinkets (Bottled Wishes, Kiroptyric Sigil and Rotting Skull). These trinkets have very powerful on-use effects that are available for each exposed tendon phase.
As a raid leader, you should try to make sure that none of the 3 tendons will lack the burst DPS needed. Employ a rotation such as the one below (this will vary depending on your raid-size and composition):
- First exposed phase of first tendon: DPS cooldowns;
- Second exposed phase of first tendon: nothing;
- First exposed phase of second tendon: DPS potions;
- Second exposed phase of second tendon: DPS cooldowns;
- First exposed phase of third tendon:
Heroism/ Bloodlust/ Time Warp;
- Second exposed phase of third tendon: any remaining DPS cooldowns.
Handling the Corrupted Bloods
While Corrupted Bloods do not melee for a lot, towards the end of the fight there will be a very high amount of them alive, and an increasing amount will continue to spawn. There are two things you can do to help with this:
- You can attempt to kill all of the remaining Corrupted Bloods in order to give your raid some room to breathe. You should ideally do this around the time that the second Burning Tendon is killed. Your raid should use a lot of damage reduction cooldowns and AoE down the Bloods.
- Your off-tank (who is tanking the Bloods) should try to kite them around on Deathwing's back rather than trying to tank them. The Bloods are quite easily kiteable, and your tank should take far less damage. Note that they are stunnable by a Paladin's Holy Wrath (with Glyph of Holy Wrath).
Achievement: Maybe He'll Get Dizzy
The ![]() Maybe He'll Get Dizzy... achievement is part of the
Maybe He'll Get Dizzy... achievement is part of the
![]() Glory of the Dragon Soul Raider achievement. It is extremely simple, and it
requires your raid to perform the following sequence of Barrel Rolls before
defeating the boss: left, right, left, right.
Glory of the Dragon Soul Raider achievement. It is extremely simple, and it
requires your raid to perform the following sequence of Barrel Rolls before
defeating the boss: left, right, left, right.
There is absolutely no subtelty or difficulty to this achievement. In order to make things as easy as possible, we recommend that your raid kills 3 Corruptions at the start of the fight and then performs the entire sequence right then. This should not take more than a minute. After that, you should kill the final Corruption and just proceed with the fight as normal.
Alternatively, you can direct your raid to either the left or the right, while performing the Barrel Rolls needed to defeat the boss, but we feel that this adds more pressure in the middle of the fight and is more prone to failure or a wipe.
Final Considerations
Like several fights in Dragon Soul, Spine of Deathwing presents quite a few unique mechanics that will contribute to making the whole raid a memorable experience.
As always, we would be pleased to read any feedback that you have (typos, suggestions, praise, etc.) by e-mail or in a comment below.
- These Rewards Are Not Returning in Legion Remix
- This Week’s Patch 11.2 Changes Hit Hard! Did Your Spec Survive?
- It’s Still Elves All the Way Down — WoW’s Most Played Race + Class Combos, Ranked
- Never Miss a Debuff Again: This Addon Makes DoT Tracking and More Effortless
- Arthas in the Sky? China’s Latest Drone Show Stuns WoW Fans
- Time to Rebuild K’aresh… or Watch It Fall Again
- Blizzard Changes The War Within Season 3 Gladiator Mount Look!
- Don’t Miss Out! All Achievements Going Away or Changing With Season 3 (Official)