Black Mage Job Guide for FFXIV — Dawntrail 7.4
Black Mage is a caster ranged DPS job in Final Fantasy XIV that uses black magic to unleash a wide array of destructive spells on their enemies. This job can be played after reaching Level 30 as a Thaumaturge and equipping their job stone.
What is Black Mage's Playstyle?
 Black Mage is a caster DPS job with high damage, focused around steady-state output with hard-hitting spells.
Black Mage is classified as a selfish DPS, providing no raid buffs or unique utility to the party other than strong
personal damage. The rotation follows a cyclical flow of burning through MP during Astral Fire phase for bonus damage on potent fire-aspected spells like
![]() Fire IV and
Fire IV and ![]() Despair, ending on
Despair, ending on ![]() Flare Star, then entering Umbral Ice to refresh MP, keeping the
Flare Star, then entering Umbral Ice to refresh MP, keeping the ![]() High Thunder DoT up throughout.
At higher levels, Black Mage must also keep track of another resource, Polyglot, generated every 30 seconds that Astral Fire or Umbral Ice are active.
High Thunder DoT up throughout.
At higher levels, Black Mage must also keep track of another resource, Polyglot, generated every 30 seconds that Astral Fire or Umbral Ice are active.
The base rotation for Black Mage is fairly simple and easy to pick up, with some built-in flexibility. However, translating it
to an actual fight may be intimidating or difficult for some newer players. Learning how to utilize movement options like
![]() Triplecast,
Triplecast, ![]() Xenoglossy, procs, and other options is integral in order to maintain uptime.
While it may take some experience to get used to the job, Black Mage is very satisfying
to get good at, with fight optimisation feeling very rewarding.
Xenoglossy, procs, and other options is integral in order to maintain uptime.
While it may take some experience to get used to the job, Black Mage is very satisfying
to get good at, with fight optimisation feeling very rewarding.
Black Mage Strengths and Weaknesses
High personal damage without specific reliance on party performance/alignment with buffs.
Variety of flexible movement tools and resources in order to keep uptime without loss.
No combat raise, unlike the other two caster DPS.
Mismanaged movement tools and resources can lead to a massive damage loss.
Newer players to the job may have difficulty learning to adapt and maintain the rotation amidst mechanics.
How do you Unlock Black Mage
In order to unlock Black Mage, you must first complete the level 30 Thaumaturge class quest, "Facing Your Demons," as well as the level 20 main scenario quest "Sylph-Management." Following this, the quest "Taking the Black" will be available from Yayake in Ul'dah - Steps of Nald (x7.3, y12.4). Completing this will grant you the Black Mage job stone, which you can equip to continue on in your adventures as a Black Mage.
Black Mage Gauge
The Black Mage Elemental Gauge displays information on quantity and timers of various resources, detailed below.
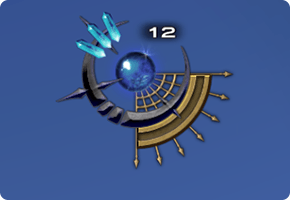
The number of stacks of Astral Fire/Umbral Ice are designated by the tick markers at the top of the gauge. Astral Fire (displayed on the gauge in orange) is granted by casting
![]() Fire,
Fire, ![]() Fire II,
Fire II, ![]() Fire III,
Fire III, ![]() Despair,
Despair,
![]() High Fire II and
High Fire II and ![]() Flare. Umbral Ice (displayed on the gauge in blue) is granted by casting
Flare. Umbral Ice (displayed on the gauge in blue) is granted by casting ![]() Blizzard,
Blizzard,
![]() Blizzard II,
Blizzard II, ![]() Blizzard III, and
Blizzard III, and ![]() High Blizzard II.
High Blizzard II.
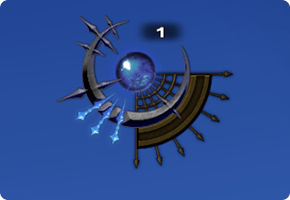
Umbral Hearts, available at level 58+, are designated by the tick markers on the bottom left. These are granted in
single-target using ![]() Blizzard IV, during AoE via
Blizzard IV, during AoE via ![]() Freeze, and built up during downtime
via
Freeze, and built up during downtime
via ![]() Umbral Soul.
Umbral Soul.

At level 70, Polyglot is added to the Black Mage Elemental Gauge. On the bottom right of the gauge, a meter will build
up while Astral Fire or Umbral Ice are active. Every 30 seconds, this bar will fill and add a Polyglot to the gauge,
designated by the bottom crystal, which can be used on ![]() Foul. At level 80, a second Polyglot charge
can be held, and a new Polyglot spender,
Foul. At level 80, a second Polyglot charge
can be held, and a new Polyglot spender, ![]() Xenoglossy, is added.
Xenoglossy, is added.

![]() Paradox is added to the gauge at level 90, designated by the crystal on the left side of the Elemental
Gauge. This resource is obtained from being in Umbral Ice III with three Umbral Hearts and swapping to Astral Fire.
Paradox is added to the gauge at level 90, designated by the crystal on the left side of the Elemental
Gauge. This resource is obtained from being in Umbral Ice III with three Umbral Hearts and swapping to Astral Fire.

At level 98, a third stack of Polyglot can be stacked.

At level 100, casting ![]() Fire IV and
Fire IV and ![]() Flare will generate Astral Soul stacks, which
accumulate on the Astral Gauge. At the maximum of six stacks,
Flare will generate Astral Soul stacks, which
accumulate on the Astral Gauge. At the maximum of six stacks, ![]() Flare Star can be used.
Flare Star can be used.
Black Mage Actions
| Action Name |
|
|
Effect |
|---|---|---|---|
|
|
|
|
MP Cost: 400.0 Deals ice damage with a potency of 180. Additional Effect: Grants Umbral Ice or removes Astral Fire |
|
|
|
|
MP Cost: 800.0 Deals fire damage with a potency of 180. Additional Effect: Grants Astral Fire or removes Umbral Ice Additional Effect: 40% chance to grant Firestarter Firestarter Effect: Next Fire III will cost no MP and have no cast time |
|
|
|
|
Swaps Astral Fire with a single Umbral Ice, or Umbral Ice with a single Astral Fire. |
|
|
|
|
Deals lightning damage with a potency of 100. Additional Effect: Lightning damage over time Potency: 45 Duration: 24s Can only be cast while under the effect of Thunderhead, granted when gaining Astral Fire or Umbral Ice from an unaspected state, or changing between their influences. Only one Thunder spell-induced damage over time effect per caster can be inflicted upon a single target. |
|
|
|
|
MP Cost: 800.0 Deals ice damage with a potency of 80 to target and all enemies nearby it. Additional Effect: Grants Umbral Ice III and removes Astral Fire |
|
|
|
|
MP Cost: 800.0 Deals unaspected damage with a potency of 100. Additional Effect: 20% chance potency will double |
|
|
|
|
MP Cost: 1500.0 Deals fire damage with a potency of 80 to target and all enemies nearby it. Additional Effect: Grants Astral Fire III and removes Umbral Ice |
|
|
|
|
Deals lightning damage with a potency of 60 to target and all enemies nearby it. Additional Effect: Lightning damage over time Potency: 30 Duration: 18s Can only be cast while under the effect of Thunderhead, granted when gaining Astral Fire or Umbral Ice from an unaspected state, or changing between their influences. Only one Thunder spell-induced damage over time effect per caster can be inflicted upon a single target. |
|
|
|
|
Fully restores MP. Additional Effect: Grants Astral Fire III Additional Effect: Grants Thunderhead Additional Effect: Grants 3 Umbral Hearts Umbral Heart Bonus: Nullifies Astral Fire's MP cost increase for Fire spells and reduces MP cost for Flare by one-third Additional Effect: Grants Paradox Can only be executed while under the effect of Astral Fire. |
|
|
|
|
Creates a barrier that nullifies damage totaling up to 30% of maximum HP. Duration: 20s |
|
|
|
|
MP Cost: 800.0 Deals ice damage with a potency of 290. Additional Effect: Grants Umbral Ice III and removes Astral Fire |
|
|
|
|
MP Cost: 2000.0 Deals fire damage with a potency of 290. Additional Effect: Grants Astral Fire III and removes Umbral Ice |
|
|
|
|
Grants Umbral Ice and 1 Umbral Heart. Umbral Heart Bonus: Nullifies Astral Fire's MP cost increase for Fire spells and reduces MP cost for Flare by one-third Additional Effect: Restores an amount of MP commensurate with your stacks of Umbral Ice Umbral Ice I: 2,500 MP Umbral Ice II: 5,000 MP Umbral Ice III: 10,000 MP Grants Umbral Ice III and 3 Umbral Hearts, and also restores 10,000 MP when used while outside of combat. Can only be executed while under the effect of Umbral Ice. |
|
|
|
|
MP Cost: 1000.0 Deals ice damage with a potency of 120 to target and all enemies nearby it. Additional Effect: Grants 3 Umbral Hearts Umbral Heart Bonus: Nullifies Astral Fire's MP cost increase for Fire spells and reduces MP cost for Flare by one-third Can only be executed while under the effect of Umbral Ice. |
|
|
|
|
Deals lightning damage with a potency of 120. Additional Effect: Lightning damage over time Potency: 50 Duration: 27s Can only be cast while under the effect of Thunderhead, granted when gaining Astral Fire or Umbral Ice from an unaspected state, or changing between their influences. Only one Thunder spell-induced damage over time effect per caster can be inflicted upon a single target. |
|
|
|
|
Rush to a target party member's side. Unable to cast if bound. |
|
|
|
|
MP Cost: 10000 Deals fire damage to target and all enemies nearby it with a potency of 240 for the first enemy, and 30% less for all remaining enemies. Additional Effect: Grants Astral Fire III Additional Effect: Grants 3 stacks of Astral Soul Effect ends when Astral Fire expires. Can only be executed while under the effect of Astral Fire. |
|
|
|
|
Connects naturally occurring ley lines to create a circle of power which, while standing within it, reduces spell cast time and recast time, and auto-attack delay by 15%. Duration: 20s Maximum Charges: 2 Cannot be executed while under the effect of Ley Lines. |
|
|
|
|
MP Cost: 800.0 Deals ice damage with a potency of 300. Additional Effect: Grants 3 Umbral Hearts Umbral Heart Bonus: Nullifies Astral Fire's MP cost increase for Fire spells and reduces MP cost for Flare by one-third Can only be executed while under the effect of Umbral Ice. |
|
|
|
|
MP Cost: 800.0 Deals fire damage with a potency of 300. Additional Effect: Grants Astral Soul Effect ends when Astral Fire expires. Can only be executed while under the effect of Astral Fire. |
|
|
|
|
Move instantly to Ley Lines drawn by you. Cannot be executed while bound. |
|
|
|
|
Deals lightning damage with a potency of 80 to target and all enemies nearby it. Additional Effect: Lightning damage over time Potency: 35 Duration: 21s Can only be cast while under the effect of Thunderhead, granted when gaining Astral Fire or Umbral Ice from an unaspected state, or changing between their influences. Only one Thunder spell-induced damage over time effect per caster can be inflicted upon a single target. |
|
|
|
|
The next three spells will require no cast time. Duration: 15s Maximum Charges: 2 |
|
|
|
|
Deals unaspected damage to target and all enemies nearby it with a potency of 600 for the first enemy, and 25% less for all remaining enemies. Polyglot Cost: 1 |
|
|
|
|
MP Cost: 10000 Deals fire damage with a potency of 350. Additional Effect: Grants Astral Fire III Can only be executed while under the effect of Astral Fire. |
|
|
|
|
Deals unaspected damage with a potency of 890. Polyglot Cost: 1 |
|
|
|
|
MP Cost: 800.0 Deals ice damage with a potency of 100 to target and all enemies nearby it. Additional Effect: Grants Umbral Ice III and removes Astral Fire |
|
|
|
|
MP Cost: 1500.0 Deals fire damage with a potency of 100 to target and all enemies nearby it. Additional Effect: Grants Astral Fire III and removes Umbral Ice |
|
|
|
|
Grants Polyglot. Can only be executed while under the effect of Astral Fire or Umbral Ice. |
|
|
|
|
Deals unaspected damage with a potency of 540. Astral Fire Bonus: Grants Firestarter Firestarter Effect: Next Fire III will require no time to cast and cost no MP Umbral Ice Bonus: Requires no MP to cast Can only be executed while under the effect of Paradox. ※This action cannot be assigned to a hotbar. ※Fire and Blizzard change to Paradox when requirements for execution are met. |
|
|
|
|
Deals lightning damage with a potency of 150. Additional Effect: Lightning damage over time Potency: 60 Duration: 30s Can only be cast while under the effect of Thunderhead, granted when gaining Astral Fire or Umbral Ice from an unaspected state, or changing between their influences. Only one Thunder spell-induced damage over time effect per caster can be inflicted upon a single target. |
|
|
|
|
Deals lightning damage with a potency of 100 to target and all enemies nearby it. Additional Effect: Lightning damage over time Potency: 40 Duration: 24s Can only be cast while under the effect of Thunderhead, granted when gaining Astral Fire or Umbral Ice from an unaspected state, or changing between their influences. Only one Thunder spell-induced damage over time effect per caster can be inflicted upon a single target. |
|
|
|
|
Weave ley lines anew, setting your circle of power at a new location. Can only be executed while under the effect of Ley Lines, and the effect duration will not be reset. |
|
|
|
|
Deals fire damage to target and all enemies nearby it with a potency of 500 for the first enemy, and 65% less for all remaining enemies. Can only be executed when the Astral Gauge is full. |
Role Actions
| Action Name |
|
|
Effect |
|---|---|---|---|
|
|
|
|
Lowers target's physical damage dealt by 5% and magic damage dealt by 10%. Duration: 15s |
|
|
|
|
MP Cost: 800.0 Puts target and all nearby enemies to sleep. Duration: 30s Cancels auto-attack upon execution. |
|
|
|
|
Gradually restores own MP. Potency: 55 Duration: 21s |
|
|
|
|
Next spell is cast immediately. Duration: 10s |
|
|
|
|
Spells can be cast without interruption. Additional Effect: Nullifies most knockback and draw-in effects Duration: 6s |
Black Mage Traits
| Action Name | Acquired | Effect |
|---|---|---|
| Lv. 1 |
Casting of certain fire and ice spells will grant a stack of Astral Fire and Umbral Ice respectively. Maximum Stacks: 1 While under the effect of Astral Fire, the potency of Fire spells is increased by 40%, the cost of casting Fire spells is doubled, MP recovery is reduced to 0, and the potency of Ice spells is reduced by 10%. While under the effect of Umbral Ice, the cost of casting Ice spells is reduced to 0, 2,500 MP is recovered upon landing an Ice spell, and the potency of Fire spells is reduced by 10%. |
|
| Lv. 20 |
Increases base action damage and HP restoration by 10%. |
|
| Lv. 20 |
Allows the stacking of a second Astral Fire and Umbral Ice. While under the effect of Astral Fire, the potency of Fire spells is increased by 60% and the potency of Ice spells is reduced by 20%. While under the effect of Umbral Ice, 5,000 MP is recovered upon landing an Ice spell and the potency of Fire spells is reduced by 20%. |
|
| Lv. 35 |
Allows the stacking of a third Astral Fire and Umbral Ice. Casting Fire II or Blizzard II grants maximum stacks of Astral Fire or Umbral Ice respectively. While under the effect of Astral Fire III, the potency of Fire spells is increased by 80%, and the cast time of Ice spells is halved and potency lowered by 30%. While under the effect of Umbral Ice III, 10,000 MP is recovered upon landing an Ice spell, and the cast time of Fire spells is halved and potency lowered by 30%. |
|
| Lv. 40 |
Increases base action damage and HP restoration by 30%. |
|
| Lv. 42 |
Grants a 40% chance that after casting Fire, your next Fire III will require no MP and have no cast time. |
|
| Lv. 45 |
Upgrades Thunder to Thunder III. |
|
| Lv. 56 |
Increases damage dealt by 5% while under the effect of Astral Fire or Umbral Ice. |
|
| Lv. 58 |
Grants stacks of Umbral Heart upon casting Freeze, or executing Manafont or Umbral Soul. |
|
| Lv. 64 |
Upgrades Thunder II to Thunder IV. |
|
| Lv. 70 |
Grants the effect of Polyglot upon maintaining Enochian for 30 seconds. Also improves Enochian's magic damage increase to 10%. |
|
| Lv. 78 |
Improves Enochian's magic damage increase to 15%. |
|
| Lv. 80 |
Allows the stacking of a second Polyglot. |
|
| Lv. 80 |
Allows for the immediate casting of Foul. |
|
| Lv. 82 |
Upgrades Fire II and Blizzard II to High Fire II and High Blizzard II. |
|
| Lv. 84 |
Reduces Manafont recast time to 100 seconds. |
|
| Lv. 86 |
Improves Enochian's magic damage increase to 22%. |
|
| Lv. 90 |
Adds a Paradox marker to your Elemental Gauge. The marker is made active after reaching Astral Fire III then swapping to the opposite element. Conversely, the marker can also be made active after reaching Umbral Ice III and gaining 3 Umbral Hearts then swapping to the opposite element. The marker is made inactive when the effect of Astral Fire or Umbral Ice expires. Fire and Blizzard become Paradox when the Paradox marker is made active. |
|
| Lv. 92 |
Upgrades Thunder III to High Thunder and Thunder IV to High Thunder II. |
|
| Lv. 94 |
Reduces Swiftcast recast time to 40 seconds. |
|
| Lv. 96 |
The location of Ley Lines can be reset while its effect is active. |
|
| Lv. 96 |
Improves Enochian's magic damage increase to 27%. |
|
| Lv. 98 |
Allows the stacking of a third Polyglot. |
|
| Lv. 98 |
Extends the duration of Addle to 15 seconds. |
|
| Lv. 100 |
Grants a stack of Astral Soul upon landing Fire IV or Flare. Maximum Stacks: 6 Allows for the immediate casting of Despair. |
Black Mage Lore
In days long past, there existed an occult and arcane art known as black magic—a potent magic of pure destructive force born forth by a sorceress of unparalleled power. Those who learned to wield this instrument of ruin came to be called black mages, out of both fear and respect for their gift. Yet great power served to corrupt the judgment of mortal man, and so he unknowingly set out upon the path of ruin. Adventurers who take the black will become agents of devastation, capable of annihilating those who oppose them through little more than the force of their will.
Changelog
- 19 Dec. 2025 (keybindings page): Updated for Patch 7.4.
- 19 Dec. 2025 (rotation page): Updated for Patch 7.4.
- 19 Dec. 2025 (Leveling page): Updated for Patch 7.4.
- 19 Dec. 2025 (gear page): Updated for Patch 7.4.
- 19 Dec. 2025 (job changes): Updated for Patch 7.4.
- 19 Dec. 2025 (melding page): Updated for Patch 7.4.
- 19 Dec. 2025 (this page): Updated for Patch 7.4.
- 26 Aug. 2025 (Leveling page): Fixed a minor error.
- 09 Aug. 2025 (keybindings page): Page updated for Patch 7.3.
- 09 Aug. 2025 (rotation page): Udpated for Patch 7.3.
- 09 Aug. 2025 (Leveling page): Updated for Patch 7.3.
- 09 Aug. 2025 (gear page): Updated for Patch 7.3.
- 09 Aug. 2025 (job changes): Updated for Patch 7.3.
- 09 Aug. 2025 (melding page): Updated for Patch 7.3.
- 09 Aug. 2025 (this page): Updated for Patch 7.3.
- 01 Apr. 2025 (keybindings page): Page updated to Patch 7.2.
- 30 Mar. 2025 (rotation page): Updated for Patch 7.2.
- 29 Mar. 2025 (Leveling page): Updated for Patch 7.2.
- 29 Mar. 2025 (gear page): Updated for Patch 7.2.
- 29 Mar. 2025 (job changes): Updated for Patch 7.2.
- 29 Mar. 2025 (melding page): Updated for Patch 7.2.
- 29 Mar. 2025 (this page): Updated for Patch 7.2.
- 21 Nov. 2024 (rotation page): Updated for Patch 7.1.
- 21 Nov. 2024 (Leveling page): Updated for Patch 7.1.
- 21 Nov. 2024 (gear page): Updated for Patch 7.1.
- 21 Nov. 2024 (job changes): Updated for Patch 7.1.
- 21 Nov. 2024 (melding page): Updated for Patch 7.1.
- 21 Nov. 2024 (this page): Updated for Patch 7.1.
- 21 Aug. 2024 (rotation page): Updated for Patch 7.05.
- 21 Aug. 2024 (Leveling page): Updated for Patch 7.05.
- 02 Aug. 2024 (gear page): Updated Best in Slot sets for Patch 7.05.
- 31 Jul. 2024 (gear page): Updated Crafted Sets for Patch 7.05 Savage Progression.
- 29 Jul. 2024 (Leveling page): Updated for Patch 7.01.
- 29 Jul. 2024 (this page): Removed leftover Endwalker References.
- 15 Jul. 2024 (Leveling page): Updated for Patch 7.0.
- 14 Jul. 2024 (rotation page): Updated for Patch 7.0.
- 14 Jul. 2024 (gear page): Updated for Patch 7.0.
- 14 Jul. 2024 (job changes): Updated for Dawntrail launch.
- 14 Jul. 2024 (melding page): Updated for Patch 7.0.
- 14 Jul. 2024 (this page): Updated for Patch 7.0.
- 06 Jun. 2024 (job changes): Job Actions and Traits from Media Tour added.
- 16 May 2024 (job changes): Job Actions Trailer added.
- 20 Apr. 2024 (keybindings page): Page added.
- 19 Jan. 2024 (rotation page): Updated for Patch 6.55.
- 19 Jan. 2024 (Leveling page): Updated for Patch 6.55.
- 19 Jan. 2024 (gear page): Updated BiS sets with Manderville relic for Patch 6.55.
- 19 Jan. 2024 (melding page): Updated for Patch 6.55.
- 19 Dec. 2023 (this page): Updated for Patch 6.55.
- 10 Oct. 2023 (rotation page): Updated for Patch 6.5
- 10 Oct. 2023 (Leveling page): Updated for Patch 6.5
- 10 Oct. 2023 (gear page): Updated TOP sets with dungeon gear for Patch 6.5.
- 10 Oct. 2023 (melding page): Updated for Patch 6.5
- 10 Oct. 2023 (this page): Updated for Patch 6.5.
- 24 Jul. 2023 (gear page): Updated TOP and DSR sets with Manderville relic for Patch 6.45.
- 27 May 2023 (rotation page): Updated for Patch 6.4.
- 27 May 2023 (Leveling page): Updated for Patch 6.4.
- 27 May 2023 (gear page): Updated for Patch 6.4.
- 27 May 2023 (melding page): Updated for Patch 6.4.
- 27 May 2023 (this page): Updated for Patch 6.4.
- 11 Jan. 2023 (rotation page): Updated for Patch 6.3.
- 11 Jan. 2023 (Leveling page): Updated for Patch 6.3.
- 11 Jan. 2023 (gear page): Updated for Patch 6.3.
- 11 Jan. 2023 (melding page): Updated for Patch 6.3.
- 11 Jan. 2023 (this page): Updated for Patch 6.3.
- 28 Aug. 2022 (rotation page): Updated for Patch 6.2.
- 28 Aug. 2022 (Leveling page): Updated for Patch 6.2.
- 28 Aug. 2022 (gear page): Updated for Patch 6.2.
- 28 Aug. 2022 (melding page): Updated for Patch 6.2.
- 28 Aug. 2022 (this page): Updated for Patch 6.2.
- 20 Apr. 2022 (rotation page): Updated for Patch 6.1.
- 20 Apr. 2022 (gear page): Updated for Patch 6.1.
- 20 Apr. 2022 (melding page): Updated for Patch 6.1.
- 20 Apr. 2022 (this page): Updated for Patch 6.1.
- 31 Mar. 2022 (Leveling page): Guide added.
- 28 Feb. 2022 (rotation page): Guide added.
- 20 Feb. 2022 (gear page): Guide added.
- 20 Feb. 2022 (melding page): Guide added.
- 15 Feb. 2022 (this page): Guide added.
- 19 Dec. 2021 (job changes): Page added.
Guides from Other Classes


Rika Vanih is a long-time FFXIV player, starting back mid A Realm Reborn, then maining Black Mage since mid-Heavensward. She has cleared all savage fights on the job since then, often within the first week or two for each raid tier, as well as all three ultimate fights. With a passion for helping others learn and improve, she is an active Black Mage mentor on the Balance Discord, more than willing to assist players new to the job, seasoned veterans looking to min-max, and everywhere in between. You can most easily find her there, on various other FFXIV-related discord servers, or directly via Discord DM at Rika Vanih#1340.
Tsutsumi Tsumi is a Black Mage main that has been raiding since Heavensward. He primarily enjoys progression and has consistently been clearing Savage week 1 since mid-Stormblood. He can be contacted for any questions regarding Black Mage through his dms on Discord by messaging The Scarlet Devil#2637.
- Patch 7.4 Moogle Treasure Trove Starts Next Week!
- Get Some Eggcellent New Cosmetics in This Year’s Hatching-tide!
- Savage Catchup: How to Ride Your Way to a Clear in M10S
- First Look at Patch 7.5 Comes This Friday — Here’s What to Know
- Here’s What You’ll Need to Step into The Merchant’s Tale
- Little Ladies’ Day 2026 Ends Soon! Don’t Miss These Free Rewards
- Savage Catchup: All the Must-Knows for Tackling M9S
- FFXIV Players Can Earn Free Glamour Items in Valentione’s Day Event

