The Nexus Dungeon Guide
The Nexus can be found in Borean Tundra. The recommended level range to run this dungeon on Normal is 68-73. Heroic mode will require Level 80 to enter.
In this guide, we will cover dungeon quests, the layout of the dungeon, tactics for each boss, loot that can be obtained, and ideal group compositions.
The Nexus Quests
Before heading into The Nexus, we advise you to get all the dungeon quests related to it. To make this process easier, we have written a separate guide for the quests and their chains.
The Nexus Entrance Location
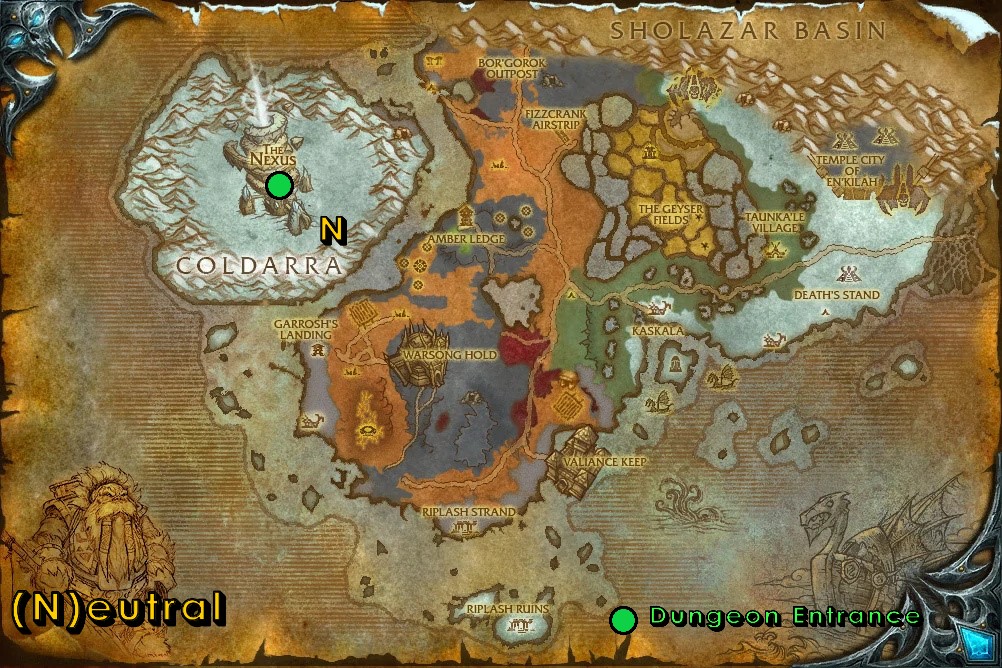
The Nexus is found on the directly in front of the entrance of the structure, on the bottom floor.
Overview of Bosses in The Nexus
Here we will give you a full rundown of what you can expect from each of the bosses found here on both Normal and Heroic difficulties as well as the items they drop.
Commander Stoutbeard / Commander Kolurg


Mechanics and Strategy
Alliance players will face Commander Kolurg, while Horde players will
face Commander Stoutbeard. On Normal difficulty, this boss will not
drop any loot. Melee players will want to be ready to quickly move away whenever
the boss begins to channel his ![]() Whirlwind ability, as this deals very
high amounts of damage to nearby enemies. Make sure to tank the boss far away
from other trash mobs, as his
Whirlwind ability, as this deals very
high amounts of damage to nearby enemies. Make sure to tank the boss far away
from other trash mobs, as his ![]() Frightening Shout might fear you into
additional mobs.
Frightening Shout might fear you into
additional mobs.
Loot from Heroic
| Item | Required Level | Item Type | Slot |
|---|---|---|---|
| 80 | Cloth | Feet | |
| 80 | Plate | Hands | |
| 80 | Cloth | Legs | |
| 80 | Accessory | Back |
Grand Magus Telestra

Mechanics and Strategy
- Phase One
- Phase Two
Make sure to spread out to avoid the ![]() Firebomb from disorienting
multiple party members. While the party is being thrown around by the
Firebomb from disorienting
multiple party members. While the party is being thrown around by the
![]() Gravity Well spell, use any instant-cast abilities available to
continue dealing damage and healing while being tossed around.
Gravity Well spell, use any instant-cast abilities available to
continue dealing damage and healing while being tossed around.
At 50% health Grand Magus Telestra will split into 3 Mirror Images, each with unique abilities. Be sure to any interrupts and stuns available on these adds as their spells can be quite deadly over time. Quickly deal with the 3 Images to make Grand Magus Telestra reappear again.
Loot from Normal
| Item | Required Level | Item Type | Slot |
|---|---|---|---|
| 71 | Leather | Waist | |
| 71 | Plate | Waist | |
| 71 | Wand | Ranged |
Loot from Heroic
| Item | Required Level | Item Type | Slot |
|---|---|---|---|
| 80 | Plate | Head | |
| 80 | Wrist | ||
| 80 | Leather | Shoulder | |
| 80 | Off-Hand | Weapon |
Anomalus

Mechanics and Strategy
Anomalus deals high Arcane damage to all enemies. Try to dispel the
![]() Arcane Attraction debuffs to reduce Anomalus' damage output.
Periodically throughout the fight, Anomalus will summon a Chaotic Rift
that deals high AoE Arcane damage and spawns Crazed Mana-Wraith. While
this Rift is alive, Anomalus himself is immune to damage. Quickly kill the Rift
and return to damaging Anomalus. Repeat this process until the boss dies.
Arcane Attraction debuffs to reduce Anomalus' damage output.
Periodically throughout the fight, Anomalus will summon a Chaotic Rift
that deals high AoE Arcane damage and spawns Crazed Mana-Wraith. While
this Rift is alive, Anomalus himself is immune to damage. Quickly kill the Rift
and return to damaging Anomalus. Repeat this process until the boss dies.
Loot from Normal
| Item | Required Level | Item Type | Slot |
|---|---|---|---|
| 71 | Feet | ||
| 71 | Hands | ||
| 71 | Off-Hand | Weapon |
Loot from Heroic
| Item | Required Level | Item Type | Slot |
|---|---|---|---|
| 80 | Leather | Head | |
| 80 | Chest | ||
| 80 | Plate | Feet | |
| 80 | Jewelry | Neck |
Ormorok the Tree-Shaper

Mechanics and Strategy
Always watch your positioning on this fight and be ready to move off of the
![]() Crystal Spikes to avoid their high damage and knockup. Casters need to
be aware of the
Crystal Spikes to avoid their high damage and knockup. Casters need to
be aware of the ![]() Spell Reflection; wait for the charges to fall off
before continuing to DPS.
Spell Reflection; wait for the charges to fall off
before continuing to DPS.
Loot from Normal
| Item | Required Level | Item Type | Slot |
|---|---|---|---|
| 71 | Plate | Shoulder | |
| 71 | Plate | Feet | |
| 71 | Off-Hand Agility Fist | Weapon |
Loot from Heroic
| Item | Required Level | Item Type | Slot |
|---|---|---|---|
| 80 | Cloth | Hands | |
| 80 | Plate | Waist | |
| 80 | Legs | ||
| 80 | Jewelry | Finger |
Keristrasza

Mechanics and Strategy
![]() Intense Cold is the main mechanic of this fight. Whenever a player
stands in place, they will take increasing amounts of Frost damage. Moving or
jumping will remove these debuffs, so players will want to be moving frequently
to prevent too many debuffs from stacking up. Keristrasza has both
frontal and rear attacks, meaning non-tank players will want to stay on the
sides of the boss to prevent taking additional damage. Keristrasza will root
players throughout the fight, preventing them from moving and resetting their
Intense Cold is the main mechanic of this fight. Whenever a player
stands in place, they will take increasing amounts of Frost damage. Moving or
jumping will remove these debuffs, so players will want to be moving frequently
to prevent too many debuffs from stacking up. Keristrasza has both
frontal and rear attacks, meaning non-tank players will want to stay on the
sides of the boss to prevent taking additional damage. Keristrasza will root
players throughout the fight, preventing them from moving and resetting their
![]() Intense Cold stacks. Use any abilities available to remove these roots
quickly to allow players to move again and reset their stacks.
Intense Cold stacks. Use any abilities available to remove these roots
quickly to allow players to move again and reset their stacks.
Loot from Normal
| Item | Required Level | Item Type | Slot |
|---|---|---|---|
| 71 | Cloth | Feet | |
| 71 | Jewelry | Finger | |
| 71 | One-Hand Dagger | Weapon |
Loot from Heroic
| Item | Required Level | Item Type | Slot |
|---|---|---|---|
| 80 | Leather | Chest | |
| 80 | Feet | ||
| 80 | Strength Shield | Weapon | |
| 80 | Accessory | Trinket | |
| 80 | Wrist | ||
| 80 | Cloth | Hands | |
| 80 | Plate | Waist | |
| 80 | Main-Hand Intellect Mace | Weapon | |
| 390 | BoP Jewelcrafting Pattern | N/A |
The Nexus Achievements in Wrath of the Lich King
| Achievement | Description |
|---|---|
| Defeat the bosses in The Nexus. | |
| Defeat the The Nexus bosses on Heroic Difficulty. | |
| Defeat Keristrasza in The Nexus on Heroic Difficulty without allowing Intense Cold to reach more than two stacks. | |
| Defeat Anomalus in The Nexus on Heroic Difficulty without destroying any Chaotic Rifts. | |
| Defeat Grand Magus Telestra in The Nexus on Heroic Difficulty after having killed her images within 5 seconds of each other during both splits. |
Changelog
- 01 Jan. 2024: Updated for Phase 5.
- 22 Sep. 2022: Achievements added.
- 10 Sep. 2022: Page added
This guide has been written by Abide, TBC and WotLK veteran for nearly a decade. Abide is a Warrior tank and multi-class expert currently playing on Faerlina Horde. You can find him in the Icy Veins Discord if you have any questions or concerns.
- Burning Crusade Classic Phase 2 Now Live: Here’s What to Expect
- Did Blizzard Just Quietly Invite Creators to Play WoW Classic’s Next Chapter?
- WoW Weekly Returns: Patch 12.0.5, Twitch Drops & Classic Updates
- WoW BCC Anniversary Edition: Overlords of Outland – Everything Coming May 14
- Battleground Honor Significantly Increased
- Limited-Time Mount Alert: Get the Voidfeather Dragonhawk for TBC Classic Servers Now!
- Could WoW Be Added to Xbox Game Pass Ultimate?
- MoP Classic Escalation PTR Update Details New Content