Gorgothra the Claimer Helliquary Raid Guide
Gorgotrha the Claimer is the third main encounter of the Helliquary Raiding system of Diablo Immortal. Like the previous Helliquary encounters (such as Vitaath the Shivering Death), you will need to gather a group of 8 players to stand a chance against this boss's four phases of mechanics. Here you will find specific strategies to survive this encounter's mechanics and claim its unique piece of loot.
Gorgothra the Claimer Overview
Gorgothra the Claimer is the third boss fight from the Helliquary endgame activity, part of the Raiding content in Diablo Immortal. Gorgothra excels at crowd control and heavily punishes unwary players with multiple sources of petrification — but stay on your toes for CC telegraphs, and the rest will be trivial!
It should be noted that Helliquary raid bosses operate on a
2/week reset basis (Monday and Thursday), so make sure to do the Helliquary
raid twice per week on the hardest difficulty you can handle in order to
maximize your ![]() Scoria rewards.
Scoria rewards.
Gorgothra the Claimer Statistics
- Location: Westmarch, Central Square, the Demonic Portal
- Reward:
 Petrified Fang
 - Advisable Combat Rating: 2,935 (Difficulty 1), 4,065 (Difficulty 2), 5,205 (Difficulty 3)
Gorgothra the Claimer Guide
The raid begins with a short intro phase. Once you enter the (pretty conventional) circular boss arena, you need to get through a bunch of melee Deceivers and ranged Succubi prior to the main fight. The boss itself is invulnerable until you take these minions down, which is a trivial task for a well-equipped party.
Phase 1
This is the easiest phase of the fight and lasts for the entirety of the first health bar of the boss. Throughout its duration, Gorgothra will use:
- Acidic Spit: Gorgothra spits acid on the ground, covering a medium-sized circle in front of its multiple heads. The puddles of acid spit linger for a short period. Naturally, standing inside its area of effect will tick for moderate damage until you move out, or the on-ground effect ends.
- Summon Minions: Gorgothra periodically summons additional minions — both melee Deceivers, as well as ranged Succubi. They are trivial trash enemies that you can easily lure and cleave alongside the main boss.
- Toxic Pods: Gorgothra leaves bulbous toxic seeds planted on the ground; they explode after a brief period, dealing moderate damage to anyone standing nearby. They have health bars of their own, and can be bursted down to avoid the full effect of their explosion.
- Acid Cones: Gorgothra marks three cone-shaped areas in front of it, telegraped via faint green outlines. Shortly thereafter, the boss spits out acid in the marked areas, dealing moderate damage to anyone standing within.
- Acid Mark: Gorgothra marks two random players with its acidic spit. The marking is clearly visible with a circular green telegraph underneath the affected players. After a brief period, the marked players will explode in three quick successions, dealing damage to anyone caught within the area. All three explosions leave acidic pools on the ground, further restricting the safe areas of the fight. If you are marked, move away from the cluster of teammates to avoid dealing friendly fire en masse. Ideally, you will drop your acidic pools on the edges of the fight, and will leave plenty of room for movement in the center of the arena.
Melee players should use movement abilities, or simply move away in time when they see the linear or circular telegraphs. Ranged players should keep their distance and fire away. If you happen to die, wait on teammates to resurrect you, since Gorgothra is relatively tame in this phase.
Phase 2
The fight ramps up. This phase lasts for the entirety of the second health bar of the boss. The phase opens with a new ability, Gorgothra's worst: the Petrification Shards (see below). Throughout the duration of Phase 2, the boss will:
- Do all of the above: All previously described attacks of Phases 1 will continue.
- Petrification Shards: This is by far Gorgothra's most dangerous ability. Gorgothra marks random players with a petrifying spell, telegraphed with a glowing white circle underneath your feet — as well as the outline of a ghostly shard forming above your head! The petrification spell will follow your movement for a short period, while the shard above your head takes shape. Once the shard is fully formed it falls to the ground, petrifying and heavily damaging unwary players. As the shard collides with the surface, it also unleashes damaging shockwaves in all four directions (telegraphed by the four arrows sticking out the edges of the white circle), which also petrify on contact. If any part of the spell — the shard or a shockwave — catches you, the petrification renders you helpless for 4 seconds, likely resulting in your death. The shockwaves from multiple Petrification spells can overlap, and can wreak havoc to the entire raid group! To avoid this attack, watch carefully for its telegraph and run out of the main cluster of players. As the stone finishes forming, use a dodge skill to move out of the initial petrification effect, as well as the shockwaves.
- Acid Spheres: Immediately after the petrification attack, as well as at random intervals throughout the fight, Gorgothra unleashes a radiating blast of three acidic spheres. These acidic spheres travel fast and deal heavy damage to anyone standing in their way as they pierce through the fight. Gorgothra does that attack three times in quick succession. Needless to say, petrified players are in grave danger from this combo.
Phase 3
The fight gets deadly. This phase lasts for the entirety of the third health bar of the boss. Throughout its duration, Gorgothra will:
- Do all of the above: All previously described attacks of Phases 1 and 2 will continue.
- Petrifying Statues: At the start of Phase 2, Gorgothra charged up
the four snake-like statues that face the center of the arena; they start
pulsating with energy. They get fully charged here, in Phase 3. The statues
will each fire a continuous beam of energy, and will slowly rotate 90 degrees.
Getting caught within their path hurts and petrifies you; to avoid this
attack, your safest bet is to stay near the edges of the arena — well
outside the statues' reach. The beam can also be dodged with movement skills
that render you invulnerable during their animation, i.e. Demon Hunters'
 Daring Swing.
Phases 4
The fight gets up close and personal. This phase lasts for the entirety of fourth and final health bar of the boss. Throughout its duration, Gorgothra will:
- Do all of the above: All previously described attacks from Phases 1, 2, and 3 will continue.
- Ring of Power: At the start of its final health bar, Gorgothra forms a ring of power around the snake-like statues, effectively shrinking the arena to its confines. You need to stay within its inner circle (and get closer to Gorgothra as a consequence) to avoid dying from the heavy ticking damage inflicted on the edges of the arena.
Gorgothra the Claimer Summary
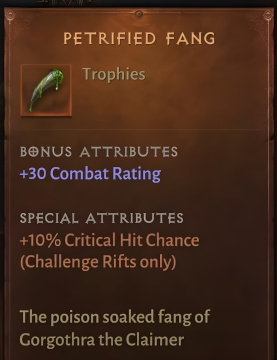
The reward from Gorgothra the Claimer is the ![]() Petrified Fang.
When inserted in your Helliquary, this item increases Combat
Rating by 30 and Critical Hit Chance by 10% (the latter is only applicable
when doing Challenge Rifts).
Petrified Fang.
When inserted in your Helliquary, this item increases Combat
Rating by 30 and Critical Hit Chance by 10% (the latter is only applicable
when doing Challenge Rifts).
Changelog
- 15 Aug. 2022: Guide added.
This build is presented to you by Deadset, one of the very few professional Diablo 3 players. Deadset regularly publishes video guides on Youtube and streams on Twitch, where you can see how this and other builds play out in practice.
- Diablo Immortal x WoW Crossover Event: Frostmourne in Sanctuary!
- Icy Veins Seeking Writers for Zenless Zone Zero: Apply Today!
- Icy Veins Launches Genshin Impact Guides Section
- Icy Veins Podcast About Path of Exile
- ARPG Vault Discord Giveaway
- Diablo Immortal Destruction's Wake Update Notes: June 13th
- Icy Veins is Getting a New Look
- Diablo Immortal: Age of Falling Towers Content Update Notes

