Lassal the Flame-spun Helliquary Raid Guide
Lassal the Flame-spun is your first true encounter of the Helliquary Raiding system of Diablo Immortal. Unlike the previous Helliquary encounter (Chaos Herald Pyl), you will need to gather a group of 8 players to stand a chance against this boss's four phases of mechanics. Here you will find specific strategies to survive this encounter's mechanics and claim its unique piece of loot.
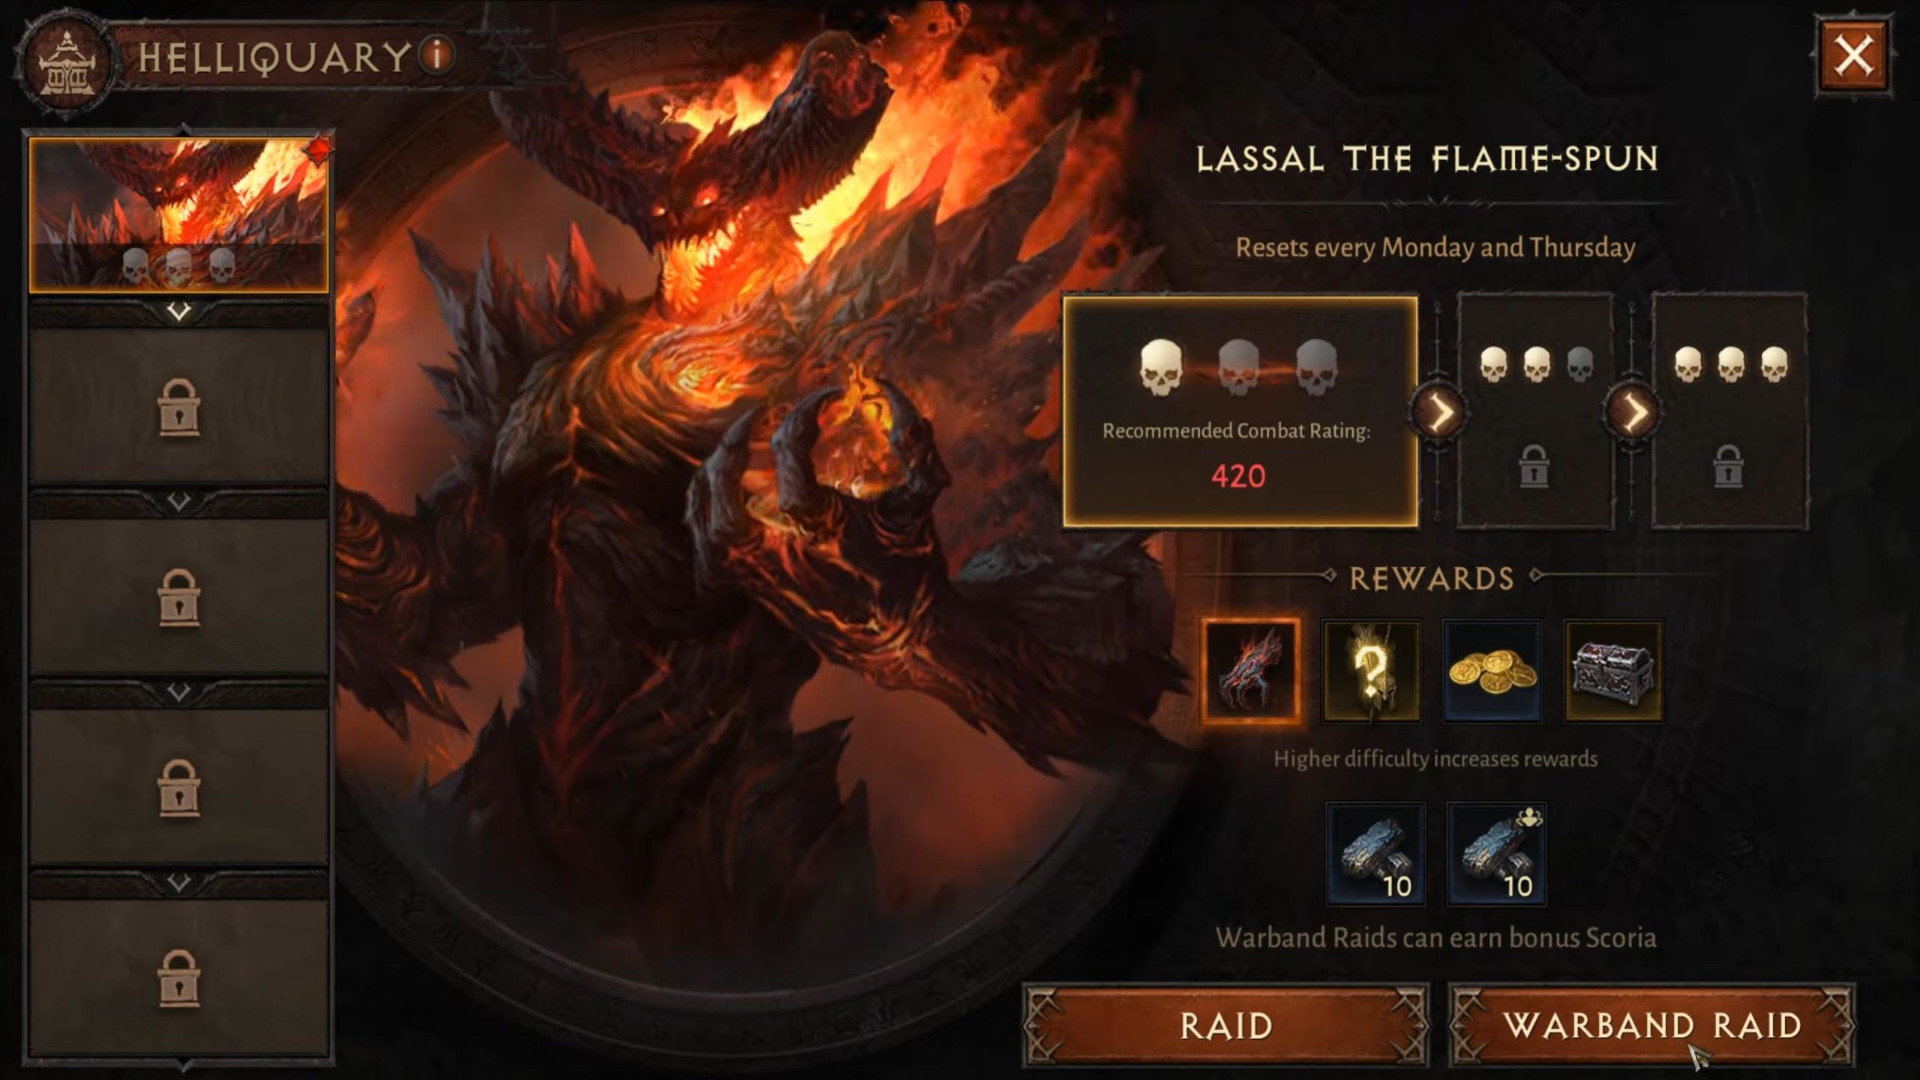
Lassal The Flame-spun Overview
Lassal The Flame-spun is the first real boss fight for the Helliquary endgame activity, part of the Raiding content in Diablo Immortal. Lassal is also the first raid challenge that requires the formation of a group of 8 players, and will indiscriminately wipe you if you ignore its mechanics.
It should be noted that Helliquary raid bosses operate on a 2/week
reset basis (Monday and Thursday), so make sure to do the Helliquary raid twice per
week on the hardest difficulty you can handle in order to maximize your
![]() Scoria rewards.
Scoria rewards.
Lassal The Flame-spun Statistics
- Location: Westmarch, Central Square, the Demonic Portal
- Reward:
 Flame-Twisted Claw
 - Advisable Combat Rating: 420 (Difficulty 1), 1250 (Difficulty 2), 1640 (Difficulty 3)
Lassal The Flame-spun Strategy Guide
Lassal The Flame-spun is the first real Helliquary boss, with a fight that can roughly be divided into four phases.
Phase 1
This is the easiest phase of the fight and lasts for the entirety of the first health bar of the boss. Throughout its duration, Lassal will use:
- Basic Attacks: A low damage, high attack speed, triple melee attack pattern.
- Slam Fists: Lassal raises its fists into the air and after a brief pause, slams them into the ground. The attack cracks the very ground in a 180-degree cone in front of Lassal in a radiating pattern, damaging anyone caught within and stunning them.
Melee players should use movement abilities, or simply move away in time, when they see the conal telegraph of his stunning attack. Ranged players should keep their distance and fire away. If you happen to die, wait on teammates to resurrect you, since Lassal is relatively tame in this phase.
Phase 2
The fight ramps up. This phase lasts for the entirety of the second health bar of the boss. Throughout its duration, Lassal will:
- Do all of the above: All previously described attacks of Phase 1 will continue.
- Leap Slam: Lassal leaps into the air and repositions; its landing spot is telegraphed with a red circular outline. Anyone caught within the circle when Lassal lands will receive moderate damage and will be knocked back. Lassal leaps a total of six times back to back.
- Summon: Lassal will summon 4 Slag Spitters in the four corners of the room, as well as cannon fodder in the form of 6 Demon Warriors.
All players should be conservative with their attacks during Lassal's Leap Slamming, and focus on evading the demon's landing locations first and foremost. As for the summons — while the Demon Warriors are easily ignored trash that will get cleaved down naturally during the fight, the Slag Spitters are anything but. Their dangerous Fireball projectiles will quickly fill the room if they are not dealt with pronto, so you should shift your attention away from the boss to take care of them first. Resume fire on Lassal only after the Slag Spitters are dead.
Phase 3
The fight gets deadly. This phase lasts for the entirety of the third health bar of the boss. Throughout its duration, Lassal will:
- Do all of the above: All previously described attacks of Phases 1 and 2 will continue.
- Boulder Toss: Lassal moves to the center of the arena, yells "Embrace Oblivion" and hurls massive boulders at randomly chosen raid members. If the player manages to evade the projectile, the rock will remain stuck in the ground as an obstacle — and a cover! (Important for the next attack.)
- Embrace Oblivion: Lassal raises its hands and begins charging a deadly attack. You will receive the on-screen message "Use the rocks to avoid Lassal's attacks!"; run behind one of the (hopefully) remaining boulders. Failing to hide before Lassal's spell finishes channeling is almost certain death.
- Delayed Detonation: Two raid members will randomly be marked with a large and very distinct fiery aura. After a brief period, they will detonate for moderate damage and leave a continuous damaging effect on the ground. If you happen to be marked, run away from the (usual) cluster of raiders. Go near the edges of the arena until the aura detonates, leaving the harmful effect well away from the main group of allies.
Phase 4
The fight is about to end. This phase lasts for the entirety of the fourth health bar of the boss. Unleash all of your hardest-hitting cooldowns and abilities, use revives and potions, and simply go all-out on the boss. Throughout its duration, Lassal will do all previously described attacks, so make sure to finish him off quickly.
Lassal The Flame-spun Summary
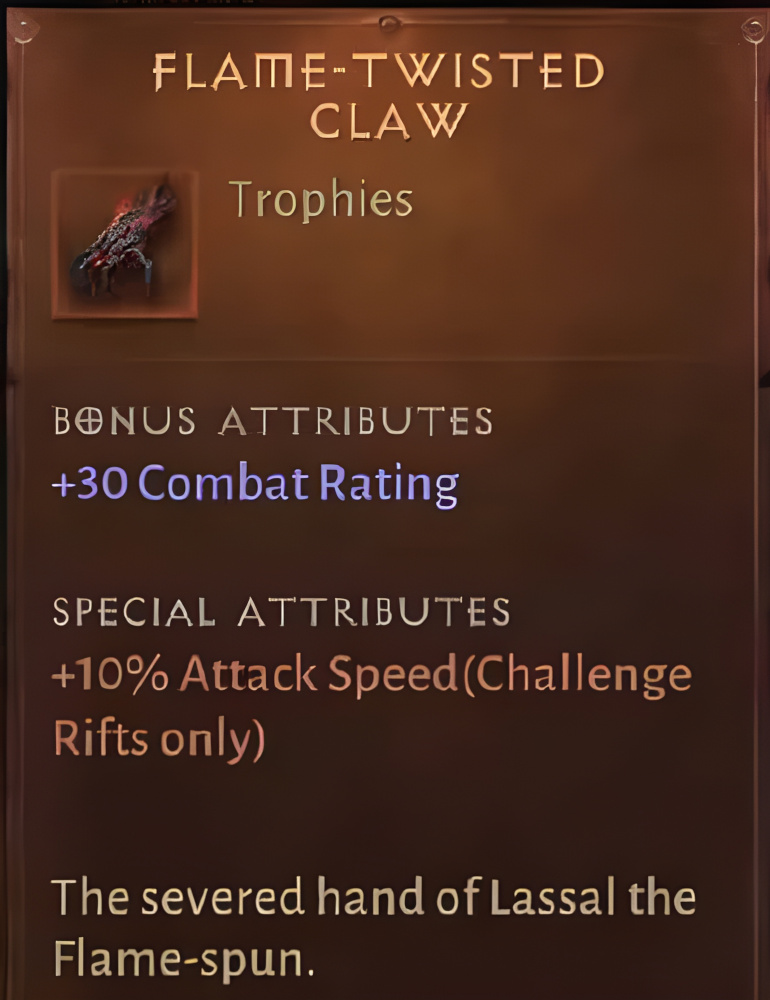
The reward from Lassal The Flame-spun is the
![]() Flame-Twisted Claw. When inserted in your Helliquary, this
item increases Combat Rating by 30 and Attack Speed by 10% (the latter is only
applicable when doing Challenge Rifts).
Flame-Twisted Claw. When inserted in your Helliquary, this
item increases Combat Rating by 30 and Attack Speed by 10% (the latter is only
applicable when doing Challenge Rifts).
Changelog
- 24 Jun. 2022: Guide added.
This build is presented to you by Deadset, one of the very few professional Diablo 3 players. Deadset regularly publishes video guides on Youtube and streams on Twitch, where you can see how this and other builds play out in practice.
- Diablo Immortal x WoW Crossover Event: Frostmourne in Sanctuary!
- Icy Veins Seeking Writers for Zenless Zone Zero: Apply Today!
- Icy Veins Launches Genshin Impact Guides Section
- Icy Veins Podcast About Path of Exile
- ARPG Vault Discord Giveaway
- Diablo Immortal Destruction's Wake Update Notes: June 13th
- Icy Veins is Getting a New Look
- Diablo Immortal: Age of Falling Towers Content Update Notes