
Apocalyptic Shadow Guide and Rewards in Honkai: Star Rail
Apocalyptic Shadow is one of the permanent Endgame modes in Honkai: Star Rail. Here is a complete guide on how it works, how to beat the bosses of the latest version, recommended teams, and the rewards you can obtain.
Apocalyptic Shadow Guide - Honkai: Star Rail Version 4.0 - 4.1

The current Apocalyptic Shadow Phase is the Militant Lupine of the Version 4.0 Treasures Lightward series. This phase will last from March 16, 2026 in Version 4.0 until April 27, 2026 in Version 4.1. Each phase lasts about six weeks, and will reset on a Monday at 04:00 server time.

Honkai: Star Rail Endgame Reset Calendar
How to Unlock Apocalyptic Shadow?
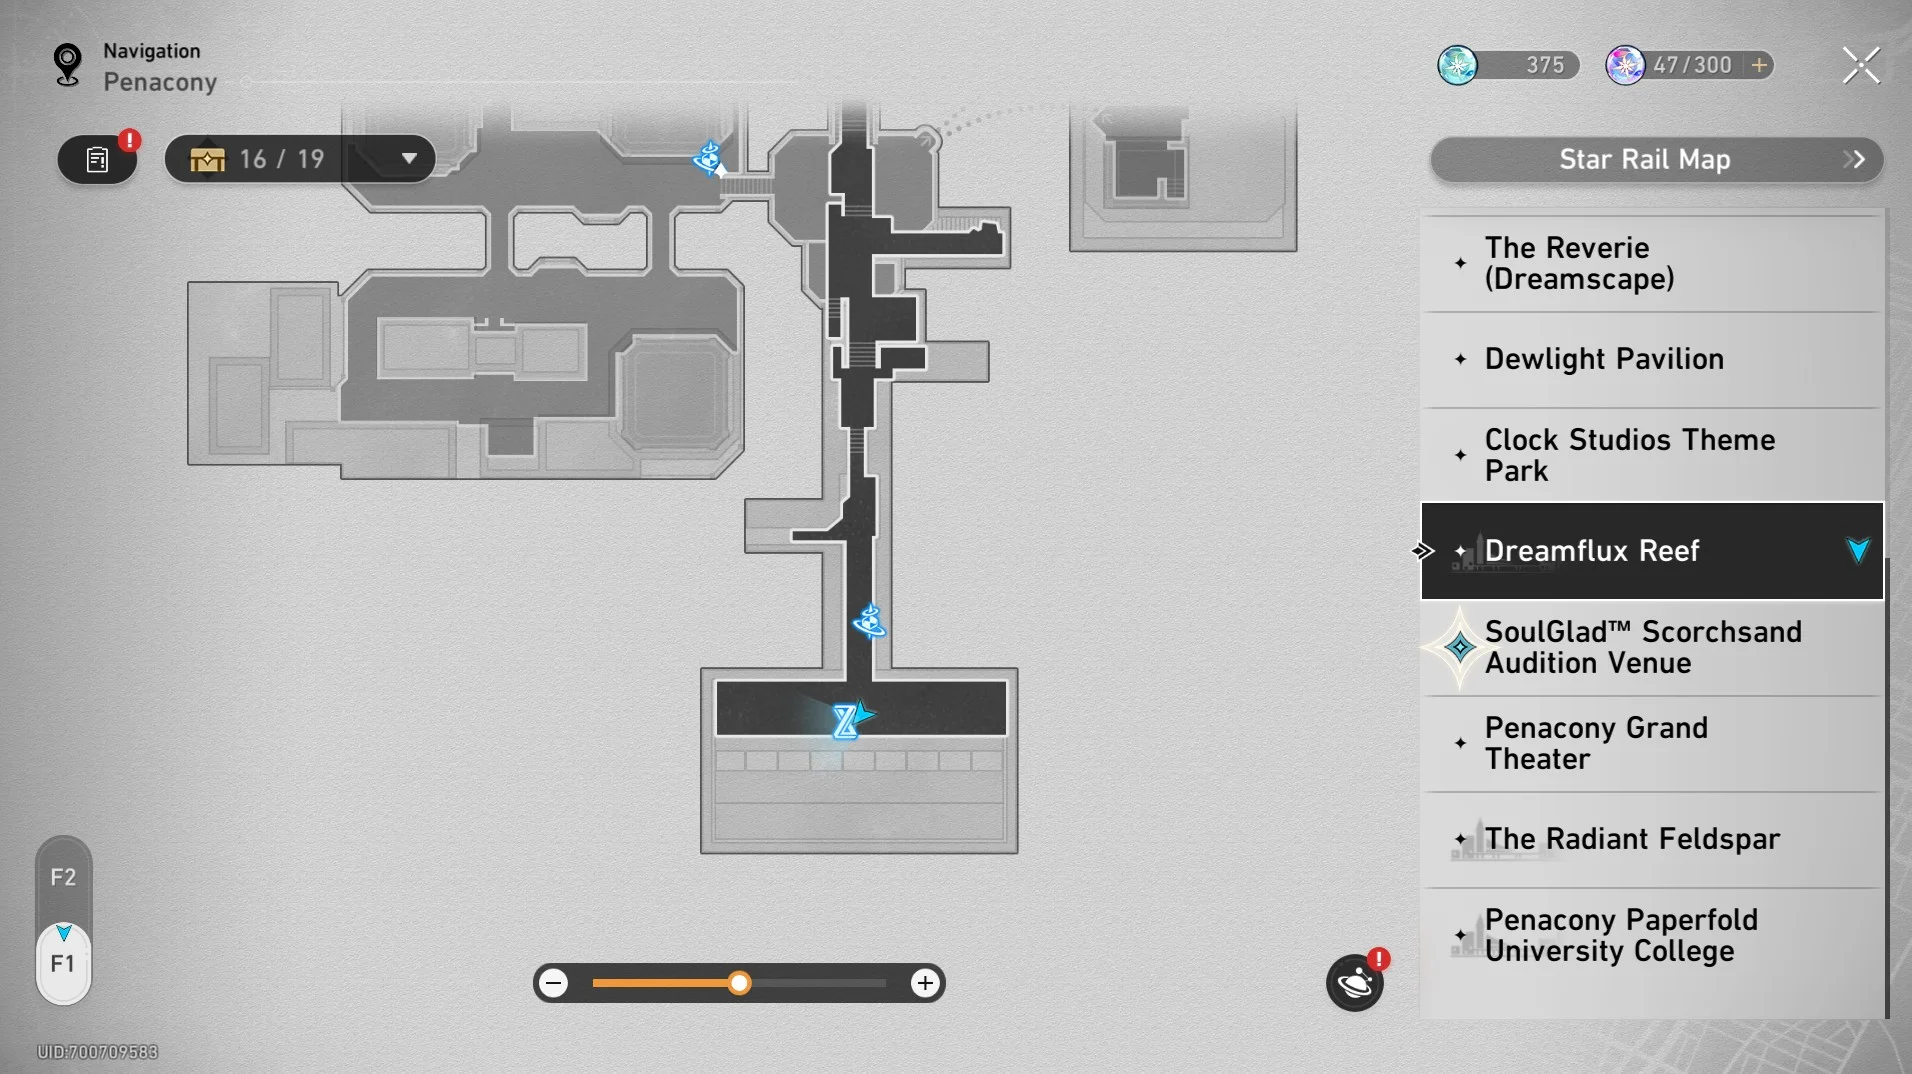
In order to unlock Apocalyptic Shadow, you need to reach Penacony and complete the Grim Film of Finality in Dreamflux Reef. The very first stage will be accessible once you talked to Elegy.

Apocalyptic Shadow is located in Dreamflux Reef in Penacony:
About Apocalyptic Shadow
Apocalyptic Shadow is one of the available endgame modes in Honkai: Star Rail where you face off against 2 different bosses featuring new combat mechanics.
Apocalyptic Shadow can be a relatively challenging mode if you come unprepared. You will need two fully leveled and properly equipped teams as you will have to beat two different bosses.
The two bosses you have to face are essentially projections of the Finality: it's bosses you already encountered during previous quests. However, this time they function differently than their normal version: they are stronger, more tanky, and come with different attacks and mechanics. The amount of new mechanics depends on the stage/difficulty level of the current fight.
When you enter the main menu, you can view the current Phase, the remaining time for the active phase, and the two current bosses you need to face.
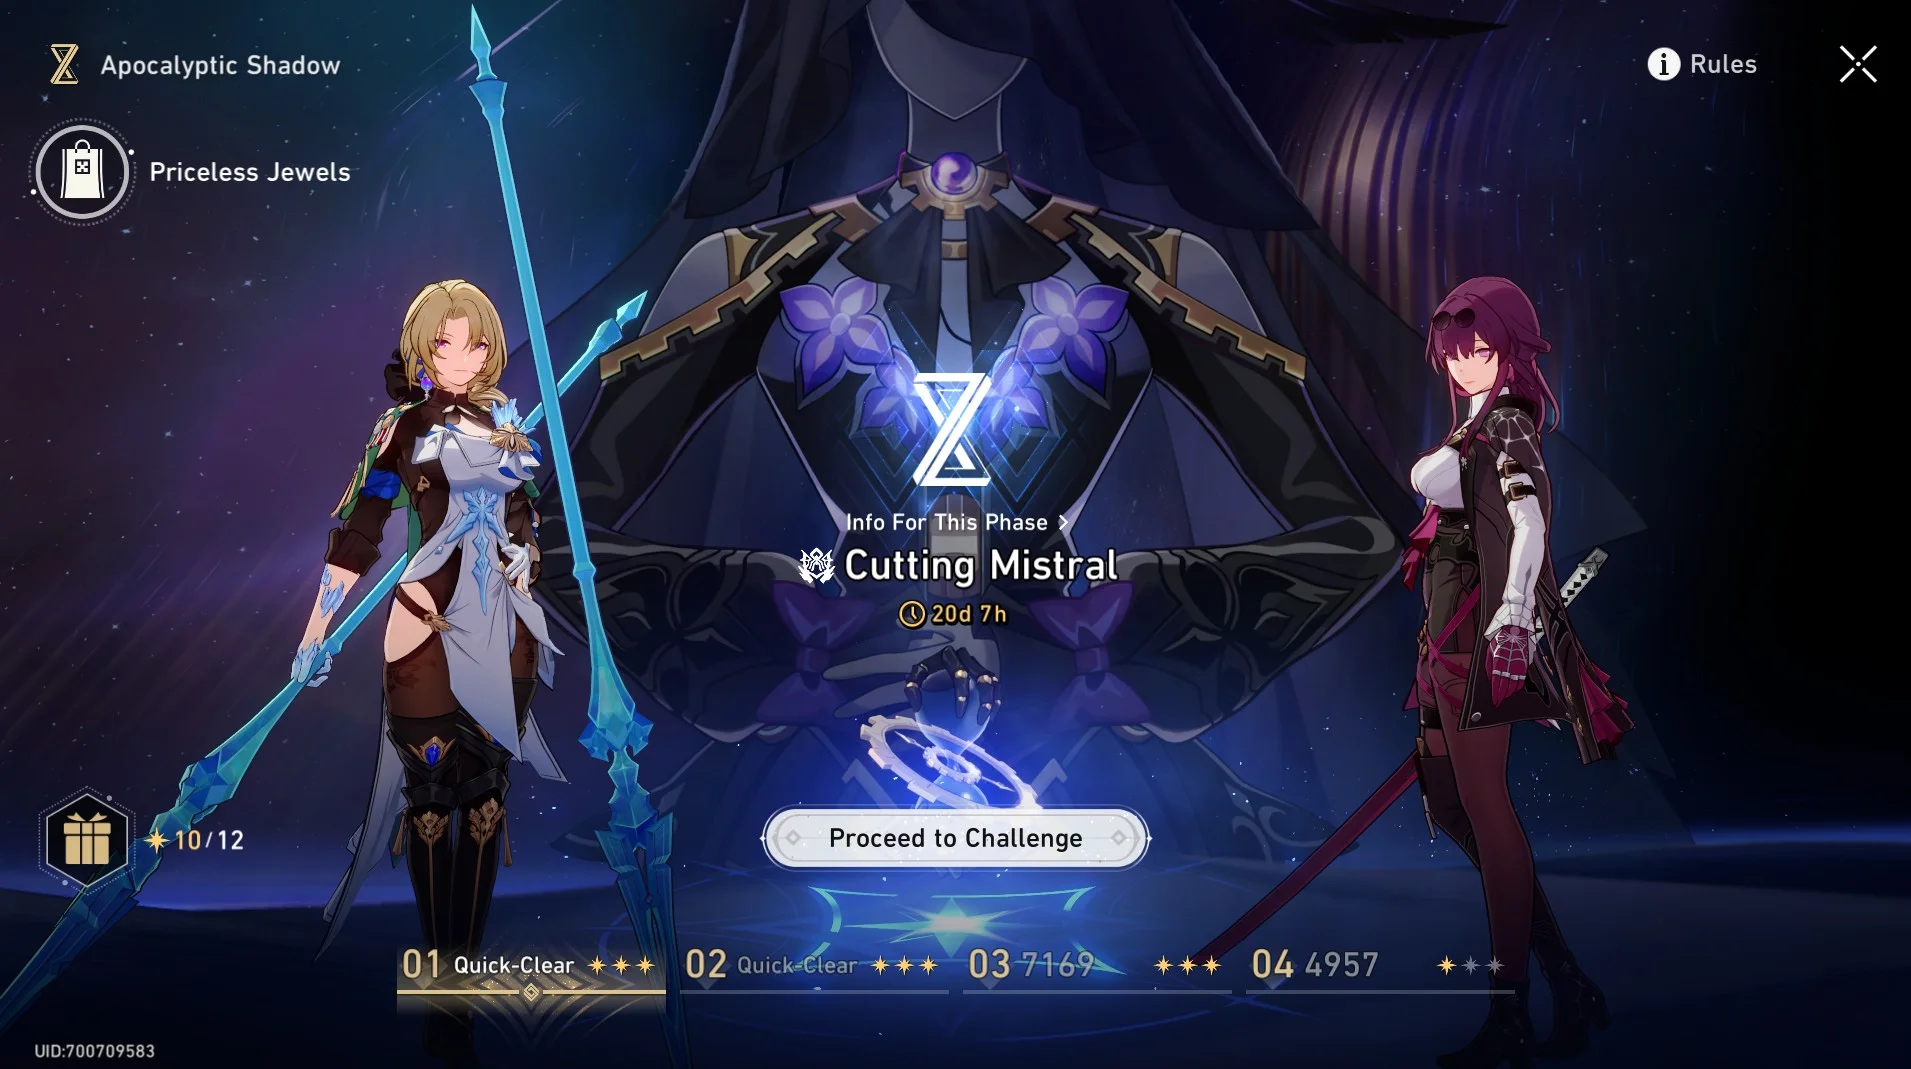
Each Apocalyptic Shadow Phase has a total of 4 stages you need to complete. Each stage ramps up in difficulty. Defeating the two bosses of a difficulty will unlock the next one. The difficulty is not set by Equilibrium Level. It's fixed difficulties for each challenge.
Apocalyptic Shadow also has specific rules:
- Ruinous Embers - Each Phase has a different Ruinous Embers which are specific effects taking place during the battles.
- Finality's Axiom - Those are three different buffs that are available for each Phase. When you pick your team for a boss, you can choose which buff you want active. Pick wisely depending on your team's strength and the available buffs.
- Boss Trait - Each boss will have specific additional abilities or effects compared to their normal version. As you go up in difficulty, they also gain more traits.
Apocalyptic Shadow Score System
Apocalyptic Shadow works with a value timer. Every time allies or enemies take action, the corresponding values is deducted from the timer. Your goal is to defeat the boss before the value timer is depleted if you want to get the most points. The points you get at the end of a battle depends on the percentage of HP left on the boss, and the remaining Action Value after successfully defeating the boss.
This means that the less HP the boss has left, and the faster you defeat him, the more points you will get at the end of the fight.
If you want the max rewards for a stage you need to reach a total of 60,000 points at the end.
If you don't defeat the Boss, you get less points. You can rechallenge each boss as many times as you want in order to try and get a better score. Just know that once your team is used, it is recorded for that stage. If you want to swap the team for any of the two bosses of one difficulty, you will have to reset both bosses of that same difficulty. Otherwise you have to retry with the same team and same equipment on both bosses.
When a new Phase starts, everything resets. However, if you complete with 3-stars each challenges, you can directly challenge the higher difficulties which will then automatically unlock the rewards for the previous ones if you manage to complete it with 3-stars again.
Current Phase Breakdown - Version 4.0
The Current Phase is called Militant Lupine and the two bosses you have to face are The Ravaged Unconquerable and Hellcharred Shadow General.
Bosses, Mechanics, and Recommended Teams
Here is a breakdown of both bosses, as well as recommended teams and best tips to get the maximum points!

The Ravaged Unconquerable
The first boss you can face is the The Ravaged Unconquerable, also know as Nikador, the Titan of Strife.
Boss Traits
| Boss Trait | Description |
|---|---|
| Steadfast Safeguard | Boss Mirage takes 50% less DMG. After Weakness is broken and action gets additionally delayed, additionally increases DMG taken by 100%. |
| Ironclad Renitence | Boss Mirage and its summons have "War Armor", reducing DMG taken by them. In phase two, "War Armor" will be enhanced to "Centirefined War Armor", greatly increasing the maximum stack limit, and Boss Mirage will gain additional Toughness Protection. |
| Taint of the Sublime (Difficulty 3+) | In Phase 2, the max stack of Boss Mirage's "Centirefined War Armor" will increase. |
| Protective Formation (Difficulty 4) | For every unit on the enemy's side of the field aside from Boss Mirage, all enemies receive less DMG and deal more DMG. |
Special Mechanics Tips
Always prioritize breaking war armor and defeating summons. Destroying War Armor will increase the amount of damage the boss takes and restore some ultimate energy to the party. Use this to your advantage to deal damage while the bosses's War Armor is down. Make sure to defeat the summons, as they will make your team more suspectible to attacks and reduce the amount of damage the boss takes.
Ruinous Embers
The current Ruinous Embers effect is:
Word Shatter - When allies use their Ultimate to attack an enemy target, inflicts the target with Shatter, stacking up to 6 time(s). At the start of the target's turn or when the target is defeated, deals a set amount of DMG to the target and adjacent targets based on the number of Shatter stacks.
Finality's Axiom
The current Finality's Axiom are:
- Oppose With Tenderness - All allies' Elation DMG ignores 15% of enemy target's All-Type RES. When an enemy target's "War Armor" or "Centirefined War Armor" are broken, gains 3 Punchline points.
- Montane Gush - After an ally target uses their Ultimate, the CRIT DMG dealt by their Skill increases by 50% for 2 turn(s).
- Moment of Opportunity - Increases Follow-Up ATK and Ultimate DMG dealt by all allies by 50%, and additionally increases by 50% against enemy targets in Weakness Broken state.
Recommended Teams
| Finality's Axiom | DPS | Sub-DPS/Support/ | Support | Sustain |
|---|---|---|---|---|
| Oppose With Tenderness | Sparxie | Yao Guang | Sparkle | Dan Heng • Permansor Terrae |
| Moment of Opportunity | Castorice | Evernight | Cyrene | Hyacine |
| Montane Gush | Phainon | Sunday | Cerydra | Dan Heng • Permansor Terrae |
| Montane Gush | The Herta | Anaxa | Tribbie | Dan Heng • Permansor Terrae |
| Moment of Opportunity | Evernight | Cyrene | Remembrance Trailblazer | Hyacine |
| Moment of Opportunity | Acheron | Jiaoqiu | Cipher | Hyacine |
| Oppose With Tenderness | Archer | Sparkle | Yao Guang | Dan Heng • Permansor Terrae |

Hellcharred Shadow General
The second boss you can face is the Hellcharred Shadow General, also known as Feixiao:
- Recommended Elements: Physical, Fire, Lightning, Wind.
- Resistances: Ice, Quantum, Imaginary.
- This boss also resists Control Effects.
Boss Traits
| Boss Trait | Description |
|---|---|
| Steadfast Safeguard | Boss Mirage takes 50% less DMG. After its Weakness is broken, its action is additionally delayed and the DMG it receives increases by 100%. |
| Steelbone Summit | Parts take 50% less DMG. After Boss Mirage's Weakness is broken, the DMG they receive increases by 100%. |
| Sickleclawed Sawteeth (Difficulty 3+) | Boss Mirage's Toughness increases by 40. |
| Beastly Rage (Difficulty 4+) | The duration of "Malediction" state increases by 1 turn(s). |
Special Mechanics
The Boss Mirage will use "Soul-Shattering Malediction" to inflict the "Malediction" effect on allies. When "Soul-Shattering Malediction" is used, prioritize selecting non-DMG dealing ally characters as the target of the ability. Prioritize using "Bloodstained Lupine's" Skill to reduce the enemy target's Toughness. When all allies' HP are low, prioritize using "Bloodstained Lupine's" Basic ATK to quickly restore HP for allies. When "Bloodstained Lupine" uses Basic ATK or Skill, gains 1 stack of "Bloodthirst." When "Bloodthirst" stacks are maxed, dispels the "Malediction" effect. Causing Boss Mirage to enter the Weakness Broken state also dispels the "Malediction" effect.
Ruinous Embers
The current Ruinous Embers effect is:
Word Shatter - When allies use their Ultimate to attack an enemy target, inflicts the target with Shatter, stacking up to 6 time(s). At the start of the target's turn or when the target is defeated, deals a set amount of DMG to the target and adjacent targets based on the number of Shatter stacks.
Finality's Axiom
The current Finality's Axiom are:
- Collapse on Sight - Increases all enemies' Break DMG taken by 10%. After Breaking an enemy's Weakness, increases all allies' SPD by 15% for 2 turn(s).
- Essence of Gold - Increases all allies' CRIT DMG by 30%. Additionally increases the CRIT DMG by 30% for the 1st character in the team lineup and their memosprite.
- Devastating Heartbreak - Increases DoT dealt to enemy targets in the Weakness Broken state by 30%.
Recommended Teams
| Finality's Axiom | DPS | Sub-DPS/Support | Support | Sustain |
|---|---|---|---|---|
| Collapse on Sight | Firefly | The Dahlia | Fugue | Lingsha |
| Collapse on Sight | Boothill | The Dahlia | Fugue | Lingsha |
| Essence of Gold | Aglaea | Cyrene | Sunday | Huohuo |
| Devastating Heartbreak | Black Swan | Hysilens | Kafka | Dan Heng • Permansor Terrae |
| Essence of Gold | Castorice | Evernight | Cyrene | Hyacine |
| Essence of Gold | Sparxie | Yao Guang | Sparkle | Dan Heng • Permansor Terrae |
Apocalyptic Shadow Rewards
Each time the Apocalyptic Shadow resets, you will be able to obtain the following rewards. These are split into Kalpa's Gift and Finale's Gift with Kalpa's Gift being for each Star obtained and Finale's Gift being for each stage cleared.
Kalpa's Gift
| Number of Stars Obtained | Rewards |
|---|---|
| 1 Star | 60 Stellar Jade + 20,000 Credits |
| 2 Stars | 60 Stellar Jade + 20,000 Credits |
| 3 Stars | 60 Stellar Jade + 20,000 Credits |
| 4 Stars | 60 Stellar Jade + 20,000 Credits |
| 5 Stars | 60 Stellar Jade + 20,000 Credits |
| 6 Stars | 60 Stellar Jade + 20,000 Credits |
| 7 Stars | 60 Stellar Jade + 100 Jade Feather + 20,000 Credits |
| 8 Stars | 60 Stellar Jade + 100 Jade Feather + 20,000 Credits |
| 9 Stars | 80 Stellar Jade + 100 Jade Feather + 20,000 Credits |
| 10 Stars | 80 Stellar Jade + 100 Jade Feather + 20,000 Credits |
| 11 Stars | 80 Stellar Jade + 100 Jade Feather + 20,000 Credits |
| 12 Stars | 80 Stellar Jade + 100 Jade Feather + 20,000 Credits |
Finale's Gift
| Difficulty | Rewards |
|---|---|
| Difficulty 1 | 24 Lucent Afterglow + 6 Traveler's Guide + 3 Refined Aether + 6 Lost Crystal + 30,000 Credits |
| Difficulty 2 | 24 Lucent Afterglow + 6 Traveler's Guide + 3 Refined Aether + 6 Lost Crystal + 30,000 Credits |
| Difficulty 3 | 24 Lucent Afterglow + 6 Traveler's Guide + 3 Refined Aether + 6 Lost Crystal + 30,000 Credits |
| Difficulty 4 | 24 Lucent Afterglow + 6 Traveler's Guide + 3 Refined Aether + 6 Lost Crystal + 30,000 Credits |
Free Character from Apocalyptic Shadow
Clearing Difficulty 2 of Apocalyptic Shadow for the very first time will allow you to claim Xueyi for free! On top of that you will also obtain 300 Stellar Jade and 1 Self-Modeling Resin.

For more information on the other free characters, you can check out our dedicated guide:
Changelog
- 14 Mar. 2026: Updated for Version 4.0 Treasures Lightward.
- 30 Jan. 2026: Updated for Version 3.8 Treasures Lightward.
- 22 Dec. 2025: Updated for 3.8.
- 10 Nov. 2025: Updated for 3.7.
- 29 Sep. 2025: Updated for 3.6.
- 18 Aug. 2025: Updated for 3.5.
- 07 Jul. 2025: Updated for 3.4.
- 17 Jun. 2025: Guide created.