Sha of Fear Encounter Guide: Strategy, Abilities, Loot
The Sha of Fear is the final boss of Terrace of Endless Spring, and is a dramatic showdown against one of Pandaria’s greatest threats. The fight features high movement, coordination, and phases that split the raid between the Main Platform and smaller Side Platforms, where select players will face off against a ghost of Pandaren history.
Role-Specific Tips for Sha of Fear
DPS Tips
- Move behind the Terror Spawns to damage them, as they are immune to all attacks made from the front.
- Finish off the Terrace Guardian, if you are transported to a Side Platform, as quickly as possible to rejoin the rest of the raid.
- On Heroic difficulty, save all major cooldowns for the very start of Phase 2; if done properly, your cooldowns will reset and you can use them twice, back-to-back.
- During Phase 2 try to cleave the Dread Spawn adds as much as possible, without losing damage on Sha of Fear.
Healer Tips
- Be mindful of
 Thrash (and
  Dread Thrash)
cooldowns, as tanks will be chunked when these go out; use a cooldown if needed.
Dread Thrash)
cooldowns, as tanks will be chunked when these go out; use a cooldown if needed. - If you are transported to a Side Platform, you are the only healer there; keep the group alive!
- In Phase 2 the raids damage taken will increase the longer the fight lasts;
coordinate defensive cooldowns for each of the
 Huddle in Terrors
after the first 2-3 minutes in this Phase.
Huddle in Terrors
after the first 2-3 minutes in this Phase. - Tanks will be frequently swapping during Phase 2 for
 Naked and Afraid,
and to rotate defensive cooldowns; make sure you are aware of who is going to be
tanking soon and be prepared to swap healing over to them when needed.
Naked and Afraid,
and to rotate defensive cooldowns; make sure you are aware of who is going to be
tanking soon and be prepared to swap healing over to them when needed.
Tank Tips
- Whoever is standing inside the Golden Circle in front of Sha of Fear will be tanking due to the fixate; all tanks should stand in the circle and perform a full taunt rotation, allowing all tanks to be in the top threat positions.
- Use a defensive cooldown to survive each Thrash; a major
defensive cooldown is needed for Dread Thrash on Heroic mode.
- You will be soaking the majority of the
 Sha Globes on the Side Platforms
when facing a Terrace Guardian.
Sha Globes on the Side Platforms
when facing a Terrace Guardian.  Implacable Strike is currently bugged and will follow the tank it
initially targeted (the visual will not follow, but the damage cone will); this
must be tanked by standing still and using a major defensive.
Implacable Strike is currently bugged and will follow the tank it
initially targeted (the visual will not follow, but the damage cone will); this
must be tanked by standing still and using a major defensive.- Try to position Sha of Fear in a way during Phase 2 that he can be easily cleaved along with the Dread Spawns.
Strategy for Sha of Fear
 The Sha of Fear is one of the most difficult fights in all of Tier 14, if
not the most difficult. On 25-man raids will need to bring 3 tanks (its possible
to bring 2 if DPS is high enough on Normal mode), as an additional tank is required for adds.
Normal difficulty sees only 1 Phase for the entire
encounter, with Heroic difficulty gaining an entirely new Phase 2, completely
changing the encounter. We will first discuss Normal difficulty (which is the
Phase 1 of Heroic), and go over Heroic modes Phase 2 afterwards.
The Sha of Fear is one of the most difficult fights in all of Tier 14, if
not the most difficult. On 25-man raids will need to bring 3 tanks (its possible
to bring 2 if DPS is high enough on Normal mode), as an additional tank is required for adds.
Normal difficulty sees only 1 Phase for the entire
encounter, with Heroic difficulty gaining an entirely new Phase 2, completely
changing the encounter. We will first discuss Normal difficulty (which is the
Phase 1 of Heroic), and go over Heroic modes Phase 2 afterwards.
One tank, who will tank the Sha of Fear himself, will need to stand
in the golden highlighted circle on the ground, indicated by a bright visual.
This tank will stand in this position for the rest of the encounter, as doing
so creates a ![]() Wall of Light being that tank. Players inside the
Wall of Light being that tank. Players inside the
![]() Wall of Light take 10% less damage from all sources and
are immune to
Wall of Light take 10% less damage from all sources and
are immune to ![]() Breath of Fear, the Sha of Fears deadliest
attack (more on this shortly).
Breath of Fear, the Sha of Fears deadliest
attack (more on this shortly).
The Sha of Fear will use ![]() Reaching Attack if no player is
in melee range, dealing damage to the entire raid every second, quickly causing
a wipe. This should not be an issue as a tank should always be standing in
position to create the
Reaching Attack if no player is
in melee range, dealing damage to the entire raid every second, quickly causing
a wipe. This should not be an issue as a tank should always be standing in
position to create the ![]() Wall of Light, causing Sha of Fear to
fixate on them; if no one is inside the circle, he will chain-cast
Wall of Light, causing Sha of Fear to
fixate on them; if no one is inside the circle, he will chain-cast ![]() Reaching Attack
and wipe the raid.
Reaching Attack
and wipe the raid.
Phase 1 - Main Platform
 We'll start off by quickly getting into position, with the tank creating the
![]() Wall of Light and staying in melee range to prevent
Wall of Light and staying in melee range to prevent ![]() Reaching Attacks
from occurring. After every 3 melee attacks, the Sha of Fear will gain the
Reaching Attacks
from occurring. After every 3 melee attacks, the Sha of Fear will gain the
![]() Thrash buff, making his next melee swing attack 2 additional times
(3 attacks total); tanks should be ready with a defensive cooldown for this by
watching the Sha of Fears buffs for
Thrash buff, making his next melee swing attack 2 additional times
(3 attacks total); tanks should be ready with a defensive cooldown for this by
watching the Sha of Fears buffs for ![]() Thrash.
Thrash.
The Sha of Fear has an energy bar, which starts at 0 Energy and fills
up to 30 Energy (approximately every 35-seconds); upon reaching 30 Energy, he will use ![]() Breath of Fear,
killing anyone not inside the
Breath of Fear,
killing anyone not inside the ![]() Wall of Light. It is possible to
survive
Wall of Light. It is possible to
survive ![]() Breath of Fear with a major defensive cooldown such as
Breath of Fear with a major defensive cooldown such as
![]() Dispersion, but this should not be relied on as a tactic as the
Dispersion, but this should not be relied on as a tactic as the
![]() Wall of Light simply prevents all damage taken from
Wall of Light simply prevents all damage taken from ![]() Breath of Fear.
Anyone hit by
Breath of Fear.
Anyone hit by ![]() Breath of Fear will also be feared for 5-seconds
(assuming they survive the initial damage), causing further chaos.
Breath of Fear will also be feared for 5-seconds
(assuming they survive the initial damage), causing further chaos.
Melee DPS should spread 3-yards apart behind Sha of Fear and move into the
![]() Wall of Light whenever
Wall of Light whenever ![]() Breath of Fear will be cast soon.
The Ranged should quickly get inside the
Breath of Fear will be cast soon.
The Ranged should quickly get inside the ![]() Wall of Light and spread
out at least 3-yards apart, as the Sha of Fear will target random players with
Wall of Light and spread
out at least 3-yards apart, as the Sha of Fear will target random players with
![]() Eerie Skull, dealing damage to them and any other players within
2.5-yards. Sha of Fear will use
Eerie Skull, dealing damage to them and any other players within
2.5-yards. Sha of Fear will use ![]() Eerie Skull very often,
dealing high damage to random targets, especially when stacked.
Eerie Skull very often,
dealing high damage to random targets, especially when stacked.
Every 60-seconds Sha of Fear will create 2 Terror Spawn adds,
1 on each side of the ![]() Wall of Light. These Terror Spawns
will stand in place, casting
Wall of Light. These Terror Spawns
will stand in place, casting ![]() Penetrating Bolt on random raid
members, dealing damage in the area and placing a stacking debuff on players hit
that increases Shadow damage taken by 15% per stack. The
Penetrating Bolt on random raid
members, dealing damage in the area and placing a stacking debuff on players hit
that increases Shadow damage taken by 15% per stack. The ![]() Penetrating Bolt
is a projectile that will travel from the Terror Spawn towards the
targeted player, giving players in the area a couple of seconds to move out of
the indicated area (a blue hellfire circle). The Terror Spawns are
similar to the
Penetrating Bolt
is a projectile that will travel from the Terror Spawn towards the
targeted player, giving players in the area a couple of seconds to move out of
the indicated area (a blue hellfire circle). The Terror Spawns are
similar to the ![]() Emperor's Courage adds in Mogu'shan Vaults, in that they
can not be attacked from the front, and can only be damaged by standing behind
the shield they place in front of them. These adds will always spawn facing
towards the
Emperor's Courage adds in Mogu'shan Vaults, in that they
can not be attacked from the front, and can only be damaged by standing behind
the shield they place in front of them. These adds will always spawn facing
towards the ![]() Wall of Light, requiring DPS players to run out of
the wall to damage them.
Wall of Light, requiring DPS players to run out of
the wall to damage them.
You do not want too many Terror Spawns alive at once, as this will
require the raid to be constantly moving to avoid the ![]() Penetrating Bolts.
Instead, DPS players will need to wait for a
Penetrating Bolts.
Instead, DPS players will need to wait for a ![]() Breath of Fear to go
out, then move behind the Terror Spawn to finish it off, quickly moving
back into the
Breath of Fear to go
out, then move behind the Terror Spawn to finish it off, quickly moving
back into the ![]() Wall of Light before the next
Wall of Light before the next ![]() Breath of Fear
cast. Damage-over-time classes excel here, as they can quickly move behind the
Terror Spawn, apply several DoTs, then move back to the
Breath of Fear
cast. Damage-over-time classes excel here, as they can quickly move behind the
Terror Spawn, apply several DoTs, then move back to the ![]() Wall of Light
with plenty of time to spare, allowing the DoTs to finish off the
Terror Spawn. Split your DPS up between the 2 adds, chipping away at
their health between each of the
Wall of Light
with plenty of time to spare, allowing the DoTs to finish off the
Terror Spawn. Split your DPS up between the 2 adds, chipping away at
their health between each of the ![]() Breath of Fear casts, ideally never
having more than 2 adds alive at once.
Breath of Fear casts, ideally never
having more than 2 adds alive at once.
Every 45-seconds on 25-man (and every 90-seconds on 10-man), Sha of Fear
will use his final ability ![]() Ominous Cackle, transporting 5 players
onto one of the 3 Side Platforms; the transported players will always be:
1 tank, 1 healer, 3 DPS. These 5 players will need to fight one of 3
Terrace Guardians, all of which have the same attacks and abilities, which we
will cover in the next section.
Ominous Cackle, transporting 5 players
onto one of the 3 Side Platforms; the transported players will always be:
1 tank, 1 healer, 3 DPS. These 5 players will need to fight one of 3
Terrace Guardians, all of which have the same attacks and abilities, which we
will cover in the next section.
Phase 1 - Side Platforms
 As mentioned above,
 ![]() Ominous Cackle will transport 5 players
(1 tank, 1 healer and 3 DPS) to one of the 3 platforms surrounding the main
platform, where Sha of Fear is. When landing on the platforms players will
face one of three adds: Yang Guoshi, Cheng Kang, or
Jinlun Kun depending on which platform they are transferred to; these
adds all have the exact same behaviour and abilities, and henceforth will be
referred to simply as "Terrace Guardian(s)". These Terrace Guardians will sit on
the middle of the platform and refuse to move; they have a normal aggro table
and must be tanked. This platform is surrounded by many pillars, which we will
need to use as a line-of-sight point in the future.
Ominous Cackle will transport 5 players
(1 tank, 1 healer and 3 DPS) to one of the 3 platforms surrounding the main
platform, where Sha of Fear is. When landing on the platforms players will
face one of three adds: Yang Guoshi, Cheng Kang, or
Jinlun Kun depending on which platform they are transferred to; these
adds all have the exact same behaviour and abilities, and henceforth will be
referred to simply as "Terrace Guardian(s)". These Terrace Guardians will sit on
the middle of the platform and refuse to move; they have a normal aggro table
and must be tanked. This platform is surrounded by many pillars, which we will
need to use as a line-of-sight point in the future.
As the Terrace Guardian is attacked and loses health it will create several
![]() Sha Globes around it; these globes will float around for 8-seconds,
allowing players to "grab" them (by walking into them), taking a small amount of
Shadow damage and restoring primary resource (Rage/Energy/Mana/etc). If the
Sha Globes around it; these globes will float around for 8-seconds,
allowing players to "grab" them (by walking into them), taking a small amount of
Shadow damage and restoring primary resource (Rage/Energy/Mana/etc). If the
![]() Sha Globes are not picked up within 8-seconds, the Terrace Guardian will
absorb the globes, healing it for 8% health for each globe. Make sure to
run over the globes as they spawn, being mindful of your health and avoiding them
if you are low; the tank here can easily soak most of these globes, once they
have threat on the Guardian.
Sha Globes are not picked up within 8-seconds, the Terrace Guardian will
absorb the globes, healing it for 8% health for each globe. Make sure to
run over the globes as they spawn, being mindful of your health and avoiding them
if you are low; the tank here can easily soak most of these globes, once they
have threat on the Guardian.
The main threat that these Terrace Guardians have is ![]() Dread Spray,
which the Guardian will use frequently. The Guardians will shoot a total of
16 shots over an 8-second duration (shooting once every 0.5 seconds) in a
"random" direction, dealing high Shadow damage to players hit in the area.
Players hit twice by
Dread Spray,
which the Guardian will use frequently. The Guardians will shoot a total of
16 shots over an 8-second duration (shooting once every 0.5 seconds) in a
"random" direction, dealing high Shadow damage to players hit in the area.
Players hit twice by ![]() Dread Spray will become feared, which can and
should be dispelled. At first the Terrace Guardians firing patterns may seem to
be random, but they will always follow the exact same pattern on each platform;
this allows us to know the patterns beforehand, allowing us to avoid all 16
shots entirely.
Dread Spray will become feared, which can and
should be dispelled. At first the Terrace Guardians firing patterns may seem to
be random, but they will always follow the exact same pattern on each platform;
this allows us to know the patterns beforehand, allowing us to avoid all 16
shots entirely.
We recommend grabbing an addon or WeakAura for this fight, greatly reducing
the learning curve and allowing your raiders to avoid every shot of
![]() Dread Spray:
Progress T14 WeakAura Pack: Including Dread Shot.
This will simplify the mechanic, allowing raiders to focus on dealing damage to
the Terrace Guardian rather than trying to remember which part of the room is
safe or dangerous.
Dread Spray:
Progress T14 WeakAura Pack: Including Dread Shot.
This will simplify the mechanic, allowing raiders to focus on dealing damage to
the Terrace Guardian rather than trying to remember which part of the room is
safe or dangerous.
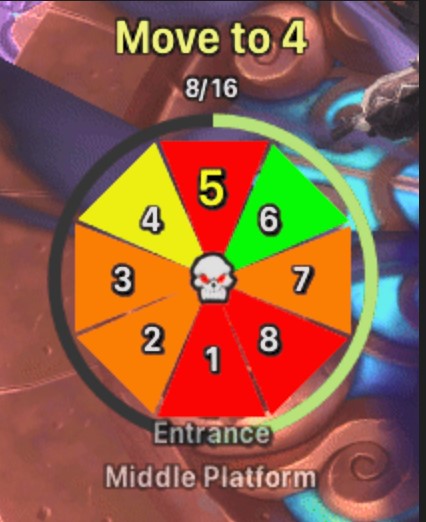
- Red sections will be hit on the next shot;
- Orangesections will be hit in the next 1-2 shots;
- Yellowsections will be hit in the next 3-4 shots;
- Green sections will not be hit again and are safe.
Using this WeakAura, or a similar one, removes the biggest threat from these side platforms; this is especially true on Heroic difficulty, where being hit 2 or 3 times in a row is almost certain death.
 The Terrace Guardians will occasionally use
 ![]() Death Blossom,
dealing very high Physical damage to all players in the Guardians line-of-sight.
Players on the platforms will need to quickly get behind the pillars around the
outsides of the platform, using them to line-of-sight the
Death Blossom,
dealing very high Physical damage to all players in the Guardians line-of-sight.
Players on the platforms will need to quickly get behind the pillars around the
outsides of the platform, using them to line-of-sight the
![]() Death Blossom cast until it completes. The tank may want to stay
in the middle of the room to continue soaking the
Death Blossom cast until it completes. The tank may want to stay
in the middle of the room to continue soaking the ![]() Sha Globes, using a
defensive cooldown to stay alive.
Sha Globes, using a
defensive cooldown to stay alive.
Once the Terrace Guardian has been defeated, a golden light will appear next
to him that can be clicked (named Return to the Terrace). Clicking this
light will transport the player back onto the main platform (where Sha of Fear
is), and buff the players with ![]() Fearless for 30-seconds. This
buff grants: increased damage, healing, and movement speed for the duration, as
well as immunity to
Fearless for 30-seconds. This
buff grants: increased damage, healing, and movement speed for the duration, as
well as immunity to ![]() Breath of Fear (both the damage and fear
component). This allows players to get back onto the Main Platform right away,
not needing to wait for the next
Breath of Fear (both the damage and fear
component). This allows players to get back onto the Main Platform right away,
not needing to wait for the next ![]() Breath of Fear to go off; players
with this buff should utilize the increased movement speed and prioritize killing
any Terror Spawns that remain up. Afterwards, return to the
Breath of Fear to go off; players
with this buff should utilize the increased movement speed and prioritize killing
any Terror Spawns that remain up. Afterwards, return to the ![]() Wall of Light
before the
Wall of Light
before the ![]() Fearless buff expires, and you become vulnerable to
Fearless buff expires, and you become vulnerable to
![]() Breath of Fear once again.
Breath of Fear once again.
For Normal difficulty, the fight will continue repeating these abilities
until either the boss or raid is defeated. With high enough DPS it is possible
to run 2 tanks on Normal mode, as long as each Terrace Guardian will die in
less than 45-seconds, before the next ![]() Ominous Cackle cast. Use
all major DPS cooldowns such as
Ominous Cackle cast. Use
all major DPS cooldowns such as ![]() Bloodlust at the start of combat, as
this fight lasts long enough for a second
Bloodlust at the start of combat, as
this fight lasts long enough for a second ![]() Bloodlust to be used.
Bloodlust to be used.
Heroic Difficulty - Phase 1
The Heroic difficulty of Sha of Fear is broken down into 2 Phases, with Phase 2 being entirely new to the fight. Phase 1 is almost the exact same as Normal mode (described above), and lasts until Sha of Fear reaches 66% health, where Phase 2 will begin. This encounter requires 3-tanks, not being optional as it is on Normal mode.
Differing from Normal mode, we will not be using ![]() Bloodlust and other
major DPS cooldowns on the pull, instead saving them for the start of Phase 2
(more on this below). We will also be ignoring the Terror Spawn adds
entirely, aiming to push Sha of Fear down to 66% before they overwhelm
the raid, as all adds will despawn in this new Phase; this includes any of the
Terrace Guardians that are alive, and the players teleported on the Side Platforms
will be returned to the raid group. With Phase 1 completed with the few minor
changes from Normal mode, we head into Heroic modes Phase 2.
Bloodlust and other
major DPS cooldowns on the pull, instead saving them for the start of Phase 2
(more on this below). We will also be ignoring the Terror Spawn adds
entirely, aiming to push Sha of Fear down to 66% before they overwhelm
the raid, as all adds will despawn in this new Phase; this includes any of the
Terrace Guardians that are alive, and the players teleported on the Side Platforms
will be returned to the raid group. With Phase 1 completed with the few minor
changes from Normal mode, we head into Heroic modes Phase 2.
Heroic Difficulty - Phase 2
Once Sha of Fear reaches 66% the raid will be granted the ![]() Lei's Hope
buff; this buff will last for the rest of the raid ID, meaning it will be up for
all future pulls during both Phase 1 and Phase 2. The Sha of Fear will
teleport to a new area, the Dread Expanse, and teleport the entire raid down
with him; a few seconds after teleporting down, all players will be healed to
full, gain full mana, and have all cooldowns reset. We are aiming to take
advantage of this cooldown reset, using all major DPS cooldowns either right
before Phase 2 starts, or immediately after being teleported to the Dread
Expanse. The goal here is to get 2 back-to-back uses of your major DPS cooldowns,
including
Lei's Hope
buff; this buff will last for the rest of the raid ID, meaning it will be up for
all future pulls during both Phase 1 and Phase 2. The Sha of Fear will
teleport to a new area, the Dread Expanse, and teleport the entire raid down
with him; a few seconds after teleporting down, all players will be healed to
full, gain full mana, and have all cooldowns reset. We are aiming to take
advantage of this cooldown reset, using all major DPS cooldowns either right
before Phase 2 starts, or immediately after being teleported to the Dread
Expanse. The goal here is to get 2 back-to-back uses of your major DPS cooldowns,
including ![]() Bloodlust as all Sated type debuffs will be removed, allowing you
to burn down Sha of Fears massive health pool during this phase.
Bloodlust as all Sated type debuffs will be removed, allowing you
to burn down Sha of Fears massive health pool during this phase.
The tank who was tanking Sha of Fear in Phase 1 and creating the
![]() Wall of Light will become imbued with a "Pure Light", granting them
a buff (
Wall of Light will become imbued with a "Pure Light", granting them
a buff (![]() Champion of the Light) that gives immunity to Fear and Horror
effects, and also reduces all damage taken by 30%; this player will be
rooted in place and unable to move. The player with the Pure Light on them will
also gain an Extra Action Button
Champion of the Light) that gives immunity to Fear and Horror
effects, and also reduces all damage taken by 30%; this player will be
rooted in place and unable to move. The player with the Pure Light on them will
also gain an Extra Action Button ![]() Transfer Light that they can use to
"throw the light" (also commonly called the ball); this works very similarly to
the
Transfer Light that they can use to
"throw the light" (also commonly called the ball); this works very similarly to
the ![]() Tainted Core from the Lady Vashj encounter in Serpentshrine
Cavern. Only 1 player can have the
Tainted Core from the Lady Vashj encounter in Serpentshrine
Cavern. Only 1 player can have the ![]() Champion of the Light buff at a
time, while they are holding the Pure Light.
Champion of the Light buff at a
time, while they are holding the Pure Light.
 The Sha himself gains a few new abilities as well, starting with
![]() Dread Thrash, an improved version of
Dread Thrash, an improved version of ![]() Thrash from
Phase 1;
Thrash from
Phase 1; ![]() Dread Thrash causes Sha of Fear to attack a total
of 6 times at once, making this a very deadly ability that tanks will need to use
a major defensive to survive. Tanks will also need to deal with
Dread Thrash causes Sha of Fear to attack a total
of 6 times at once, making this a very deadly ability that tanks will need to use
a major defensive to survive. Tanks will also need to deal with ![]() Naked and Afraid
every 30-seconds, which completely removes their armor, as well as their
dodge and parry chance for 50-seconds. Tanks will need to rotate whenever one
of the tanks gets this debuff, taunting off of them; with a 30-second cooldown
and a 50-second duration, this is the reason 3 tanks are required for Heroic
mode.
Naked and Afraid
every 30-seconds, which completely removes their armor, as well as their
dodge and parry chance for 50-seconds. Tanks will need to rotate whenever one
of the tanks gets this debuff, taunting off of them; with a 30-second cooldown
and a 50-second duration, this is the reason 3 tanks are required for Heroic
mode.
Sha of Fear will use ![]() Implacable Strike, a
frontal-cone attack that deals heavy Frost damage to anyone in front of the boss
after a 3.5 second cast; this will always be placed on the position of the
current tank. Normally, you would simply move out of this ability before the cast
completes, with DPS players never standing in front of the boss; however,
currently
Implacable Strike, a
frontal-cone attack that deals heavy Frost damage to anyone in front of the boss
after a 3.5 second cast; this will always be placed on the position of the
current tank. Normally, you would simply move out of this ability before the cast
completes, with DPS players never standing in front of the boss; however,
currently ![]() Implacable Strike is bugged. Instead of it being on a fixed
area (where the current tank was standing at the start of the cast),
Implacable Strike is bugged. Instead of it being on a fixed
area (where the current tank was standing at the start of the cast),
![]() Implacable Strike will instead follow the tank, despite the visuals of
the attack animation not moving. This means that if the tank moves out of the
Implacable Strike will instead follow the tank, despite the visuals of
the attack animation not moving. This means that if the tank moves out of the
![]() Implacable Strike, it will follow them (but the visual will not), dealing
damage to anyone around them (killing them). Tanks will need to use a major
defensive cooldown here to survive the roughly 900,000 Frost damage; utilize
the 3 tanks you have by rotating who is tanking based on defensive cooldown
availability.
Implacable Strike, it will follow them (but the visual will not), dealing
damage to anyone around them (killing them). Tanks will need to use a major
defensive cooldown here to survive the roughly 900,000 Frost damage; utilize
the 3 tanks you have by rotating who is tanking based on defensive cooldown
availability.
![]() Waterspout will target several players, spawning a pool of
water under their feet that will activate after 1.5 seconds, dealing high
Frost damage to all players within 2-yards. Be on the lookout for these spawning
under your feet and quickly move away from them, ideally taking no damage at all;
these can be difficult to see, as their visual is a similar color to the floor.
Waterspout will target several players, spawning a pool of
water under their feet that will activate after 1.5 seconds, dealing high
Frost damage to all players within 2-yards. Be on the lookout for these spawning
under your feet and quickly move away from them, ideally taking no damage at all;
these can be difficult to see, as their visual is a similar color to the floor.
![]() Huddle in Terror is cast on random players (5 on 25-man, 3 on
10-man), causing the targets to be feared in place and take high Shadow damage
every second for 12-seconds; this fear can not be dispelled through normal means.
To remove the fear, players will need to be thrown the Pure Light to
gain the
Huddle in Terror is cast on random players (5 on 25-man, 3 on
10-man), causing the targets to be feared in place and take high Shadow damage
every second for 12-seconds; this fear can not be dispelled through normal means.
To remove the fear, players will need to be thrown the Pure Light to
gain the ![]() Champion of the Light buff, which grants immunity to fear;
this will immediately dispel the
Champion of the Light buff, which grants immunity to fear;
this will immediately dispel the ![]() Huddle in Terror debuff, removing
both the fear and the damage-over-time components of the spell.
Huddle in Terror debuff, removing
both the fear and the damage-over-time components of the spell.
We will be handling ![]() Huddle in Terror by utilizing the
Pure Light mechanic, as the
Huddle in Terror by utilizing the
Pure Light mechanic, as the ![]() Champion of the Light buff
grants fear immunity. Quickly throw the Pure Light around to all players
debuffed with
Champion of the Light buff
grants fear immunity. Quickly throw the Pure Light around to all players
debuffed with ![]() Huddle in Terror to break them free; that player will
then need to throw the Pure Light to another player who is feared by
Huddle in Terror to break them free; that player will
then need to throw the Pure Light to another player who is feared by
![]() Huddle in Terror, until all fears are cleared.
Huddle in Terror, until all fears are cleared.
![]() Implacable Strike,
Implacable Strike, ![]() Waterspout, and
Waterspout, and
![]() Huddle in Terror will only be used once in between each
Huddle in Terror will only be used once in between each
![]() Submerge use; they will be used in a random order, making the
fight somewhat unpredictable.
Submerge use; they will be used in a random order, making the
fight somewhat unpredictable.

![]() Submerge is used every 55-seconds and can be monitored by
simply watching Sha of Fears energy bar (similar to
Submerge is used every 55-seconds and can be monitored by
simply watching Sha of Fears energy bar (similar to ![]() Breath of Fear
during Phase 1); when his energy is full, he will
Breath of Fear
during Phase 1); when his energy is full, he will ![]() Submerge.
During
Submerge.
During ![]() Submerge Sha of Fear will become untargetable for
a few seconds before picking an area to
Submerge Sha of Fear will become untargetable for
a few seconds before picking an area to ![]() Emerge from; this area
will be largely visible due to the splashing water. Players remaining in this
indicated area will die to
Emerge from; this area
will be largely visible due to the splashing water. Players remaining in this
indicated area will die to ![]() Emerges damage once the Sha of Fear
breaks through the ground; move away before you die.
Emerges damage once the Sha of Fear
breaks through the ground; move away before you die.
Each time a ![]() Submerge occurs a number of Dread Spawn
adds will spawn. Every other time that
Submerge occurs a number of Dread Spawn
adds will spawn. Every other time that ![]() Submerge is used, an
additional Dread Spawn add will spawn, aside from the first
Submerge is used, an
additional Dread Spawn add will spawn, aside from the first
![]() Submerge. This will look like the following:
Submerge. This will look like the following:
| 1st |
2nd |
3rd |
4th |
5th |
6th |
|---|---|---|---|---|---|
| 1× Dread Spawn | 2× Dread Spawn | 2× Dread Spawn | 3× Dread Spawn | 3× Dread Spawn | 4× Dread Spawn |
The Dread Spawn adds do not have a threat table, but instead will
fixate on whoever is currently holding the Pure Light (with the ![]() Champion of the Light
buff). If they reach this player they will try to cast
Champion of the Light
buff). If they reach this player they will try to cast ![]() Eternal Darkness,
instantly killing the target. To prevent this, players will want to throw the
Pure Light around the raid, forcing the Dread Spawn to continually
chase the Ball around the room. The goal with this is to get the adds to group
up close to each other, allowing them to be AoE'd down, and continue to pass
the Pure Light around the room to kite them.
Eternal Darkness,
instantly killing the target. To prevent this, players will want to throw the
Pure Light around the raid, forcing the Dread Spawn to continually
chase the Ball around the room. The goal with this is to get the adds to group
up close to each other, allowing them to be AoE'd down, and continue to pass
the Pure Light around the room to kite them.
The Dread Spawns will periodically gain stacks of
![]() Gathering Speed, doubling their movement speed for each stack;
all stacks are dropped each time the Pure Light is passed from one player
to another. Their most deadly ability is
Gathering Speed, doubling their movement speed for each stack;
all stacks are dropped each time the Pure Light is passed from one player
to another. Their most deadly ability is ![]() Sha Spine, which every
Dread Spawn will cast each time the Pure Light is passed from one
player to another; this adds a ton of raid-wide damage when there are a bunch of
adds alive.
Sha Spine, which every
Dread Spawn will cast each time the Pure Light is passed from one
player to another; this adds a ton of raid-wide damage when there are a bunch of
adds alive.
Handling the Dread Spawn adds will be the main portion of this Phase,
requiring the raid to cleave damage as needed on the boss and adds. With only 1
Dread Spawn up at first, they can be slowly killed off, with only a few
players assigned to damage them. As more and more spawn, they will require ever
increasing focus from additional DPS players to kill them before the next wave
of adds spawn. Their main threat is ![]() Sha Spine, which each
Dread Spawn will use every time the Pure Light is thrown, causing
massive raid-wide damage when many adds are alive.
Sha Spine, which each
Dread Spawn will use every time the Pure Light is thrown, causing
massive raid-wide damage when many adds are alive.
As mentioned earlier, we will want to break ![]() Huddle in Terrors by
tossing the Pure Light to all players with the debuff; this will cause a large
amount of raid-wide damage to occur thanks to
Huddle in Terrors by
tossing the Pure Light to all players with the debuff; this will cause a large
amount of raid-wide damage to occur thanks to ![]() Sha Spine. Early into
the fight this will not be an issue, as there will typically only be 1-2
Dread Spawns alive, if any. When there are 3-4 Dread Spawns alive,
you will want to use raid-wide defensive cooldowns to keep players alive while
tossing the Pure Light around to break the
Sha Spine. Early into
the fight this will not be an issue, as there will typically only be 1-2
Dread Spawns alive, if any. When there are 3-4 Dread Spawns alive,
you will want to use raid-wide defensive cooldowns to keep players alive while
tossing the Pure Light around to break the ![]() Huddle in Terrors
out; with 4-5 Dread Spawns alive you will want to stop using the
Pure Light to break the
Huddle in Terrors
out; with 4-5 Dread Spawns alive you will want to stop using the
Pure Light to break the ![]() Huddle in Terrors out entirely, as
the raid-wide damage will be too high. Try to keep these players alive through
traditional cooldowns and healing, focusing on dealing as much damage to
Sha of Fear as possible (as this is likely at the very end of the
fight).
Huddle in Terrors out entirely, as
the raid-wide damage will be too high. Try to keep these players alive through
traditional cooldowns and healing, focusing on dealing as much damage to
Sha of Fear as possible (as this is likely at the very end of the
fight).
Towards the end of the fight you will have a ton of Dread Spawns
alive, causing massive raid-wide damage each time you use the
Pure Light, which you need to use to prevent ![]() Eternal Darkness
from killing players. At this point you want to go for "long-distance throws",
trying to throw the Ball between the 2 furthest players away from each other.
This will reduce how often the raid gets bombarded by multiple
Eternal Darkness
from killing players. At this point you want to go for "long-distance throws",
trying to throw the Ball between the 2 furthest players away from each other.
This will reduce how often the raid gets bombarded by multiple
![]() Sha Spines, as the adds will need to travel further than usual to
reach these players. Try to save and use any personal defensive cooldowns
towards the end of the fight, as it will typically come down to a race against
the clock to burn down Sha of Fear before the adds overwhelm your raid.
Sha Spines, as the adds will need to travel further than usual to
reach these players. Try to save and use any personal defensive cooldowns
towards the end of the fight, as it will typically come down to a race against
the clock to burn down Sha of Fear before the adds overwhelm your raid.
Sha of Fear Loot
Below you will find all of the loot available for this boss encounter. Use the different buttons to view the different loot between both Normal and Heroic difficulties.
Celestial Dungeon Loot
| Item |
|---|
Below you will find all of the loot available for this boss encounter. Use the different buttons to view the different loot between both Normal and Heroic difficulties.
Normal Difficulty Loot
| Item |
|---|
Below you will find all of the loot available for this boss encounter. Use the different buttons to view the different loot between both Normal and Heroic difficulties.
Heroic Difficulty Loot
| Item |
|---|
Sha of Fear Achievements
| Achievement | Description |
|---|---|
| Defeat the Sha of Fear in Terrace of Endless Spring on Normal or Heroic difficulty without any raid members being feared by Dread Spray or Breath of Fear. | |
| Defeat the Sha of Fear in Terrace of Endless Spring on Heroic difficulty. | |
| Defeat the Sha of Fear in Terrace of Endless Spring on Heroic difficulty while in a guild group. | |
| Defeat the Sha of Fear in Terrace of Endless Spring on Normal difficulty, before the discovery of the Throne of Thunder. | |
| Defeat the Sha of Fear in Terrace of Endless Spring on Heroic difficulty, before the discovery of the Throne of Thunder. | |
| First guild on the realm to defeat the Sha of Fear in Terrace of Endless Spring on Heroic difficulty while in a guild group. |
Further Reading
Sha of Fear is just one of the four encounters present in the Terrace of Endless Spring raid of Mists of Pandaria. If you would like to learn more about the others, please see our other pages for the raid below.
Changelog
- 25 Aug. 2025: Raid guide created.
This guide has been written by Abide, TBC veteran for nearly a decade. Abide is a Warrior tank and multi-class expert currently playing on Faerlina as Horde. You can find him in the the Icy Veins Discord. You can also see him live on Twitch.
- WoW Classic on a Phone?! This Player Shows It Actually Works
- Blizzard Confirms No Fresh Season of Discovery Servers, Fueling Classic+ Rumors
- XP Blocker Moves: Season of Discovery Hotfixes, June 25th
- Players Think a Leaked Blizzard Timeline Just Revealed Classic+ Release Window
- Mists of Pandaria Classic Hotfixes, June 22nd
- Guardian Mounts and Mog, Sa’bak: WoW Summer Sale, Up To 50% Off on Mounts, Pets, Toys, Transmog!
- Celestial Dungeon Tuning, Garrosh Bonus Roll: Mists of Pandaria Classic Hotfixes, June 17th
- Classic+ Fans, This ‘Camelot’ Datamine Is the Lead You’ve Waited For