Sword and Shield DPS PvE Build for New World
This PvE DPS build is a niche setup that uses the Sword and Shield
offensively. This can be used in groups who are needing the ![]() Leadership
buff, or for players who want to use 6 offensive weapon perks and want an
off-META style of build.
Leadership
buff, or for players who want to use 6 offensive weapon perks and want an
off-META style of build.
Sword and Shield DPS
In PvE combat this is a viable PvE DPS build that can be used in expeditions
when you do not have a tank, or the tank does not have ![]() Leadership.
Leadership.
DPS Sword Build
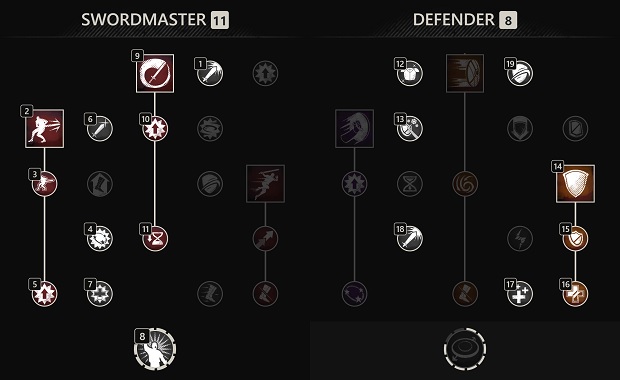
 Upheaval — This is your primary cooldown reduction tool. This should be used only
after your other two abilities are on cooldown. It will also do high damage to your target.
Upheaval — This is your primary cooldown reduction tool. This should be used only
after your other two abilities are on cooldown. It will also do high damage to your target. Whirling Blade — Quick AoE damaging ability that also applies Rend.
 Defender's Resolve — Potent damage reduction tool that should be maintained as
needed.
Defender's Resolve — Potent damage reduction tool that should be maintained as
needed.
Secondary Weapons
Hatchet
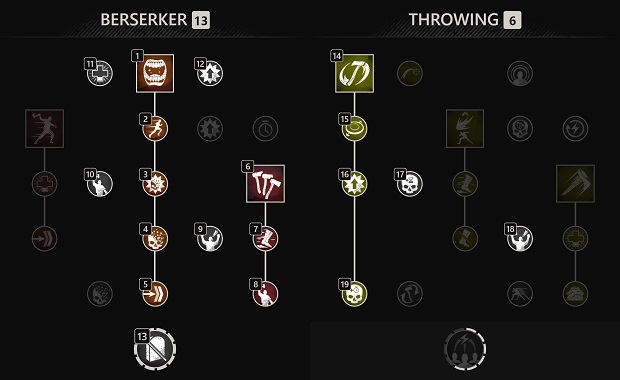
 Berserk — This is your main DPS cooldown. Try to activate this before large burst damage windows.
It will also provide movement speed and self-healing.
Berserk — This is your main DPS cooldown. Try to activate this before large burst damage windows.
It will also provide movement speed and self-healing. Raging Torrent — This will be your only real active weapon ability. It has great single target
damage when used with maximum empower stacks, and does have AoE damage potential as it can hit multiple enemies.
Raging Torrent — This will be your only real active weapon ability. It has great single target
damage when used with maximum empower stacks, and does have AoE damage potential as it can hit multiple enemies. Rending Throw — This is your main source of Rend. It is only able to hit one target at a time, but
it results in increased damage and is great for boss fights.
Rending Throw — This is your main source of Rend. It is only able to hit one target at a time, but
it results in increased damage and is great for boss fights.
War Hammer
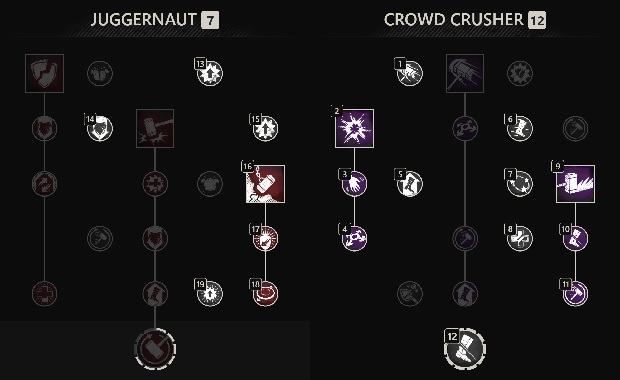
 Wrecking Ball — This is a great tool for defensiveness and crowd-control. When it is used it will
apply a Fortify buff that will help with survivability. Additionally, it has a unexpectedly large AoE knockdown
effect that is essential for starting any kind of crowd-control combo.
Wrecking Ball — This is a great tool for defensiveness and crowd-control. When it is used it will
apply a Fortify buff that will help with survivability. Additionally, it has a unexpectedly large AoE knockdown
effect that is essential for starting any kind of crowd-control combo. Shockwave — This will act as an AoE stun and way to apply Rend.
 Path Of Destiny — This is perfect for free AoE damage and it does stagger, so you can use it to
interrupt enemies and apply a slow.
Path Of Destiny — This is perfect for free AoE damage and it does stagger, so you can use it to
interrupt enemies and apply a slow.
Great Axe
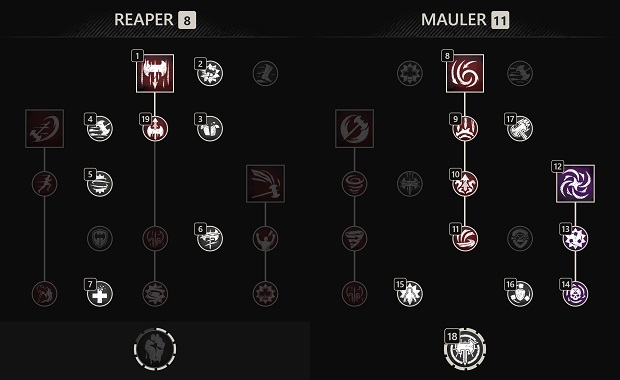
 Reap — This can be used to pull enemies into
  Gravity Well, or be used to start off a
CC combo so that enemies are closer together.
Gravity Well, or be used to start off a
CC combo so that enemies are closer together. Maelstrom — This ability offers single-target and AoE burst. It then deflects all incoming
projectiles, and it pulls enemies within its range. It will also apply a weaken with its perk.
Maelstrom — This ability offers single-target and AoE burst. It then deflects all incoming
projectiles, and it pulls enemies within its range. It will also apply a weaken with its perk.- Gravity Well — This is the best crowd-control ability in New World. It is mostly used
on trash packs so that your group can quickly kill enemies with AoE abilities.
Attributes
In PvE your Constitution should be as low as you are comfortable with. Typically players sit around 100 as a DPS.
You can go fully into Strength to maximize the damage of both weapons if they do not scale with Dexterity. But, if you prefer the Sword and Shield at your primary, play at 300 Strength and the rest into Dexterity.
Gearing
| Slot | Perks | Gem | Weight | Attribute | Source |
|---|---|---|---|---|---|
| Sword |
|
- | Strength | Crafted/BoE | |
| Hatchet** |
|
- | Strength | Crafted/BoE | |
| War Hammer** |
|
- | Strength | Crafted/BoE | |
| Great Axe** |
|
- | Strength | Crafted/BoE | |
| Shield | - | Round | Strength | Crafted/BoE | |
| Helmet |
|
Elemental Damage Reduction Gem (Mutator Specific) | Light | Strength or Constitution | Crafted/BoE |
| Chest |
|
Elemental Damage Reduction Gem (Mutator Specific) | Light | Strength or Constitution | Crafted/BoE |
| Gloves |
|
Elemental Damage Reduction Gem (Mutator Specific) | Light | Strength or Constitution | Crafted/BoE |
| Pants |
|
Elemental Damage Reduction Gem (Mutator Specific) | Light | Strength or Constitution | Crafted/BoE |
| Boots |
|
Elemental Damage Reduction Gem (Mutator Specific) | Light | Strength or Constitution | Crafted/BoE |
| Amulet | Elemental Damage Reduction Gem (Mutator Specific) | - | Strength or Constitution | Crafted/BoE | |
| Ring | Elemental Damage Reduction Gem (Mutator Specific) | - | Strength | Named Drop**** | |
| Earring | Elemental Damage Reduction Gem (Mutator Specific) | - | Strength or Constitution | Crafted/BoE or Named Drop**** |
*: The only ability perk that is needed is for Sword and Shield is ![]() Fortifying Shield Rush.
Your secondary weapon options could result in more perks needed, please reference their respective guides.
If the perk is essential, it is listed as a perk needed on the weapon.
Fortifying Shield Rush.
Your secondary weapon options could result in more perks needed, please reference their respective guides.
If the perk is essential, it is listed as a perk needed on the weapon.
**: Pick whatever secondary weapon your perfer depending on playstyle and the expedition you are running.
***: ![]() Legate's Ring is a best in slot drop from Grave Offerings in Brimstone Sands. You can
pick this up during a chest run, or focus specific locations. It is best because
Legate's Ring is a best in slot drop from Grave Offerings in Brimstone Sands. You can
pick this up during a chest run, or focus specific locations. It is best because ![]() Slash Damage
and
Slash Damage
and ![]() Keen Awareness cannot normally be on an item together. Since you do not need
Keen Awareness cannot normally be on an item together. Since you do not need ![]() Hearty,
this is best.
Hearty,
this is best. ![]() Doom's Chance Earring is a named earring option that works in many builds.
Doom's Chance Earring is a named earring option that works in many builds.
Overall with gearing, this is the ideal loadout of perks for a best in slot build. With that being said, be sure to refer to the Sword Perks guide Perks guide or any of the secondary weapon options below to have a better understanding of other flexible perk options to fit into your build. You can decide what you are most comfortable with.
Gem Optimization
For more specific information on optimizing your gems in PvP and PvE please refer to our dedicated guides.
Heartrune
![]() Brutal Heartrune of Detonate can be a great DPS cooldown on single-target and AoE fights.
Brutal Heartrune of Detonate can be a great DPS cooldown on single-target and AoE fights.
Use ![]() Brutal Heartrune of Grasping Vines to help group enemies together, deal AoE damage, and
apply Rend.
Brutal Heartrune of Grasping Vines to help group enemies together, deal AoE damage, and
apply Rend.
![]() Stalwart Heartrune of Stoneform can be taken as a defensive option.
Stalwart Heartrune of Stoneform can be taken as a defensive option.
Heartrune Usage
Your Heartrune will be used similarly in PvP and PvE scenarios. As such, please refer to our Sword guide or any of the secondary weapon options below for tips on how it can be used most effectively.
Rotation and Priority List
Single Target Boss Rotation
- Use Whirling Blade.
- Use Upheaval from behind.
- Light attack and rotate between these two cooldowns.
- Swap to your secondary weapon if it has burst
cooldown windows, like Berserk.
- Use Defender's Resolve if you need damage reduction.
AoE Trash Rotation
- Use Whirling Blade.
- Swap weapons and use crowd-control or AoE damage abilities.
- Continue light attacking and using all posible AoE abilities.
Gameplay Tips
When using the Sword in PvP and PvE there are many similar aspects that go into gameplay decisions and rotations. To learn more about how you can improve your gameplay, use certain secondary weapons, or additional information on specific abilities, please refer to the Gameplay section of the Sword page any of the secondary weapon options below.
FAQ
For more information on the most frequently asked Sword or Secondary Weapon questions please refer to the FAQ section of the Sword, or secondary weapons below, for answers on PvP and PvE topics!
Changelog
- 25 Nov. 2024: Guide updated for expansion.
- 22 Oct. 2023: Guide updated for expansion.
- 29 Mar. 2023: Updated gear.
- 23 Feb. 2023: Guide added.
Savvvo is a full-blown MMORPG try-hard who overthinks every build, min-maxes every stat, and theorycrafts like his life depends on it. If there’s a meta, he’s dissecting it. If there isn’t, he’s creating one.
You can take a closer look at his guides and content on YouTube.
- AMA Session with New World’s Former Lead World Designer
- New World Aeternum 2026 Roadmap Revealed
- Can New World Be Saved? Offers Are Starting to Pop Up.
- The Last Day of New World: Aeternum
- New World Server Mergers (Again)
- What Else Was Planned for New World: Aeternum?
- Global Storage Search is Now Live in New World: Aeternum
- Daggers Are Officially Live in New World: Aeternum