Bard Job Guide for FFXIV — Dawntrail 7.5
Bard is a physical Ranged DPS job in Final Fantasy XIV that uses their songs and a flurry of arrows to aid their allies in combat, inspiring them to victory. They can only be played at Level 30 or above, after reciving their job stone as an Archer.
What is Bard's Playstyle?
 Bard is a physical ranged DPS job and is Final Fantasy XIV's bow user.
Bard has a priority-based rotation, and the job is heavy on off-global cooldowns
as you cycle through your songs and handle procs.
Bard is a physical ranged DPS job and is Final Fantasy XIV's bow user.
Bard has a priority-based rotation, and the job is heavy on off-global cooldowns
as you cycle through your songs and handle procs.
The centerpiece of the rotation is a big two-minute burst enhanced by their
personal ![]() Raging Strikes buff, in addition to a pair of party buffs -
Raging Strikes buff, in addition to a pair of party buffs -
![]() Battle Voice and
Battle Voice and ![]() Radiant Finale — that give Bard
the strongest group-wide buff package in the game.
Radiant Finale — that give Bard
the strongest group-wide buff package in the game.
Bard mixes its bow skills with a musical motif. They cycle through three
songs - ![]() The Wanderer's Minuet,
The Wanderer's Minuet, ![]() Mage's Ballad, and
Mage's Ballad, and
![]() Army's Paeon - that roll an 80% chance to gain some effect every
three seconds. Bard also has frequent off-global cooldowns on top of these,
in addition to other random procs. This makes Bard both one of the fastest-paced jobs,
and it is also one of the more reactive ones.
Army's Paeon - that roll an 80% chance to gain some effect every
three seconds. Bard also has frequent off-global cooldowns on top of these,
in addition to other random procs. This makes Bard both one of the fastest-paced jobs,
and it is also one of the more reactive ones.
Bard Strengths and Weaknesses
 Strongest party-wide burst buffs in the game.
- Has two unique support skills.
- Most mistakes do not cause rotation problems later.

 Relies on party to maximize buff value.
- Song cycle lacks flexibility.

How do you Unlock Bard?
To unlock Bard, you need to first reach level 30 on Archer and complete the level 30 class quest "The One That Got Away." You also need to complete the level 20 main story quest "Sylph-Management." Once you have done both, talk to Lucianne at the Archer's Guild in New Gridania (x15.4, y11.8) to pick up the quest "A Song of Bards and Bowmen." This quest unlocks Bard.
Bard Gauges
Bard's Song Gauge has three parts - the song-specific gauge, the Soul Gauge beneath it, and your Coda to the right.
The Soul Gauge increases by five any time you get a Repertoire proc, and this is
spent on ![]() Apex Arrow. You can get one Coda from each of your three
main songs when starting it. Coda is spent by using
Apex Arrow. You can get one Coda from each of your three
main songs when starting it. Coda is spent by using ![]() Radiant Finale,
which then enables
Radiant Finale,
which then enables ![]() Radiant Encore.
Radiant Encore.
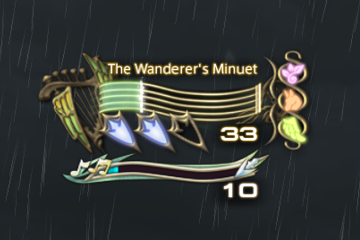
All three song-specific gauges will show the time remaining on the song. Every three seconds - at 42, 39, 36, and so on down to 3 - you get an 80% chance for a Repertoire proc. Repertoire has a different effect depending on the song.
In ![]() The Wanderer's Minuet (above), Repertoire gives you stacks
that are spent on
The Wanderer's Minuet (above), Repertoire gives you stacks
that are spent on ![]() Pitch Perfect, up to three. The song gauge
tracks how many you have.
Pitch Perfect, up to three. The song gauge
tracks how many you have.
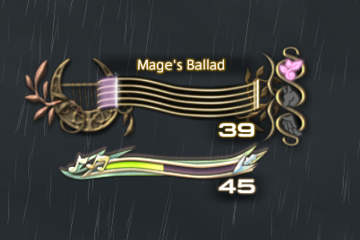
In ![]() Mage's Ballad, the song gauge flashes when you get a
Repertoire proc. Procs reduce the cooldown of
Mage's Ballad, the song gauge flashes when you get a
Repertoire proc. Procs reduce the cooldown of ![]() Heartbreak Shot and
Heartbreak Shot and
![]() Rain of Death.
Rain of Death.
In ![]() Army's Paeon, Repertoire procs give you stacks that are
shown on the gauge, up to four. These are not spent on anything. Instead, they give you
4% increased speed on your weaponskills and auto-attacks.
Army's Paeon, Repertoire procs give you stacks that are
shown on the gauge, up to four. These are not spent on anything. Instead, they give you
4% increased speed on your weaponskills and auto-attacks.
Bard Actions
| Action Name |
|
|
Effect |
|---|---|---|---|
|
|
|
|
Delivers an attack with a potency of 160. Additional Effect: 20% chance of granting Hawk's Eye Duration: 30s |
|
|
|
|
Delivers an attack with a potency of 200. Can only be executed when under the effect of Hawk's Eye or Barrage. |
|
|
|
|
Increases damage dealt by 15%. Duration: 20s |
|
|
|
|
Delivers an attack with a potency of 100. Additional Effect: Venom Potency: 15 Duration: 45s |
|
|
|
|
Delivers an attack with a potency of 130. Maximum Charges: 3 Shares a recast timer with Rain of Death. |
|
|
|
|
Jump 10 yalms away from current target. Cannot be executed while bound. |
|
|
|
|
Delivers an attack with a potency of 110 to all enemies in a cone before you. Additional Effect: 20% chance of granting Hawk's Eye Duration: 30s |
|
|
|
|
Delivers an attack with a potency of 140 to target and all enemies nearby it. Barrage Potency: 220 Can only be executed while under the effect of Hawk's Eye or Barrage. |
|
|
|
|
Grants Mage's Ballad to self and all party members within 50 yalms, increasing damage dealt by 1%. Duration: 45s Additional Effect: 80% chance to grant Repertoire This effect can trigger repeatedly while singing the Mage's Ballad. Repertoire Effect: Reduces the recast time of Heartbreak Shot and Rain of Death by 7.5s Additional Effect: Grants Mage's Coda Can only be executed while in combat. |
|
|
|
|
Deals wind damage with a potency of 60. Additional Effect: Wind damage over time Potency: 20 Duration: 45s |
|
|
|
|
Removes one select detrimental effect from self or target party member. If the target is not enfeebled, a barrier is created nullifying the target's next detrimental effect suffered. Duration: 30s |
|
|
|
|
Grants Barrage, allowing the use of Refulgent Arrow and Shadowbite. Upon execution, Refulgent Arrow will strike the selected target three times, while Shadowbite's potency will be increased to 300. Duration: 10s Additional Effect: Grants Resonant Arrow Ready Duration: 30s |
|
|
|
|
Grants Army's Paeon to self and all party members within 50 yalms, increasing direct hit rate by 3%. Duration: 45s Additional Effect: 80% chance to grant Repertoire This effect can trigger repeatedly while singing the Army's Paeon. Repertoire Effect: Reduces weaponskill cast time and recast time, spell cast time and recast time, and auto-attack delay by 4% Can be stacked up to 4 times. Additional Effect: Grants Army's Coda Can only be executed while in combat. |
|
|
|
|
Delivers an attack with a potency of 100 to target and all enemies nearby it. Maximum Charges: 3 Shares a recast timer with Heartbreak Shot. |
|
|
|
|
Increases direct hit rate of self and all nearby party members by 20%. Duration: 20s |
|
|
|
|
Delivers an attack to the target and all enemies nearby it. Potency varies with number of Repertoire stacks, dealing full damage for the first enemy, and 50% less for all remaining enemies. 1 Repertoire Stack: 100 2 Repertoire Stacks: 220 3 Repertoire Stacks: 360 Can only be executed when the Wanderer's Minuet is active and you have at least one stack of Repertoire. |
|
|
|
|
Grants the Wanderer's Minuet to self and all party members within 50 yalms, increasing critical hit rate by 2%. Duration: 45s Additional Effect: 80% chance to grant Repertoire This effect can trigger repeatedly while singing the Wanderer's Minuet. Repertoire Effect: Allows execution of Pitch Perfect Can be stacked up to 3 times. Additional Effect: Grants Wanderer's Coda Can only be executed while in combat. |
|
|
|
|
Delivers an attack with a potency of 260. Additional Effect: Grants Repertoire while singing Mage's Ballad, Army's Paeon, or the Wanderer's Minuet |
|
|
|
|
Delivers an attack with a potency of 100. Additional Effect: If the target is suffering from a Caustic Bite or Stormbite effect inflicted by you, the effect timer is reset Additional Effect: 35% chance of granting Hawk's Eye Duration: 30s |
|
|
|
|
Delivers an attack with a potency of 400. |
|
|
|
|
Reduces damage taken by self and nearby party members by 15%. Duration: 15s Effect cannot be stacked with machinist's Tactician or dancer's Shield Samba. |
|
|
|
|
Delivers an attack with a potency of 150. Additional Effect: Poison Potency: 20 Duration: 45s Additional Effect: 35% chance of granting Hawk's Eye Duration: 30s |
|
|
|
|
Deals wind damage with a potency of 100. Additional Effect: Wind damage over time Potency: 25 Duration: 45s Additional Effect: 35% chance of granting Hawk's Eye Duration: 30s |
|
|
|
|
Increases HP recovery via healing actions by 15% for self and nearby party members. Duration: 15s |
|
|
|
|
Delivers an attack with a potency of 280. Can only be executed when under the effect of Hawk's Eye or Barrage. |
|
|
|
|
Delivers an attack with a potency of 200 to target and all enemies nearby it. Barrage Potency: 300 Can only be executed when under the effect of Hawk's Eye or Barrage. |
|
|
|
|
Delivers an attack with a potency of 220. Additional Effect: 35% chance of granting Hawk's Eye Duration: 30s |
|
|
|
|
Delivers an attack with a potency of 140 to all enemies in a straight line before you. Soul Voice Gauge Cost: 20 Potency increases up to 700 as Soul Voice Gauge exceeds minimum cost. Additional Effect: Grants Blast Arrow Ready upon execution while Soul Voice Gauge is 80 or higher Duration: 10s Consumes Soul Voice Gauge upon execution. |
|
|
|
|
Delivers an attack with a potency of 140 to all enemies in a cone before you. Additional Effect: 35% chance of granting Hawk's Eye Duration: 30s |
|
|
|
|
Delivers an attack to all enemies in a straight line before you with a potency of 700 for the first enemy, and 50% less for all remaining enemies. Can only be executed while under the effect of Blast Arrow Ready. ※This action cannot be assigned to a hotbar. ※Apex Arrow changes to Blast Arrow when requirements for execution are met. |
|
|
|
|
Increases damage dealt by self and nearby party members. Duration: 20s Effectiveness is determined by the number of different Coda active in the Song Gauge. 1 Coda: 2% 2 Coda: 4% 3 Coda: 6% Additional Effect: Grants Radiant Encore Ready Duration: 30s Can only be executed when at least 1 coda is active. |
|
|
|
|
Delivers an attack with a potency of 180. Maximum Charges: 3 Shares a recast timer with Rain of Death. |
|
|
|
|
Delivers an attack to target and all enemies nearby it with a potency of 640 for the first enemy, and 50% less for all remaining enemies. Can only be executed while under the effect of Resonant Arrow Ready. |
|
|
|
|
Delivers an attack to target and all enemies nearby it. Potency is determined by the number of different Coda consumed in the Radiant Finale executed prior, dealing full damage for the first enemy, and 50% less for all remaining enemies. 1 Coda: 700 2 Coda: 800 3 Coda: 1,100 Can only be executed while under the effect of Radiant Encore Ready. |
Role Actions
| Action Name |
|
|
Effect |
|---|---|---|---|
|
|
|
|
Afflicts target with Heavy +40%. Duration: 10s |
|
|
|
|
Instantly restores own HP. Cure Potency: 800 |
|
|
|
|
Binds target. Duration: 10s Cancels auto-attack upon execution. Target unbound if damage taken. |
|
|
|
|
Increases movement speed of self and nearby party members. Duration: 30s Effect ends when enmity is generated. Has no effect in battle. |
|
|
|
|
Interrupts the use of a target's action. |
|
|
|
|
Nullifies most knockback and draw-in effects. Duration: 6s Additional Effect: When you are struck by a physical attack, the striker will be afflicted with Slow +20% Duration: 15s |
Bard Traits
| Action Name | Acquired | Effect |
|---|---|---|
| Lv. 2 |
Adds to Heavy Shot a 20% chance to grant Hawk's Eye. Duration: 30s |
|
| Lv. 20 |
Increases base action damage by 10%. |
|
| Lv. 25 |
Adds to Quick Nock a 20% chance to grant Hawk's Eye. Duration: 30s |
|
| Lv. 40 |
Increases base action damage by 20%. |
|
| Lv. 64 |
Upgrades Venomous Bite and Windbite to Caustic Bite and Stormbite respectively. |
|
| Lv. 68 |
Guarantees the trigger of the additional effects for current Mage's Ballad, Army's Paeon, and the Wanderer's Minuet when Empyreal Arrow hits a target. |
|
| Lv. 70 |
Upgrades Straight Shot to Refulgent Arrow. |
|
| Lv. 72 |
Upgrades Wide Volley to Shadowbite. |
|
| Lv. 76 |
Adds to Stormbite, Caustic Bite, and Iron Jaws a 35% chance to grant Hawk's Eye. Duration: 30s |
|
| Lv. 76 |
Upgrades Heavy Shot to Burst Shot. |
|
| Lv. 78 |
While under the effect of Army's Paeon with at least one stack of Repertoire, singing Mage's Ballad or the Wanderer's Minuet will grant Army's Muse, reducing weaponskill cast time and recast time, spell cast time and recast time, and auto-attack delay. Duration: 10s Allowing the effect of Army's Paeon and accumulated stacks of Repertoire to expire without singing Mage's Ballad or the Wanderer's Minuet will grant Army's Ethos. Duration: 30s While under the effect of Army's Ethos, singing Mage's Ballad or the Wanderer's Minuet will grant Army's Muse. Both Army's Ethos and Army's Muse require stacks of Repertoire, the number of which will determine the potency of the latter. 1 Repertoire: 1% 2 Repertoire: 2% 3 Repertoire: 4% 4 Repertoire: 12% |
|
| Lv. 80 |
Increases Soul Voice Gauge by 5 each time Repertoire is granted. |
|
| Lv. 82 |
Upgrades Quick Nock to Ladonsbite. |
|
| Lv. 84 |
Allows a third charge of Bloodletter and Rain of Death. |
|
| Lv. 86 |
Grants Blast Arrow Ready upon executing Apex Arrow after the Soul Voice Gauge has reached 80 or higher. Duration: 10s Apex Arrow becomes Blast Arrow while under this effect. |
|
| Lv. 88 |
Reduces Troubadour recast time to 90 seconds. |
|
| Lv. 90 |
Grants Mage's Coda, Army's Coda, or Wanderer's Coda upon singing Mage's Ballad, Army's Paeon, or the Wanderer's Minuet respectively. |
|
| Lv. 92 |
Upgrades Bloodletter to Heartbreak Shot. |
|
| Lv. 94 |
Increases the potency of Empyreal Arrow to 260, Sidewinder to 400, Refulgent Arrow to 280, Burst Shot to 220, and Apex Arrow to 140 up to 700. |
|
| Lv. 94 |
Increases the healing potency of Second Wind to 800. |
|
| Lv. 96 |
Grants Resonant Arrow Ready upon executing Barrage. Duration: 30s |
|
| Lv. 98 |
Improves Troubadour's damage reduction effect to 15%. |
|
| Lv. 100 |
Grants Radiant Encore Ready upon executing Radiant Finale. Duration: 30s |
Bard Lore
The word "bard" ordinarily puts folk in mind of those itinerant minstrels, fair of voice and nimble of finger, who earn their coin performing in taverns and the halls of great lords. Few know, however, that bards in fact trace their origins back to the bowmen of eld, who sang in the heat of battle to fortify the spirits of their companions. In time, their impassioned songs came to hold sway over the hearts of men, inspiring their comrades to great feats and granting peace unto those who lay upon the precipice of death.
Changelog
- 28 Apr. 2026 (keybindings page): Reviewed for Patch 7.5.
- 28 Apr. 2026 (how to improve page): Reviewed for Patch 7.5.
- 28 Apr. 2026 (FAQ page): Reviewed for Patch 7.5.
- 28 Apr. 2026 (rotation page): Reviewed for Patch 7.5.
- 28 Apr. 2026 (Leveling page): Reviewed for Patch 7.5.
- 28 Apr. 2026 (gear page): Reviewed for Patch 7.5.
- 28 Apr. 2026 (job changes): Reviewed for Patch 7.5.
- 28 Apr. 2026 (melding page): Reviewed for Patch 7.5.
- 28 Apr. 2026 (this page): Reviewed for Patch 7.5.
- 17 Dec. 2025 (keybindings page): Reviewed for Patch 7.4.
- 17 Dec. 2025 (how to improve page): Reviewed for Patch 7.4.
- 17 Dec. 2025 (FAQ page): Reviewed for Patch 7.4.
- 17 Dec. 2025 (rotation page): Reviewed for Patch 7.4.
- 17 Dec. 2025 (Leveling page): Reviewed for Patch 7.4.
- 17 Dec. 2025 (gear page): Updated for Patch 7.4.
- 17 Dec. 2025 (job changes): Updated for Patch 7.4.
- 17 Dec. 2025 (melding page): Updated for Patch 7.4.
- 17 Dec. 2025 (this page): Reviewed for Patch 7.4.
- 06 Aug. 2025 (gear page): Updated for Patch 7.3.
- 06 Aug. 2025 (job changes): Updated for Patch 7.3.
- 28 May 2025 (job changes): Minor update for 7.25.
- 31 Mar. 2025 (keybindings page): Updated for 7.2.
- 29 Mar. 2025 (gear page): Updated for Patch 7.21.
- 25 Mar. 2025 (job changes): Minor update for 7.2.
- 30 Jul. 2024 (gear page): Updated for Patch 7.05.
- 22 Jul. 2024 (how to improve page): Updated for Patch 7.01.
- 22 Jul. 2024 (FAQ page): Updated for Patch 7.01.
- 22 Jul. 2024 (rotation page): Updated for Patch 7.01.
- 22 Jul. 2024 (Leveling page): Updated for Patch 7.01.
- 22 Jul. 2024 (gear page): Updated for Patch 7.01.
- 22 Jul. 2024 (job changes): Page updated with early Dawntrail information.
- 22 Jul. 2024 (melding page): Updated for Patch 7.01.
- 22 Jul. 2024 (this page): Updated for Patch 7.01.
- 09 Jun. 2024 (job changes): Page updated with information from the Dawntrail media tour.
- 20 May 2024 (job changes): Page updated with patch history and preliminary Dawntrail information.
- 14 May 2024 (keybindings page): Guide added.
- 30 Jan. 2024 (how to improve page): Reviewed for Patch 6.55.
- 30 Jan. 2024 (FAQ page): Reviewed for Patch 6.55.
- 30 Jan. 2024 (rotation page): Reviewed for Patch 6.55.
- 30 Jan. 2024 (Leveling page): Reviewed for Patch 6.55.
- 30 Jan. 2024 (gear page): Reviewed for Patch 6.55.
- 30 Jan. 2024 (melding page): Reviewed for Patch 6.55.
- 30 Jan. 2024 (this page): Reviewed for Patch 6.55.
- 13 Oct. 2023 (FAQ page): Updated for Patch 6.5.
- 13 Oct. 2023 (gear page): Updated for Patch 6.5.
- 12 Oct. 2023 (how to improve page): Updated for Patch 6.5.
- 12 Oct. 2023 (rotation page): Updated for Patch 6.5.
- 12 Oct. 2023 (Leveling page): Updated for Patch 6.5.
- 12 Oct. 2023 (melding page): Updated for Patch 6.5.
- 12 Oct. 2023 (this page): Updated for Patch 6.5.
- 25 May 2023 (how to improve page): Updated for Patch 6.4.
- 25 May 2023 (FAQ page): Updated for Patch 6.4.
- 25 May 2023 (rotation page): Updated for Patch 6.4.
- 25 May 2023 (Leveling page): Updated for Patch 6.4.
- 25 May 2023 (gear page): Updated for Patch 6.4.
- 25 May 2023 (melding page): Updated for Patch 6.4.
- 25 May 2023 (this page): Updated for Patch 6.4.
- 10 Jan. 2023 (how to improve page): Updated for Patch 6.3.
- 10 Jan. 2023 (FAQ page): Updated for Patch 6.3.
- 10 Jan. 2023 (rotation page): Updated for Patch 6.3.
- 10 Jan. 2023 (Leveling page): Updated for Patch 6.3.
- 10 Jan. 2023 (gear page): Updated for Patch 6.3.
- 10 Jan. 2023 (melding page): Updated for Patch 6.3.
- 10 Jan. 2023 (this page): Updated for Patch 6.3.
- 20 Sep. 2022 (how to improve page): Updated as of Patch 6.2.
- 20 Sep. 2022 (FAQ page): Updated as of Patch 6.2.
- 20 Sep. 2022 (rotation page): Updated as of Patch 6.2.
- 20 Sep. 2022 (Leveling page): Updated as of Patch 6.2.
- 20 Sep. 2022 (gear page): Updated for Patch 6.2.
- 20 Sep. 2022 (melding page): Updated as of Patch 6.2.
- 20 Sep. 2022 (this page): Updated as of Patch 6.2.
- 20 Apr. 2022 (how to improve page): Updated for Patch 6.1.
- 20 Apr. 2022 (FAQ page): Updated for Patch 6.1.
- 20 Apr. 2022 (rotation page): Updated for Patch 6.1.
- 20 Apr. 2022 (gear page): Updated for Patch 6.1.
- 20 Apr. 2022 (melding page): Updated for Patch 6.1.
- 20 Apr. 2022 (this page): Updated for Patch 6.1.
- 27 Mar. 2022 (Leveling page): Guide added.
- 09 Feb. 2022 (rotation page): Guide added.
- 01 Feb. 2022 (how to improve page): Guide added.
- 01 Feb. 2022 (FAQ page): Guide added.
- 01 Feb. 2022 (melding page): Guide added.
- 01 Feb. 2022 (this page): Guide added.
- 19 Dec. 2021 (job changes): Page added.
- 01 Feb. 2021 (gear page): Guide added.
Guides from Other Classes

This guide was written by Cetonis, who has been a Bard theorycrafter and guide contributor since late ARR. He is also part of The Balance as a Bard mentor. All good theorycraft is a group effort, and credit goes out to the Bards of the ranged theorycraft discord for helping to work things out.
- Get Your Switch 2 Before Prices Increase September 1st
- EP8 Now Available — Listen to These Dawntrail Tunes ASAP
- FFXIV Players Can Now Grab Berlin Fan Fest Merch Before It Sells Out
- FFXIV Players: Here’s Every Major Drop Before Evercold Hits
- Evangelion Alliance Raid Announced for FFXIV Evercold in 2027
- FFXIV Launching on Switch 2 But Leaving PS4 — Here’s What You Need to Know
- FFXIV Patch 7.5 Just Kicked Off Dawntrail’s Final Chapter
- Yoshi-P Fanfest Q&A: Glamour Plates, Job Design, and Favorite Scion