Blue Mage Raid Guide for Titan (E4S)
This page provides a guide for Titan, the fourth fight in the Eden raid series. It's intended to be used specifically for Blue Mage. This guide includes strategies catering to the unique party composition, as well as recommended spells.
Introduction
At first glance, the faintly glowing crystal brought back from Eden's core appears to be little more than a pretty bauble. As you gaze deep within, however, you are bombarded with images of your encounters in the Empty-but your adversaries have been twisted into monstrosities far more ferocious than those in your memory. Though you know these to be naught more than illusions, you find yourself compelled to see them through...
General Notes
This is the first fight in the Eden Blue raid series and is the easiest of the three by a pretty substantial margin. Overall it's quite straightforward, but there are a couple of tricky mechanics.
Raid Guide
This guide is written assuming you have all Blue Mage spells, appropriate gear, and know how to play your chosen role.
Video Guide
If you prefer video format, there is a full video guide available below.
Party Setup
For this fight I would recommend having one tank mimic, one healer mimic, and six DPS mimics. This can be solo healed quite easily as the damage is very predictable.
Utility Spells
 Diamondback
 Frog Legs on the off-tank
Phase 1: Titan
Titan's Abilities
- Stonecrusher: Tankbuster with three hits that applies a Physical Vulnerability Up debuff.
- Voice of the Land: Moderate raid-wide AoE damage.
- Weight of the Land: Targets some squares with AoEs.
- Pulse of the Land: Targets players with yellow "spread" markers which detonate on the square where the player is standing.
- Force of the Land: Targets players with orange "stack" markers which detonate on the square where the player is standing.
- Evil Earth: A square Plaincracker-style mechanic. Starts on one square and grows outwards.
- Geocrush: Massive knockback from the center of one square.
- Landslide: Untelegraphed T-shape AoE.
- Bomb Boulder: Explodes after a few seconds causing high AoE damage.
- Crumbling Down: Marks two sets of two players with AoEs that drop large boulders that deal proximity-based AoE damage.
- Seismic Wave: Massive raid-wide AoE damage.
This phase doesn't have a ton going on and most of the mechanics are
pretty simple. I recommend pulling Titan to the south side at the beginning
to make the first mechanic slightly easier to do right after
![]() Moon Flute openers have finished. Titan opens up with
Stonecrusher, which just needs to be mitigated by
Moon Flute openers have finished. Titan opens up with
Stonecrusher, which just needs to be mitigated by
![]() Diamondback. The tank should still be healed during the
hits, as even through Diamondback it hits quite hard.
Diamondback. The tank should still be healed during the
hits, as even through Diamondback it hits quite hard.
After Stonecrusher, Titan uses Weight of the Land. Assign every player their own square in the southern half of the arena. Stand off of the squares being targeted by AoEs, and then move onto your square.
Next up is Evil Earth which will start in two opposite corners on either the outside squares or the inside four squares. The party should start on the outside corners that are not on the diagonal line between the two starting squares. The party will step one square diagonally inwards once it is safe to do so. If the squares started on the inside, this will be after two explosions. If they started on the outside, this will be after three explosions. While this is going on the party will be targeted by Force of the Land, which requires that no one be on a square by themselves. I recommend having the whole party move together for this mechanic, but as long as no one ends up alone it will resolve fine. After this resolves, heal up because Titan casts Voice of the Land right after.
Titan will cast Geocrush and go into one of two mechanics: Car or
Fists. Position yourself so you don't get knocked off the arena and adjust
based on whichever form Titan goes into. This can be resisted with
![]() Surecast. There will be three spread markers and five stack
markers applied to the party for both mechanics, requiring quick
adjustment to resolve the AoEs appropriately.
Surecast. There will be three spread markers and five stack
markers applied to the party for both mechanics, requiring quick
adjustment to resolve the AoEs appropriately.
Titan Car and Titan Fists
For Titan Car, have the orange markers stack on the square next to Titan, with the three yellow markers all on their own square in a straight line from the orange markers. This will take some practice to get consistent, but calling out which spot you're taking can be helpful. Titan will do a charge and knock everyone back to the edge causing an expanding line AoE. After being knocked back, the party will need to step in after the row in front of them explodes. Titan will also target the tank with a line AoE tankbuster that deals more damage the closer the tank is to Titan. Instead of lining up on the side of Titan, the tank can actually stand in the same square and Diamondback. They will not get knocked back and will survive all of the damage, making things a bit easier. Titan will then cast Magnitute 5.0 which is a donut-style AOE while applying spread markers to everyone. Everyone needs to get underneath Titan for the initial cast and then spread to their own square. I recommend assigning everyone a "clock position" relative to Titan for spread positions.
For Titan Fists, do the same line-up for orange/yellow markers but do them in-line with Titan. He will hit all other squares, and then the squares in line with him. After the first explosion, just step outwards. Once this is done, pull Titan back to the center. He will cast Voice of the Land, and then start casting Landslide. He will jump to a cardinal side, so look where he is jumping and run away from the T-shaped AoE created by Landslide. After the initial explosion, step into where the first AoEs were to avoid the follow-up explosion. Titan will then cleave one half of the room and spawn Bomb Boulders in either an X or + shape. There will be a second set of boulders spawned in whichever shape he didn't spawn first. Get on the safe side of the arena first and determine the order of the safe boulders. After the cleave, move to the side that he just cleaved since the other side will now explode, and move onto one of the boulders that spawned in the second set. After the first boulders explode, move into the spot where they just exploded to dodge the explosions from the second set of boulders.
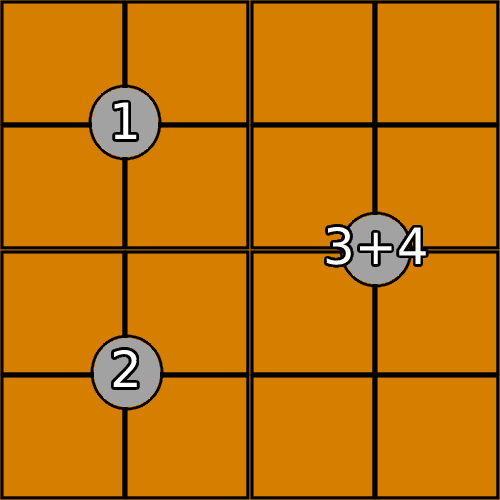
The order in which Titan does Car and Fist mechanics is random, but he will always do each one once separated by Crumbling Down. Titan will target two players with markers that drop large boulders and deal proximity-based AoE damage. These players should drop their AoEs on the west side, on the outer corners of the inner four squares. The rest of the party should move to the east side while two more players get marked. The first two marked players should move to the east side once their marks disappear, and the second set of markers should drop their boulders on the east side in the center. This is hard to explain in just words, so reference the image below to see the positioning. Once the first boulders drop down, the party should run straight west and after reaching the far wall move behind whichever of the boulders is not exploding. It is important that you run all the way to the far wall, as running directly behind a boulder may not be far enough to survive from the proximity damage. Titan will cast Seismic Wave, so make sure you are out of his line-of-sight by using the big boulder. At the same time, three vertical lines of three small bomb boulders will spawn in the arena starting with the center vertical line. After the Seismic Wave cast, be ready to dodge into the center line to avoid the boulders that spawned on the column where the party is. Depending on the order in which the boulders spawned, this could be a tight movement. I recommend looking at the enemy target list to start moving as soon as the Explosion cast finishes on the first set of bomb boulders.
After the Crumbling Down mechanic finishes, Titan will cast Voice of the
Land followed by Stonecrusher. He will then do whichever of Car
or Fists that he didn't do previously, and then phase two begins. Before
phase two, the off-tank should use ![]() Frog Legs to make sure
they're second on threat. It doesn't matter too much when this is used, as
long as it is used somewhere in the first phase.
Frog Legs to make sure
they're second on threat. It doesn't matter too much when this is used, as
long as it is used somewhere in the first phase.
Phase 2: Titan Maximus
Titan's Abilities
- Earthen Fury: Massive raidwide AoE damage.
- Earthen Fist: Line AoE with knockback on one half of the arena, two times. Sides are targeted at random, signalled by Titan channeling one of his fists.
- Weight of the World: Blue spread marker that hits the square and all surrounding squares on the targeted player.
- Dual Earthen Fists: Big knockback from the middle/front of the arena with tankbusters and a blue Weight of the World marker.
- Earthen Anguish: AoE tankbuster on the top two threat targets.
- Megalith: AoE stack tankbuster on the top threat target.
- Tectonic Uplift: Causes 2 2x2 squares in opposite corners to rise up.
- Rock Throw: Targets two players with goals which explode after some time if not killed. If the gaols are too close, they will tether to each other and apply a strong vulnerability down debuff and become unkillable.
- Plate Fracture: Punches a 2x2 section of the arena and knocks it down, removing the platform. The side on which Titan is punching is signalled by him winding his arm up on that side of the arena.
- Tumult: Multi-hit raidwide AoE damage.
- Orogenesis: Spawns little Titan.
Titan starts the phase with Earthen Fury, so heal up afterwards. Titan will then cast Earthen Fist as well as targeting some squares with Weight of the Land, so dodge accordingly.
Right after Earthen Fist, Titan casts Dual Earthen Fists.
The main tank should go to the front left and the off-tank should go to the
front right. The party should get knocked back to the southwest except for
the person targeted by Weight of the World who should get knocked
back to the southeast. The off-tank can ![]() Diamondback once
getting into position to mitigate the Earthen Anguish tankbuster.
The main tank should mitigate the Eathen Anguish with
Diamondback once
getting into position to mitigate the Earthen Anguish tankbuster.
The main tank should mitigate the Eathen Anguish with
![]() Dragon Force while avoiding the knockback with
Dragon Force while avoiding the knockback with
![]() Surecast, and then follow up with Diamondback to mitigate
Megalith.
Surecast, and then follow up with Diamondback to mitigate
Megalith.
Tectonic Uplift
Next up is our first major mechanic of phase two: Tectonic Uplift.
For this, players should be pre-assigned into two groups of four. One group
should be inside the AoE on the north side to get raised up, and
the other group should be on the south side to get raised up. At the same
time, two players will get targeted with Weight of the World markers.
One player should go to an outer corner of the north 2x2 square that will not
get raised up, and the other should go to an outer corner of the south 2x2
square that will not get raised up. If the markers are split between the two
groups, then just default to the north group marker going north and the
south group marker going south. If the markers are in the same group, then
adjust accordingly. There is plenty of time to adjust for this.
Next, two players will be targeted with orange stack markers and two players
will be targeted with yellow spread markers. On the lower platforms, AoEs
will appear such that there are two safe squares on one side and three safe
squares on the other. The orange stack markers should drop down to the side
with two safe squares and stack on a different square from the player who is
already down there (previously dropped blue), while the two yellow spread
markers should drop down to the side with three safe squares and everyone
should be on their own square. At the same time, the remaining players above
will be targeted with blue markers. These players need to go to the outer
corner of their platform. If both players are on the same side, they will
need to use ![]() Diamondback to survive. After this all
resolves, meet back towards the center to heal up for the Earthen Fury that
follows. A raidplan for this mechanic can be found
here.
Diamondback to survive. After this all
resolves, meet back towards the center to heal up for the Earthen Fury that
follows. A raidplan for this mechanic can be found
here.
The next mechanic to deal with is Rock Throw and Plate Fracture. Whichever two players get targeted by Rock Throw should separate north and south, on the center vertical line, just barely on whichever side is not being targeted by Plate Fracture first. Titan will punch out three sections of the arena, leaving one 2x2 square in the end. He will then cast Tumult, so just heal through it.
Up next is Dual Earthen Fist again, but this time there will
not be a Megalith hit. The off-tank should ![]() Diamondback
as early as possible to be able to move for the next mechanic. Titan will
use Earthen Fist immediately after, but this time there will be an
Evil Earth at the same time. The dodging can be tricky, but after a
few times it becomes pretty straightforward. Dodge the Earthen Fist, but
position yourself such that you can step into a safe spot from the Evil
Earth while avoiding the second Earthen Fist hit.
Diamondback
as early as possible to be able to move for the next mechanic. Titan will
use Earthen Fist immediately after, but this time there will be an
Evil Earth at the same time. The dodging can be tricky, but after a
few times it becomes pretty straightforward. Dodge the Earthen Fist, but
position yourself such that you can step into a safe spot from the Evil
Earth while avoiding the second Earthen Fist hit.
Tectonic Uplift 2
Once Earthen Fist has resolved, we will move into Tectonic Uplift
2. Four players will be targeted with orange stack markers. The targeted
players should ride the south platform up, while the non-targeted players
should ride the north platform up. After the orange markers resolve, two
players will be targeted with gaols and everyone will be targeted with
yellow spread markers (including the goaled players). The gaols should take
the outer corners, while everyone else just spreads onto their own squares.
If the gaols are on the same side, they can spread enough to not
tether to one another with one person on the outer corner and one person on
the inner corner of the platform. This is extremely tight, though,
and both players need to be as far as they possibly can without falling off
the platform. After the yellow markers resolve, two players will be targeted
with blue spread markers and need to spread the same way as in Uplift 1: one
person goes to the north lower half and one person goes to the south lower
half. Once this resolves, four of players on the raised platforms will be
targeted with orange stack markers and the other two will be targeted with
blue spread markers. One of the lower halves will have two safe squares and
one will only have one. The orange markers should drop down to the side with
two safe squares and stack in a square separate from the player who
previously dropped down with their blue marker. The blue markers on the
raised platforms should move to the outer corners. Just like before if the
two blue markers are on the same platform they will need to
![]() Diamondback to survive. A raidplan for this mechanic can
be found here.
Diamondback to survive. A raidplan for this mechanic can
be found here.
After Uplift 2 resolves, move towards the middle to heal up for Earthen
Fury and heal through another set of Tumults. Titan will then cast Plate
Fracture and remove a 2x2 square while also casting Megalith on the tank
(which can be mitigated with ![]() Diamondback again). Titan
will then use Plate Fracture again which will leave a 2x4 square. When this
happens, four players will be targeted with orange stack markers, three
players will be targeted with yellow spread markers, and one player will be
targeted with a blue spread marker. To resolve this, have the blue marker go
to the far east/south side (either square works), the orange markers stack
on the inner-most square of the west/north 2x2 section, and the yellow
markers spread around the orange marker on the west/north 2x2 section.
Diamondback again). Titan
will then use Plate Fracture again which will leave a 2x4 square. When this
happens, four players will be targeted with orange stack markers, three
players will be targeted with yellow spread markers, and one player will be
targeted with a blue spread marker. To resolve this, have the blue marker go
to the far east/south side (either square works), the orange markers stack
on the inner-most square of the west/north 2x2 section, and the yellow
markers spread around the orange marker on the west/north 2x2 section.
After Plate Fracture is finished, Titan will cast Earthen Fury followed by Orogenesis and move into phase 3.
Phase 3: Baby Titan
For the final phase, little Titan from Phase 1 returns and will do some of his mechanics combined with the mechanics of Titan Maximus. Any competent group should be able to skip this entirely, and it's generally more trouble than it's worth to try to stumble through this. As such, there isn't really a guide for this portion of the fight but the mechanics largely play out the same for Blue Mages as it would for traditional jobs.
Final Sting
Titan's Final Sting threshold is about 7%. Once he is at 7%, apply
![]() Off-guard, then use
Off-guard, then use ![]() Moon Flute, any
Primal abilities you have, and finish with
Moon Flute, any
Primal abilities you have, and finish with ![]() Whistle and
Whistle and
![]() Final Sting.
Final Sting.
Changelog
- 14 Mar. 2024: Clarified Crumbling Down positioning.
- 13 Mar. 2024: Guide added.
More FFXIV Content

This guide has been written by Liam Galt, who created the Blue Academy Youtube channel and Discord in response to the lack of consolidated and accurate Blue Mage resources available. Liam enjoys finding non-standard solutions to problems, so Blue Mage content with all of its zaniness is a natural interest! Outside of Blue Mage, he also enjoys Savage and Ultimate raiding which he streams on Twitch.
- How Auto Content Balancing Will Change How You Play Evercold
- This Rare FFXIV Minion Secretly Became Sellable in Patch 7.55
- The Yo-kai Watch Event Returns Again to Eorzea
- Best Crafting Rotations for 7.55 Phantom Occultum Relics
- FFXIV Hits the Switch 2 Soon! Here’s What We Know About the Release Date
- Hear, Feel, Think: What Eorzea Immersion Sounds Like
- New Character Creation Updates With FFXIV’s Patch 8.1
- Yoshi-P Answers More Questions About Evercold at Berlin Press Conference