Machinist DPS Advanced Optimization Guide — Dawntrail 7.5
On this page, you will find information regarding advanced techniques and optimization geared towards Machinist. The information presented is not for beginners and may include intermediate math or non-standard rotational changes.
Machinist Advanced Guide
This page covers the advanced rotational concepts for Machinist needed for optimization in raid encounters. This page assumes you are familair with the base concept of machinists rotation, a refresher can be found in the text guide linked above or in the video guide linked below:
Fundamentals of Optimization
It's important to understand the basis on which all optimization lays. The next section will be dedicated to these fundamentals. If you are already familair with these, then feel free to skip ahead to the next section.
Terminology
| Term | Meaning |
|---|---|
| Potency per Gauge (PPG) | The translated amount of potency each point of heat or battery gives you. |
| Potency per Second (PPS) | The amount of potency a skill gives if used on cooldown. For example, Drill has a cooldown of 20 seconds, if we divide its potency by its cooldown then we get its potency per second. |
| Kill Time (KT) | The encounter time at which you kill the boss or transition into a downtime phase. |
| Drift / Delay / Hold | With or without intention letting an action sit unused while it's off cooldown. |
| Even Minute / Burst Window / Buff Window | A time frame which occurs every 2 minutes in a vacuum where all players try to line up their party wide damage increasing buffs and potency heavy actions. |
The Main Rules
When optimizing any scenario, you generally want to try to follow the follow two rules:
- Maximize the uses of your actions.
- Ensuring your cooldown restricted actions are used a maximum amount of times. Actions that are affected by a cooldown tend to hold large amounts of potency relative to your filler combo GCDs, thus it is paramount that you don't miss uses of these actions by allowing them to overcap their charges or sit idle while off cooldown. An exception can be made if we gain damage by doing this intentionally.
- Maximize the damage your actions deal.
- Machinist can be played in a way most would find easy, by simply pressing all your cooldown bound actions on their cooldown cycle and ensuring you don't overcap any resources, such as Heat and Battery. With this being said, a good Machinist is able to funnel their high potency actions into the raid buffs of their party members, as this could potentionally increase the damage you deal with them up to 40%. You can see an example of this in our openers, as we intetionally delay our Multi-tool GCDs to line up with the rest of the raid party's buffs, which tend to get used around the third GCDs of the opener. Do keep in mind the aforementioned 40% number, as this implies that it is not worth drifting an action into raid buffs if it causes you to lose a usage of said action.
Determined and Undetermined Encounters
In the general rotation guide you are taught to play Machinist in a way that works for any encounter, no matter the kill time or downtime phasing. This is because the fights in Final Fantasy 14 usually don't require more than this to clear any encounter. Naturally, exceptions are made for Savage difficulty shortly after their release, for Ultimate difficulty in general, and for those aiming to compete for speed running rankings. For the players that bring Machinist into these types of content, it is important to learn how and when to deviate from the vacuum rotation.
When first entering an encounter like this, try to start off by using the general rotation. You can use these first few pulls as a base line. By looking at this baseline scenario you can determine the kill time, phase timings, and more. By applying the two rules mentioned earlier, you might already come to the conclusion that changing something could net you extra uses of an action. For example, changing the GCD order of the opener or something that could increase the damage an action does by drifting it intentionally into buffs or a potion without losing a usage of the action.
Queen and Battery
Companions, or pets, in this game have always have some form of oddities in the way they operate. ![]() Automaton Queen is
included in this, and the list can be found below as to the special ways she interacts with our kit.
:
Automaton Queen is
included in this, and the list can be found below as to the special ways she interacts with our kit.
:
- Queen snapshots raid buffs and potions with each action it uses. This also includes debuffs such as Damage Down but not Resurrection Sickness.
- Queen updates the stats and substats of the player dynamically.
- Queen has a DEX modifier of 100, while the player has 115.
- Queen updates her stats whenever the player eats or drinks a potion.
- Queen is unaffected by the 5% mainstat party bonus.
- Queen is unaffected by any racial stat bonuses.
The earlier mentioned DEX modifier differences cause Queen's potency to be worth only 89% of the players potency. As example, Arm Punch is listed as 120 potency, but when compared to GCDs the player uses themselves it only equal to 106.8 potency.
Timings
In a vacuum at level 90, Machinist generates around 180 to 190 battery per two minute cycle. This is enough battery to summon Queen twice per cycle, at roughly 95 battery every minute. Since this isn't possible, the summons will be of different Battery sizes, and one will be more potent than the other. Try to align the more Battery-heavy Queen with the raid buff window every two minutes so she gains increased damage from said buffs.
If downtime occurs in a fight, the Battery generated per two minute cycle naturally drops as you end up
using less filler combo GCDs, and thus use less ![]() Heated Clean Shot. In these scenarios, it is even more important
to manage your Queen summons so that the largest possible queen aligns with raid buffs with out overcapping Battery.
Heated Clean Shot. In these scenarios, it is even more important
to manage your Queen summons so that the largest possible queen aligns with raid buffs with out overcapping Battery.
Delaying Battery Generation
Occasionally, you want to delay Queen from being summoned to better align her with raid buffs or potions. One way to do this is to manipulate your
Battery generation by moving a ![]() Hypercharge either earlier or later in your rotation. This will either add or
remove 10 Battery from your current rotation (by taking away or adding an extra
Hypercharge either earlier or later in your rotation. This will either add or
remove 10 Battery from your current rotation (by taking away or adding an extra ![]() Heated Clean Shot)
and make certain Battery amounts possible for summoning Queen that otherwise weren't prior. If your current Heat economy doesn't
make this possible, you could potentionally move a Hypercharge window to make this work.
Heated Clean Shot)
and make certain Battery amounts possible for summoning Queen that otherwise weren't prior. If your current Heat economy doesn't
make this possible, you could potentionally move a Hypercharge window to make this work.
If you are already at the desired heat, you could move an earlier ![]() Drill usage to behind
the latest
Drill usage to behind
the latest ![]() Automaton Queen to push back your combo's by one GCD.
Automaton Queen to push back your combo's by one GCD.
Another way to delay your ![]() Heated Clean Shot is by using
Heated Clean Shot is by using ![]() Scattergun. This is a notable loss on both one and two target
encounters, so this can only be a gain if you are sure this doesn't lose you any uses of actions and if the potential lost
Battery is off set by the increase in damage from the delayed Queen.
Scattergun. This is a notable loss on both one and two target
encounters, so this can only be a gain if you are sure this doesn't lose you any uses of actions and if the potential lost
Battery is off set by the increase in damage from the delayed Queen.
End of Encounter Adjustments
Once you summon your last ![]() Automaton Queen of your fight, you want to avoid generating new Battery as this would be a wasted resource.
This can be done by carrying Heat into the end of the fight and attempting to end an encounter with
Automaton Queen of your fight, you want to avoid generating new Battery as this would be a wasted resource.
This can be done by carrying Heat into the end of the fight and attempting to end an encounter with ![]() Hypercharge while Queen is summoned.
For multi-target, due to the end of fight Battery being unable to be utilized, the priority of actions also shifts slightly and causes
Hypercharge while Queen is summoned.
For multi-target, due to the end of fight Battery being unable to be utilized, the priority of actions also shifts slightly and causes ![]() Scattergun to become a gain over your regular
heated combo GCDs on two targets.
Scattergun to become a gain over your regular
heated combo GCDs on two targets.
Reassemble
Upon reaching level 90, Machinist has access to two charges of ![]() Reassemble which allows us to perform some interesting opimization. The cooldown of both charges of
Reassemble is 110 seconds, which doesn't match the 120 second cycle our burst is tied to. We can intentionally drift Reassemble 10 seconds each two minute cycle to put them both into raid
buffs, however this usually costs us a usage of the ability and thus is rarely worth doing for all burst windows.
Reassemble which allows us to perform some interesting opimization. The cooldown of both charges of
Reassemble is 110 seconds, which doesn't match the 120 second cycle our burst is tied to. We can intentionally drift Reassemble 10 seconds each two minute cycle to put them both into raid
buffs, however this usually costs us a usage of the ability and thus is rarely worth doing for all burst windows.
This does mean that if we do not lose a usage by drifting, that it is encouraged to drift them into raid buffs. A common raid buff window that
![]() Reassemble is drifted into is the ones that align with your potions, however usually more raidbuff windows can be drifted
into without losing a usage. You can find out if you lose a usage or not by utilising a spreadsheet once you know your kill time.
Reassemble is drifted into is the ones that align with your potions, however usually more raidbuff windows can be drifted
into without losing a usage. You can find out if you lose a usage or not by utilising a spreadsheet once you know your kill time.
Early Air Anchor Usage
If you use the Early Air Anchor opener, then you can use the following table as a cheatsheet. For any other openers, you can use it as an
example as to how when it is worth drifting ![]() Reassemble into buffs.
Reassemble into buffs.
| Reassemble in Buffs | Start time | End time |
|---|---|---|
| Yes | 0:22.5 | 1:02.5 |
| Yes | 1:12.5 | 2:00 |
| Yes | 2:25 | 2:42.5 |
| Yes | 3:12.5 | 3:42.5 |
| Yes | 4:22.5 | 4:40 |
| Yes | 5:12.5 | 5:42.5 |
| Yes | 7:12.5 | 7:20 |
| No | 7:20 | N/A |
It's worth noting that if your kill time is not listed within these windows that it doesn't mean you shouldn't drift ![]() Reassemble
into buff windows, it just means you shouldn't do it for every single buff window.
Reassemble
into buff windows, it just means you shouldn't do it for every single buff window.
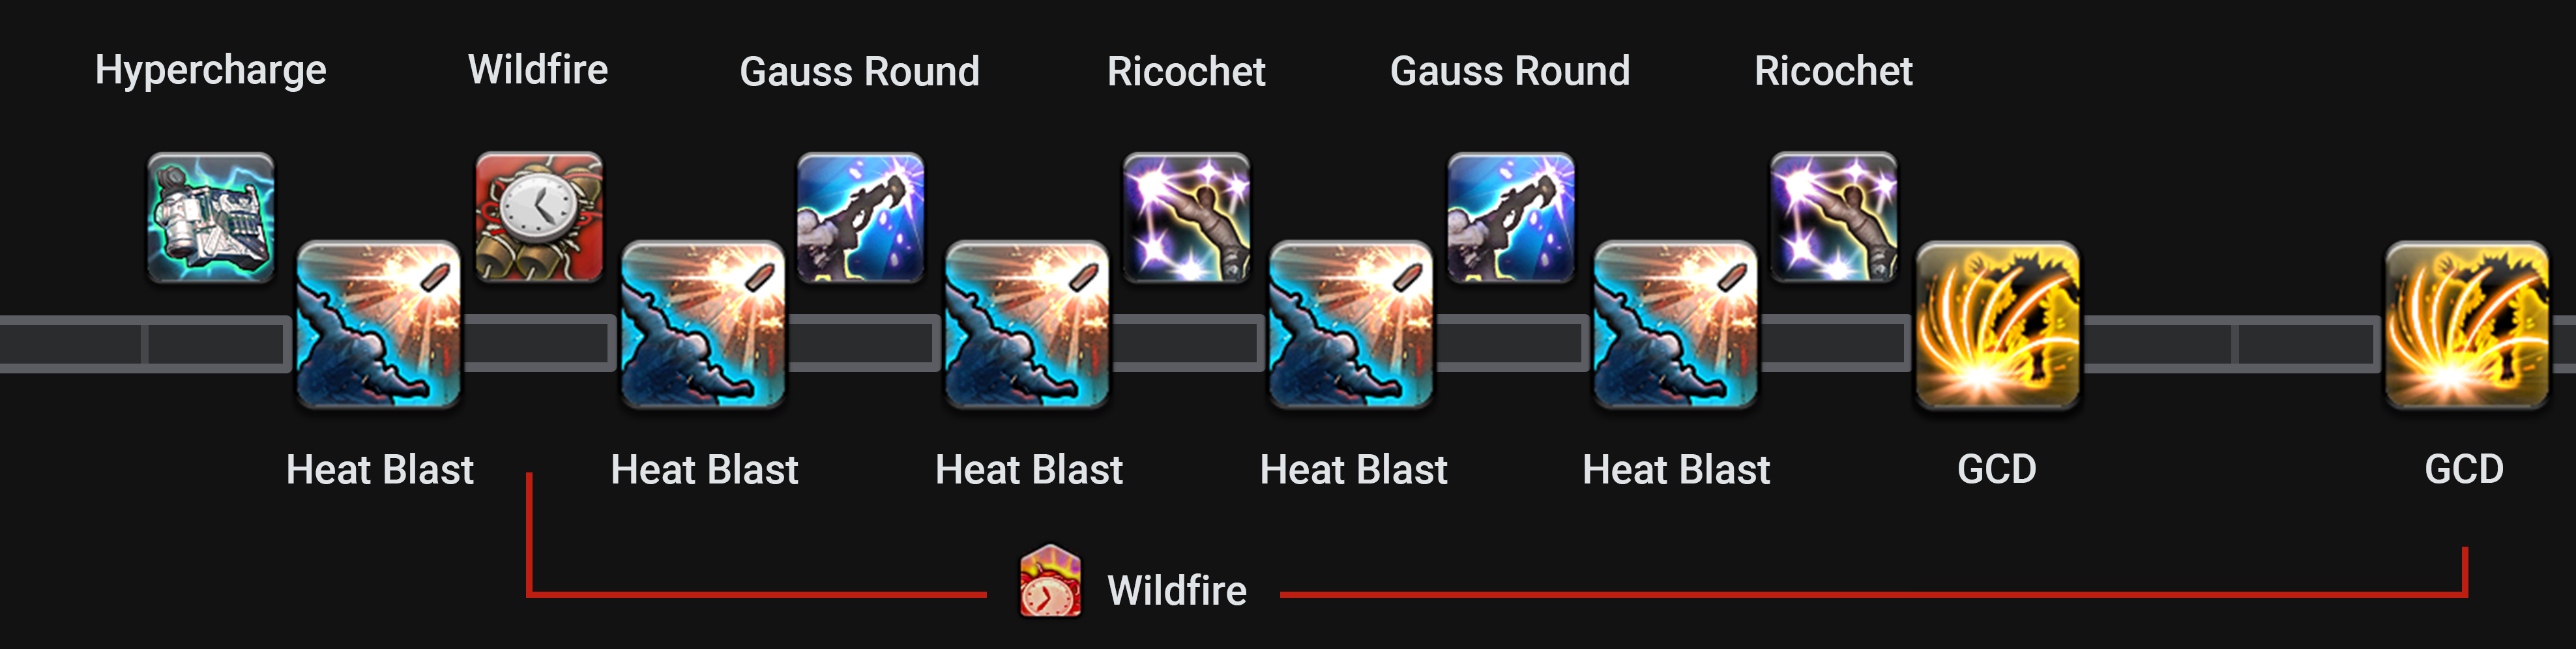
Wildfire
When playing machinist at a recast time of 2.5 seconds, Wildfire effectively loops in our rotation and can be woven on the exact same GCD every single even minute window. When downtime occurs, or if we use a different recast speed, then this luxury is forfeit. This can cause some awkward timings with wildfire. These timings can be solved in the following ways:
- Hypercharge → Wildfire
- This is the most latency friendly option, it has a clipping tolerance of 1.7 seconds, which is reduced to 1.3 seconds if you end on a tool GCD.
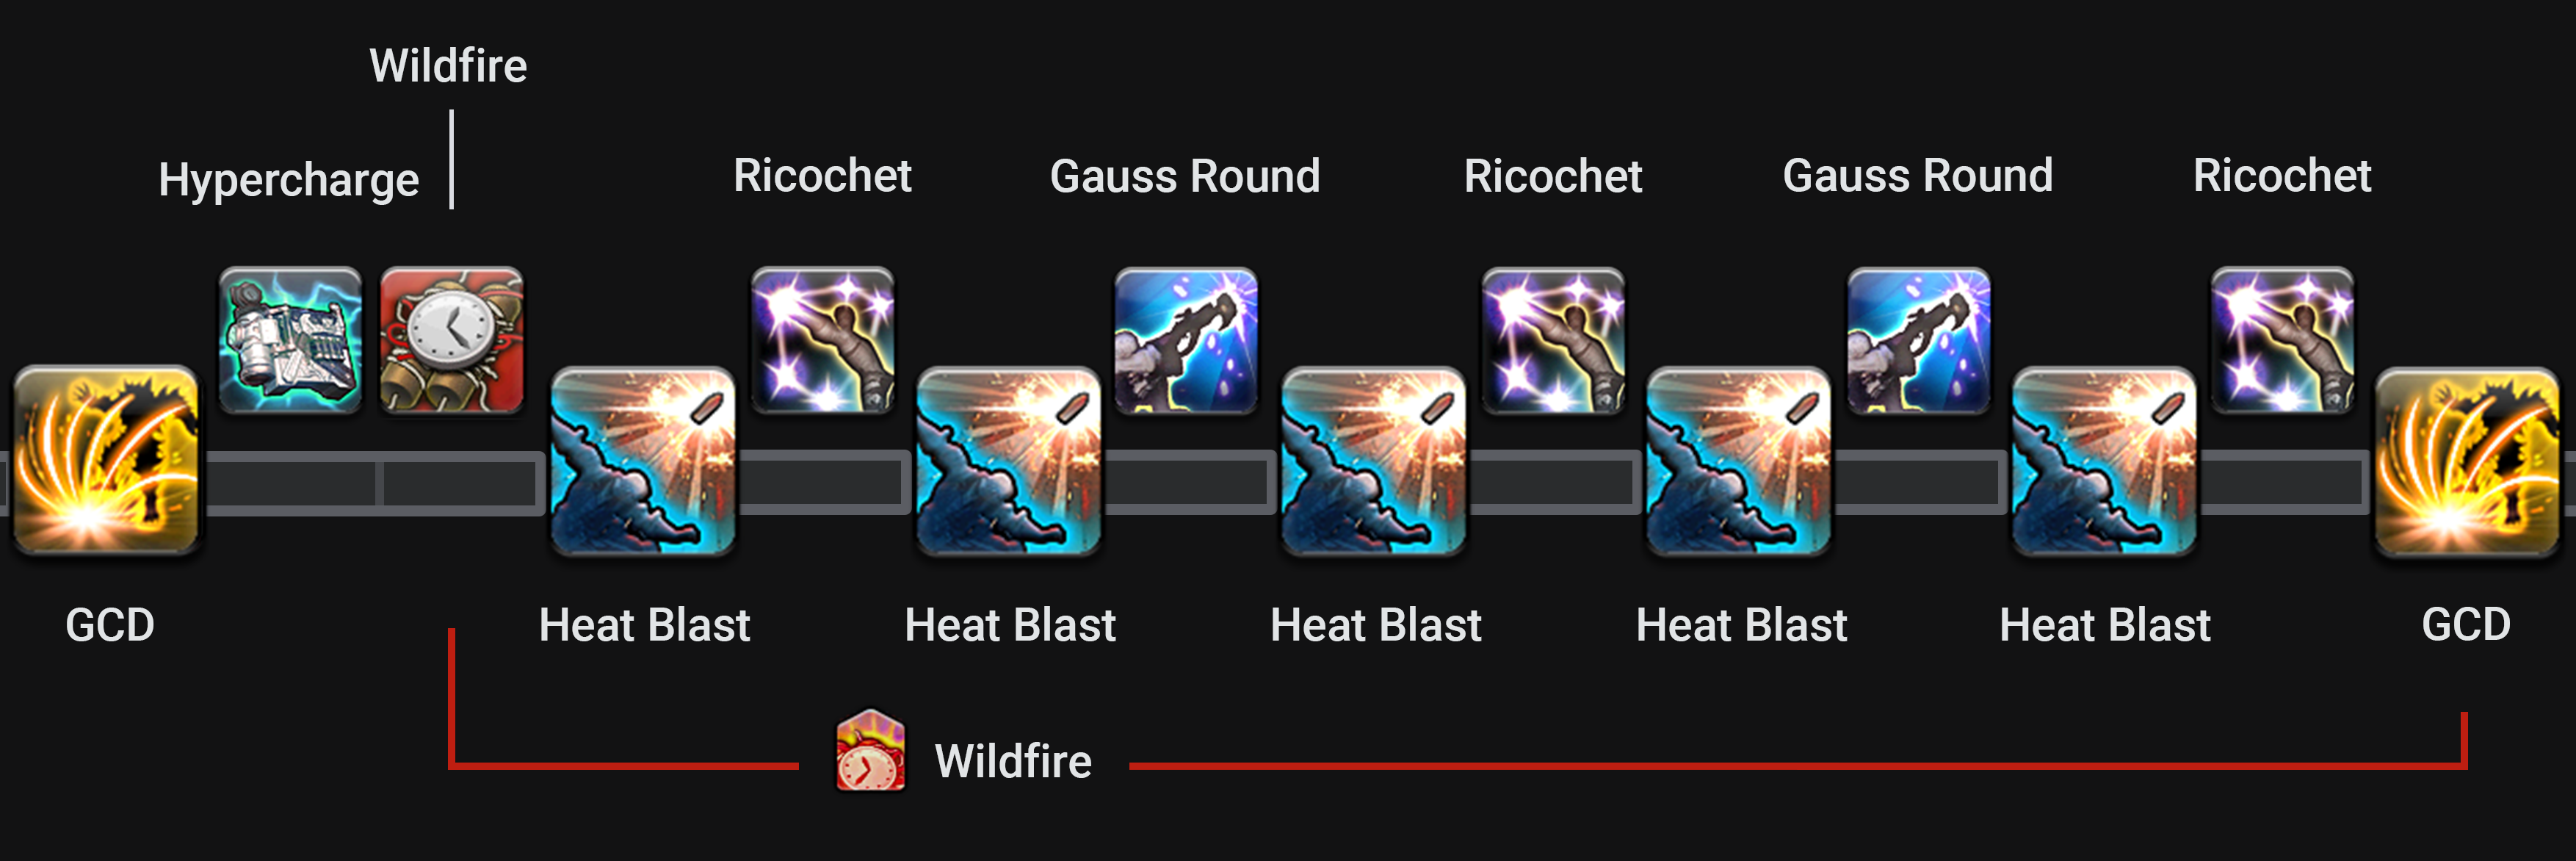
- Wildfire → GCD → Hypercharge
- If
 Wildfire comes off cooldown a GCD before you can enter
  Hypercharge, then use this option. Clipping tolerance: 0.7 seconds.
- If
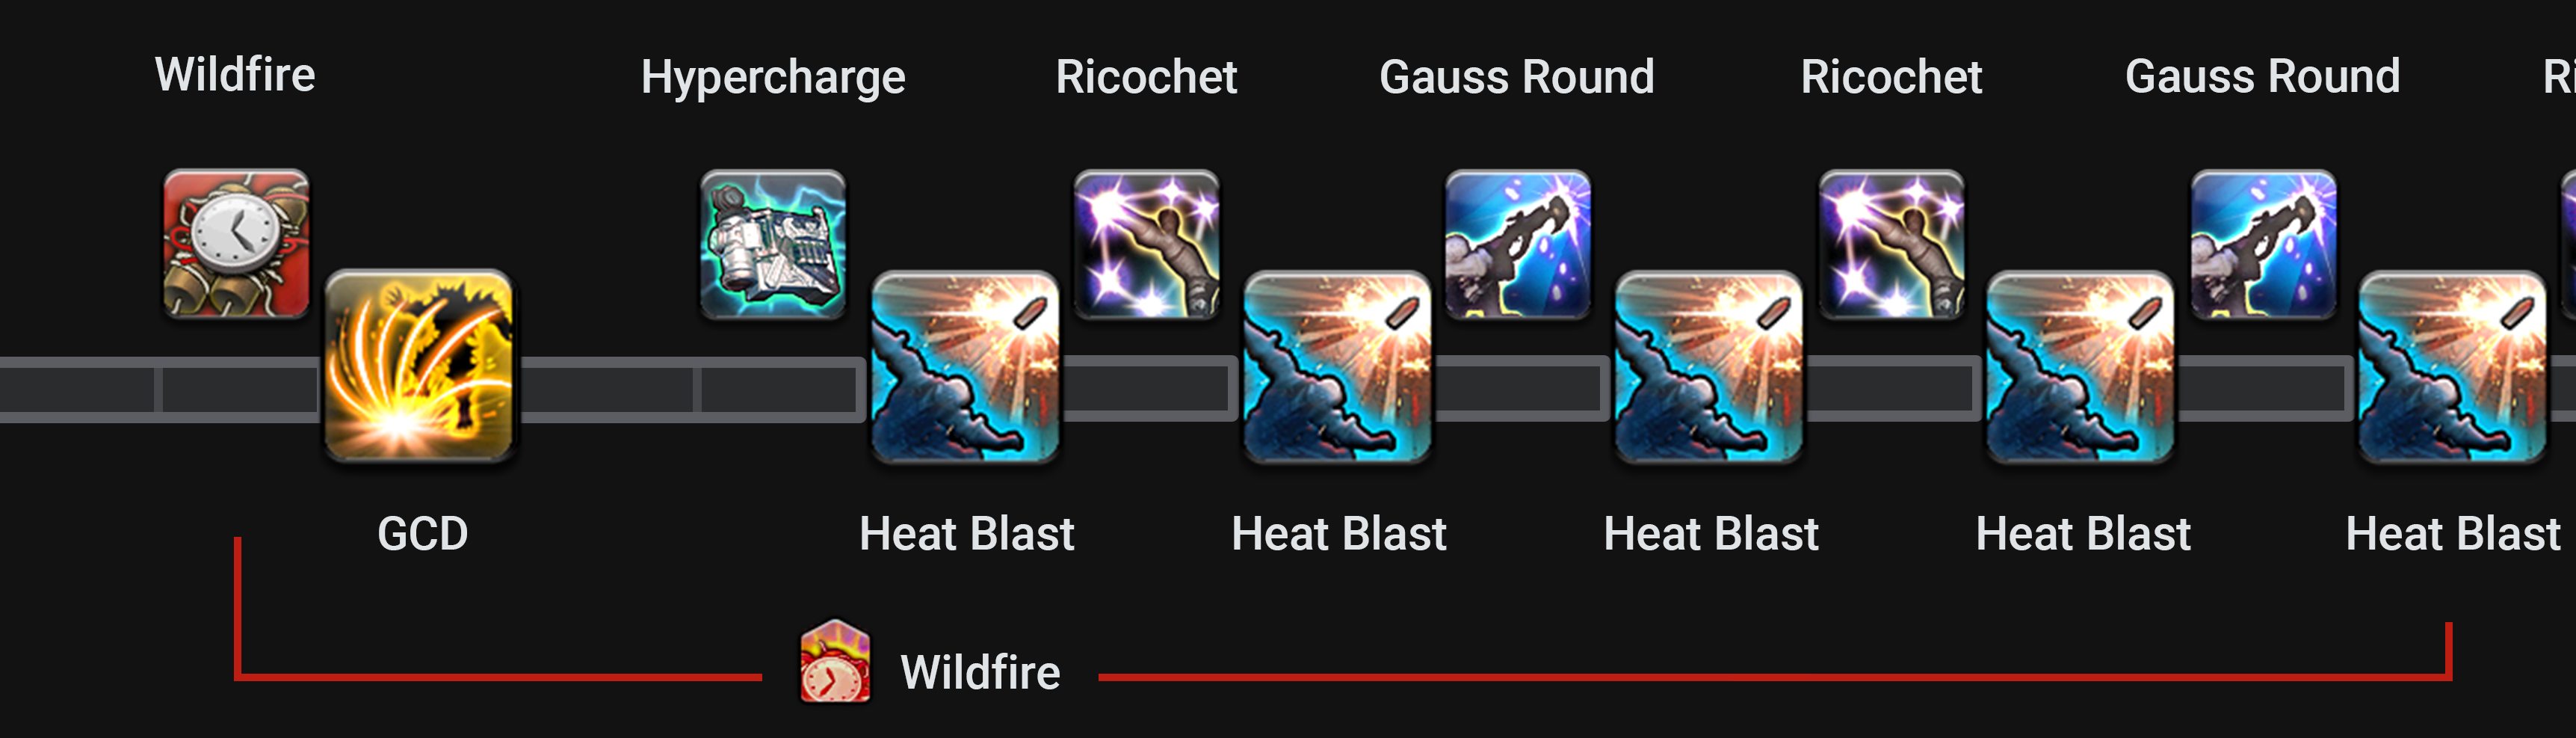
- Hypercharge → Heat Blast → Wildfire
- If you are forced to enter Hypercharge before Wildfire is available, or if you need to drift Wildfire backwards use this option. Clipping tolerance: 0.7 seconds. 0.3 seconds if you end on a tool GCD.
- If you are forced to enter
Non-Standard Openers
The order of actions you use in your opener can impact your burst windows and total uses of cooldowns throughout a fight. This is why chosing an opener
is one of the most important aspects of Machinist optimization. Generally you want your strongest hitting abilities (![]() Wildfire,
Wildfire,
![]() Automaton Queen,
Automaton Queen, ![]() Drill,
Drill, ![]() Chain Saw,
Chain Saw, ![]() Air Anchor,
Air Anchor, ![]() Full Metal Field,
Full Metal Field, ![]() Excavator,
Excavator, ![]() Blazing Shot)
to be inside of raid buffs so they can benefit from the increased damage that these buffs provide. Raid buffs in this game are 20 seconds long, meaning 8-9 GCDs can fit inside (with a
Blazing Shot)
to be inside of raid buffs so they can benefit from the increased damage that these buffs provide. Raid buffs in this game are 20 seconds long, meaning 8-9 GCDs can fit inside (with a ![]() Hypercharge window counting as 3 GCDs). This does mean that we have more high potency actions than can fit inside raid buffs. With this in mind its important to prioritize actions with a high potency in raid buffs over actions with a high effective potency. This means we prefer using
Hypercharge window counting as 3 GCDs). This does mean that we have more high potency actions than can fit inside raid buffs. With this in mind its important to prioritize actions with a high potency in raid buffs over actions with a high effective potency. This means we prefer using ![]() Full Metal Field over
Full Metal Field over ![]() Air Anchor as it has higher potency eventhough
Air Anchor as it has higher potency eventhough ![]() Air Anchor also has potency in the form of 20 battery.
Air Anchor also has potency in the form of 20 battery.
Double Hypercharge Burst
![]() Hypercharge grants a more immediate damage output compared to a heated combo, making it a good idea to maximize the
number of
Hypercharge grants a more immediate damage output compared to a heated combo, making it a good idea to maximize the
number of ![]() Heat Blasts you can incorporate into raid buffs. While it's essential to have one Hypercharge available for
Heat Blasts you can incorporate into raid buffs. While it's essential to have one Hypercharge available for ![]() Wildfire,
when you have both
Wildfire,
when you have both ![]() Barrel Stabilizer and pooled Heat at your disposal, it's also good to time your second usage of Hypercharge so it's within raid buffs.
Barrel Stabilizer and pooled Heat at your disposal, it's also good to time your second usage of Hypercharge so it's within raid buffs.
Given that ![]() Hypercharge replaces three GCDs, you can intentionally create a three-GCD gap between two tool uses in your opener.
This approach allows you to slot in a Hypercharge during subsequent burst windows. Depending on when your group's raid buffs are applied, this placement
of Hypercharge is likely to synchronize more effectively than using Hypercharge after Wildfire.
Hypercharge replaces three GCDs, you can intentionally create a three-GCD gap between two tool uses in your opener.
This approach allows you to slot in a Hypercharge during subsequent burst windows. Depending on when your group's raid buffs are applied, this placement
of Hypercharge is likely to synchronize more effectively than using Hypercharge after Wildfire.
Tools
The exact potency behind each tool will be mentioned later on in the potency analysis section. However, this section will conclude that the value of our tools
from highest to lowest is: ![]() Air Anchor →
Air Anchor → ![]() Drill →
Drill → ![]() Chain Saw. This order is derived due to the shorter
cooldowns of Drill and Air Anchor, alongside the Battery generated by using Air Anchor.
Chain Saw. This order is derived due to the shorter
cooldowns of Drill and Air Anchor, alongside the Battery generated by using Air Anchor.
If we know our kill times, we can change the order of our opener to rush tools to gain extra uses. For example if a boss were to die around 6:10, we can move our 6:15 chainsaw down to the third GCD so we can use it at 6:05, ensuring we get that final usage of Chainsaw. This does come at the cost of moving it out of raid buffs but an extra usage almost always is more valuble than the increased damage of raid buffs.
Queen
Due to the introduction of ![]() Chain Saw in Endwalker and
Chain Saw in Endwalker and ![]() Excavator in Dawntrail, we can now use
Excavator in Dawntrail, we can now use ![]() Automaton Queen in our opener after both
Automaton Queen in our opener after both ![]() Air Anchor and
Air Anchor and ![]() Excavator.
This means we can summon Queen at the earliest after three GCDs. Realistically this number is four, as drifting
Excavator.
This means we can summon Queen at the earliest after three GCDs. Realistically this number is four, as drifting ![]() Drill for such an extended time almost always loses you a usage of
the tool. It is worth noting that this also pushing
Drill for such an extended time almost always loses you a usage of
the tool. It is worth noting that this also pushing ![]() Wildfire back to the 5th GCD which could result in a lost usage of Wildfire in certain kill times. In this scenarios it is better to delay your first
Queen until after the opener Wildfire.
Wildfire back to the 5th GCD which could result in a lost usage of Wildfire in certain kill times. In this scenarios it is better to delay your first
Queen until after the opener Wildfire.
Wildfire
As previously mentioned, there may arise situations where it becomes necessary to forgo using the opener ![]() Automaton Queen in order to expedite the cooldown of
Automaton Queen in order to expedite the cooldown of ![]() Wildfire.
The process of setting up Wildifre in the opener is somewhat more intricate compared to other cooldowns. Firstly, we must accumulate a free usage from Barrel Stabilizer, and secondly, we must expend a minimum of three charges
of both
Wildfire.
The process of setting up Wildifre in the opener is somewhat more intricate compared to other cooldowns. Firstly, we must accumulate a free usage from Barrel Stabilizer, and secondly, we must expend a minimum of three charges
of both ![]() Double Check and
Double Check and ![]() Checkmate to prevent them from reaching their maximum limit during
Checkmate to prevent them from reaching their maximum limit during ![]() Hypercharge. The earliest moment at which we can employ Wildfire without exceeding these limits is after the second GCD.
Achieving this requires a sequence of Wildfire followed by a GCD and then Hypercharge.
Hypercharge. The earliest moment at which we can employ Wildfire without exceeding these limits is after the second GCD.
Achieving this requires a sequence of Wildfire followed by a GCD and then Hypercharge.
An intriguing aspect of ![]() Wildfire is its internal handling as a Damage over Time (DOT) effect, as opposed to direct damage. This characteristic leads to a couple of important implications:
Wildfire is its internal handling as a Damage over Time (DOT) effect, as opposed to direct damage. This characteristic leads to a couple of important implications:
- Wildfire captures the state of your buffs at the moment of its casting, rather than when the damage is eventually dealt.
- If you Skill Speed exceeds 400 points, Wildfire's damage is subject to a slight multiplier based on this stat.
One additional point worth emphasizing regarding ![]() Wildfire is its inability to benefit from critical hits and direct hits. Consequently, when
planning the timing of Wildfire usage, there is no need to consider buffs related to critical strike or direct hit.
Wildfire is its inability to benefit from critical hits and direct hits. Consequently, when
planning the timing of Wildfire usage, there is no need to consider buffs related to critical strike or direct hit.
Reassemble
Using ![]() Reassemble before pulling can be done to potentionally gain another usage of the ability before the fight ends. If this doesn't
grant you an extra charge, then think about postponing the initial usage of Reassemble unitl your first tool GCD under raid buffs. You can then allocate the
subsequent charge for another tool GCD afterwards, ensuring that both charges of Reassemble benefit from the raid buffs.
Reassemble before pulling can be done to potentionally gain another usage of the ability before the fight ends. If this doesn't
grant you an extra charge, then think about postponing the initial usage of Reassemble unitl your first tool GCD under raid buffs. You can then allocate the
subsequent charge for another tool GCD afterwards, ensuring that both charges of Reassemble benefit from the raid buffs.
Potion Usage
A potion increases the damage your abilities deal by roughly 8%. This is bigger than any raid buff in the game. This is why it's key to maximize the uses of your high potency cooldowns within your potion windows. A good potion window includes the following actions:
- Automaton Queen (Specifically
 Pile Bunker and
  Crowned Collider)
 - Two
 Drills
 - Atleast a single
 Reassemble
  Air Anchor
 Chain Saw
 Excavator
 Full Metal Field
- Wildfire
- 10
 Blazing Shots
 - 15+
 Double Checks /
  Checkmates
Machinist typically aims to use their initial potion during the two-minute window when they can fully maximize their Queen damage. However, this indeal scenario doesn't always align with the phases of every encounter. If we opt for the 2 minute burst potion usage, the next suitable opportunity to use another potion would be at the 8 minute burst, which frequently exceeds the kill time of encounters in optimized groups.
In cases where your group has the flexibility to coordinate a delay in raid buffs, it might become feasible to use the second potion at a more advantageous time, such as 6:30 or 7:00 minutes into the encounter, thus allowing you to still use the initial 2 minute potion without being forced into a suboptimal second potion usage.
Cheatsheet
You can use the following cheatsheet to help plan in your potion usage based on kill times:
| Max Kill Time | Uses | Standard Buff Timings |
|---|---|---|
| 2:30 | 1 | 0:00 |
| 4:30 | 1 | 2:00 |
| 6:00 | 2 | 0:00, 4:30 (or 5:00) |
| 6:30 | 2 | 0:00, 6:00 |
| 8:30 | 2 | 2:00, 8:00 |
| 10:00 | 3 | 0:00, 4:30, 9:00 |
| 10:30 | 3 | 0:00, 5:00, 10:00 |
Skill Speed
Skill Speed represents our least favorable substat on average, although there are instances where it becomes necessary due to gear constraints or phase timings.
Our GCD alignement remains consistent at every 0.06s GCD interval, which includes values like 2.50, 2.44, 2.38, and so forth. When your GCD falls within one of
these intervals, you'll need to insert an additional filler Heated Combo GCD within each two-minute loop to prevent your tool GCDs from reversing and overlapping
with your ![]() Wildfire window.
Wildfire window.
If your GCD doesn't align with any of these intervals, your ![]() Wildfire cooldown will no longer seamlessly synchronize with your GCD rotation. In such cases,
you have two options: you can opt for the rotation of the nearest lower interval (for instance, the 2.44 rotation if your GCD is at 2.46), or you can exercise
some creativity in your Wildfire setups while ensuring your tools remain on cooldown.
Wildfire cooldown will no longer seamlessly synchronize with your GCD rotation. In such cases,
you have two options: you can opt for the rotation of the nearest lower interval (for instance, the 2.44 rotation if your GCD is at 2.46), or you can exercise
some creativity in your Wildfire setups while ensuring your tools remain on cooldown.
Phase Optimization
In certain exceptional situations, Skill Speed can enable you to obtain an additional tool GCD towards the end of a phase in a fight. If this gain can be achieved with a minimal increase in Skill Speed, and the duration of the encounter is relatively brief, it might be better to use a sub-2.50 Skill Speed set specifically tailored for the phase timings of that particular encounter. This approach can potentionally result in a slight overall damage gain.
Potency Analysis
Having taken in the information above, you should now possess a fundamental understanding of how to tailor your rotation to suit the demands of a specific encounter. The remaining piece of the puzzle involves determining when it's appropriate to adapt your rotation and gauging the expected benefits and drawbacks. In the following section, we will delve into the fundamentals of potency analysis for Machinist, equipping you with the tools needed to justify changes in your own rotation.
Battery
The calculation for Queen's damage scaling per point of gauge spent is relatively straightforward. At maximum gauge, Queen's attack deals 2660 potency, which is calculated as follows: 10*120+680+780. However, it's important to note that Queen's damage scaling differes from that of the player's own actions, so we need to apply a normalization factor. As previously mentioned, in a typical raid setting, this normalization factor is about 89%, which means the equivalent player potency is approximately 2367p. Dividing this number by the 100 gauge spent yields the conclusion that Battery is worth 23.67 potency per gauge (PPG).
This value becomes key information when assessing actions that generate gauge. For instance, both ![]() Drill and
Drill and ![]() Air Anchor deal 600 potency. However, Air Anchor generates 20
Battery, which we now understand to be worth 473.4 potency (23.67*20), assuming we can spend it before the fight concludes.
Air Anchor deal 600 potency. However, Air Anchor generates 20
Battery, which we now understand to be worth 473.4 potency (23.67*20), assuming we can spend it before the fight concludes.
Heat
Assessing the value of spending Heat gauge requires a more intricate evaluation due to the displacement of three GCDs by the ![]() Hypercharge combo. This displacement
will typically encompass a full Heated Combo in single-target scenarios or three
Hypercharge combo. This displacement
will typically encompass a full Heated Combo in single-target scenarios or three ![]() Scatterguns in AoE scenarios. Since these actions also generate Heat, it's necessary
to define Heat's effective potency recursively.
Scatterguns in AoE scenarios. Since these actions also generate Heat, it's necessary
to define Heat's effective potency recursively.
In a single-target scenario, the complete equation for evaluating Heat (doneted here as x) is as follows:
x = (Hypercharge potency - Heated Combo potency) / (Heat cost of Hypercharge)
x = (240*5 + 180*2.5 + 180*2.5 - (220 + 320 + 400 + 15x + 10*23.67)) / 50
x = 14.21 (ST)
Hence, in single-target situations, the value of Heat is calculated to be 14.21 Potency per Gauge (PPG). By using a similar formula, we can math out the
value of Heat in AoE scenarios, substituting the ![]() Blazing Shot and Heated Combo potencies with
Blazing Shot and Heated Combo potencies with ![]() Auto Crossbow and
Auto Crossbow and ![]() Scattergun potencies as neccessary. Below is the
Heat value breakdown for different target numbers, ranging from one to six targets:
Scattergun potencies as neccessary. Below is the
Heat value breakdown for different target numbers, ranging from one to six targets:
| Targets | Hypercharge Combo | Filler Replacement | PPG |
|---|---|---|---|
| 1 | Heat Blast | Combo | 14.21 |
| 2 | Heat Blast | Combo | 18.36 |
| 3 | Heat Blast | Scattergun | 28.13 |
| 4 | Heat Blast | Scattergun | 31.5 |
| 5 | Heat Blast | Scattergun | 34.88 |
| 6 | Auto Crossbow | Scattergun | 62.63 |
Heated Combo
The difficult part of the Heated Combo equations have been done already, making the evulation of the Heated Combo potency a lot easier. All the remains is to sum up the direct potency, Heat PPG, and Battery PPG for each actions:
| Action | Direct Potency | Heat Potency | Battery Potency | Total Potency |
|---|---|---|---|---|
| Split Shot | 220 | 71.05 | 0 | 256.75 |
| Slug Shot | 320 | 71.05 | 0 | 391.05 |
| Clean Shot | 400 | 71.05 | 236.7 | 708.05 |
| Full Combo Avg. | 313.3 | 71.05 | 78.9 | 463.25 |
Tools
To construct PPS (Potency per Second) models for each of the four tool GCDs, considering that these GCDs replace a Heated Combo in a single target scenario, we can compute the effective potency of each action (on average) by subtracting the average potency of a combo GCD, which was previously calculated:
| Action | Direct Potency | Battery Potency | Replacement Potency | Total Potency |
|---|---|---|---|---|
| Drill | 660 | 0 | -463.25 | 196.75 |
| Air Anchor | 660 | 473.4 | -463.25 | 670.15 |
| Chainsaw | 660 | 473.4 | -463.25 | 670.15 |
| Excavator | 660 | 473.4 | -463.25 | 670.15 |
It's noteworthy that ![]() Drill, due to a lack of gauge generation, offers a relatively modest effective potency gain. When we evaulate each single-target tool in
terms of their cooldowns, we can readily discern that
Drill, due to a lack of gauge generation, offers a relatively modest effective potency gain. When we evaulate each single-target tool in
terms of their cooldowns, we can readily discern that ![]() Air Anchor yields the highest PPS of the three (652.5 / 40 > 179.1 / 20). This explains why it's generally
preferable to use Air Anchor as the first GCD in the opener.
Air Anchor yields the highest PPS of the three (652.5 / 40 > 179.1 / 20). This explains why it's generally
preferable to use Air Anchor as the first GCD in the opener.
Context plays a pivotal role in comparing these numbers. For instance, in the "post-battery" phase of an encounter, all three tools hold the same potency value since there's no gauge to spend. Similarly, when strictly assessing the direct potency that can be infused into raid buffs, the gauge generated by these actions may not be expended in time to benefit from the buffs, rendering all three tools worth the same in that scenario.
Full Metal Field
![]() Full Metal Field has a guarenteed crit/dhit built into the action, to account for this we must apply the expected multiplier to the potency, which is an approximate.
Full Metal Field has a guarenteed crit/dhit built into the action, to account for this we must apply the expected multiplier to the potency, which is an approximate.
cdh expected multiplier (approx) (1.6 * 1.25) / (1 + (1.6 * 0.3)) = 1.35x
fmf 700 * 1.35 = 945p
This ends up making the net potency from ![]() Full Metal Field 945p - 455p = 490p
Full Metal Field 945p - 455p = 490p
Raid Buffs
In FFXIV, damage buffs like ![]() Embolden and
Embolden and ![]() Dokumori stack multiplicatively. This means that when two 10% damage increase buffs are active, the resulting damage increase is
calculated by multiplying the values together: 1.1 * 1.1 = 1.21x. This multiplier is higher than if the two buffs were applied independently. It's a key reason why players
should aim to synchronize raid buffs, as it maximizes the overall damage out put.
Dokumori stack multiplicatively. This means that when two 10% damage increase buffs are active, the resulting damage increase is
calculated by multiplying the values together: 1.1 * 1.1 = 1.21x. This multiplier is higher than if the two buffs were applied independently. It's a key reason why players
should aim to synchronize raid buffs, as it maximizes the overall damage out put.
Conversely, rate buffs like ![]() Battle Voice and
Battle Voice and ![]() Battle Litany stack additively. When two 10% critical strike rate buffs are in effect, the increase of your critical strike
rate is calculated by simply adding the precentage together: 0.1 + 0.1 = 0.2, which equates to a 20% critical strike rate.
Battle Litany stack additively. When two 10% critical strike rate buffs are in effect, the increase of your critical strike
rate is calculated by simply adding the precentage together: 0.1 + 0.1 = 0.2, which equates to a 20% critical strike rate.
Accounting for Critical Hit and Direct Hit
To effectively assess actions like ![]() Wildfire,
Wildfire, ![]() Reassemble,
Reassemble, ![]() Full Metal Field, and rate buffs such as
Full Metal Field, and rate buffs such as ![]() Battle Litany, it's essential to enhance our potency model with Crit / Direct Hit normalizations.
The following formula can be utilized to estimate your expected crit multiplier on actions that are not Wildfire or Reassemble:
Battle Litany, it's essential to enhance our potency model with Crit / Direct Hit normalizations.
The following formula can be utilized to estimate your expected crit multiplier on actions that are not Wildfire or Reassemble:
Expected crit multiplier = (1 + (crit modifier - 1) * crit rate)
For instance, if your Crit multiplier is 1.5x and your crit rate stands at 20%, your expected multiplier can be calculated as follows:
Expected crit multiplier = (1 + (1.5 - 1) * 0.2) = 1.1
A similar calculation can be done for Direct Hit.
Expected DH multiplier = (1 + (0.25 * DH rate))
The Crit and Direct Hit multiplier for Reassembled actions are slightly more complicated to calculate:
Expected Reassemble multiplier = 1.25 \* crit modifier \* (1 + (buff crit rate \* (crit modifier - 1))) \* (1 + ((DH rate + buff DH rate) * 0.25))
As an example, if your Crit multiplier is 1.5x, your Direct Hit rate is 30%, you have a +10% Crit rate from buffs, and you also have a +10% Direct Hit rate from buffs, your Reassemble multiplier can be calculated using the formula profided like so:
Reassemble multiplier = 1.25 * 1.5 * (1 + (1.5 - 1)) * (1 + ((0.3 + 0.1) * 0.25)) = 1.978
Using all of the formulas listed above we can compare the potency across various Crit/Direct Hit scenarios. Typically, this model of potency that considers Crit and Direct Hit rates is referred to as "effective potency" (ePotency).
If we have a Crit buff active, we can adjust the Crit rate variable in the Crit multiplier accordingly. If ![]() Reassemble is active on a GCD, we can simply set the Crit rate and Direct Hit rates to 100%.
Reassemble is active on a GCD, we can simply set the Crit rate and Direct Hit rates to 100%.
With this information, we can precisely calculate the increase in effective potency gained by using ![]() Reassemble on a tool GCD:
Reassemble on a tool GCD:
Variables:
Crit rate = 23.1%
Crit multiplier = 1.581
Direct Hit rate = 35.4%
Crit buffs = 0%
Direct Hit buffs = 0%

Drill ePotency = 600 * (1 + (crit modifier - 1) * crit rate) * (1 + (0.25 * DH rate))
Drill ePotency = 600 * (1 + (1.581 - 1) * 0.231) * (1 + (0.25 * 0.354))
Drill ePotency = 740.7p

Reassembled Drill ePotency = 600 * 1,25 * crit modifier * (1 + (buff crit rate * (crit modifier - 1))) * (1 + ((DH rate + buff DH rate) * 0.25))
Reassembled Drill ePotency = 600 * 1,25 * 1.581 * (1 + (0 * (1.581 - 1))) * (1 + ((0.354 + 0) * 0.25))
Reassembled Drill ePotency = 1290.7p
As illustrated by the math above, ![]() Reassemble contributes 550 ePotency (1290.7 - 740.7) to the tool it enhances in this particular scenario.
It's important to note that this figure will vary based on your specific Crit and Direct Hit statistics, as well as the buffs that are active. Ideally, you should aim to
synchronize Reassemble with as many buffs as feasible, provided you can do so without forfeiting a use of the ability, to maximize the impact on your overall damage output.
Reassemble contributes 550 ePotency (1290.7 - 740.7) to the tool it enhances in this particular scenario.
It's important to note that this figure will vary based on your specific Crit and Direct Hit statistics, as well as the buffs that are active. Ideally, you should aim to
synchronize Reassemble with as many buffs as feasible, provided you can do so without forfeiting a use of the ability, to maximize the impact on your overall damage output.
Substat Theory
This section will provide an introduction to creating your own gearsets.
Stat Tiering
In FFXIV, all stats operate within specific "tiers", where their effects only increase when you reach certain thresholds. The specific stat tiering formula's changes each expansion. Since Dawntrail is relatively new, we still require further testing to be able to calculate them. They shall be posted here once they are figured out.
Skill Speed
The preference for a 2.50 GCD over other lopping tiers like 2.44 or 2.38 in Machinist rotations is grounded in the direct connection between the value of Skill Speed as a stat and the damage gained from accelerating our GCD rotation. Skill Speed's impact on Machinists damage is heavily tied to the GCD because both Heat and Battery gauge generation rely on GCDs, and abilities like Ricochet and Gauss Round are triggered by Heat.
However, there's a significant factor to consider: the fixed duration of every ![]() Hypercharge window at 7.5 seconds (1.5 seconds per actions * 5 actions). This duration
remains constant regardless of how fast our GCD is. Additionally, these 7.5-second segments do not evenly replace three GCDs at any feasible recast speed below 2.5 seconds,
leading to a slight drift in our tool GCDs.
Hypercharge window at 7.5 seconds (1.5 seconds per actions * 5 actions). This duration
remains constant regardless of how fast our GCD is. Additionally, these 7.5-second segments do not evenly replace three GCDs at any feasible recast speed below 2.5 seconds,
leading to a slight drift in our tool GCDs.
In lights of these factors, comprehensive simulations consistently indicate that 2.50 GCD setups are generally the most effective, unless there are exceptional reasons to
opt for a faster GCD in a particular encounter. This emphasis on a 2.50 GCD is primarily attributed to the limitations imposed by the fixed ![]() Hypercharge window duration and the
lack of scalability of certain GCDs with Skill Speed.
Hypercharge window duration and the
lack of scalability of certain GCDs with Skill Speed.
Critical Hit Interactions
Machinist possesses two distinct and unique actions that impact its approach to Critical Hit and Direct Hit: ![]() Wildfire and
Wildfire and ![]() Reassemble.
Reassemble.
![]() Wildfire operates in a manner that does not benefit from Crit or DH stats whatsoever, making them slightly less valuable for Machinists compared to other jobs.
Wildfire operates in a manner that does not benefit from Crit or DH stats whatsoever, making them slightly less valuable for Machinists compared to other jobs.
On the other hand, Reassemble's effectiveness now scales with the DH stat, since the 6.2 update. Additionally, Reassemble can now take advantage of Crit
and Direct Hit raid buffs like ![]() Battle Litany and
Battle Litany and ![]() Battle Voice. These changes emphasize the evolving role of Crit and Direct Hit stats
for Machinists, particularly with respect to
Battle Voice. These changes emphasize the evolving role of Crit and Direct Hit stats
for Machinists, particularly with respect to ![]() Reassemble's impact on their damage output.
Reassemble's impact on their damage output.
Miscellaneous Optimization Methods
As a Machinist, you have access to several optimization techniques. While we'll provide a brief overview of each, it's essential for you to determine the most appropriate moments to apply them in a specific encounter. If you've followed this guide thus far, you should have the knowledge and skills needed to make those informed decisions effectively!
Mid-Hypercharge AoE GCDs
The interaction with ![]() Hypercharge stacks and certain AoE GCDs, like
Hypercharge stacks and certain AoE GCDs, like ![]() Chain Saw,
Chain Saw, ![]() Full Metal Field,
Full Metal Field, ![]() Excavator,
Excavator, ![]() Bioblaster, offers a unique optimization opportunity for Machinists. These AoE GCDs can be used
during
Bioblaster, offers a unique optimization opportunity for Machinists. These AoE GCDs can be used
during ![]() Hypercharge without consuming any stacks, as Hypercharge stacks are only consumed by single-target GCDs. This method
can be useful in specific scenarios, such as:
Hypercharge without consuming any stacks, as Hypercharge stacks are only consumed by single-target GCDs. This method
can be useful in specific scenarios, such as:
- Managing Heat: When Chain Saw will be off cooldown in less than 8 seconds, and you're on the brink of overcapping
Heat, you can use Hypercharge and incorporate Chain Saw into your rotation as soon as it becomes available.
- Weaving Efficiency: If you require an additional weave slot to utilize all charges of
 Ricochet and
  Gauss Round during a burst phase,
you can integrate Chain Saw into your Hypercharge window. For example, you can employ it on the 4th GCD in your opener to free up an extra weave slot.
Gauss Round during a burst phase,
you can integrate Chain Saw into your Hypercharge window. For example, you can employ it on the 4th GCD in your opener to free up an extra weave slot.
It's worth noting that to make the most of ![]() Chain Saw in this manner, you'll need to micro-drift its cooldown, as it doesn't evenly
align with the 1.5-second recast GCDs. This micro-drifting adjustment ensures that Chain Saw can be seamlessly incorperated into your rotation during
Chain Saw in this manner, you'll need to micro-drift its cooldown, as it doesn't evenly
align with the 1.5-second recast GCDs. This micro-drifting adjustment ensures that Chain Saw can be seamlessly incorperated into your rotation during
![]() Hypercharge without disrupting your overall DPS rhythm.
Hypercharge without disrupting your overall DPS rhythm.
10x Heat Blast burst
Using the information above, that ![]() Chain Saw does not consume a Hypercharge stack, it becomes feasible to configure a burst
window that allows for the execution of 10
Chain Saw does not consume a Hypercharge stack, it becomes feasible to configure a burst
window that allows for the execution of 10 ![]() Heat Blasts in a row. This can be useful for burst windows where you use your
potion to maximize the damage ouput.
Heat Blasts in a row. This can be useful for burst windows where you use your
potion to maximize the damage ouput.
The burst sequence unfolds as follows:
The specific burst sequence is achievable when you use your tools in precisely this sequence. It's crucial to ensure that ![]() Drill is
used later in the sequence to avoid drifting, and
Drill is
used later in the sequence to avoid drifting, and ![]() Chain Saw is positioned as the last GCD just before entering the burst. In encounters with full uptime,
the 123 Tools opener is able to abuse this burst pattern.
Chain Saw is positioned as the last GCD just before entering the burst. In encounters with full uptime,
the 123 Tools opener is able to abuse this burst pattern.
Pooling Ricochet
Pooling your ![]() Ricochet charges in anticipation of an upcoming AoE situation within a fight can be a savvy move to make use of Ricochet's cleave damage.
Each charge of Ricochet can potetionally add an additional 65 potency per target in the cleave area. However, it's important to keep in mind that Ricochet has a 5y radius,
so for optimal cleave damage, the enemies must be grouped closely together.
Ricochet charges in anticipation of an upcoming AoE situation within a fight can be a savvy move to make use of Ricochet's cleave damage.
Each charge of Ricochet can potetionally add an additional 65 potency per target in the cleave area. However, it's important to keep in mind that Ricochet has a 5y radius,
so for optimal cleave damage, the enemies must be grouped closely together.
Here's a helpful tip: The distance calculating ![]() Ricochet's cleave is determined from the center of your target's hitbox to the edge of the hitbox of other enemies.
Ricochet's cleave is determined from the center of your target's hitbox to the edge of the hitbox of other enemies.
Extending Buffs with Flamethrower
![]() Flamethrower operates similarly to ground damage-over-time actions; it snapshots the player's buffs at the time of casting the action (although it doesn't snapshot debuffs on the
target, like
Flamethrower operates similarly to ground damage-over-time actions; it snapshots the player's buffs at the time of casting the action (although it doesn't snapshot debuffs on the
target, like ![]() Chain Stratagem). This means that if you start channeling Flamethrower on the last GCD of your buffs, those buffs will remain in effect for the full duration of Flamethrower.
Chain Stratagem). This means that if you start channeling Flamethrower on the last GCD of your buffs, those buffs will remain in effect for the full duration of Flamethrower.
To put it into perspective, achieving a small 1.03x buff multiplier for ![]() Flamethrower is enough to make it worth more than using your regular Heated Combo on two targets.
The benefits become even more pronounced when dealing with three or more targets.
Flamethrower is enough to make it worth more than using your regular Heated Combo on two targets.
The benefits become even more pronounced when dealing with three or more targets.
Flamethrower Tick Fishing
While this technique is quite minor and impractical, it's included here for the sake of completeness. If you start channeling ![]() Flamethrower
during a period where the boss is untargetable, you have the potential the land a tick on the boss just as it becomes targetable again, all without consuming any
GCD time. However, it's essential to start channeling Flamethrower atleast 2.5 seconds prior to the boss becoming targetable to ensure that Flamethrower doesn't
interfere with your GCD timing.
Flamethrower
during a period where the boss is untargetable, you have the potential the land a tick on the boss just as it becomes targetable again, all without consuming any
GCD time. However, it's essential to start channeling Flamethrower atleast 2.5 seconds prior to the boss becoming targetable to ensure that Flamethrower doesn't
interfere with your GCD timing.
Extending Queen
As we are aware, ![]() Automaton Queen consistently executes 5 GCDs before her
Automaton Queen consistently executes 5 GCDs before her ![]() Pile Bunker and
Pile Bunker and ![]() Crowned Collider finishers.
During these initial 5 GCDs, she can either use
Crowned Collider finishers.
During these initial 5 GCDs, she can either use ![]() Arm Punch or
Arm Punch or ![]() Roller Dash. Arm Punch takes up one GCD slot, while
Roller Dash occupies two for double the damage output. However, there's a technique to prompt Queen to use a Roller Dash on her 5th GCD, effectively providing her with the damage potential equivalent
to 6 GCDs.
Roller Dash. Arm Punch takes up one GCD slot, while
Roller Dash occupies two for double the damage output. However, there's a technique to prompt Queen to use a Roller Dash on her 5th GCD, effectively providing her with the damage potential equivalent
to 6 GCDs.
To execute this tactic, instruct your tank to move the boss away from Queen's melee range between her 4th and 5th GCD. This maneuver ensures that Queen uses a Roller Dash as her 5th GCD.
Macro Pulling
A special thanks to Kero Kaeru for the following section of this guide.
The main tool abilities of Machinist apply their damage at a significant delay from their cast. This has to do with the differences between the
preparation line and the actual moment of damage application. To prepull properly, you ideally sync this damage delay with the prepull time. This
causes your GCD and cooldown to start rolling earlier, giving you slightly more time in both regards which can result in an easier time hitting last
GCDs at the end of phases. A good example of a fight where this technique is benefitial is Endwalker's Pallas Athena, where it allows for the inclusion of one
final ![]() Air Anchor before her downtime when her Limit Cut phase starts.
Air Anchor before her downtime when her Limit Cut phase starts.
There is one thing making pulling on the damage delay timer unfeasible, which is your auto attacks. Whenever you press an action, your auto attacks will enable immediately, causing damage to be dealt before the tool lands, resulting in an early pull. To address this issue and enable the optimization described above, macro pulling can be used. This method suppresses the automatic enabling of auto-attacks until after Air Anchor lands, allowing for the desired timeline synchronizaion and the associated benefits
Suppressing Auto-Attacks
The main idea behind macro pulling involves utilizing the /action text command to execute your first GCD. This is done in combination with a placeholder
that enabled you to specify the boss for the ![]() Air Anchor command without having the boss targetted. This specific setup ensure that auto-attacks are not used
prematurely.
Air Anchor command without having the boss targetted. This specific setup ensure that auto-attacks are not used
prematurely.
It's crucial to emphasize that the boss should not be targetted when the /action command is executed for this approach to work effectively.
The specific macro you should employ largely depends on your personal preferences and specific requirements. Selecting the right macro is more about tailoring your user interface (UI) to your needs rather than optimizing your performance in a particular way. Therefore, isntead of providing a single, definitive macro, I'll outline the various options available to you, allowing you to decide which one aligns best with your playstyle and objectives.
When it comes to using macro's in combat, it's important to note that macros lack the queueing functionality associated with regular actions. Therefore, to ensure the most reliable and swift execution of a macroed action, it's often necessary to essentially spam the action command on every line of the macro.
An example of the macro would be like so:
/ac "Air Anchor" <pl>
/ac "Air Anchor" <pl>
/ac "Air Anchor" <pl>
/ac "Air Anchor" <pl>
/ac "Air Anchor" <pl>
/ac "Air Anchor" <pl>
/ac "Air Anchor" <pl>
/ac "Air Anchor" <pl>
/ac "Air Anchor" <pl>
/ac "Air Anchor" <pl>
/ac "Air Anchor" <pl>
/ac "Air Anchor" <pl>
/ac "Air Anchor" <pl>
/ac "Air Anchor" <pl>
/micon "Air Anchor" action
Here, "p1" is a placeholder which you should replace with a specific targetting variable listed below. The micon line can be removed and replaced with an additional /ac line at the cost of a normal looking GCD action on your hotbars. Lastly, the Air Anchor tool can be replaced with any other action that you would like to use. Mind you that mainly the tools suffer from this notable delay in their damage application, so this method is most useful for only these 3 GCDs.
List of targetting variables:
- tt: This attacks the target of your target. Most casters start casting their prepull action long before we would use our macro. We can target them instead of the boss and use a macro with this placeholder instead.
- f: This attacks your current focus target. This is slightly annoying to use as you are required to re-focus target the boss every single pull, and it might interfere with your preference of using focus target for other uses.
- lt/le: These attack your previous targets. First target the boss and then nothing else before using a macro with these targetting variables. "Le" is slightly more forgiving as it targets the last target you had, so accidentally targetting a party member won't ruin your prepull.
- attackN/bindN/square/etc: These attack targets with specific overhead markers. You also have to apply these in between every single pull and can cause issues for marker based solutions to mechanics.
- mo: This attacks the target which your mouse is currently hovering over. While effective, this method cannot be utilized by controller players.
Macro Without potion
The earlier mentioned macro is very nice to use specifically for moments where you also want to use a potion on the pull. However, for moments where this isn't necessary you could instead opt to use the following macro for ease of use:
/nt
/ta <0>
/ac "Air Anchor" <le>
/ta <le>
/micon "Air Anchor" action
In a single target encounter this macro works similar to simply pressing ![]() Air Anchor but functions without the action queue or automatic auto attack activation.
Air Anchor but functions without the action queue or automatic auto attack activation.
Changelog
- 28 Apr. 2026: Updated for Patch 7.5.
- 16 Dec. 2025: Updated for Patch 7.4.
- 03 Sep. 2025: Updated for Patch 7.3.
- 25 Mar. 2025: Updated for Patch 7.2.
- 11 Jan. 2025: Flamethrower modifier updated.
- 26 Jun. 2024: Initial Dawntrail update
- 18 Jan. 2024: Updated for patch 6.55.
- 05 Oct. 2023: Updated for Patch 6.5.
- 22 Sep. 2023: Guide added.
Guides from Other Classes

Juliacare has been playing FFXIV since Heavensward focusing solely on casters, until Shadowbringers when they decided to add physical ranged into their line up. Since then they have been aiding in theorycrafting for physical ranged and Summoner, becoming a Machinist Mentor in The Balance Discord and uploading video job guides to their Youtube Channel.
- New Framer’s Kit With Return Of Breaking Brick Mountains
- Last Chance For THE PRIMALS x Download Festival T-Shirt!
- Team DN Claims #WorldFirst in FFXIV’s Dancing Mad!
- FFXIV Players Blown Away By Store Updates!
- Support #WorldFirst in FFXIV Dancing Mad Ultimate — Now Available!
- Calling FFXIV Fishers To Catch The Rainbow For Charity!
- Last Chance To Enter FFXIV x Jollibee Sweepstakes!
- The Senor Otters Make Their Grand Debut in FFXIV