Keybindings and Hotbar Setup for Summoner — Dawntrail 7.5
Welcome to our keybinding and controller setup guide for Summoner. Here you'll find example setups to play FFXIV for mouse and keyboard configurations, as well as controller users.
UI Introduction
Keybindings and UI design can be a very important factor for players. Ultimately, the choice of your keybindings and UI design is subjective, and should revolve around personal comfort. However, in an attempt to achieve this, you should also aim to streamline your UI, and avoid any unnecessary clutter. Placing and sizing your UI elements to be easily seen and readable, while minimizing the amount of screen space taken up is ideal.
Hotbar Placement
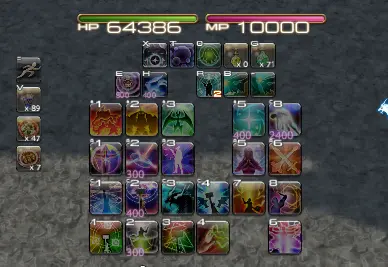
Hotbar placement is one of the most important decisions with your UI layout. Generally speaking, you'll notice many players placing their hotbars in the lower center portions of their screen. Once again, the choice of your hotbar placement will ultimately be subjective, and based on which part of your screen you feel most comfortable to glance at.
Summoner Hotbar Setup
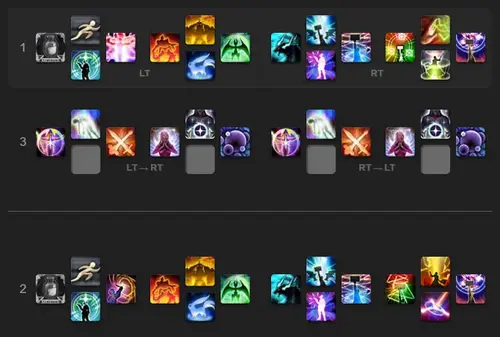
For the controller setup, our example will use three hotbars in total. The first and second hotbars are organized for single-target and AoE rotations specifically, while the third hotbar is reserved for role and utility actions. The third hotbar is accessible by holding both triggers simultaneously. You can enable double trigger pull hotbars by turning on the setting location in Character → Hotbar → Custom → Expanded Hold Controls.
Keyboard and Mouse setups will be dependent on your variant of keyboard. Examples shown on this page are designed for QWERTY layouts, while assuming the WASD keys are reserved for character movement. This example layout will NOT assume the use of an MMO Mouse/Mouse buttons that can be remapped, but can be easily adapted for these peripherals if needed.
With Summoner maintaining fewer placeable actions in comparison to most other jobs, this keybind layout prioritizes using your numbers 1 through 4 keys, along with CTRL, ALT, and SHIFT modifiers. Of course there are additional actions that require other hotkey space, and we use a few letters nearby the WASD keys, along with a few extra number keys to place the remaining actions. All of these hotkey placements were designed to reachable with your keyboard hand, without the need to mouse click your actions. Of course you may click your actions however if you feel more comfortable to do so.
Additional Keybind Advice
- Since FFXIV allows players to play any class on one character, it can be a good habit
to place similar actions on the same hotkeys across jobs. Some examples can be:
- Basic GCD abilities and combos
- Similar mitigation abilities
- Role actions, such as
 Swiftcast or
  Addle
Addle
- You may use mouse-over macros in place of manually targeting party members for various actions. The benefits to this are that mouse-over macros allow you to cast a targeted ability simply by hovering your mouse over their place in the party list, or by hovering their character model. Doing so allows you to cast these abilities, while not having to drop your target from the boss.
Additional UI Advice
Along with your hotbar placement, there are additional ways of improving the efficiency of your UI, and we can label a few tips below:
- Size your UI elements to the minimum size you feel comfortable using, and that you are able to read and see clearly. Reducing the amount of space UI elements take up on your screen can help reduce unnecessary visual clutter.
- Avoid covering the direct center of your screen with UI elements. The center of your screen is very important to keep clear for visibility purposes. Any visual clutter that could potentially distract you, or keep you from seeing important information (such as boss telegraphs) would be detrimental, and should be avoided as much as possible.
- Move your party list to a place that's quick and easy for you to see at all times. Having awareness of your party list can be incredibly important for many jobs, as various utility actions, like raise abilities, targeted mitigation abilities, and single-target healing abilities, can require you to immediately target specific party members. It can also be important to be aware of your party members' MP and HP values.
- Keep your primary UI elements in a similar place on your screen. These elements include:
- Hotbars
- Target and Focus Target bars
- Player Buffs and Debuffs
- Cast bar
- You can also use hotbars as visual aids to help memorize raid strategies and toolboxes. A great example of this are visual aids players will make for playstation tether mechanics. These visual aids are a great habit to build, as they're a simple way to assist you, while keeping the information on your main game screen. For players who do not have access to multiple monitors, this can be extremely useful.
Changelog
- 03 May 2026: Reviewed for Patch 7.5.
- 22 Dec. 2025: Reviewed for Patch 7.4.
- 19 Aug. 2025: Reviewed for Patch 7.3.
- 01 Apr. 2025: Reviewed for Patch 7.2.
- 21 Nov. 2024: Reviewed for Patch 7.1.
- 05 Jul. 2024: Reviewed for Patch 7.0.
- 30 Apr. 2024: Guide added.
Guides from Other Classes

Elevation is a long time theorycrafter and World First raider for Echo Esports. Starting all the way back in Patch 3.2, Elevation has remained as one of the best caster players, primarily focused around Summoner. Not only has he achieved top placements in the Race to World First, but has also pushed top rankings in the optimization scene over the course of multiple expansions, including several personal Rank 1 parses. Elevation is known for providing a multitude of guides for Magical Ranged DPS, for both extensive job optimization knowledge, as well progression related tips and advice.
- FFXIV Players Can Now Grab Berlin Fan Fest Merch Before It Sells Out
- FFXIV Players: Here’s Every Major Drop Before Evercold Hits
- Evangelion Alliance Raid Announced for FFXIV Evercold in 2027
- FFXIV Launching on Switch 2 But Leaving PS4 — Here’s What You Need to Know
- FFXIV Patch 7.5 Just Kicked Off Dawntrail’s Final Chapter
- Yoshi-P Fanfest Q&A: Glamour Plates, Job Design, and Favorite Scion
- Get Ready ASAP for Kefka’s Ultimate Raid in Patch 7.51
- Find Out How Evercold is Changing FFXIV to a Weekly System

