Weapon's Refrain Ultimate: Ultima Guide
This page contains detailed information and strategy about the high-end Duty "The Weapon's Refrain (Ultimate)", commonly abbreviated as UWU, specifically for the portions of the fight dealing with Lahabrea and Ultima.
Lahabrea and The Ultima Weapon
Due to Lahabrea being such a short and easy to understand phase of the fight, it has been included on this page alongside Ultima. Lahabrea will disappear once you've satisfied the Limit Break requirements this Ultimate imposes on you; Defeating all three previous Primals with Woken status.
Ultima itself can be separated into three categories. Active Phases, Intermissions and Primal Roulette. In total there are two Active Phases and three Intermissions. The fight ends on a finale of Primal Roulette where Ultima summons all three absorbed Primals to unleash one last devastating attack on the party.
Lahabrea
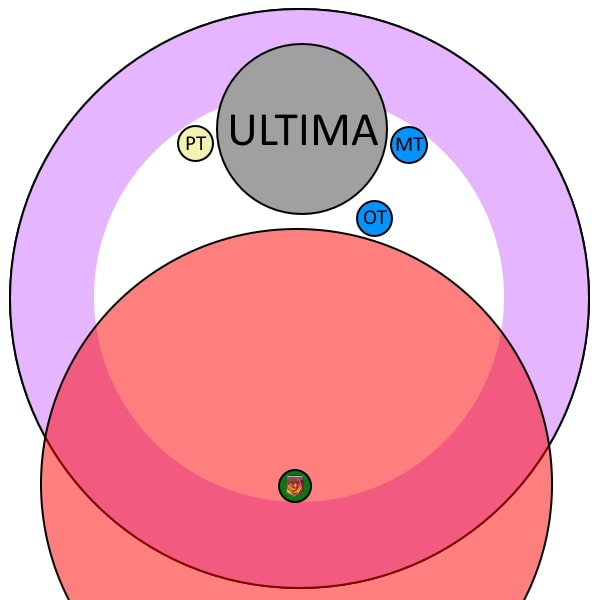
This phase will consist of the party having to use four Level 3 Limit Breaks in a row, taking advantage of the Beyond Limits buff that drops at the end of each primal. The phase begins with four large pillars dropping on the cardinals of the arena which deal proximity-based magic damage in the form of Freefire. Make sure players are stacked in the middle of the arena and shielded appropriately. Six Magitek Bits will then spawn across the arena, each beginning to cast a 12 second long Self-Destruct. These must be destroyed instantly with a Level 3 Caster Limit Break. Keep in mind damage variance may result in Caster Limit Break not completely destroying some Magitek Bits. All other party members should be hitting the Magitek Bits while the Caster Limit Break is being used.
Soon after the Magitek Bits are destroyed, Lahabrea will appear and cast Blight placing all player's HP at one and inflicting both an eight second doom and a four second Down for the Count debuff. This doom must be dispelled via a Level 3 Healer Limit Break. Lahabrea will then become targettable and begin casting Dark IV, a 17 second cast dealing 999,999 damage. As Lahabrea takes significantly less damage, the only viable way to defeat him before Dark IV finishes casting is via a Level 3 Melee Limit Break. After Lahabrea is defeated the Ultima Weapon will appear and begin casting Ultima, a raidbuster dealing massive magic-based damage that must be mitigated via shields and a level 3 Tank Limit Break. Essentially, you will have to Caster LB3, then a Healer LB3, then a Melee LB3, and finally a Tank LB3.
The caster LB3 should be used as soon as Freefire damage appears on the screen, and the Healer LB3 should be used as soon as Down for the Count resolves. All other LBs can be used as soon as they become available, which means your melee and tank can spam the LB button when it is their turn and they will correctly time their Limit Breaks.
The Ultima Weapon absorbs all abilities from previous primals, as well as gains the following:
The Ultima Weapon's Abilities:
- Ultima Aether: Duty Gauge that is present throughout thie entire phase. If it reaches 100 before the end of the fight, Ultima will gain a Damage Up buff, likely wiping the raid. It increases gradually when Ultima casts some abilities by four, and also increases by four with every death.
- Ultima: Massive raidbuster dealing extremely heavy magic damage. Must be mitigated via the use of a Level 3 Tank Limit Break.
- Tank Purge: Raidbuster dealing heavy magic damage.
- Homing Lasers: Very heavy tankbuster (~125k unimitigated) targeting the player with the second highest enmity in a small circle around them.
- Viscous Aetheroplasm: Attack applying the Viscous Aetheroplasm debuff which explodes after a short period of time for heavy magic damage that can be soaked with the party. It is a small circle AoE and any players near the target will get a Viscous Aetheroplasm debuff if they are also hit.
- Diffractive Laser: Tankbuster with no cast bar dealing moderate magic damage. Cleaves.
- Aetheric Boom: Knockback originating from Ultima hitting all players. It is accompanied by four sets of Aetheroplasms.
This phase alternates between complex series of mechanics (which will be referred to as 'Intemissions'), and burn phases where the boss is targettable, but with significantly less complex mechanics (which will be referred to as 'Active Phases'.)
After Ultima, the Ultima Weapon will devour all of the primals in a fairly lengthy in-fight cutscene, and proceed to use Tank Purge, followed closely by Homing Lasers, before casting Ultimate Predation.
Ultima Toolbox Resource
For the entirety of the phase, please reference these Toolboxes for a detailed view of how each mechanic is handled.
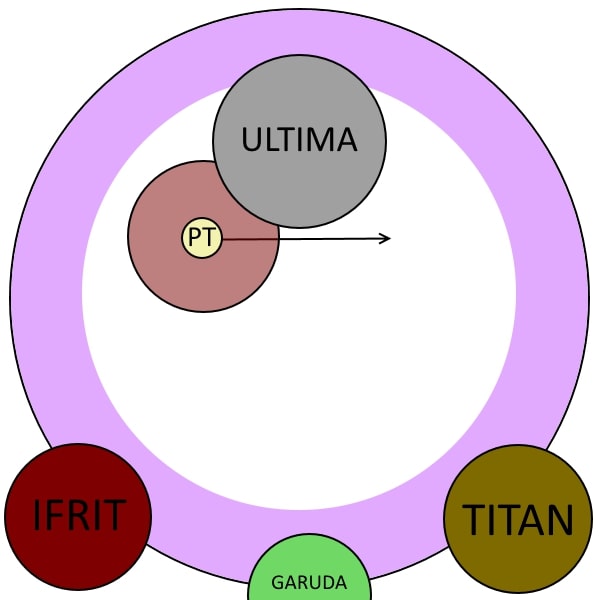
Intermission I: Ultimate Predation
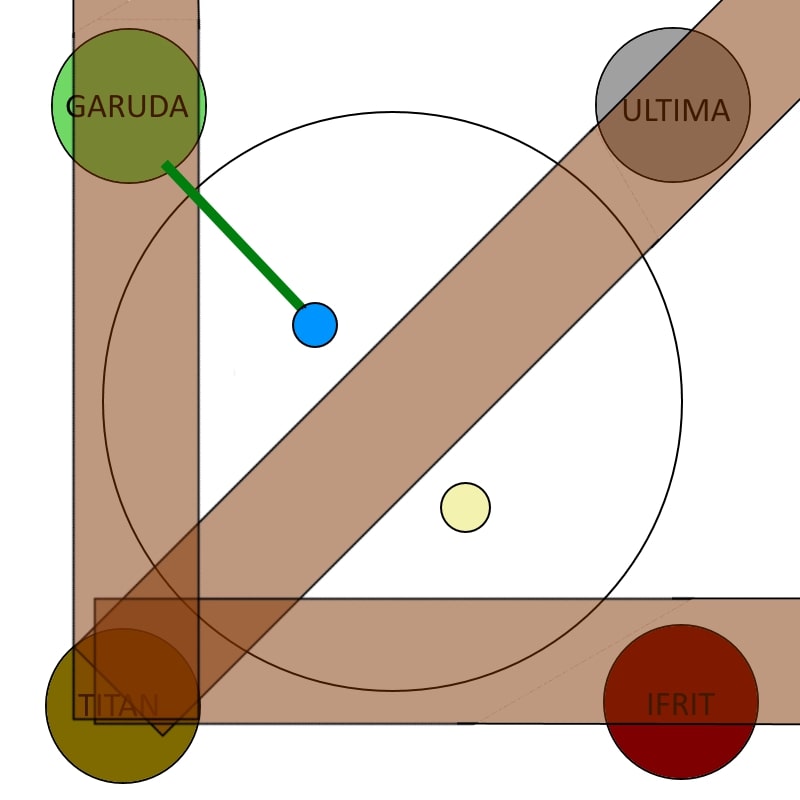
- Garuda spawns in a random quadrant near the center of the arena, slightly offset. Ifrit and Ultima spawn in a random intercardinal. Titan spawns in a random cardinal, shifted to either right or left of the direct cardinal.
- Garuda begins to use a Woken Wicked Wheel, which means it is followed followed by Wicked Tornado. This Wicked Tornado can be outranged.
- Ifrit will use a Woken Crimson Cyclone, leaving behind afterburner covering the cardinals.
- Titan will use a Woken Landslide, making it hit twice, exactly like his previous phase.
- Ultima will use Ceruleum Vent, covering its entire quadrant.
- After all is resolved, Garuda will use Feather Rain.
While this mechanic seems daunting at first, it is actually very simple. There are runes around outside of the arena that will make finding the safe spot significantly easier. Find Garuda and Ifrit, and make sure you are positioned opposite Garuda's quadrant (i.e. if she spawns Northwest of the center, go to either the East, Southeast, or South edge of the arena), and make sure you are dodging Ifrit's Crimson Cyclone. The spot you are dodging to cannot have either Titan or Ultima near it. After the Crimson Cyclone resolves, count four runes from either side, and stand on that spot.
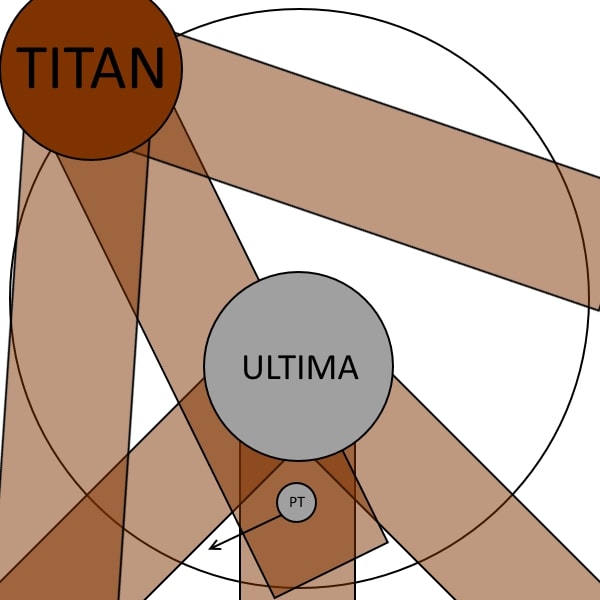
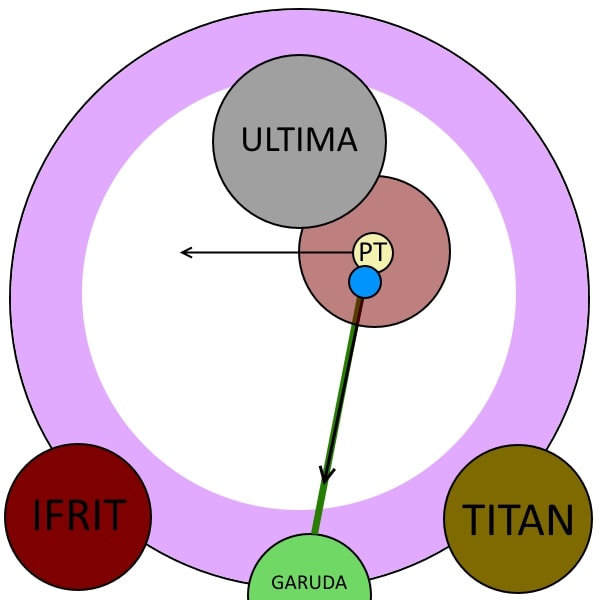
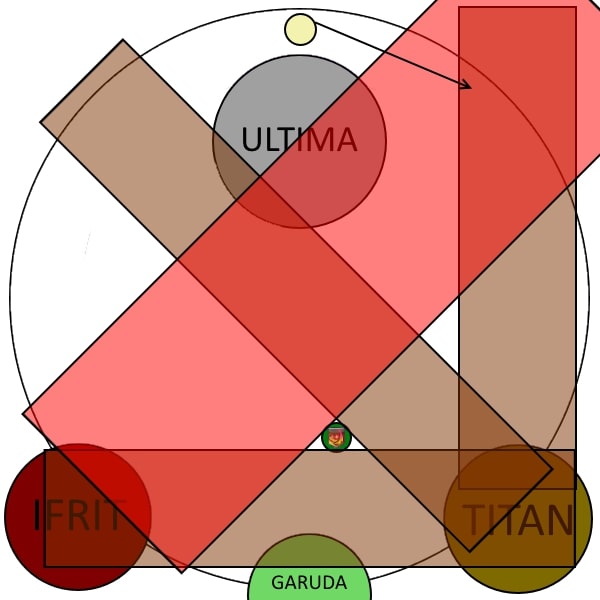
This should be a safe spot from everything that goes on in the second half of this Intermission. You might have to dodge a landslide during the first half, but simply dodge into the rune after the first hit. Below is an example of a theoretical "worst-case scenario" and how to deal with it.
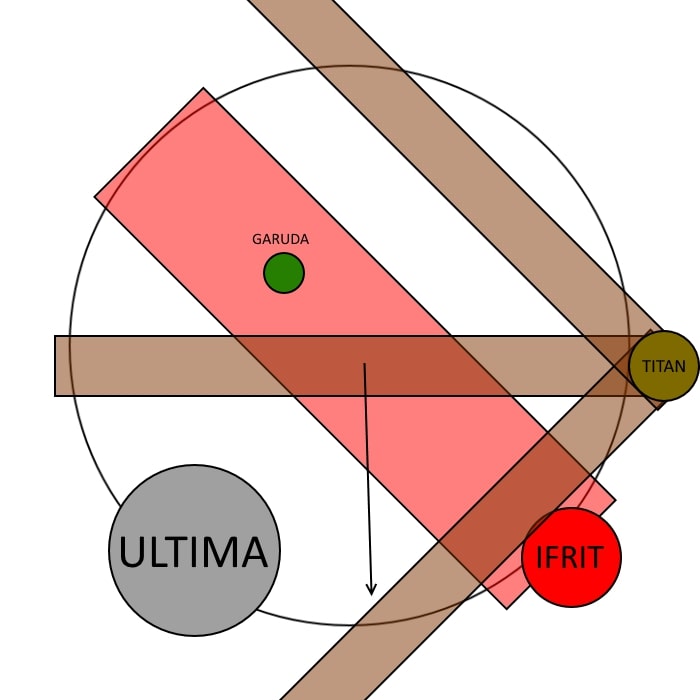
Begin by locating the primals. First, find the spot opposite Garuda that is safe. As Titan covers up East, and Ifrit covers Southeast, the party will run south. Be careful of the landslide, and you might have to dash a little into Ultima's quadrant.
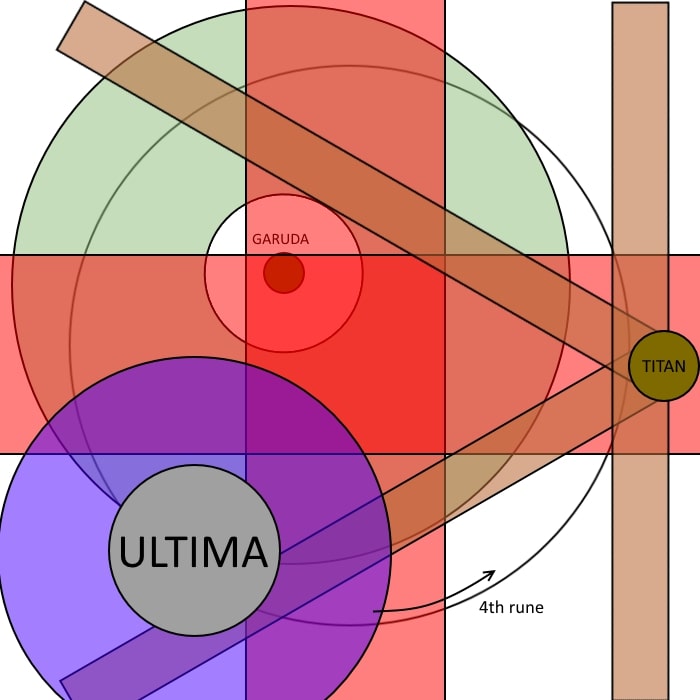
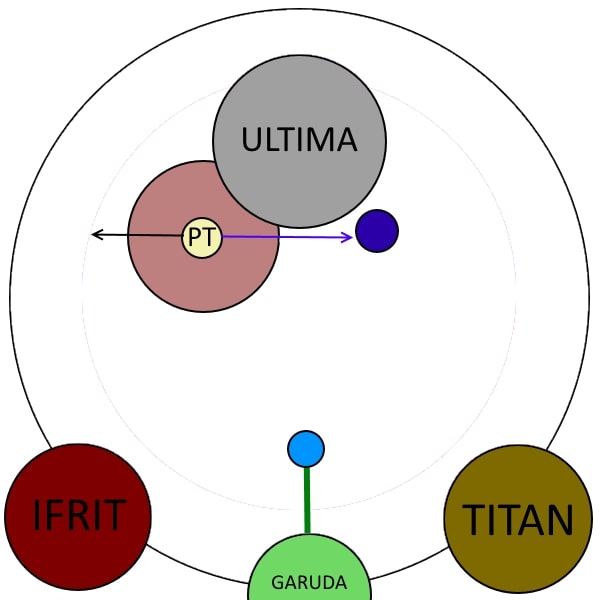
After the first Landslide and Crimson Cyclone resolve, move as fast as possible into the fourth rune, away from Ultima. Stay there as everything else resolves, and you will avoid all damage.
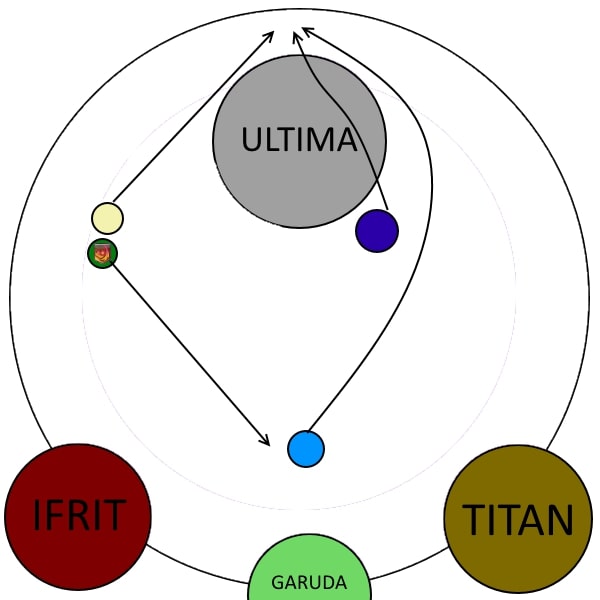
Make sure stay together to bait the upcoming Feather Rain, and move toward the middle on the shriek. Ultima will teleport back to the middle of the arena, and become targettable.
Active Phase I
Ultima will teleport to the middle of the arena, Spawning the three primals out do to a variety of abilities. In order:
- Ifrit spawns at the north edge of the arena, and casts a proximity-baited Eruption.
- Ultima casts Radiant Plume along the edges.
- Titan spawns far from Ultima, so this position is baitable.
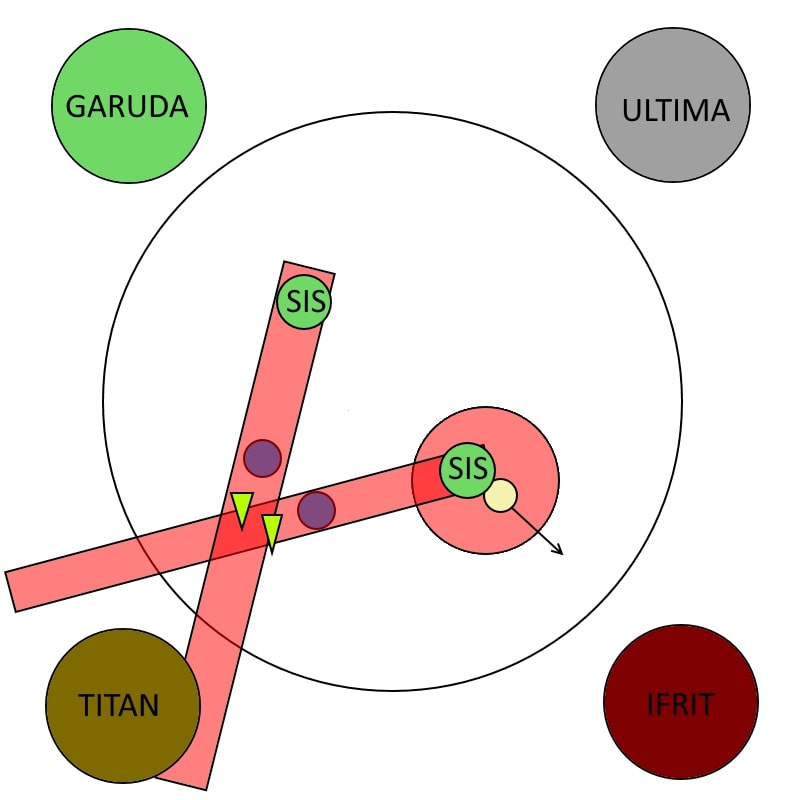
- As soon as Radiant Plume resolves, Titan throws rocks along the center of the arena, in a clockwise fashion.
- Ultima and Titan both use Landslide on a random player. Only Titan uses a woken landslide.
- Titan begins to use Tumults while Ultima uses Viscous Aetheroplasm on the current tank.
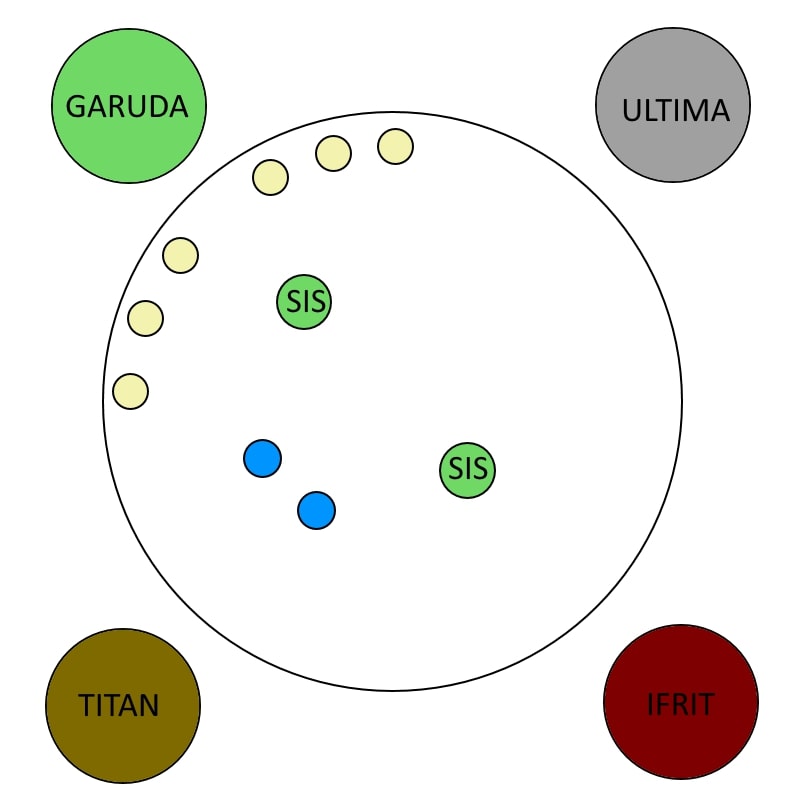
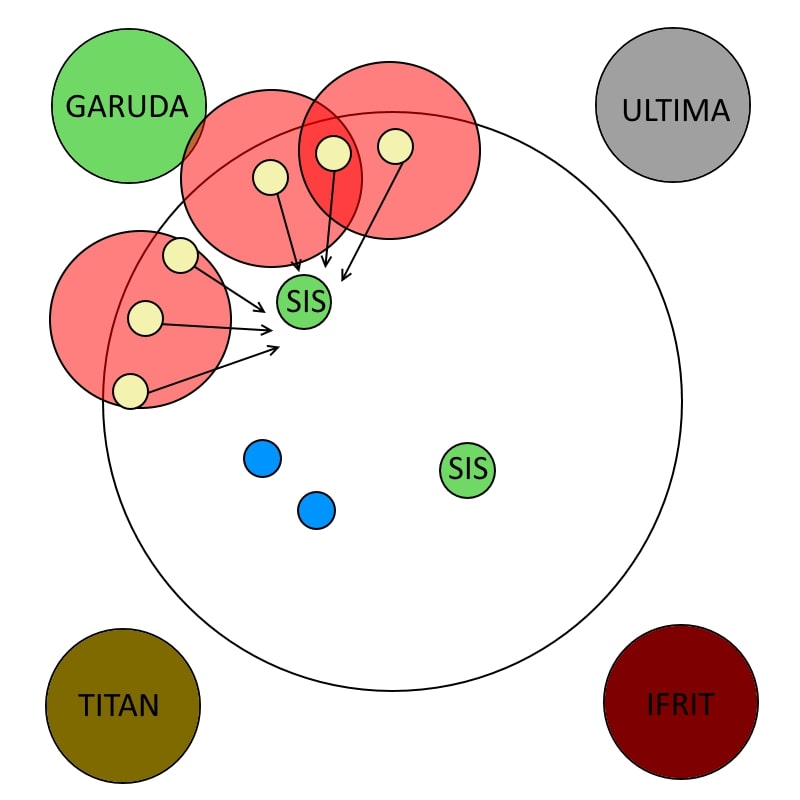
- Sisters spawn at the East and West of the arena, and use Wicked Wheel.
- Garuda spawns at the center of the arena, and uses Mistral Shriek. At the same time, sisters will jump and use Feather Rain.
- Ultima will cast Homing Lasers on the player with the second highest enmity.
- Garuda jumps and uses Feather Rain.
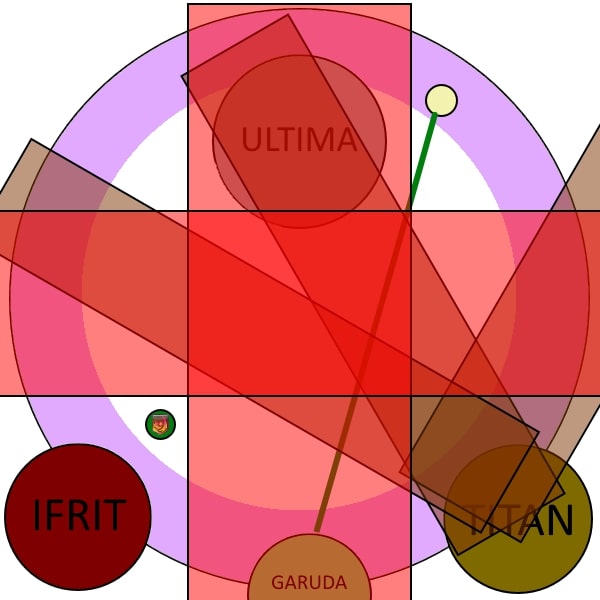
While this seems like a lot, many of these mechanics are fairly simple to avoid by pulling the boss near south, baiting Titan away from the party. Below is a diagram that shows my recommended strategy. You are essentially sitting in the south of the arena, and most mechanics should resolve themselves.
Ifrit will be north, so have two players bait by moving south.
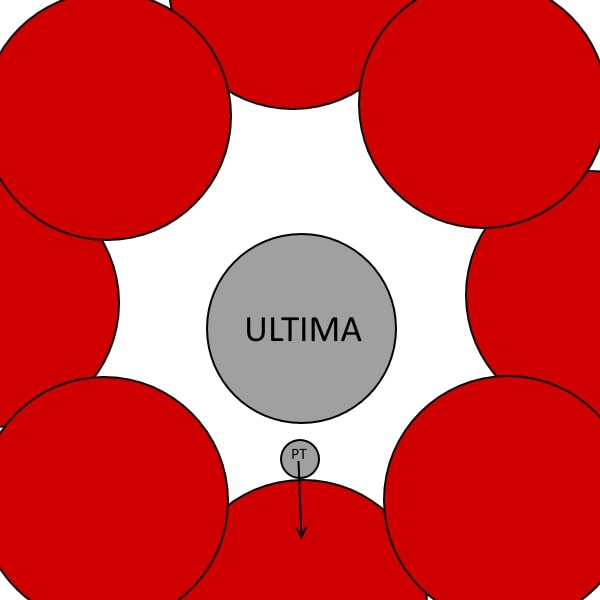
When Radiant Plumes appear, make sure the party is tightly stacked south, right on the edge of the plume, and move into the explosion animation.
The movement done previously should position the party to avoid any rocks that land in the middle of the arena.
If the party is south, stacking together, it should be able to bait the landslides in a way that makes them trivial to dodge. Simply move into the first landslide hit after dodging it.
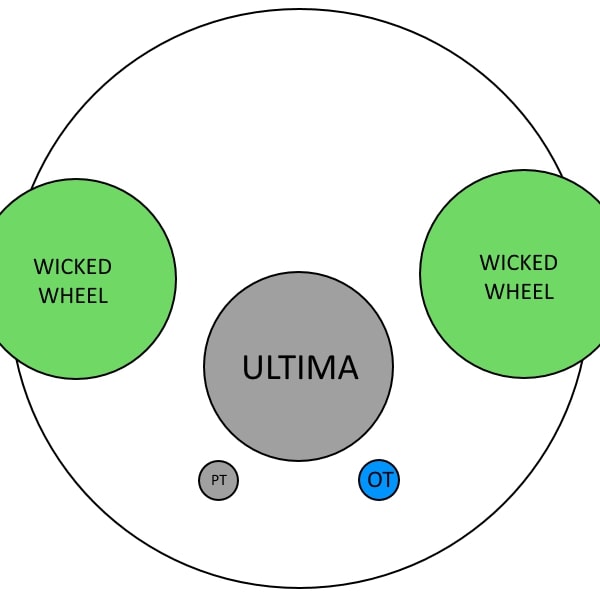
Afterwards, have your current tank separate to take the Viscous Aetheroplasm alone, and stay separated to take Homing Missle safely, without splashing damage on the rest of the party. It's not a bad idea to have a tank use an invulnerability here and have them take all of the tank damage.
Alternatively, you can have the final Aetheroplasm stack with the party to split the damage, and have the OT take the homing missile alone. Just be wary that the Viscous Aetheroplasm application is a cleave. After all of this is over Ultima will begin casting Ultimate Annihilation.
Intermission II: Ultimate Annihilation
While labeled as an Intermission, Ultimate Annihilation is different in the fact that you can still target and hit the Ultima Weapon throughout this phase. The phase goes as follows:
- Ultima teleports to the north edge of the arena, Garuda spawns at the south, Ifrit and Titan both spawn at either the southeast or southwest of the arena.
- Titan uses Weight of the Land while Ifrit marks a random non-tank for Flaming Crush. Garuda uses Eye of the Storm.
- A second set of Weight of the Land puddles appear and Garuda tethers a random player with a Mesohigh tether.
- The third Weight of the Land puddles appears and an Aetheroplasm orb spawns near the southeast of his hitbox.
- A random healer gets marked with Searing Wind and Garuda uses Feather Rain. A second Aetheroplasm orb spawns near the southeast of Ultima's hitbox.
- Titan uses a Woken Landslide and Ifrit dashes in a straight line through an intercardinal.
- Titan uses his second Landslide hit and Ifrit leaves afterburner in a cross through the cardinal points of the arena.
- A third Aetheroplasm orb spawns near the southeast of his hitbox.
- Garuda uses Eye of the Storm and tethers a random player with Mesohigh.
- Ultima begins casting Tank Purge. A fourth Aetheroplasm orb spawns near the south-east of his hitbox (about halfway through the cast).
- Garuda uses Feather Rain.
- Tank Purge cast finishes.
The most important part of Ultimate Annihilation is the Aetheroplasm orbs that spawn throughout the phase. When a player is inside the orb's AoE, they will take menial damage and be tethered to Ultima, increasing his Ultima Aether gauge by one per player. The more people that take an Aetheroplasm orb the greater the tether between two orbs will be during the Aetheric Boom phase, which means the more time you will have to take said orbs in the Aetheric Boom phase. Each orb that spawns corresponds to an orb in the Aetheric Boom phase, with the first orb being north-west, and continuing on clockwise. More info can be found in the Aetheric Boom portion of this guide.
Prepare for these orbs during Ultimate Annihilation by having three players soak the first and second orb and one player (preferably a tank) soak the last two (a 3-3-1-1 orb setup, if you will). This will give you enough time to be knocked back into the first set of orbs, heal up to full, and take the second set. If you are confident in your damage and want to have some extra breathing room, consider a 6-3-1-1 strategy for some extra time in taking a final orb, but this should not be necessary. A recommended strategy can be seen below.
Begin by baiting the first Weight of the Land at melee range, near the south-west of Ultima's hitbox. Move toward the south-east to dodge.
The second Weight of the Land should appear at the south-east of Ultima's hitbox and a Mesohigh tether will tether to a random person. Have a pre-assigned player (preferably a ranged DPS) move out of the stack to take the tether out while the rest of the party dodges back to the south-west. Flaming Crush should resolve here.
Have all players in charge of taking Aetheroplasms dodge right while the rest of the party dodges left. The number of people dodging right depends on your Aetheric Boom strategy.
The orb group should take the second orb here. Everyone except for the Searing Wind healer should then move behind Ultima, while the Searing Wind healer moves toward the south near the wall, to avoid Ifrit charges and Landslides. Make sure to bait the Feather Rain before you move.
Have players move into the Ifrit charge, in the location of the Titan Landslide, in order to dodge the second hits. Your Searing Wind healer should do a similar movement, standing close to the wall behind Titan's landslide. There is merit in dodging toward the north-west, regardless of Titan's position, so if the party is having trouble with the Aetheroplasm hitting unwanted players, I would recommend trying it out.
A tether will appear on a random player, and Eye of the Storm will begin.
The Searing Wind healer should take the Mesohigh tether while everyone else dodges the Eye of the Storm.
Have a single tank take the last two Aetheroplasms while the rest of the party dodges. There is a Feather Rain here, so take note of it, and do not accidentally dodge into the Aetheroplasm.
You are essentially baiting the Weights of the Land near Ultima's hitbox in order to mantain uptime. Make sure you stay stacked as a Flaming Crush marker will appear over a player. Have a pre-assigned player (I would recommend a ranged DPS) move out of the stack after the second Weight of the Land to take the Mesohigh tether. Have your Searing Wind healer move south to prepare to take the second Mesohigh tether, dodge Feather Rains as they appear, dodge Ifrit charges/afterburner and Titan landslides, and the phase will finish with Ultima using a Tank Purge.
After the final Tank Purge, Ultima will teleport to the middle of the arena. Keep in mind that Searing Wind will still be active for a while after the phase is over, so be wary.
Active Phase II
This phase goes as follows:
- Garuda will cast Eye of the Storm.
- Ultima will cast Homing Lasers on the player 2nd in enmity.
- Garuda will cast Eye of the Storm, which will be immediately followed by Ifrit using Radiant Plumes.
- Ultima will use an untelegraphed Diffractive Laser on the tank. Make sure nobody else is standing in front of the boss.
- Vulcan Burst + Eye of the Storm. Vulcan Burst will knock you back roughly halfway through the arena.
- Ultima will cast Homing Lasers on the player 2nd in enmity.
- Another Vulcan Burst + Eye of the Storm combo.
- Ultima will once again use an untelegraphed Diffractive Laser on the tank. Make sure nobody else is standing in front of the boss.
As Searing Wind will still be active when the phase ends, the recommended positioning is shown below:
Drag Ultima closer to north, into the Eye of the Storm, just in case Vulcan Burst is not shielded properly.
The key part of this active phase is shielding Vulcan Bursts that will come out periodically. Make sure your tank who is ready to take Homing Lasers is second in threat, as it will come by shortly. Afterwards, the primals will use an Eye of the Storm into Radiant Plume combo. Stand near the edge of the Eye of the Storm and move into it as soon as it is resolved, dodging the Radiant Plumes. I would recommend taking this opportunity to drag Ultima into the Eye of the Storm, just in case the upcoming Vulcan Burst is not shielded properly. Ultima will cleave in the form of Diffractive Laser. Prepare for the upcoming Vulcan Burst by shielding now. Ultima will follow up with a Vulcan Burst into Eye of the Storm. If shields are not timed properly your tank may have to use their anti-knockback here. Alternatively, you can keep the boss north and have the tank run through the party, having everyone get intentionally knocked back. Ultima will then follow up with a Homing Laser, followed once more by a Vulcan Burst into Eye of the Storm. Shielding here is fairly simple, outside of the tank taking Homing Lasers, which is fairly tight.
When Ultima reaches 49.9%, it will begin casting Ultimate Suppression. This can be pushed early, so be wary. If possible, the goal should be goal to attempt to push Ultima as soon as he begins casting Homing Lasers. This will leave him animation-locked, and will allow you to push some extra damage before the burn after Ultimate Suppression, giving you a bit more time before he enrages.
Intermission III: Ultimate Suppression
Ultima becomes untargettable and the following occurs:
- Garuda spawns at the north-west, Ultima spawns at the north-east, Titan spawns at the southwest, and Ifrit spawns at the southeast. Sisters spawn near the center of the arena, slightly north-west and south-east of the center. Featherlances begin circling around the arena, moving counter-clockwise.
- 3 Eruptions go on three random party members.
- At the second Eruption marker, two random non-eruption players get marked with Mistral Song.
- At the third Eruption marker a random target gets marked with Granite Gaol.
- At the fourth Eruption marker, Mistral Songs resolve, the Gaol marker becomes fettered, and Garuda uses a large fan AoE targetting a random player.
- After the fourth Eruption The sisters use Feather Rain and Mistral Song tornados appear. The Gaol begins casting Granite Impact.
- A second Feather Rain is used by Garuda. Light Pillar begins chasing a random player (The non-tank who has not been selected by either Eruptions, Mistral Song, or Gaol).
- Ultima uses Aetherochemical Laser randomly shooting a line AoE through either the middle, toward its left, or toward its right.
- A Mesohigh tether appears, Titan uses Landslide on a random player, and Ifrit marks a random DPS with Flaming Crush.
- Titan's second Landslide hit at the same time Flaming Crush and Mesohigh tethers resolve.
- Garuda uses another Feather Rain.
- Ultima uses Tank Purge ending the phase ends.
Ultimate Suppression is arguably the greatest wall of the fight, with mechanics seemingly rapid-firing. The phase is fairly simple to digest, however, once it is separated into its main components. The main thing to note is that each player (aside from tanks) will be marked with at least 1 mechanic, which means your goal is to find out who is marked for what as soon as possible in order to figure out what player will be targetted by Light Pillar, which will chase a party member around with a series of pillars of light dealing magic damage to all players under it when it falls.
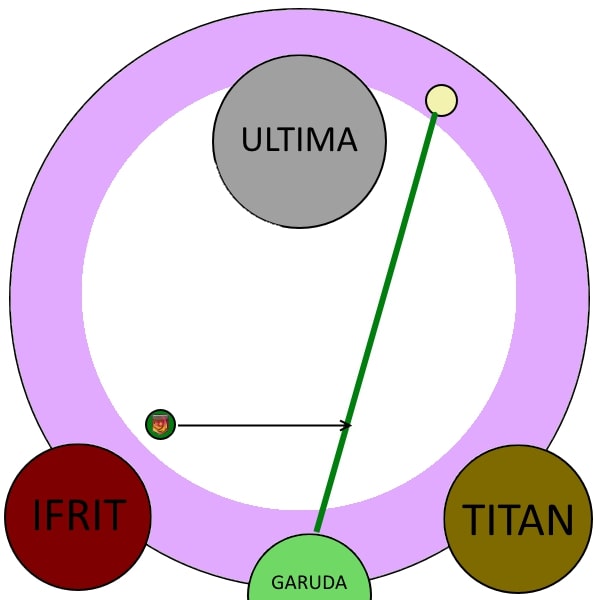
Begin by starting at pre-assigned positions fanned out near Garuda in order to figure out who are the Eruption targets. Bait the second Eruption moving toward the middle and have players marked with Mistral Song move behind the tanks. It is possible to have a single tank take both initial hits of the Mistral Song by popping some cooldowns if you have any to spare. The rest of the party should continue moving forward, preferably baiting the third eruption forward the sisters as shown in the diagram below. A random player will be marked for Gaol, which means at this point you will know who will be targetted by the Light Pillar via process of elimination. The Gaoled player can safely stand inside the fourth eruption and not die as they will be fettered before the damage resolves. Dodge out of AoEs, avoid Feather Rain, and break the Granite Gaol as soon as possible. Keep in mind you will be dodging two Feather Rains in quick succession. Make sure players not in the party stack do not accidentally Feather Rain the party stack.
Have the party fanned out in front of Garuda and the tanks standing in front of Titan. (Tanks can also go on Ultima's side if you want, but you might have issues with lasers.)
Three random non-tanks will be marked with eruptions. Everyone should move toward the middle.

Two players will get marked with Mistral Song as the second eruption appears. These players should move behind the tanks near titan so the tanks can intercept Mistral Song. The rest of the party continues moving forward.
At this point one player will be marked with Granite Gaol. There is one player who has not been selected for any mechanics. This person will be baiting the Light Pillar shortly.
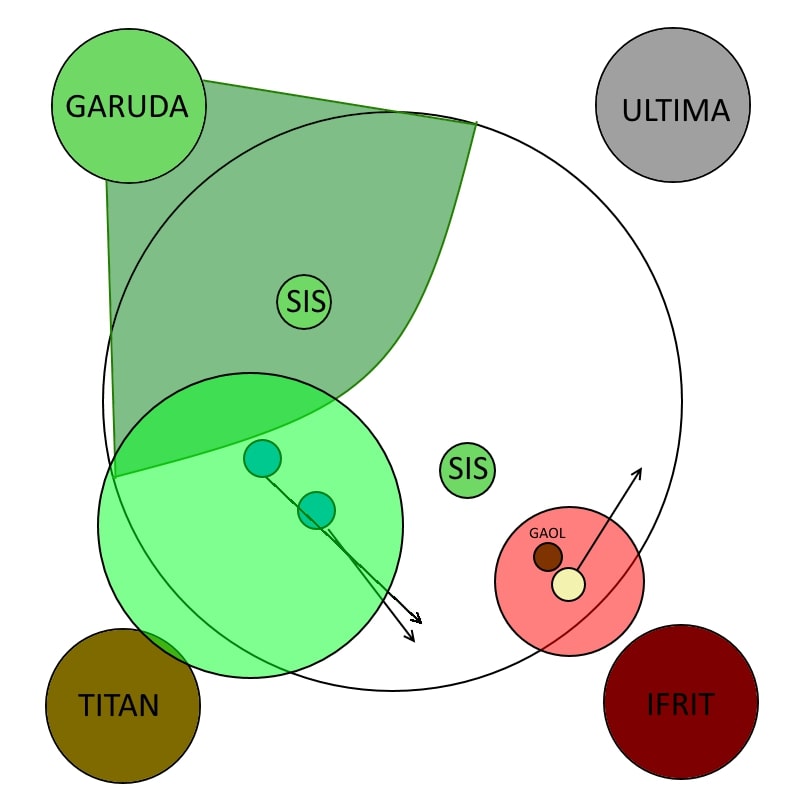
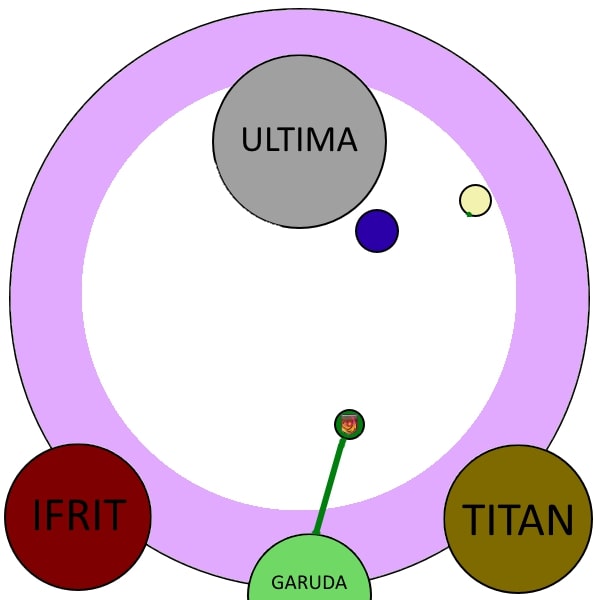
Move out of the fourth Eruption/Tornado, avoid Garuda's fan AoE, and get ready to bait Feather Rain.
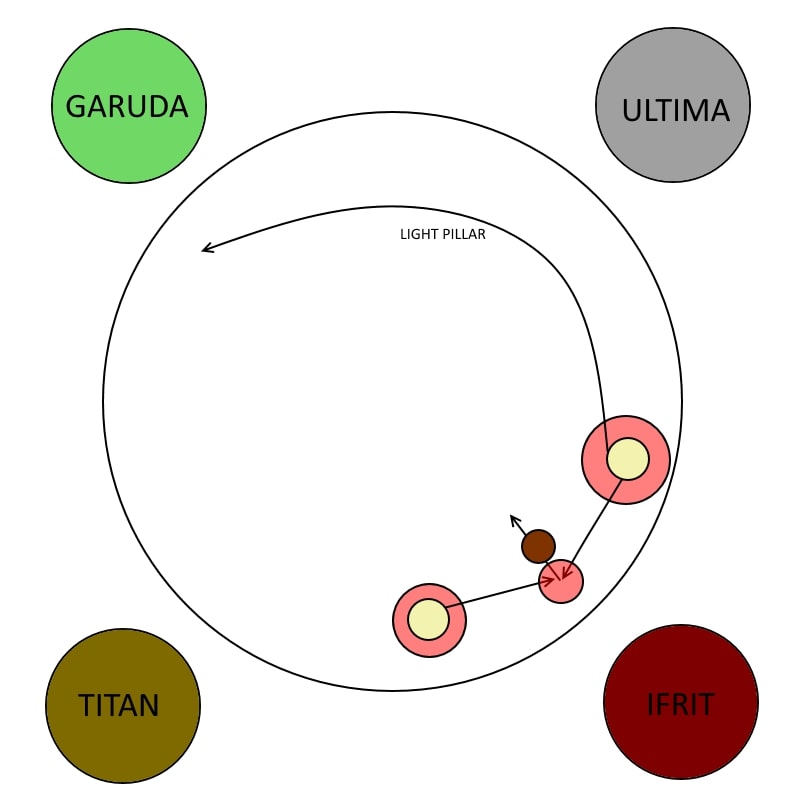
Make sure the Light Pillar bait moves along the wall (but not too close, as Featherlances are circling around the arena) toward Garuda, hitting the Granite Gaol if possible. Everyone else should be attacking the Gaol and dodging Feather Rain.
After all of this is completed, have your whole party stacked in one position, as shown below, to bait Landslide. A random player will be marked with Flaming Crush and another player will be tethered by Mesohigh. Move together as a group to avoid Landslide (out and back in) with a pre-assigned player (preferably a tank) separating and taking the Mesohigh tether. Dodge a final feather rain and get ready for a Tank Purge, so have everyone stacked and shielded. After this phase is over Ultima will teleport back to the middle.
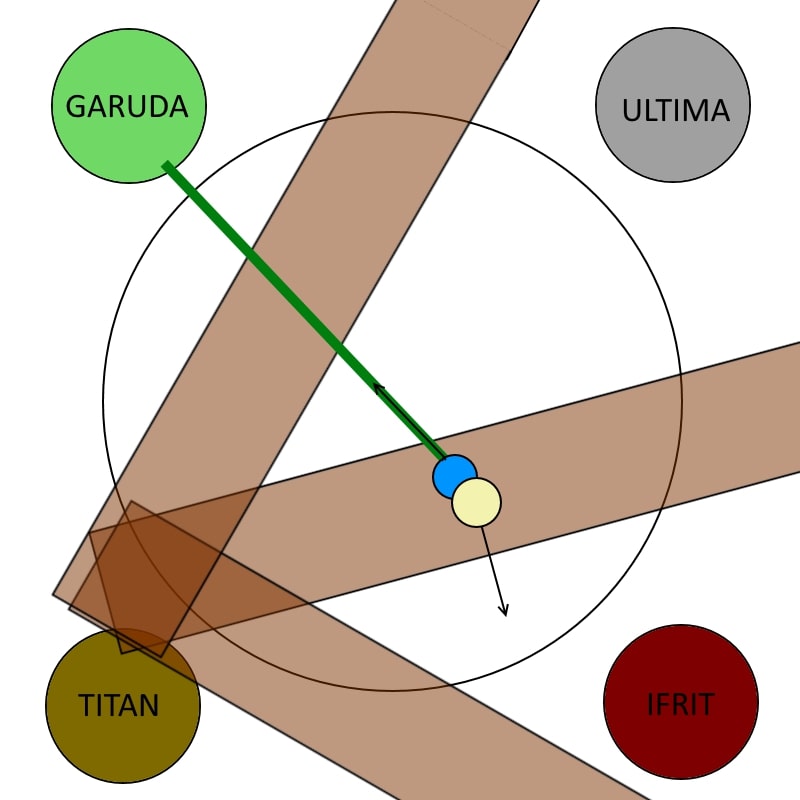
The party does not have to be stacked in this exact position. Be wary that Ultima Lasers are going out throughout all of this so you may have to adjust your position.
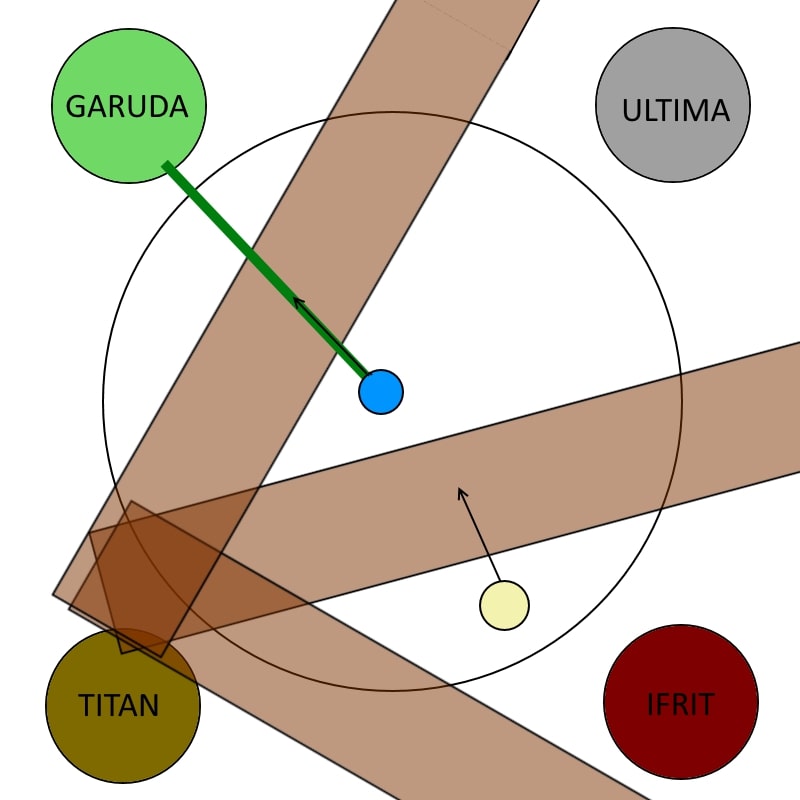
Have a pre-assigned player(preferably a tank) move out of the stack, while the rest of the party dodges back into the landslide after it goes off. The player taking the Mesohigh tether should attempt to dodge into a further Landslide.
Heal up, dodge a Feather Rain, and prepare for a Tank Purge.
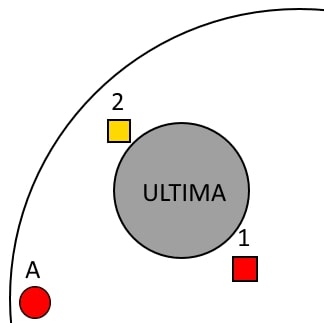
Aetheric Boom
Ultima will begin casting Ultima. This, once again, must be mitigated with heavy shielding and a Level 3 Tank Limit Break. Ultima will immediately follow up with Aetheric Boom which will knockback all players regardless of if they take damage from it or not. However, knockback cancelling abilities do work. This is where the orbs from Ultimate Annihilation come into play. The more players who take orbs, the longer the tether between the two corresponding orbs is. The first orb corresponds to the north-western orb, the second orb corresponds to the north-eastern orb, the third orb corresponds to the south-eastern orb, and the fourth orb corresponds to the south-western orb.
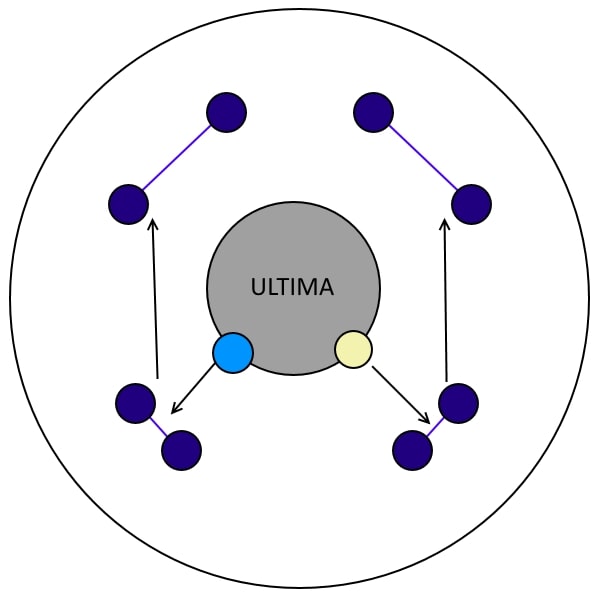
Split in 2 groups: one with 2 tanks with defensive cooldowns, and the other being the rest of the party. Sprint is nice here, to take the second set of orbs as soon as groups are healed.
If you have been following this guide, have each group get knocked back into one of the southern orbs, and then sprint north to the second set of orbs after being healed.
Primal Roulette
After orbs resolve, Ultima will use an AoE Viscous Aetheroplasm, giving three
random players the Viscous Aetheroplasm debuff. Ultima will then summon all three
primals (Garuda, Ifrit, and Titan) in one of three orders: Garuda, Ifrit,
Titan; Ifrit, Garuda, Titan; or Titan, Ifrit, Garuda. This means that you will
be able to accurately predict the last two primals after identifying the first.
Each primal has a set rotation, including their ultimate raidbuster, and will be
immediately followed up by the next primal. During each Primal phase, one Viscous
Aetheroplasm will explode, so your party must be stacked while dodging all of
these mechanics. As Primals are not targetable, targeted mitigation such as
![]() Addle or
Addle or ![]() Reprisal will be ineffective during Primal ultimates. Make sure people
are topped and shielded after every Viscous Aetheroplasm explosion, plus an extra
form of party mitigation. Ensure your party has two set safe spots (ideally
near the middle of the arena, and on an intercardinal) to stay stacked.
Reprisal will be ineffective during Primal ultimates. Make sure people
are topped and shielded after every Viscous Aetheroplasm explosion, plus an extra
form of party mitigation. Ensure your party has two set safe spots (ideally
near the middle of the arena, and on an intercardinal) to stay stacked.
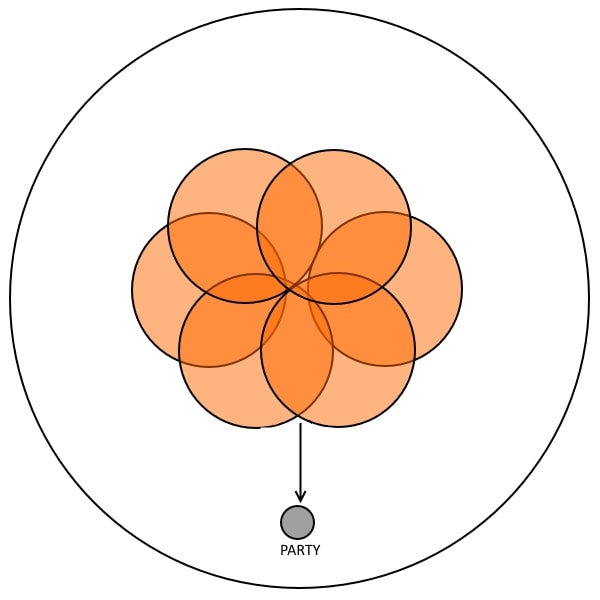
Having set safe spots similar to these will help immensely when coordinating to stack together.
Because of the chance that the Limit Break bar reaches 3 levels here, Primal Roulette is likely the best place to use it due to the fact an extra LB bar may be filled from heavy raidwide damage. If your DPS is more than ahead of the check, however, it is a good idea to wait until all three primals are done to use Melee Limit Break 3 just to play safe.
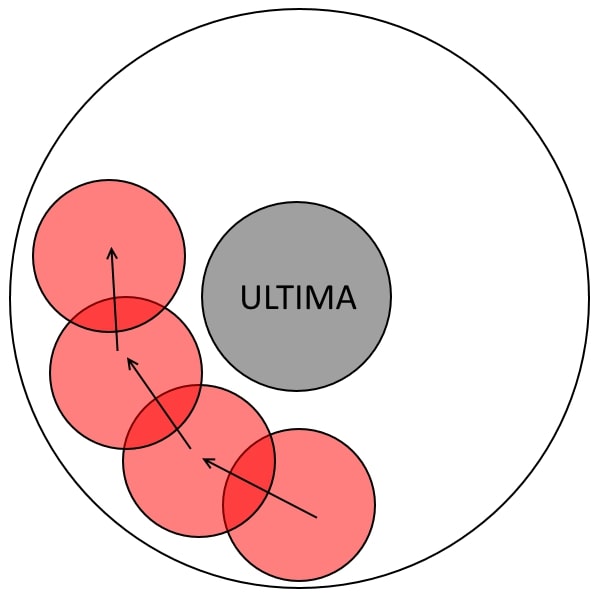
Garuda will begin by using a Wicked Wheel followed by a Wicked Tornado. The Viscous Aetheroplasm will explode as the Wicked Tornado goes off. Garuda will then follow up with an Aerial Blast, followed by a Feather Rain. It is fairly safe to LB as soon as you dodge into the Wicked Wheel, you will have about 2-3s of leeway to dodge Feather Rain.
Ifrit will begin by using a single set of two eruptions followed by a set of Crimson Cyclones going across the cardinals of the map. I would recommend stacking together at either a cardinal or near the middle, and moving to the intercardinal as soon as possible. The Viscous Aetheroplasm will explode after Crimson Cyclones resolve, and will quickly follow up with a Hellfire, so make sure everyone is topped right after Viscous Aetheroplasm explodes. It is fairly safe to Limit Break during Ifrit, just hit the button as soon as you dodge Crimson Cyclone.
Titan will begin by using a triple Weight of the Land followed by his Earthen Fury. The Viscous Aetheroplasm will explode after the second Weight of the Land resolves so it is imperative that your party is dodging the same direction throughout all three Weight of the Lands. You can simply dodge right-left-right from a set position and you should be fine. Because of the precise movement, I would not recommend using Limit Break during Titan.
After all three primals are done, Ultima will teleport to the north of the arena and begin charging up his remaining Ultima Aether. As soon as Ultima reaches 100 Ultima Aether, it will begin a fairly elaborate enrage. Ultima will gain a damage up and slowly begin to stun players one-by-one, pulling them into the middle of the arena, and raising them into the air before killing them with Citadel Siege. It will begin pulling everyone to the middle starting with players who did the least total damage to Ultima and ending with the player who did the most damage (usually ends up pulling healers, tanks, and then finally DPS in that order). There is a somewhat long animation even after all players are defeated so make sure to refresh dots for those final seconds of damage.
If you've defeated the Ultima Weapon, congratulations! You will be rewarded with an Ultima Totem, which can be exchanged in Rhalgr's Reach for an i375 Ultima weapon of your choice.
Changelog
- 02 Feb. 2022: Guide added.
More Final Fantasy XIV Content

To be added...
- New Framer’s Kit With Return Of Breaking Brick Mountains
- Last Chance For THE PRIMALS x Download Festival T-Shirt!
- Team DN Claims #WorldFirst in FFXIV’s Dancing Mad!
- FFXIV Players Blown Away By Store Updates!
- Support #WorldFirst in FFXIV Dancing Mad Ultimate — Now Available!
- Calling FFXIV Fishers To Catch The Rainbow For Charity!
- Last Chance To Enter FFXIV x Jollibee Sweepstakes!
- The Senor Otters Make Their Grand Debut in FFXIV