Dragonsong's Reprise Ultimate (DSR) Guide for Dragonking Thordan
This page contains detailed information and strategy about the high-end Duty "Dragonsong's Reprise (Ultimate)", commonly abbreviated as DSR, specifically for the portion of the fight dealing with Dragonking Thordan.
Phase 7: The Dragon King
Pre-fight preparation:
- Assign Group 1 to the left and Group 2 to the right. This will be important for Ahk Morn's Edge.
- Assign an auto attack soaking order between the DPS and Healers. We recommend Melees first, Ranged second, and Healers third.
Recurring mechanic:
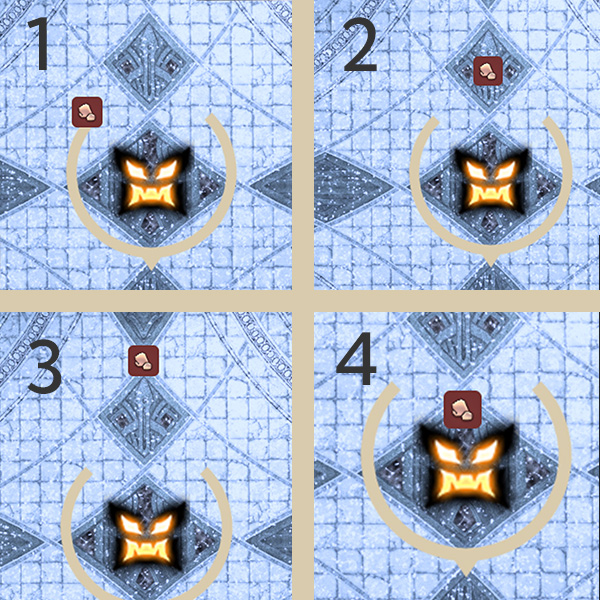
- Throughout the phase, Thordan's sword will glow either red (fire) or blue (ice). If it glows red, he will do an AoE underneath him, making the area inside of his inbox unsafe. If it glows blue, he will do a donut AoE around him, making the area outside of his hitbox unsafe. This in / out movement happens at the start of every major mechanic in this phase, so be mindful of the sword glow.
Dragon-king Thordan Toolbox Resource
For the entirety of the phase, please reference this Toolbox for a detailed view of how each mechanic is handled.
Dragon-king Thordan Strategy
Regardless of your expectation of this phase, it is not as easy as it seems. The DPS check is relatively tight, and the mitigation required to survive must be planned out if you hope to make progress against this final boss.
Exaflare's Edge
This mechanic will happen three times prior to enrage.
- Have the main tank face Thordan directly north or south.
- During the cast of this mechanic, Thordan's swords will glow red or blue. If it is blue, stand inside his hitbox. If it is red, stand slightly out of his hitbox before moving to dodge the Exaflares.
- Stack up behind Thordan to resolve Exaflares. There's two ways to do this which will be outlined below.
- Static Exaflare Dodge: Regardless of pattern, find the Exaflare that spawns directly behind Thordan and always dodge like this:
While this movement will be the same every single time, it does require more movement.
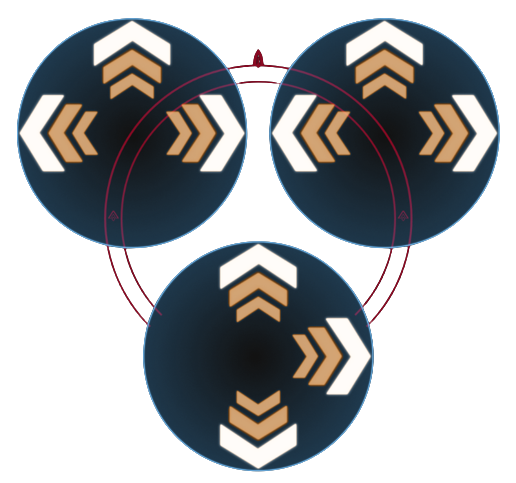
- Single Movement Dodge (also known as Uptime Exaflares): Rather than finding the Exaflare behind Thordan, you will look for the Exaflare that will not be intersected by the other two
Exaflares on the field. The only movement required for this dodge is to move into the direct center of the Exaflare, it will be safe
for the remainder of the mechanic. An example set up for Exaflares can be found below:
Using this image as a reference, the top two Exaflares are pointing at each other, making the bottom Exaflare safe for a single movement dodge. While it will not always be the same Exaflare that is safe, there will always be at least one Exaflare that is safe to do this movement with, sometimes two depending on the pattern you get.
- Static Exaflare Dodge: Regardless of pattern, find the Exaflare that spawns directly behind Thordan and always dodge like this:


Keep in mind that doing Uptime Exaflares is riskier than doing Static Exaflares. It is not recommended to do them unless you are extremely confident that you can identify the correct spot every time. Dying to the Exaflares can easily cause a wipe, especially if you are a Tank player or it is your turn for Trinity.
Please consult this Toolbox for an example of Static Exaflares
Trinity
Thordan will hit both tanks and the closest person to him for an auto attack. The main threat is given a Darkness debuff, the second in threat is given a Light debuff, and the closest person to Thordan will be given a Physical Vulnerability. Tank swap during the cast of every mechanic to swap which debuff the tanks are given. If the tanks do not swap, the damage they will take from Trinities will keep increasing until it is fatal. DPS and Healers will need to rotate who is taking the third auto to ensure each person only takes one based on a pre-asigned priority. Taking another auto attack while having the Physical Vulnerability Up debuff will result in death. Thordan will auto attack twice after each mechanic. We recommend the following priority:
- Melee 1 will take the first Trinity, followed by Melee 2 after each Exaflare's Edge.
- Ranged 1 will take the first Trinity, followed by Ranged 2 after each Ahk Morn's Edge.
- Healer 1 will take the first Trinity, followed by Healer 2 after Gigaflare's edge.
Tip: Ensure that players who are not taking the proximity based Trinity are at least max melee from the boss to ensure they do not get clipped.
Akh Morn's Edge
This mechanic will happen three times prior to enrage.
- Thordan will spawn three towers around him: one behind him, one to his front left, and one to his front right. There are two ways of doing Akh Morn's Edge towers:
- The 3/3/2 Method: Split the party into three groups, which puts both tanks in the rear tower and splits the other towers with the remainder of party members with one healer and two dps in each group. Group 1's Healer and DPS players will soak the front left tower, and Group 2's will soak the front right tower.
- The 6/1/1 Method: Have a tank use an invulnerability ability (such as
 Living Dead) on the rear tower and soak it solo, while the other tank takes one of the side towers by themself and mitigates the damage, and the remaining six players take the remaining tower.
We recommend sending the six players to the front left tower (Group 1's tower). This leaves the invulnerable tank in the rear tower and the mitigating tank in the front right tower.
Living Dead) on the rear tower and soak it solo, while the other tank takes one of the side towers by themself and mitigates the damage, and the remaining six players take the remaining tower.
We recommend sending the six players to the front left tower (Group 1's tower). This leaves the invulnerable tank in the rear tower and the mitigating tank in the front right tower.
- Please note: is it not possible to use the 6/1/1 method on all three sets of Ahk Morn's Edge due to the long cooldown of invulnerablilty abilities. Instead, parties can do 3/3/2 on the first Ahk Morn's Edge, and then do 6/1/1 on the remaining two. Using the 6/1/1 method allows the party to shift some mitigation to the Giagaflares Edge mechanics, which in turn makes both Ahk Morn's Edge and Gigaflare's Edge require less healing resources, but makes Tank mitigation significantly more strict.
- If one of your Tanks is a Paladin, the latest they can use
 Hallowed Ground is the first tank buster of Phase 5: Dark Thordan.
It will be up for the second Ahk Morn's Edge if done here. If used on the last tankbuster in Phase 5, or later, it will not come up in time to use for any set of Ahk Morn's Edge.
Hallowed Ground is the first tank buster of Phase 5: Dark Thordan.
It will be up for the second Ahk Morn's Edge if done here. If used on the last tankbuster in Phase 5, or later, it will not come up in time to use for any set of Ahk Morn's Edge.
- During this mechanic Thordan's sword will glow red or blue. If it is blue, stand inside his hitbox. If it is red, stand slightly out before moving in to soak your Akh Morn.
- After the in or out, try to have each group move closer under Thordan's hitbox to make healing easier. Some heals have a smaller range and might miss players if they remain too far out.
- Prepare for another round of Trinity auto attacks.
Gigaflare's Edge
This mechanic will happen two times before enrage.
Three Gigaflare proximity AoEs will spawn around Thordan in a triangle formation. Take notice of the order that they spawn in. There are two methods for doing Gigaflare's Edge:
Method 1: The Run Around the Room Strat
- Position the party to be opposite of the first Gigaflare and wait for it to explode.
- Prior to the first Gigaflare explosion, Thordan's sword will glow red or blue. If it is blue, stand inside his hitbox opposite of the first Gigaflare. If it is red, stand slightly out on the opposite side of the Gigaflare.
- Move the party clockwise/counterclockwise to be opposite of the second Gigaflare and wait for it to explode.
- Move the party again clockwise/counterclickwise to be opposite of the last Gigaflare and wait for it to explode.
This method is significantly more movement than the other method, but is slightly safer for HP as there is less chance of being slightly too close to the explosion and taking significantly more damage.
Method 2: The Single Movement Strat
- Identify where the first explosion is and position the party directly accross from it.
- Prior to the first Gigaflare explosion, Thordan's sword will glow red or blue. If it is blue, stand inside his hitbox opposite of the first Gigaflare. If it is red, stand slightly out on the opposite side of the Gigaflare.
- As soon as the first explosion damage hits, run directly through the boss and stop at least at max melee distance from Thordan, on top of where the first Gigaflare exploded. Ranged can choose to stand slightly farther out to take less damage from the remaining two explosions.
- Unlike the first method, the party does not need to rotate more. Instead, they should ensure that they are not too close to either of the remaining two explosions as this method puts the party closer to both than the other method.
This method is significantly less movement for the party, but has a much higher risk of being too close to the exaflares and taking lethal damage. The lower movement may be preferred for casters, but make sure to be in the correct spot to avoid extra, potentially lethal, damage.
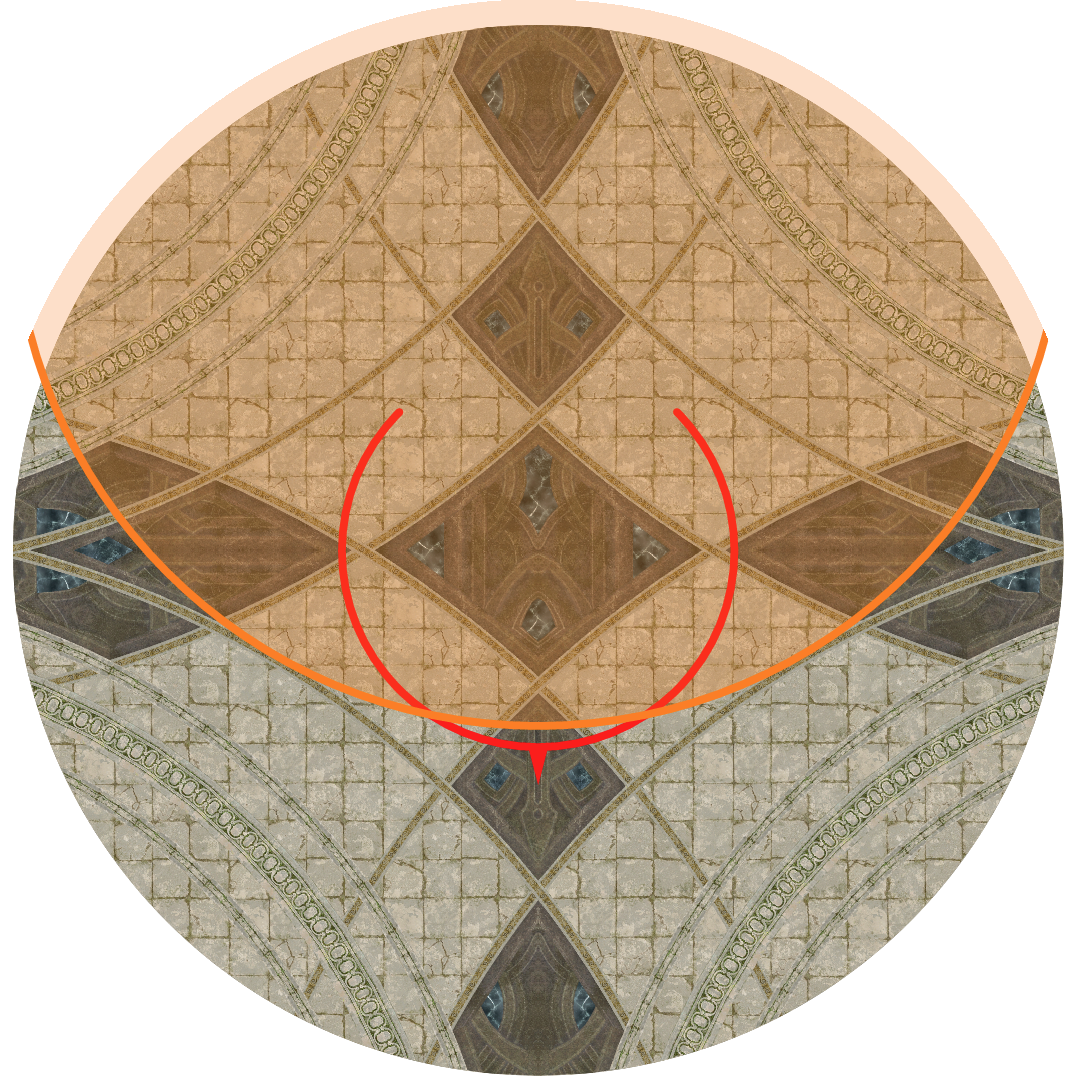
In regard to Gigaflare's range, the proximity of the falloff damage is about 21 yalms. While dodging out of Thordan's hitbox for red may be simple, the safe spot created by blue is extremely small. The image below shows an accurate distance where the Gigaflare damage is lethal, so ensure you are standing in the sliver of safe spot created if you need to dodge inwards.
Mechanic Loop
The mechanics repeat three times each (except for Gigaflare's Edge which only happens twice), ending with Morn Afah's Edge. This makes the timeline for the whole phase:
- Exaflare's Edge 1
- Two Trinity auto attacks (Melees take these)
- Akh Morn's Edge 1
- Two Trinity auto attacks (Ranged take these)
- Gigaflare's Edge 1
- Two trinity auto attacks (Healers take these)
- Exaflare's Edge 2
- Two Trinity auto attacks (Melees take these)
- Akh Morn's Edge 2
- Two Trinity auto attacks (Ranged take these)
- Gigaflare's Edge 2
- Two trinity auto attacks (Healers take these)
- Exaflare's Edge 3
- Two Trinity auto attacks (Melees take these)
- Akh Morn's Edge 3
- Two Trinity auto attacks (Ranged take these)
- Morn Afah's Edge
Enrage Sequence: Morn Afah's Edge
Dragon-king Thordan will begin to channel Morn Afah's Edge after executin the third set of Ahk Morn's Edge and its subsequent Trinities. He will spawn three sets of towers in the same positions as Ahk Morn's Edge, except this time they will instantly kill whoever is inside of them. Failing to have at least one person in the towers will cause them to explode, instantly wiping the group. In order to get as much time as possible out of this enrage sequence, send one player in each tower for the first two sets of towers, then no players in the third set, as this will allow the remaining players to get an extra ability off before the towers explode. Since there are only 8 players and 9 towers, the final set of towers would explode regardless. We recommend sending both Healers and Tank 1 for the first set, both Ranged DPS and Tank 2 for the second set, and the Melee DPS stay outside of all sets of towers. If Limit Break 3 has not been used by this point, one of the Melee DPS should use it at the start of Morn Afah's Edge.
If you have managed to make it this far, and have slain the Dragon King, then congratulations on clearing Dragonsong's Reprise (Ultimate)! You can exchange your ![]() Dragonsong Totem for an Ultimate Weapon of the Heavens in Radz-at-Han from Nesvaaz (X:10.5 Y:10.1)
Dragonsong Totem for an Ultimate Weapon of the Heavens in Radz-at-Han from Nesvaaz (X:10.5 Y:10.1)
Changelog
- 25 May 2024: Guide updated with current community strategies.
- 04 Jun. 2022: Guide added.
Phase Guides for Dragonsong's Reprise

Torael Valdis, or Tor for short, is an experienced raider in FFXIV who has been playing the game since the tail end of the Heavensward expansion. His experience includes multiple Week 1 Savage Tier kills as well as completion of each Ultimate Raid in the patch they were released. You can find him in The Balance Discord where he currently is active as a melee DPS mentor. He also occasionally streams early prog on his Twitch.
- How Character Action Skins Will Give You More Ways to Customize
- How Auto Content Balancing Will Change How You Play Evercold
- This Rare FFXIV Minion Secretly Became Sellable in Patch 7.55
- The Yo-kai Watch Event Returns Again to Eorzea
- Best Crafting Rotations for 7.55 Phantom Occultum Relics
- FFXIV Hits the Switch 2 Soon! Here’s What We Know About the Release Date
- Hear, Feel, Think: What Eorzea Immersion Sounds Like
- New Character Creation Updates With FFXIV’s Patch 8.1