The Unending Coil of Bahamut (Ultimate) Nael deus Darnus Guide
This page contains detailed information and strategy about the high-end Duty "The Unending Coil of Bahamut (Ultimate)", commonly abbreviated as UCoB, specifically for the portion of the fight dealing with Nael deus Darnus.
Phase 2: Nael Deus Darnus
The phase begins with Heavensfall, a raid-wide AoE with a knockback dealing damage based on how close you are to the center. Make sure to mitigate. Immediately after the knockback is resolved, a set of glowing Thermionic Bursts will appear on the floor, dividing the arena into pie slices. Standing in this AoE when they explode will deal lethal damage, and inflict paralysis if you manage to survive. At the same time, Nael will Meteor Stream a total of eight party members, in two sets of four. These are splash damage, so all players must spread out across the arena to prevent doubling up on damage. Afterwards, Nael will use Dalamud Dive and jump on the tank who held threat on Twintania, dealing significant damage. This is also splash damage, so make sure to stay away from her target. This will always be the party member who had top enmity on Twintania when she left the arena.
Nael has the following abilities:
- Dalamud Dive: Nael jumps onto her target, dealing significant splash damage. Make sure to spread away from the tank to prevent any extra damage.
- Bahamut's Claw: Physical tankbuster consisting of five successive hits to her target.
- Iron Chariot: Nael will spin around with her spear, dealing lethal damage and a knockback to any player in melee range. Has no AoE indicator or cast bar.
- Thermionic Beam: Nael shoots a laser at a random party member, dealing massive magic damage which can be soaked across party members. Has no cast bar or AoE indicator.
- Lunar Dynamo: Instant raid-wide AoE dealing lethal damage, with only two safe spots in melee range or very far away from Nael. Looks like a donut.
- Raven's Dive: Nael will randomly jump on a party member, knocking back all other players hit except for her target.
- Ravensbeak: Tankbuster dealing significant physical damage to her target, and inflicts Piercing Resistance Up II. Forces a tank swap.
- Hypernova: Sphere targeted on players. Standing inside will pull you to its center, apply a deadly bleed, and deal significant damage.
Nael's Quotes
As many of these moves do not have AoE markers, you will have to use Nael's unique tell to predict what attacks she will use. These tells are present in the form of quotes. Nael's quotes will appear over her head and in the chatbox, and she will perform a different series of moves depending on her quote. Possible quotes are shown below:
- O hallowed moon, take fire and scorch my foes! – Lunar Dynamo > Thermionic Beam
- O hallowed moon, shine you the iron path! – Lunar Dynamo > Iron Chariot
- Blazing path, lead me to iron rule! – Thermionic Beam > Iron Chariot
- Take fire, O hallowed moon! – Thermionic Beam > Lunar Dynamo
- From on high I descend, the iron path to call! or From on high I descend, the iron path to walk! – Raven's Dive > Iron Chariot
- From on high I descend, the hallowed moon to call! – Raven's Dive > Lunar Dynamo
- Fleeting light! 'Neath the red moon, scorch you the earth! – Dalamud Dive > Thermionic Beam
- Fleeting light! Amid a rain of stars, exalt you the red moon! – Meteor Stream > Dalamud Dive
These quotes are not entirely random, and are usually present in sets of two throughout the phase (excluding the end). I highly recommend either using ACT triggers or have a person in the raid always call out what each quote means.
Fire, Ice, and Lightning Mechanics
After landing on the tank, Nael will immediately use Bahamut's Claw on her target, and follow up with Bahamut's Favor, gaining a damage buff and summoning five dragons outside the arena, signifying the start of the Elements phase. Each of the dragons signifies a different element, and each does different abilities, explained below:
- The Thunder Dragon inflicts Thunderstruck on any two players. When Thunderstruck ticks to 0, it does splash damage + paralysis. Other players cannot get hit by this splash, especially not each other.
- The Ice Dragon casts Iceball on all eight players, one by one, inflicting Icebitten, unless the target is suffering from Firescorched, in which case it will be removed. Icebitten can be removed by getting hit by a fireball. If a player is hit by Iceball and suffers from Icebitten, they will take lethal damage.
- The Fire Dragon will tether a random player, targeting them for Fireball. Fireball will splash the fire in a radius, inflicting all players without a debuff with Firescorched, unless suffering from Icebitten, in which case it will be removed. Firescorched can be cleansed by getting hit by an Iceball. If a person with a Firescorched debuff gets hit by a Fireball, they will die.
- The Light Dragon will cast Wings of Salvation, placing white puddles on the ground under random players. Standing in these puddles when they disappear will deal lethal damage. After they disappear, they will leave behind a small white circle. Walking into the circle will remove the Doom debuff.
- The Dark Dragon will periodically inflict Doom on random party members, each with different durations. When Doom counts down to zero, the player will instantly die. This debuff can be cleansed by walking into a white circle left behind by Wings of Salvation.
Players must be hit twice by fireball throughout the phase in order to prevent death from Icebitten. However, they cannot take a fireball hit if suffering from Firescorched. There are many ways to stack fire tethers in and out in order to survive these mechanics. Examples include IN->OUT->IN->OUT, OUT->IN->IN->OUT, among others. It takes about two fire tethers in order for the Ice Dragon to Iceball the whole party twice.
An alternative, for added safety, you can instead have three fire tethers stack in the party (IN->OUT->IN->IN), as only two fires in will result in a risk of Iceball deaths if any player dies. This is the recommended method.
Because of the amount of soak mechanics in this phase, I would highly recommend having your party always stack together and dodge mechanics in the same direction. This obviously excludes members marked by Thunderstruck or Fireball tethers wanting to be placed out.
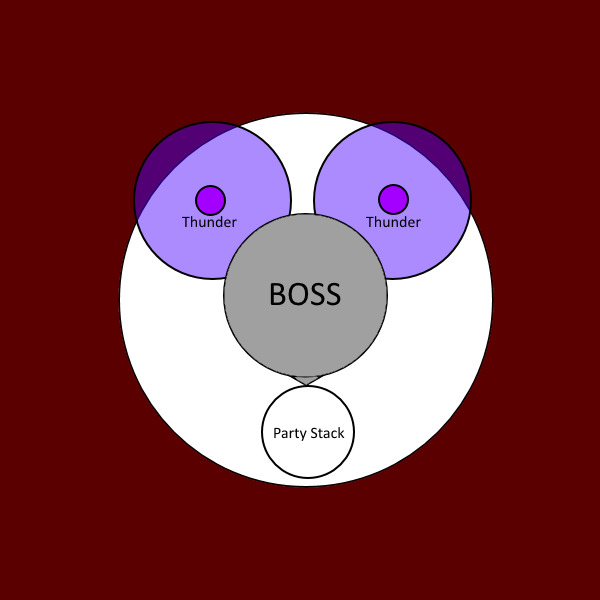
After casting Bahamut's Favor, Nael will yell out a quote, and two random party members will be inflicted with Thunderstruck. She will then use Lunar Dynamo. The party must account for two thunderstruck AoEs, and a safe spot for the party, while preparing to dodge the upcoming Lunar Dynamo. I would recommend having the two thunderstruck players positioned in the back left and back right flanks, with the rest of the party stacking north, as shown below:
Nael's quote will determine what move she will use immediately following Lunar Dynamo, being either Thermionic Beam ("O hallowed moon, take fire and scorch my foes! "), or Iron Chariot ("O hallowed moon, shine you the iron path!"). At the same time, a fire tether will appear. Be sure to have your whole party dodge in the same direction if Chariot is chosen, if you are planning to keep this Fireball in. Afterwards, two random players will be marked with Doom (with durations of either 6s or 10s), and Wings of Salvation puddles will appear under random players. Have the player with the shortest Doom duration take the first white circle after Wings of Salvation resolves, and the second shortest take the second white circle.
After a very short pause, Nael will use another set of Bahamut's Claws on her target, and another fire tether will appear. Two players will also be marked with Thunderstruck after a few seconds. Because there is no Lunar Dynamo present, Thunderstruck players are free to just move away from the stack to avoid their splash damage. If you are planning on keeping this fire in, make sure Thunderstruck players take the fire first before spreading out, as Fireball resolves before Thunderstruck.
Nael will then say her second quote, determining if she will either use Thermionic Beam > Lunar Dynamo ("Take fire, O hallowed moon!"), or Thermionic Beam > Iron Chariot ("Blazing path, lead me to iron rule!"). Because Thermionic Beam is always present, I would highly recommend preparing mitigation for it. The Light and Dark Dragons will then preform the same Wings of Salvation and Doom combination they did earlier, except this time there will be three players marked with Doom (durations of 6s, 10s, and 16s), and three Wings of Salvation will be cast. At the third Wings of Salvation dance, Thunderstruck will be applied on two players, and a fire tether will appear. Contrary to the second fire, Thunderstruck will resolve BEFORE Fireball, so have Thunderstruck players spread out their thunders first, and then stack in for fire if you are planning on keeping this fire in. Nael will follow up with another set of Bahamut's Claws on the tank.
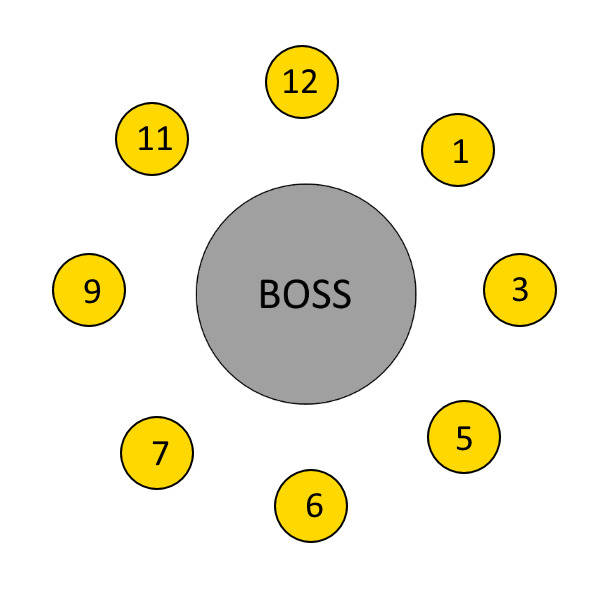
Nael will then say her third quote, determining whether she will use Raven's Dive > Lunar Dynamo ("From on high I descend, the hallowed moon to call! "), or Raven's Dive > Iron Chariot ("From on high I descend, the iron path to call!" or "From on high I descend, the iron path to walk! "). Raven's Dive will always be present. In order to prevent Raven's Dive from knocking back other players, but still keeping Nael close enough to everyone to easily react to mechanics, I would recommend assigning a clock-position based spread, as shown below:
During Nael's second move (either Lunar Dynamo or Iron Chariot) a random player will be marked by a fireball tether. Shortly afterwards, two players will be marked with thunderstruck. In this case, Thunderstruck resolves after Fireball, so have your thunders get hit by Fireball before spreading out their thunders. Immediately after, the Light and Dark Dragons will do the exact same Wings of Salvation + Doom combination, once again with three players marked with Doom.
After the third Wings of Salvation is resolved, Nael will use Ravensbeak on her target, forcing a tank swap. Immediately afterwards, Nael will say her fourth quote, and a green marker will appear on a random player, signifying the beginning of Divebombs.
Divebombs
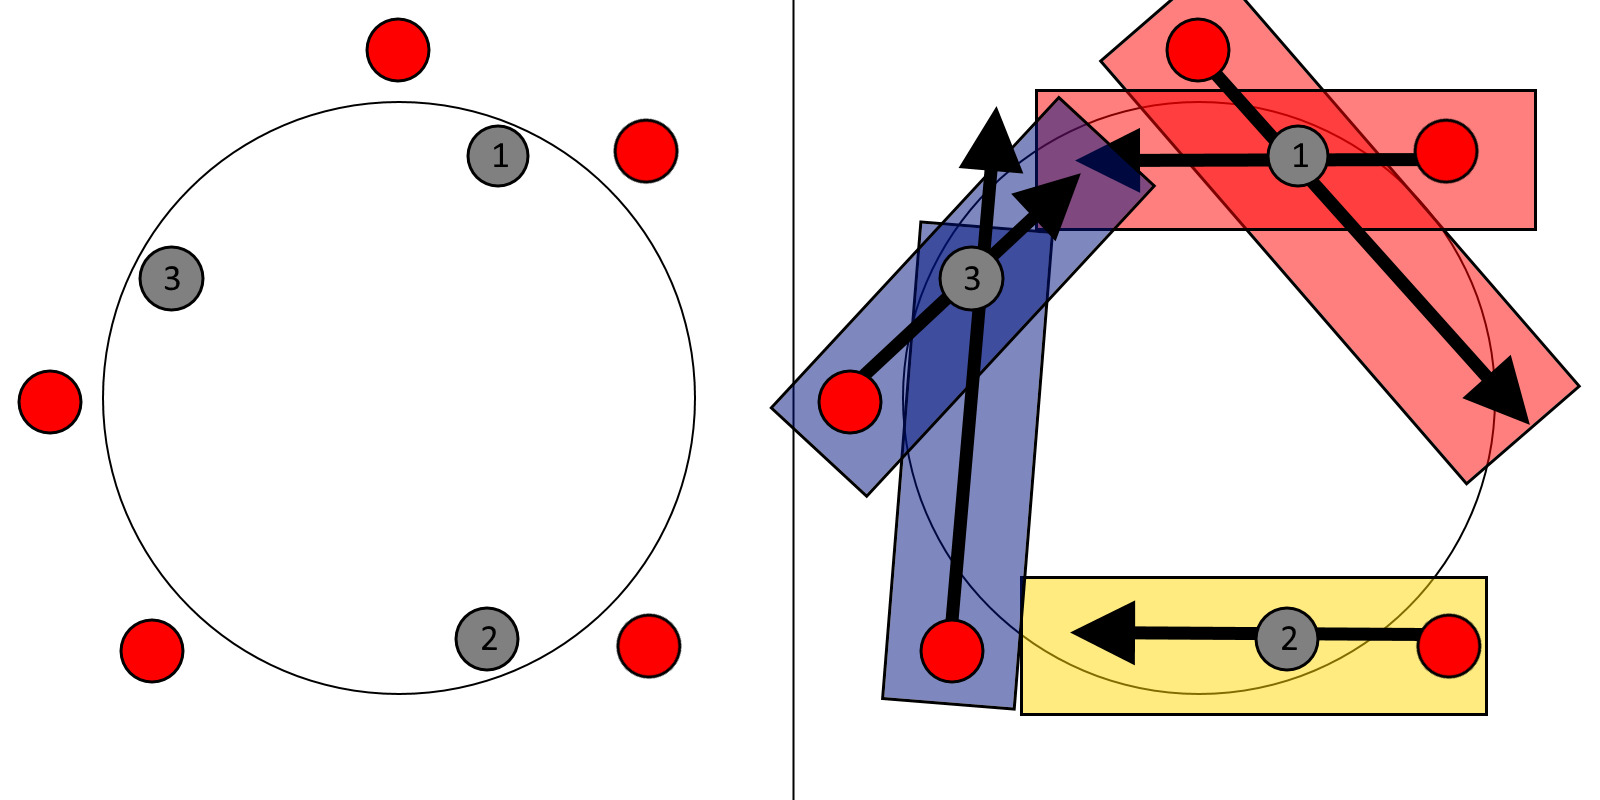
A series of three green markers will appear above three random players (not including the current main tank). Dragons will dive in the location the markers disappear, so the goal is to bait them into locations keeping the center safe. The common strategy is to have one person in charge of finding the safe spots to call divebombs before the mechanic starts, using preset waymarks on the edge of the arena. Dragons always appear in exactly cardinals or intercardinals, and appear after the Bahamut's Favor cast, so there is plenty of time. The time dragons dive depends on their position in the arena. Starting true north (12 o'clock) of the arena, and moving clockwise around the arena, the first two dragons will dive as a group, the third will dive alone, and the last two dragons will dive last as a group. They will always dive in this 2-1-2 configuration. Divebomb waymarks should be placed in locations where dragons will dive away from the center, ideally diving tangent to the edge. An example is shown below:
During divebomb baiting, Nael will be throwing out Hypernovae at the furthest targets from her, which ideally should be the people baiting divebombs. Make sure the divebomb marker over your head disappears before moving away to dodge Hypernovae. If possible, always dodge Hypernovae by moving clockwise.
Nael will also say her fourth quote, determining whether she will do Meteor Stream > Dalamud Dive ("Fleeting light! Amid a rain of stars, exalt you the red moon! "), or Dalamud Dive > Thermionic Beam ("Fleeting light! 'Neath the red moon, scorch you the earth!"). This determines whether you should spread out during this phase, to avoid doubling up on Meteor Streams, or to stack together and soak Thermionic Beam. Make sure that nobody is near the main tank, as Dalamud Dive's splash damage will be lethal to anyone that is not a tank. Meteor Streams will occur during the second divebomb, so make sure the party is spread out away from the second waymark. If Divebombs have been marked correctly, the center will always be safe, making it the perfect stack point for Thermionic Beam.
After all divebombs are resolved, dragons will no longer do any actions for the rest of the phase, so you no longer have to worry about Iceballs, Fireballs, Thunderstruck, Doom, or Wings of Salvation. Nael will follow up with another set of Bahamut's Claws, and proceed to say two more quotes. These quotes can be any of the previously seen quotes (excluding divebomb quotes), so be ready for anything. Nael will then follow with a Ravensbeak, forcing a tank swap, and attacking her new target with a set of Bahamut's Claws. Shortly after, she will become untargetable, and begin casting a lethal Megaflare, wiping the raid and serving as an enrage.
After Nael is killed, she will jump away, signifying the end of the phase. Nael can be pushed before her rotation is complete. Be sure to prepare mitigation and stack together once more to prepare for this phase transition.
Changelog
- 13 Apr. 2022: Guide added.
More Final Fantasy XIV Content

To be added...
- New Framer’s Kit With Return Of Breaking Brick Mountains
- Last Chance For THE PRIMALS x Download Festival T-Shirt!
- Team DN Claims #WorldFirst in FFXIV’s Dancing Mad!
- FFXIV Players Blown Away By Store Updates!
- Support #WorldFirst in FFXIV Dancing Mad Ultimate — Now Available!
- Calling FFXIV Fishers To Catch The Rainbow For Charity!
- Last Chance To Enter FFXIV x Jollibee Sweepstakes!
- The Senor Otters Make Their Grand Debut in FFXIV