Hydaelyn's Call Extreme Trial Guide
This guide aims to prepare players for "The Minstrel's Ballad: Hydaelyn's Call" by providing detailed explanations of the fight's mechanics, as well as consistent strategies for the purpose of farming.
Introduction
From the first note of the minstrel's melody, you recall the scene with crystal clarity─your allies and Hydaelyn, hope against hope. Overcome once again with the emotion of that day, no epithet seems too grand, no verse too epic...
Unlock Requirements
The Minstrel's Ballad: Hydaelyn's Call can be unlocked at level 90 after completing the main scenario quest "Endwalker" and talking to the Wandering Minstrel in Old Sharlayan (x12.7, y14.2). It requires a minimum item level of 560 to queue, but this requirement can be bypassed by entering with a full party.
Encounter Guide
Phase 1: Hydaelyn's Arms
Hydaelyn's Abilities:
- Heros's Radiance: Heavy unavoidable raidwide damage, only used when Hydaelyn is equipped with a sword.
- Shining Saber: Heavy damage in the form of an 8-player party stack targeting a random player. This is only used when Hydaelyn is equipped with a sword.
- Magos's Radiance: Heavy unavoidable raidwide damage. Only used when Hydaelyn is equipped with a staff.
- Mousa's Scorn: 2-man tankbuster stack. Only used when Hydaelyn is equipped with Chakrams.
- Crystalize: Hydaelyn imbues one of three elements to her weapon, each having
a different animation, which will dictate what attack will be used after a delay:
- Ice: Circle AoEs targeted on 8 players that cannot be stacked.
- Water: 4-player stack targeting each healer, which inflicts Water Resistance Down.
- Earth: 8-player party stack targeting a random player.
- Dawn's Mantle: Colored shapes appear on the left and right of Hydaelyn,
transforming her weapon into one of three forms. She will immediately follow
it up with an attack depending on which weapon she chooses:
- Chakrams (Red): Roomwide AoE where only the boss's hitbox is safe.
- Staff (Green): Point-blank AoE around Hydaelyn.
- Sword (Blue): A large cross AoE with Hydaelyn in the middle hitting a straight line from her front, back, and flanks to the wall.
- Aureole: Raidwide attack hitting everywhere in the arena except for small cones on both of Hydaelyn's flanks.
- Lateral Aureole: Raidwide attack hitting everywhere in the arena except for a small cone on Hydaelyn's front and back.
Hydaelyn's first phase consists of combinations between her Crystalize attacks and her currently equipped weapon. Hydaelyn begins with her sword equipped and will always have a visible buff indicating what weapon is currently equipped. The phase begins with heavy raidwide damage in the form of Heros's Radiance, followed up by a Shining Saber, which the party should stack together to soak.
Hydaelyn will Crystalize her weapon, as well as switch to one of her other two weapons. Hydaelyn's Dawn's Mantle will resolve first, immediately followed up by the Crystalize attack used before. For example, If Hydaelyn crystalizes with Ice and then uses a red Dawn's Mantle, it indicates to move into her hitbox and then spread out for ice AoEs.
Hydaelyn will then follow up with either a Mousa's Scorn, or a Magos's Radiance, depending on if her weapon is either in the form of chakrams or a staff respectively. She will then use one of either Aureole or Lateral Aureole, and she will repeat this timeline of attacks three times before she becoming untargettable and transitioning into her next phase. Hydaelyn will always equip her sword again during her third loop.
Phase 2: Crystals of Light
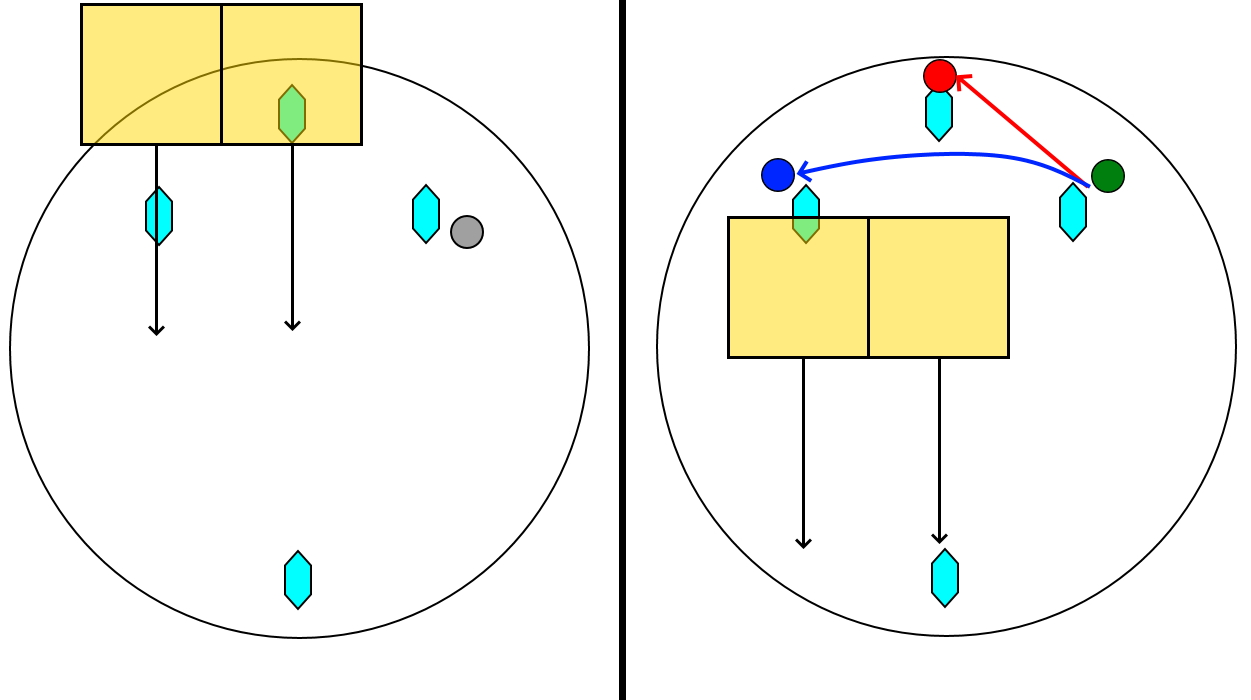
The phase begins with two large Echoes of Hydaelyn appearing on the east and west, in addition to six crystals appearing around the arena. The Echoes will tether to other crystals and to each other. Any crystal tethered by the Echoes will gain a Vulnerability Down buff, and when both Echoes are tethered to each other, they will gain a Damage Up buff. Hydaelyn also begins to charge Conviction, as shown in the duty gauge. If Conviction reaches 100, the raid will wipe.
After a short pulse, a set of three crystals will begin to light up, located either all on the north side or all on the south side. Lit crystals will charge the duty gauge faster, so they must be destroyed as soon as possible.
Both of the party's tanks will move toward the side opposite the lit crystals, with the rest of the party moving to the lit crystals. The party should be destroying the lit crystals as soon as possible while the tanks stay put opposite the party. After one side of crystals is destroyed, the tanks and the party will swap places, making sure that the adds do not tether to crystals. The adds will get a Damage Up stack while tethered together, but it is easy to heal through with tank cooldowns. There is no other raid damage throughout the phase.
Destroying a crystal deals heavy damage to both adds, and when all crystals are destroyed, the adds will be left with very low HP. Once the adds are defeated, as long as Hydaelyn's Conviction gauge is less than 100, Hydaelyn will use Exodus, dealing heavy raidwide damage and transitioning into the next phase.
Phase 3: Lightwaves
Hydaelyn gains the following new abilities:
- Halo: Heavy raidwide damage.
- Lightwave: Spawns a set of waves on the outside of the arena in one of three lanes. These act as large square AoEs that will slowly move forward across the arena. When a Lightwave hits a crystal, it will cause an explosion and deal heavy damage to all players. Damage can be avoided by breaking line of sight by hiding behind another crystal.
- Intralateral Arc: Deals heavy magic damage in a cone three times, targeting a tank, a healer, and a DPS.
- Heros's Glory: Lethal attack dealing damage in front of Hyadelyn. Must be avoided by standing behind her.
- Heros's Sundering: Heavy tankbuster in the form of a large AoE cone aiming at her target.
- Parhelion: Hydaelyn summons three sets of chakrams, which will quickly slash from the middle to a wall, and then shoot across the arena in a straight line after a short delay when Hydaelyn casts Subparhelion. Only used when Hydaelyn is equipped with Chakrams.
- Parhelic Circle: Hydaelyn summons a set of lines from the middle on the arena's floor. After a short delay, she will summon Mystic Refulgences on the tips of every line, which explode in a small circle AoE around them. Only used when Hydaelyn is equipped with a staff.
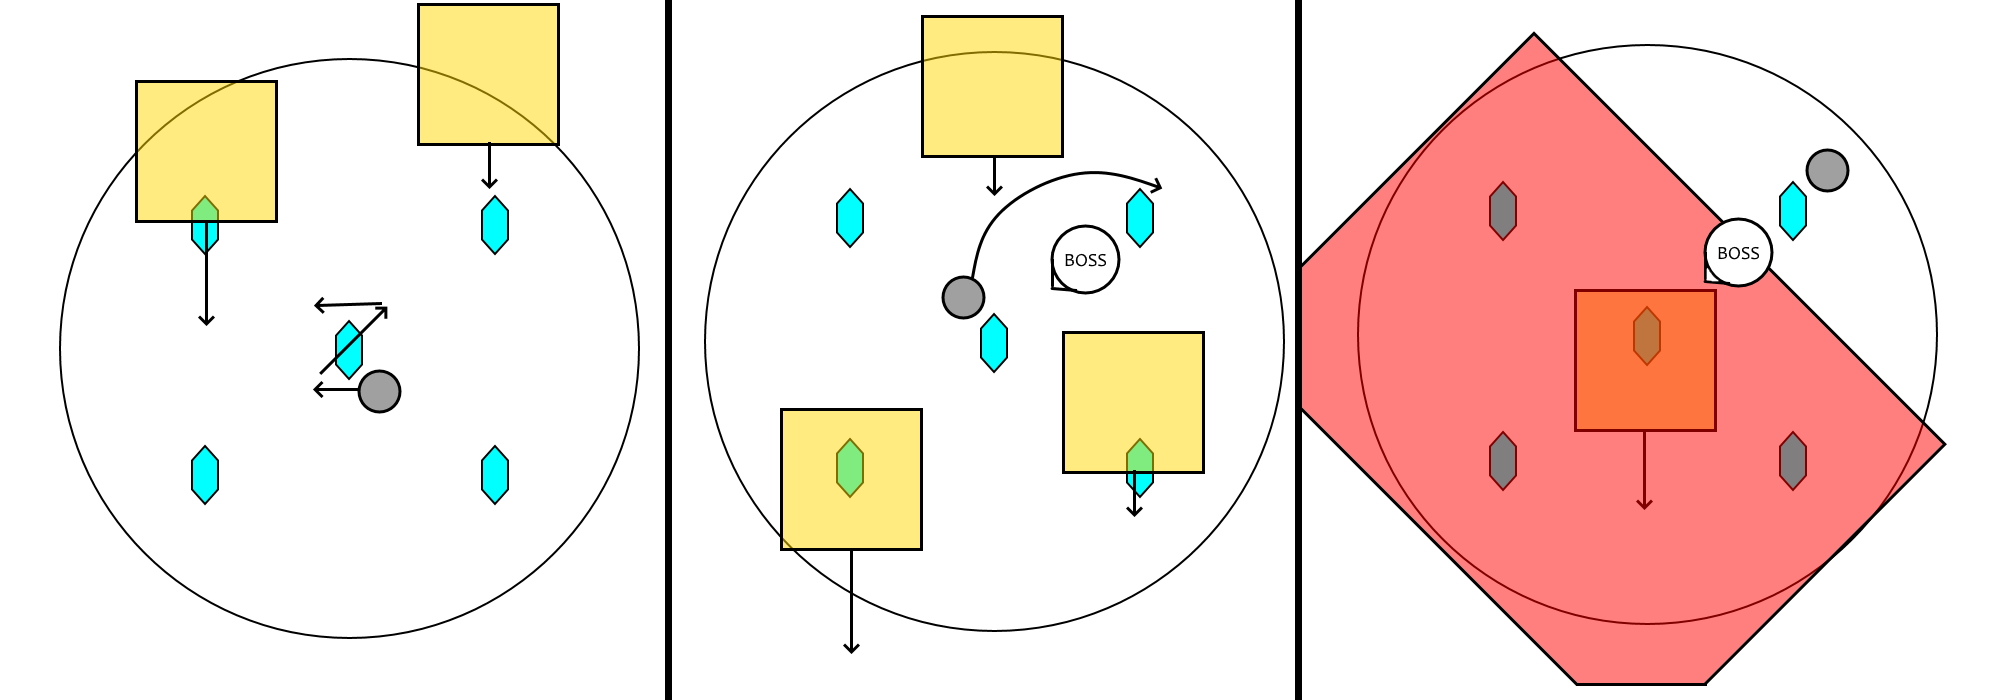
A set of two Lightwaves will appear. One on the middle lane, and the second on either the left or the right lane. Four crystals will spawn in fixed locations: three on the north side of the arena, and one at the south. The party will move toward the crystal that will not collide with a Lightwave, and block line of sight from the first two waves. After two explosions, each role should separate and each move behind each of the three crystals to prepare for Intralateral Arc and the bottom crystal's explosion. Be wary that you want to break line of sight with a crystal at the very south of the arena, not the middle.
As soon as the first set of Lightwaves crosses the arena, Hydaelyn will immediately begin to cast Lightwaves once more. This time, lightwaves will spawn one at a time in each lane. The side lane lightwaves will move first, followed by the middle lane lightwave. A second set of crystals will also spawn in set positions - one in the middle, and one toward each quadrant of the arena in intercardinal positions. Hydaelyn will then jump slightly north of the center crystal, turn toward the middle, and begin casting Heros's Glory. The party must wait until Heros's Glory resolves before moving to the middle crystal to begin dodging Lightwave explosions.
The party will use the middle crystal to dodge the first four lightwave explosions, moving in a Z formation opposite each intercardinal crystal's explosion. After the fourth explosion, Hydaelyn will jump in front of one of the intercardinal crystals and once again use Heros's Glory, facing the middle of the arena. The party should now move toward the crystal behind Hydaelyn to dodge Heros's Glory as well as break line of sight with the middle crystal's explosion.
After the second set of Lightwaves, Hydaelyn will once again use Halo before targeting the current tank with Heroes's Sundering. The boss must not face the party to avoid the tankbuster's cleave. After Hydaelyn uses Shining Saber once more, she will change her weapon's form via Dawn's Mantle to either Chakrams (red) or Staff (green), functioning identically to the attacks in the first phase. The weapon she has at this point will determine which timeline of attacks she will use. When this timeline is finished, Hydaelyn will swap to the weapon she hasn't used yet, and proceed with that timeline of attacks. i.e. if Dawn's Mantle is red, Hydaelyn will use a green Dawn's Mantle after the timeline of attacks, and vice-versa
Chakrams
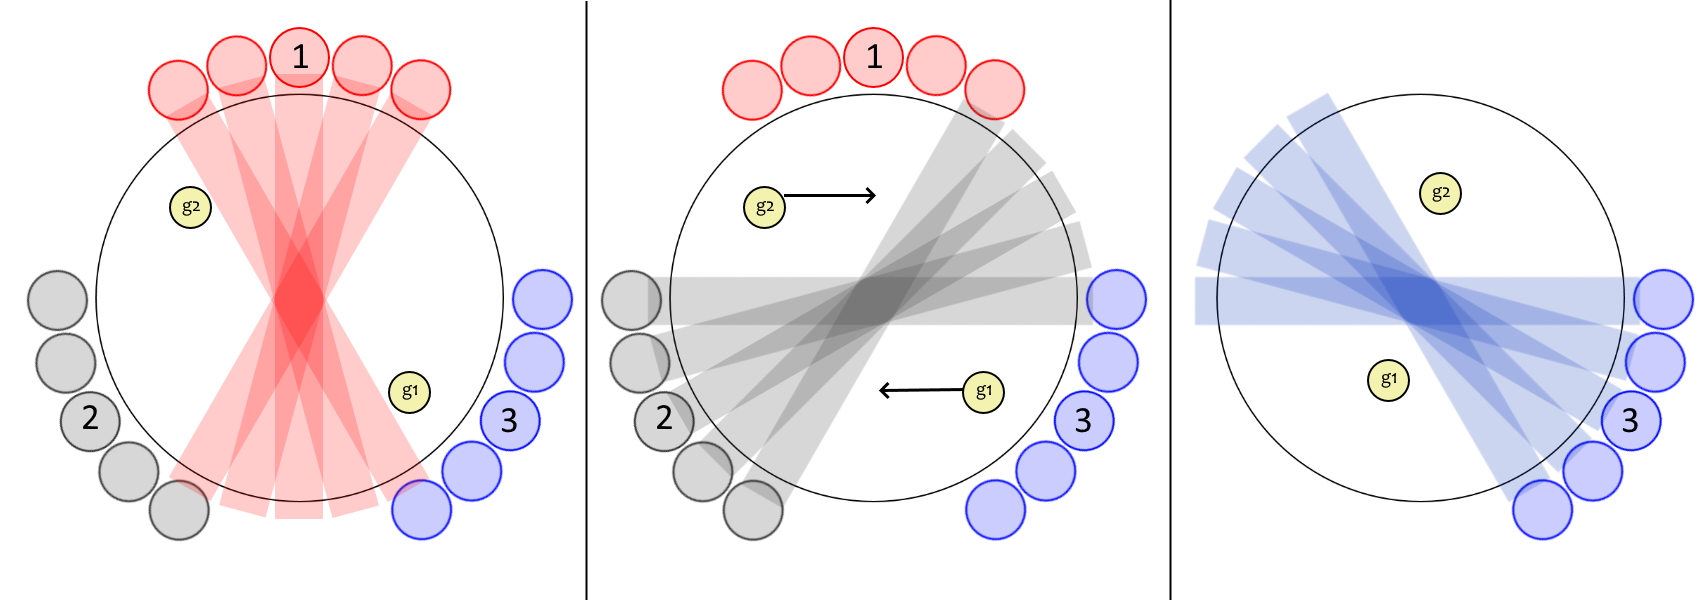
If Hydaelyn uses Dawn's Mantle to equip chakrams (red symbol), she will immediately follow up with Mousa's Scorn. Hydaelyn will then use Parhelion, summoning three sets of chakrams that will shoot from her toward the wall, each set moving one at a time. These chakrams will stay on the edges of the arena until Hydaelyn uses Subparhelion, commanding the chakrams to shoot across the arena from wall to wall in the same order as they were summoned. Before using Subparhelion, however, Hydaelyn will Crystalize her weapon with water, requiring the party to split into two light party stacks, which will resolve right before Subparhelion is casted. In order to properly dodge both chakrams and water stacks, light parties will need to stand together, opposite each other, in front of the third set of chakrams. After the first set of chakrams shoots across the arena after Subparhelion, the parties must quickly move toward where the first chakrams where, as shown in this diagram.
After all of this is over, Hydaelyn will then quickly cast one of either Aureole, or Lateral Aureole, signifying the end of this timeline of attacks.
Staff
If Hydaelyn uses Dawn's Mantle to equip a staff (green symbol), she will immediately follow up with Magos's Radiance. She will then Crystalize her weapon with Ice and begin to cast Parhelic Circle, summoning a series of lines of differing lengths along the arena, coming from the middle. After a short delay, the endpoints of the lines will explode in a small circle around them. In order to easily find a safe spot, players can move to either between two long lines, or behind the endpoint of a small line, close to the wall, as shown in the diagram below.
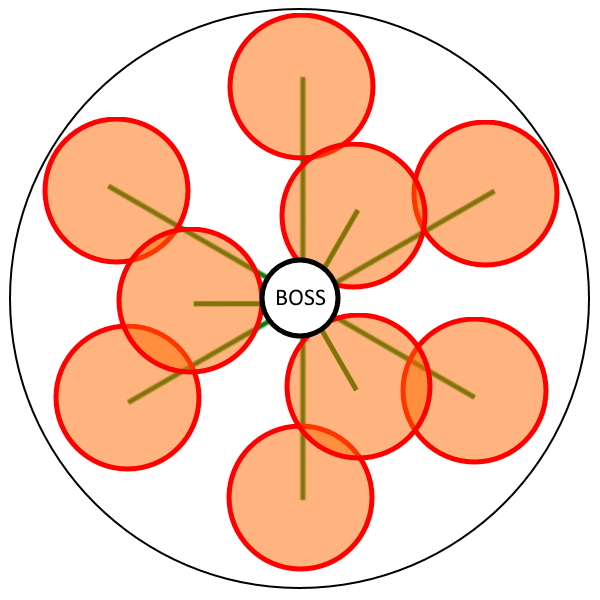
All players must be spread in different locations, as when Parahelic Circle resolves, so will Hydaelyn's Crystalized Ice attack. After all of this is over, Hydaelyn will then quickly cast one of either Aureole, or Lateral Aureole, signifying the end of this timeline of attacks.
As soon as both attack timelines are finished, Hydaelyn will once more use Dawn's Mantle to equip a sword (blue symbol), and use Radiant Halo, heavy raidwide damage transitioning into the final phase.
Phase 4: Echoes
Hydaelyn gains the following new ability:
- Echoes: Group stack damage hitting 5 times in succession for magical damage. It will be followed by a tank being targeted with a 2-man tankbuster stack, and all other players will be targeted with a circle AoE surrounding them.
Hydaelyn will begin this phase by summoning another set of Lightwaves on each cardinal direction of the arena, each covering one of the three lanes identical to the previous phase. At the same time, Hydaelyn will use Echoes. The goal is to find the safe corner that is not hit by any Lightwave and stack together with the party to soak Echoes. As soon as this soak resolves, a tank will be targeted by a tankbuster, and all other roles will be marked with a circle AoE. The tanks should both run to the middle of the arena, and the rest of the party should spread out along the sides of the arena. After these AoEs resolve, the party will then move to the middle in order to dodge the second set of Lightwaves, where the middle will always be a safe spot.
After this, Hydaelyn will once again Crystalize her weapon with either Water, Ice, or Earth, and then she will follow up with one of either Shining Saber, Aureole, or Lateral Aureole. Similar to the first phase, you will first have to properly resolve the first attack before moving in order to properly resolve the attack Hydaelyn crystallizes. Hydaelyn will then once more use Dawn's Mantle in order to change her weapon.
This phase will then repeat once from the first Lightwave, and then will begin to barrage the party with multiple Crystalize + Dawn's Mantle combos until the fight duration reaches 11:00, in which Hydaelyn will begin casting Heros's Radiance, serving as the fights enrage.
Loot
When Hydaelyn is defeated, she will drop a random item level 580 weapon, as well as a coffer that contains an item level 580 weapon of the player's current job when it is used. All party members will also gain an Umbral Totem, of which 10 can be exchanged for any item level 580 Hydaelyn weapon from Nesvaaz in Radz-at-Han (x10.6, y10.0).
Changelog
- 13 Dec. 2021: Guide added.
More FFXIV Content

To be added...
- FFXIV’s Berlin Fan Festival Schedule Is Out!
- Pre-Order FFXIV Nendoroids Y’shtola & G’raha Now!
- From Action to Tab Targetting — How Did You Start FFXIV?
- Developing FFXIV Big Fish Together With Ryuta Suyama
- These Changes Will Make You Think Twice Before Tanking in Evercold
- Complete Dawntrail’s Art Book Collection With – Relics of Eternity –
- New Framer’s Kit With Return Of Breaking Brick Mountains
- Last Chance For THE PRIMALS x Download Festival T-Shirt!