The Abyssal Fracture Extreme Trial Guide
This guide aims to prepare players for "The Abyssal Fracture (Extreme)" by providing detailed explanations of the fight's mechanics, as well as consistent strategies for the purpose of farming.
Introduction to Zeromus Extreme
Unlock Requirements
The Abyssal Fracture (Extreme) can be unlocked at level 90 after completing the main scenario quest "Dawn in the Dark" and talking to the Wandering Minstrel in Old Sharlayan (x12.7, y14.2). It requires a minimum item level of 640 to queue, but this requirement can be bypassed by entering with a full party.
Zeromus Video Resources
If you would prefer to watch a video that covers the fight, take a look at Hope Productions visual guide.
Encounter Guide
Raid Preparation
Place waymarks as such.
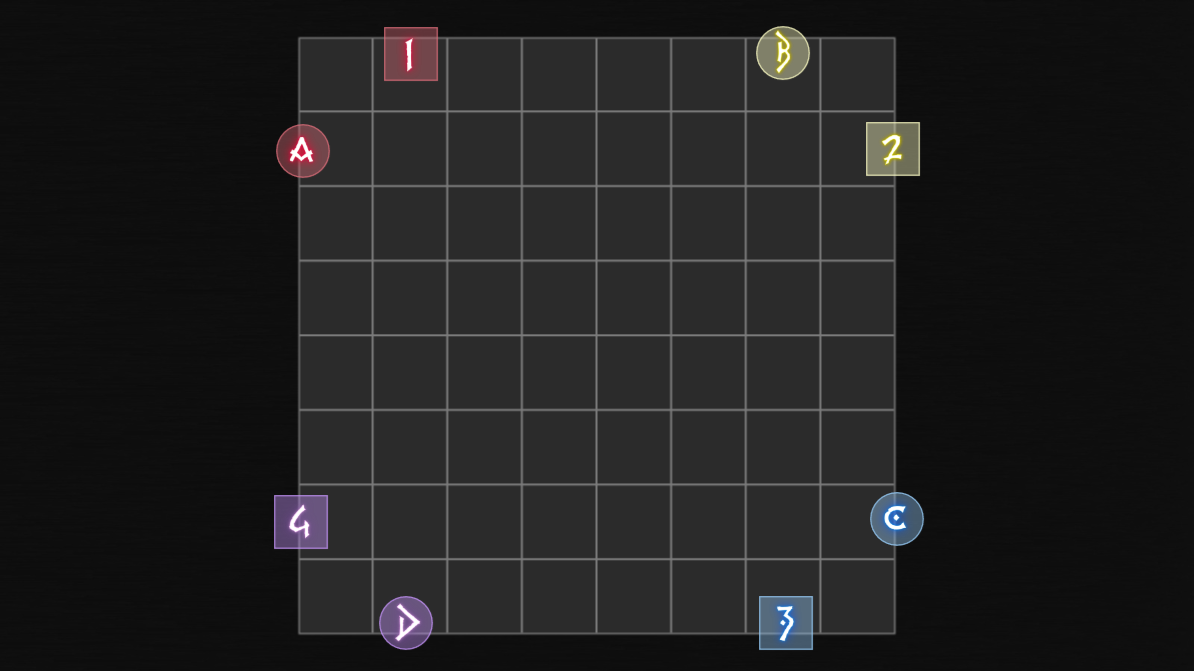
Pair off each DPS and support and assign them to a corner of the arena. Number each pair from 1 to 4. Ideally the tank and melee pairs are in the 1 and 2 positions and healer and ranged pairs are in the 3 and 4 positions.
Phase One: Zeromus
Zeromus is fought in a square arena in which players can fall off or be knocked off. The fight has a hard enrage timer of 11:05, with a DPS check of roughly 56,400 raid DPS.
Zeromus's Abilities
- Abyssal Nox: This orb will explode and set all player's HP to 1, inflicting a Doom debuff that is removed when player HP is restored to full. The orb then lights up several beacons on the arena, doing a circle AoE on each.
- Sable Thread: A line AoE that must be shared. Deals multiple hits of magic damage. The two players closest to Zeromus will take increased damage.
- Dark Matter: A tank buster on both tanks that deals three hits of heavy magic damage.
- Visceral Whirl: Zeromus's claws slash across the arena, leaving two safe spots in the front and back of the arena. Afterwards, three claw X-shaped claw marks will appear on the arena and emit a large diagonal line AoE from its corners.
- Flare: Two towers that must be soaked, dealing moderate magic damage to players inside. This will leave behind a fireball that inflicts persistent damage to players inside that shoots out line AoEs which must be dodged.
- Void Bio: Summons orbs at the front of the arena that slowly move towards the back. Getting hit by one will inflict a potent poison DoT.
Zeromus Phase One Strategy
- Begin the fight by using self-healing and healing buffs to heal all players to full. Dodge the large orb explosions on the ground by moving between top-left and top-middle as there are two waves.
- Return to the middle of the arena to stack together. The tanks should be in front and use light mitigation. The tanks should then move away from the party and each other and mitigate Dark Matter.
- Move to the same spot for Visceral Whirl. Identify the safe spots
from the claw marks on the ground and move there. There are two safe spots
on the arena. One will be in the front and the other is in the back. Here are
guidelines to finding the safe spot in the front of the arena.
- If the three claw marks are in somewhat of a vertical line or there's only one claw mark in the front, the safe spot is north of the front-most one.
- If the two front-most claw marks are close to each other but staggered, the safe spot is on the opposite corner.
- If the two front-most claw marks are close to each other in a horizontal line, the safe spot is on the opposite side of the back one on the edge.
- There will be two towers for Flare, one in the front and one in the back. Have the tanks and melee soak the tower in the front, and healers and ranged soak the tower in the back. Move out of the tower to avoid pulsing damage and dodge the line AoEs. The sides of the arena is usually safe, but there are safe spots in the centre as well depending on the pattern.
- Dodge the orbs summoned by Void Bio and move into the safe spot for Visceral Whirl, then move to the safe spot for the claw marks.
Phase Two: Zeromus
Zeromus's New Abilities
Zeromus gains the following new abilities during this phase:
- Big Bang: Summons many small ground AoEs. All players received a
marked AoE that deals light damage and inflicts a magic vulnerability debuff.
Deals heavy raidwide magic damage, reduces all players' max HP, and inflicts
players with debuffs.
- All players are inflicted with Acceleration Bomb. This requires the player to stop all actions when the debuff expires.
- All players are inflicted with Divisive Dark, a marked AoE that inflicts a magic vulnerability debuff.
- All players are inflicted with Big Bounce, which deals damage over time.
- One healer is inflicted with Beckoning Dark, a stack marker that inflicts a magic vulnerability debuff.
- Two DPS are inflicted with Forked Lightning, which deals lightning damage to nearby players.
- Void Meteor: Summons meteors on the arena that do proximity damage. They will explode immediately and wipe the raid if hit by Meteor Impact AoEs, and explode afterwards in a large AoE if not damaged.
- Meteor Impact: Zeromus summons two meteors at the back of the arena and tethers four players of one role to each. This shoots a meteor at their location, and players must stretch out the tether while not clipping each other as it inflicts a Blunt Resistance Down debuff. Tethers will destroy meteors it hits, instantly wiping the raid. You can tell if this will happen if the line AoE becomes red.
- Bonds of Darkness: Tethers DPS to supports. This tether is broken by moving a sufficient distance from each other.
- Black Hole: Marks a random player from the boss with a divebomb marker. This summons a black hole which expands. This will suck players in and instantly kill them if standing inside.
- Fractured Eventide: Zeromus will turn towards one side of the arena, and do a line AoE that rotates across the arena.
- Big Crunch: The same attack as Big Bang, but removes the maximum HP penalty debuff and inflicts Big Bounce, a DoT, to all players.
- Sparking Flare: Summons two towers in the middle of the arena, which must be soaked by four players each. These will do line AoEs horizontally and vertically afterwards, just like the regular Flare. All players will take damage that inflicts a Fire Resistance Down debuff, so players must spread in their assigned quadrants.
- Branding Flare: Summons two towers in the middle of the arena, which must be soaked by four players each. These will do line AoEs horizontally and vertically afterwards, just like the regular Flare. Four players of a role will take damage that inflicts a Fire Resistance Down debuff, so players must stack with their partner in their assigned quadrants.
- Nox: Two players will receive a large AoE that chases them.
Zeromus Phase Two Strategy
- Spread out for Big Bang and dodge the AoEs. The spread can be fairly loose as there are plenty of safe spots around the arena. Return to the middle afterwards to heal up.
- Stack in the middle and heal up for Void Meteor. Meteor Impact is cast immediately afterwards. Players of one role will have to stretch their tether as far as possible without overlapping each other or any other meteor. Use the numbered schema to assign players where to go: the 1 player will be the left-most, the 4 player will be the right-most, and 2 and 3 will be in the middle.
- The second set of tethers will appear before the first set has gone off. These players should be careful not to stand in the path of the first set. Their tethers will be red, but they haven't resolved yet so they should not move until the first set has gone off.
- Immediately after the first set of meteors drop, those players need to get out of the way. The second set of players will use the same strategy to place their meteors: stretch them as far as possible, don't overlap, and line up based on the numbering. It is better to die to an unstretched tether than to blow up the entire raid by clipping a meteor.
- If done correctly, no meteors will explode. Return to the middle and dodge the ground AoEs from the meteors exploding.
- Stay in the middle as the Zeromus casts Visceral Whirl. Have DPS go to the north safe spot and supports go to the south safe spot to break the tethers. Immediately after, the Acceleration Bomb debuff will expire so all players must stand still and not perform any actions
- Dodge into the safe spot from the claw marks. It is advised to have ranged and melee spread out for this one as the Divisive Dark debuff expires soon after. However all players can go to the same safe spot and finely spread afterwards.
- The healer marked with Beckoning Dark and the three other non-tanks marked with no more debuffs need to stay together for the stack. The two DPS with Forked Lightning must move away to avoid hitting other players, and the tanks will move away as Zeromus casts Dark Matter.
- Return to the middle and quickly identify which side Zeromus is blasting to. Head to the north corner of that side. The player with the marker needs to drop the black hole directly at the cardinal edge east or west (or even further back to be safe) and move back to the party once the mark disappears.
- Rotate along with the laser to the opposite side, moving fast enough to outpace the expanding Black Hole. Spread out for Big Crunch afterwards.
- The boss then casts Abyssal Nox into Sable Thread. Heal up, stack, and mitigate.
- The two towers from Sparking Flare or Branding Flare will then appear. Note which one is it, and players will soak the tower on their quadrant's side. Immediately after soaking, move to your assigned quadrant.
- If it was Sparking, players will spread in their quadrant. If it was Branding, players will stack in their quadrant. The two players marked with Nox can run their AoE east or west and other players can return to the middle. If the AoEs were both east/west, they can run them north and south.
- Zeromus will then do Void Bio, Visceral Whirl, then Dark Matter after the safe spots, so dodge and tanks mitigate.
- Zeromus does the opposite Flare mechanic as before. If the first one was Sparking, it will now cast Branding and vice-versa.
- Finally, it will cast Abyssal Nox to end the phase. Heal up in preparation of the final phase.
Phase Three: Zeromus
Zeromus's New Abilities
Zeromus gains the following new abilities during this phase:
- Rend the Rift: Deals heavy raidwide magic damage. Afterwards and after every set of mechanics, Zeromus will summon many ground line AoEs and circle AoEs.
- Nostalgia: Waves of raidwide damage, starting with Bury which deals physical damage, Roar which deals magical damage, and finally Primal Roar, which deals magical damage.
- Flow of the Abyss: Creates a crack on the side of the arena
which does a line AoE across. All players will receive one set of mechanics.
- All players of one role receive an enumeration marker which requires one other player to stack with them to survive damage. Stack with your partner in the assigned quadrant while dodging the line AoE.
- All players receive a marker, which drop a persistent AoE on their location. Drop this near your quadrant, and move out of it while dodging the line AoE.
- Chasmic Nails: A series of conal AoEs from Zeromus which inflict a DoT if hit.
Zeromus Phase Three Strategy
- Stack up to mitigate and heal through Rend the Rift and Nostalgia.
- Dodge the AoEs, then head towards your quadrant for Flow of the Abyss. Either stack with your partner, or drop the marker on one spot and move out of it. Keep in mind your quadrant may be covered by the line AoE, so move north or south depending on where the crack appears to dodge the line AoE.
- Move from a later Chasmic Nail conal AoE into one of the first two that appear to dodge it. This is accompanied with ground AoEs and another line AoE from Flow of the Abyss that may or may not have changed locations, so look for it while dodging.
- Zeromus will then cast Flow of the Abyss once more, doing the opposite mechanic as before. Dodge the ground AoEs, line AoEs, and do the mechanic: either drop the AoE and move out, or stack with your partner.
- Zeromus repeats Nostalgia, Flow of the Abyss, and Chasmic Nails, before finally enraging at 11:05 with Big Bang. Spread out and kill the boss before it kills you!
Party Finder Strategies
- All strategies here are used for Party Finder. Certain parties have different orderings for meteors such as RMMR instead of MMRR.
Rewards
When Zeromus is defeated, it will drop one random item level 655 Voidvessel
Weapon and one ![]() Voidvessel Weapon Coffer (IL 655). Rarely, it will drop a
Voidvessel Weapon Coffer (IL 655). Rarely, it will drop a
![]() Lynx of Abyssal Grief Flute,
Lynx of Abyssal Grief Flute, ![]() Faded Copy of FINAL FANTASY IV: The Final Battle (Endwalker),
Zeromus Triple Triad Card, and/or a
Faded Copy of FINAL FANTASY IV: The Final Battle (Endwalker),
Zeromus Triple Triad Card, and/or a ![]() Abyssal Diamond.
Abyssal Diamond.
In addition, all party members will receive two ![]() Voidvessel Totem,
ten of which can be exchanged for any Item Level 655 Voidvessel weapon from
Nesvaaz in Radz-at-Han (x10.6, y10.0).
Voidvessel Totem,
ten of which can be exchanged for any Item Level 655 Voidvessel weapon from
Nesvaaz in Radz-at-Han (x10.6, y10.0).
Changelog
- 04 Oct. 2023: Guide added.
More FFXIV Content

This guide has been written by Lyra an accomplished raider in FFXIV and has written raid guides for the game for the past five years. You can follow him on Twitter and he streams raids on Twitch.
- FFXIV’s Berlin Fan Festival Schedule Is Out!
- Pre-Order FFXIV Nendoroids Y’shtola & G’raha Now!
- From Action to Tab Targetting — How Did You Start FFXIV?
- Developing FFXIV Big Fish Together With Ryuta Suyama
- These Changes Will Make You Think Twice Before Tanking in Evercold
- Complete Dawntrail’s Art Book Collection With – Relics of Eternity –
- New Framer’s Kit With Return Of Breaking Brick Mountains
- Last Chance For THE PRIMALS x Download Festival T-Shirt!