Zodiark's Fall Extreme Trial Guide
This guide aims to prepare players for "The Minstrel's Ballad: Zodiark's Fall" by providing detailed explanations of the fight's mechanics, as well as consistent strategies for the purpose of farming.
Introduction
The account of your triumph over the god of Darkness has prompted the wandering minstrel to once again perform the impossible, by taking an already senses-shattering encounter and exaggerating it to ludicrous extremes. His mellifluous musings transport your mind to that fateful moment, where your terrifying foe awaits, His unfathomable strength surpassing even your wildest imagination...
Unlock Requirements
The Minstrel's Ballad: Zodiark's Fall can be unlocked at level 90 after completing the main scenario quest "Endwalker" and talking to the Wandering Minstrel in Old Sharlayan (x12.7, y14.2). It requires a minimum item level of 560 to queue, but this requirement can be bypassed by entering with a full party.
Encounter Guide
Phase 1: Zodiark
Zodiark's Abilities:
- Kokytos: Unavoidable raidwide damage, leaving all party members with 1 HP.
- Paradeigma: Summons a series of tokens, which will have different shapes of
AoE damage depending on the token. Zodiark will summon a different series of tokens
every time this is cast, with a set timeline for the entire encounter. The types
of tokens that can appear are as follows:
- Bird Token: Raid-wide AoE dealing lethal damage, with only 2 safe spots in melee range, and far away. Looks like a donut.
- Behemoth Token: Large point-blank AoE dealing damage in a circle around the token.
- Snake Token: Deals AoE damage in a line in a large front of it. Picturing the arena as a 4x4 grid, a Snake Token's AoE will always cover either one row, or one column.
- Styx: Group stack magic damage hitting multiple times in succession. It starts with 6 hits, and every time it is cast, it will hit one more time.
- Ania: Tankbuster dealing heavy magic damage and inflicting Umbral Rays, a debuff causing Zodiark's attacks to deal lethal damage and forcing a tank swap. The attack takes the form of a small circle surrounding the target, so make sure tanks are not accidentally clipping other players.
- Exoterikos: Zodiark summons a large Arcane Sigil of a random color in one of
the 4 cardinal directions, which will then use Esoteric Sect, an AoE with a shape
depending on the sigil's color. After a short while, a shape will appear on the
sigil, further clarifying the shape of the AoE that will appear. The sigils
appear on the enmity list to easily show the timing of this attack. The
colors that can appear are as follows:
- Red Sigil (Rectangle): Inflicts damage on the entire half of the arena that the circle is present in.
- Blue Sigil (Triangle): Inflicts damage as a large cone originating from the circle across the entire arena.
- Green Sigil (Diamond): Inflicts damage as large line AoE in front of it across the arena, covering roughly one third of the arena.
- Algedon: Zodiark will move to one of the 2 front corners and use a large line AoE that will knock players off the arena if hit. The only safe spots are the two corners that are not Zodiark's and the coner across from his.
- Phobos: Heavy raidwide magic damage, also inflicting a heavy DoT in the form of Bleed. Heavy mitigation is suggested, in order to reduce the potency of the Bleed.
- Astral Flow: Zodiark will raise players into the air and rotate the entire arena 90 degrees either clockwise or counter-clockwise, with all tokens placed by Paradeigma moving with it. Neither players nor Exoterikos squares will be rotated.
- Adikia: Zodiark will slam each half of the arena with a large circle AoE one by one, hitting the west side first, and then the east in quick succession. Safe spots for both hits are in the direct north and south of the arena.
This encounter mostly consists of Zodiark creating multiple self-enclosed 'puzzles,' summoning totems with Paradeigma, Exoterikos, and his other attacks while creating multiple overlapping AoE attacks with specific safe spots. The goal is to find a safe spot to avoid all of his attacks. In between these puzzles, Zodiark will deal occasional raidwide damage or tankbusters, as well as use other common raid mechanics.
The encounter begins with Zodiark using Kokytos, and hew will immediately follow up with the first Paradeigma of the encounter. Zodiark's Paradeigmas always summon the exact same totems, with a set configuration that can be rotated. For example, in Paradeigma II, Bird Tokens will always be both placed on the east side of the arena, while the Behemoth Tokens will be placed in the west. But this can also be rotated for Behemoth Tokens to be on the north side of the arena, and the Bird tokens on the south.
Paradeigma I: 4 Bird Tokens
The first Paradeigma is very simple, introducing Bird Tokens which were not seen in the previous difficulty. Simply have the entire party stack inside the red circle of any of the Bird Tokens and you will succesfully dodge this Paradeigma. the party should move toward one of the north tokens to keep uptime. Most Party Finder groups tend to move together toward the NW token, but this is mostly arbitrary.
As the first Paradeigma resolves, Zodiark will use Styx. The party should be stacked together already, and this Styx will hit 6 times. This will be immediately followed up with Ania, forcing a tank swap. Zodiark will then use Esoterikos, summoning two sigils in one of east or west, and north. Both of these Sigils will attack at the same time, covering the arena with two Esoteric Sects at once. These sigils can only be either Triangle or Rectangle sigils. Zodiark will then use his second Paradeigma.
Paradeigma II: 2 Bird Tokens, 2 Behemoth Tokens, Algedon
The second Paradeigma will summon each set of tokens in corners opposite each other. At the same time, Zodiark will also be using Algedon. In order to dodge this Paradeigma, the party must stand under the Bird Token that will not be hit with Zodiark's Algedon. The safe spot can be in either of the four corners, so it is possible that the safe spot may not be in melee range. Zodiark will follow up with Phobos before using the third Paradeigma.
Paradeigma III: 2 Snake Tokens, Exoterikos, Astral Flow
Snake Tokens will spawn on the north or south side of the arena, separated by one row if the arena is imagined as a 4x4 grid. This is the first Paradeigma where Zodiark will use Astral Flow, which will rotate the arena. In order to dodge the Paradeigma, the party must move to a location that will dodge the Arcane Sigil while avoiding the same row that Snake Tokens will be in after the arena is rotated.
Snake Token rotation is probably the most difficult part of the encounter to properly visualize, as it is not as inherently intuitive as visualizing other tokens which are always placed on corners, and rotating a 4x4 square can be very difficult in the heat of the moment. In order to more easily determine the locations Snake Tokens will hit, it is highly recommended to instead cut off a 2x2 corner of the arena, and rotate that instead, as shown below.
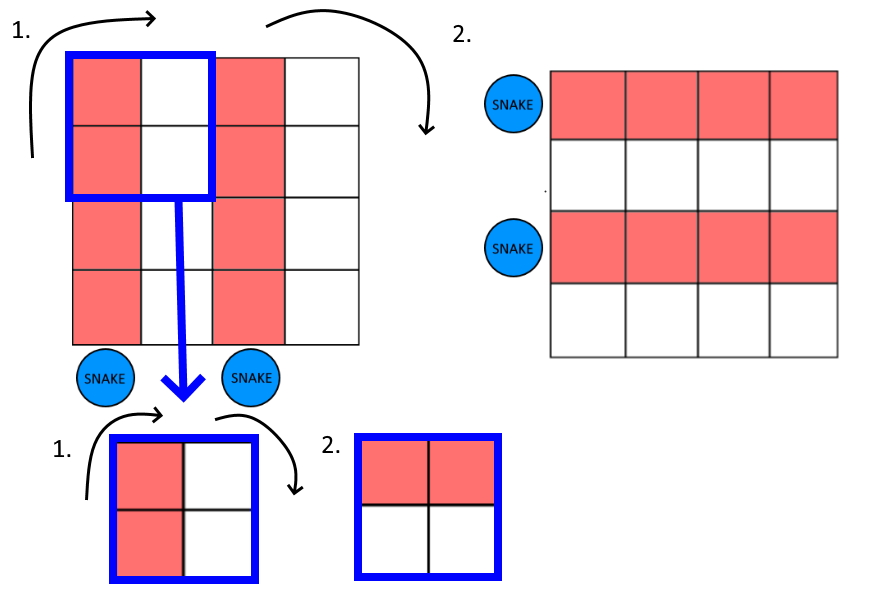
Essentially, it converts the rotation of Snake Tokens into one very similar to other tokens, as each 2x2 grid can act as the corners other types of tokens are placed in. Zodiark will then use Ania once more, and cast his fourth Paradeigma.
Paradeigma IV: 2 Snake Tokens, Adikia
Snake Tokens will spawn on either the east or west walls of the arena, separated identically as in Paradeigma III. Adikia can be easily dodged by simply moving to the north-middle side of the arena, as Zodiark's Adikia will leave a safe spot in the north that can dodge both of the possible Snake Token locations. The party will move north, and angle their camera to see the Snake Tokens and make sure that they are not standing in front of one.
When everything is resolved, Zodiark will become untargetable and move into his next phase.
Phase 2: Rolling Darkness Orbs
Four Rolling Darkness orbs will appear in the center of the arena, and Zodiark will begin charging his "Zodiark's Power" gauge. If Zodiark's Power reaches 100, the raid will wipe. As the phase continues, Zodiark will summon 3 sets of Arcane Sigils: Triangle-Diamond-Triangle, Diamond-Triangle-Diamond, and Diamond-Rectangle-Diamond. While the Sigils of each set are exactly the same, the order that the sets appear in is random. For Sigil patterns which include Triangle sigils, there will always be a safe spot on the wall directly on the left or right side of the Sigil, as the cone will not be wide enough to hit the wall.
Because of the locations of safe spots for each set of Arcane Sigils, it is recommended to prioritize destroying the rear orbs first, leaving the front orbs available for melee players to keep uptime. When all orbs are destroyed, Zodiark will use Apomnemoneumata, dealing heavy magic damage and signifying the end of the phase.
Phase 3: Zodiark II
Zodiark gains the following abilities:
- Astral Eclipse: Zodiark will become untargetable and circle outside the arena, summoning 3 sets of meteors in the skies east, south, and west of the arena. These meteors will then strike into the arena, one set at a time, dealing lethal damage and inflicting a Vulnerability Up stack. More info is below.
- Triple Esoteric Ray: Zodiark summons 3 green Arcane Sigils on the north of the arena. The order that the rays appear in will be the order in which they go off. There are only two possible orders: middle then east/west sides, or east/west sides then middle. The party will have to either dodge from the sides to the middle, or from the middle to the sides depending on the order they spawn.
- Infernal Wall: An addition to Phase 1's Astral Flow. All Astral Flows now summon a firewall from corner to corner across the arena. As the arena rotates, the firewall will also rotate, and any area it moves through will deal heavy damage in the form of Infernal Torrent while inflicting a Vulnerability Up stack.
- Trimorphos Exoterikos: Zodiark will summon 3 Arcane Sigils on each cardinal direction he is not present in, one at a time, which will resolve in the order they appeared. These sigils work exactly like Exoterikos sigils seen previously. Trimorphos Exoterikos will only summon Triangle or Rectangle sigils.
- Phlegethon: Zodiark will summon 3 sets of circle AoEs under each player, one at a time.
After a short while, Zodiark will become untargetable and use Astral Eclipse. Astral Eclipse meteor markers will make a 3x3 grid, with two safe spots. This grid can be applied to the arena, with the safe spot seen on the meteor marker corresponding to a safe spot on the arena itself. Something that may seem unintuitive is that safe spots will be mirrored along the edge of the arena. What this means is that the markers closest to the edge (the bottom ones) will hit the closest grid spaces in the arena closest to that edge. For example, if there is no meteor on the bottom right spot on the markers on the west side, the safe spot will be on the northwest of the arena.
While meteors are falling from the arena, Zodiark will begin casting Triple Esoteric Ray, so the party must quickly move from the last meteor dodge into either the center or the sides of the arena to dodge the first Arcane Sigil that appears. The party will then dodge the second Arcane Sigils that appear. Zodiark will then use his first Paradeigma of this phase.
Paradeigma V: 2 Bird Tokens, 2 Behemoth Tokens, Astral Flow
The placement of these tokens works exactly like in Paradeigma II. However, this Paradeigma also includes Astral Flow, now with an Infernal Wall across opposing sets of corners of the arena. In order to dodge this Paradeigma, the party must stand on a corner that will both have a Bird Token rotate into it, as well as not being hit by the Infernal Wall.
Dodging the Infernal Wall is done by first finding the safe corner that the party will be moving into. The Infernal Wall will either bisect the corner or not appear in the corner at all. If the Infernal Wall is bisecting the corner, the party must stand either directly in front or directly behind the Infernal Wall, depending on the rotation of the platform. If the Infernal Wall is not in the corner, the party must look at the corner clockwise/counterclockwise of the safe corner and stand on either the front or the back of the wall's end location. The arena will have a faded line that will bisect the corner to more easily know where the party must stand.
After the entire Paradeigma resolves, Zodiark will use Ania once more, and then summon a sigil with Exoterikos. This sigil will either be a Triangle or a Rectangle Sigil. Zodiark will then use Algedon, which will resolve at the same time as the sigil. Find the safe spot (far from the sigil if it is a Rectangle, close and to the side if it is a Triangle) that dodges both the sigil and Algedon. Zodiark will then cast Paradeigma once again.
Paradeigma VI: 2 Snake Tokens, 4 Bird Tokens, Astral Flow
All 4 Bird Tokens are placed on each corner, which in turn makes every 4 corners a safe spot, so they can largely be ignored. The most difficult part of this Paradeigma is rotating the snakes, as well as the Infernal Wall. All 4 corners have a location that will both avoid the Infernal Wall and not be hit by a Snake Token's attack. Zodiark will then quickly follow up with Styx, this time hitting a total of 7 times.
Zodiark will then use Trimorphos Exoterikos, quickly followed up by an Aidikia. Dodge each Arcane Sigil in the order they appear, and then move north to avoid Adikia. At this point, many of the mechanics that will be encountered will simply be repeated from previous phases, with a few minor additions.
Zodiark will once again become untargetable and use Astral Eclipse, working identically to the Astral Eclipse seen earlier in the fight. The only difference is that as the meteors resolve, Zodiark will move into a corner and use Algedon. Simply move quickly from the meteor's safe spot into the safe corners to avoid Algedon. Zodiark will use Ania, and then cast Paradeigma once more.
Paradeigma VII: 2 Snake Tokens, Exoterikos, Astral Flow
This Paradeigma works identically to Paradeigma III, except with the added difficulty of also having to avoid the Infernal Wall. After it is resolved, Zodiark will cast Phlegethon, summoning 3 sets of AoEs, and this will be immediately followed up by Styx, hitting a total of 8 times.
Zodiark will then follow up with an Exoterikos on the east or west wall, followed by a Triple Esoteric Ray. This Exoterikos can only summon a Triangle or a Rectangle Arcane Sigil. The first set of green sigils will resolve at the same time as the sigil summoned by Exoterikos, so the party must first dodge these sigils before dodging the second set of green sigils. Zodiark will then use another Paradeigma.
Paradeigma VIII: 2 Bird Tokens, 2 Behemoth Tokens, Exoterikos, Astral Flow
This Paradeigma is identical to Paradeigma II, with the addition of Astral Flow and Zodiark summoning a Rectangle arcane sigil in the back of the room. Each set of tokens are again summoned in corners opposite each other. Simply move to the Behemoth Token in the front side of the room, and make sure you are standing on the side of the token that will not be hit by the Infernal Wall.
After this Paradeigma is resolved, Zodiark will use Phobos. After a short while, he will then cast Trimorphos Exoterikos, working identically as when it was previously seen. As soon as the third sigil resolves, Zodiark will use Algedon, so the party must quickly move from the safe spot of the last sigil to the safe corner avoiding Algedon. After all is resolved, Zodiark will use Styx once more, this time hitting a total of 9 times. Zodiark will then use the final Paradeigma.
Paradeigma IX: 2 Snake Tokens, 4 Bird Tokens, Exoterikos, Astral Flow
This Paradeigma is identical to Paradeigma VI, except Zodiark will also use Exoterikos, summoning an arcane sigil on the east or west sides of the arena, being either a triangle or a rectangle arcane sigil. Simply make sure you are avoiding the arcane sigil's attack, and dodge exactly like in Paradeigma VI.
After this Paradeigma resolves, Zodiark will use one final Styx, this time hitting for a total of 10 times. Finally, when the fight duration reaches roughly 11:30, Zodiark will cast Apomnemoneumata, serving as the encounter's enrage timer.
Loot
When Zodiark is defeated, he will drop 4 random item level 580 accesories. All party members will also gain an Astral Totem, of which 5 can be exchanged for any item level 580 Zodiark accesory from Nesvaaz in Radz-at-Han (x10.6, y10.0).
Changelog
- 15 Dec. 2021: Guide added.
More FFXIV Content

To be added...
- FFXIV’s Berlin Fan Festival Schedule Is Out!
- Pre-Order FFXIV Nendoroids Y’shtola & G’raha Now!
- From Action to Tab Targetting — How Did You Start FFXIV?
- Developing FFXIV Big Fish Together With Ryuta Suyama
- These Changes Will Make You Think Twice Before Tanking in Evercold
- Complete Dawntrail’s Art Book Collection With – Relics of Eternity –
- New Framer’s Kit With Return Of Breaking Brick Mountains
- Last Chance For THE PRIMALS x Download Festival T-Shirt!