Miner, Botanist, and Fisher (DoL) Basics in FFXIV
This page will go over the basics for gathering by explaining node types, gathering stats, fishing mechanics, and the benefits of leveling these jobs.
Mining and Botany Basics
Once you have unlocked your gathering class, you can explore the open world! To
gather, you firstly need to locate a node. Make sure you have the skills
![]() Prospect for Miner and
Prospect for Miner and ![]() Triangulate for Botanist toggled on
to see normal nodes in the open world.
Triangulate for Botanist toggled on
to see normal nodes in the open world.
From there, you can use Lay of the Land abilities. Lay of the Land 1 will
show you the nearest node, and Lay of the Land 2 will show you the highest
leveled node in the zone. To see Unspoiled (special timed) nodes, you will also need
to use ![]() Truth of Mountains or
Truth of Mountains or ![]() Truth of Forests.
Truth of Forests.
For fishing, almost every single body of water in the game counts as a fishing hole that players can fish in.
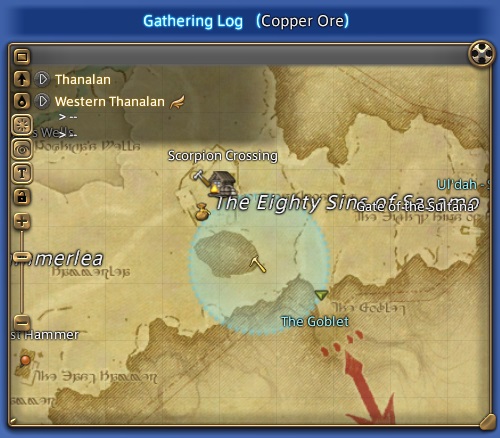
You can also use your Gathering Log to locate nodes around the world, as shown in the image above.
The Integrity (health) of the node is displayed above the node. This goes down with each gathering attempt. You can also see the chance you currently have to gain the item, in addition to the chance to obtain a boon that increases your yield. At the bottom, you can also see any possible bonuses and effects that you might want to take advantage of.
You can also use various gathering skills on nodes to increase your chance to gather the item or gain extra yield. For information on these gathering skills, check out our guide below.
Mining and Botany Stats
There are three stats that matter for your gathering classes. These are Gathering, Perception, and GP. These stats are incredibly important.
With how the Gathering stats work, all of the skills available are based around set stat breakpoints. For example, a skill might increase yield by two if you have 1000 Gathering, and the same skill might increase yield by three with 1300 Gathering. This is the case with all skills and node bonuses. Stats also increase your chance to gather or gain Gatherer's Boon while gathering. When looking at gear, you generally want to consider these breakpoints. In the example we just described, having 1200 Gathering would be worthless and provide no benefit.
Gathering
Gathering is most importantly used to increase your chances to gather items up to a cap of 100%. Outside of that, Gathering is very important for Node Bonuses as well as stat breakpoints for various skills.
Gathering impacts the following skills:
- The yield gained from using
 Bountiful Yield II/
 Bountiful Harvest II.
 - Collectability with
 Scour,
  Brazen Prospector, Intuition Procs, and
  Meticulous Prospector.
 - Your chance of extra Integrity using Meticulous on Collectables.
- The Cap of
 Scrutiny, which is impacted by both Gathering and Perception, unlike what the skill says.
Perception
Your Perception stat increases your chances to gain additional items from a Gatherer's Boon bonus. This Boon effect increases your yield by 1. This is useful for gaining more materials to craft with and also grants additional XP. Boon caps at 60% but it can be hard to get close to that cap without gear from the next expansion.
Perception also impacts the following skills:
- Your Intuition Rate on Collectables.
- The Cap of Scrutiny, which is impacted by both Gathering and Perception, unlike what the skill says.
Gathering Points (GP)
Your Gathering Points (GP) are used to activate your skills at various costs. You will regain GP over time while gathering and from hitting nodes once the trait is unlocked. The amount of GP you possess increases over time as you level up and unlock new traits.
GP also has breakpoints like the other two stats. The first is node bonuses. Outside of that, you generally want enough GP to gather what you need while taking full advantage of all your skills.
Types of Nodes
There are various types of nodes in the game, each with unique attributes. Nodes give many different items, spawn at different times, and sometimes respawn from specific mechanics. This means you want to go to different types of nodes for different goals.
People commonly keep track of nodes by making lists of alarms using sites such as FFXIV Teamcraft and Garlandtools.
Regular Nodes
Regular nodes are comprised of the many nodes you gather out in the open world. These respawn as you cycle around to each of the nodes in the group. Some of them can even have hidden items inside, including treasure map and hidden materials.
Unspoiled Nodes
Unspoiled nodes are special nodes that appear at specific
times of the day using the in-game clock. You will need to use
![]() Truth of Mountains/
Truth of Mountains/![]() Truth of Forests to make these nodes visible to
you on your minimap. Unspoiled nodes can only be gathered once per window
and will only respawn during their specific time slots, so make sure to use all of your
GP to get as much yield as you can from them.
Truth of Forests to make these nodes visible to
you on your minimap. Unspoiled nodes can only be gathered once per window
and will only respawn during their specific time slots, so make sure to use all of your
GP to get as much yield as you can from them.
Legendary Nodes
Legendary nodes are also timed nodes that appear at specific times of the day. Unlike Unspoiled nodes, you have to unlock Legendary nodes by purchasing folklore tomes from the scrip exchange. Mechanically, they function in the same way afterward.
Ephemeral Nodes
Ephemeral nodes are different from the other types of nodes mentioned. They also spawn at set times of the in-game day, and once you finish the node, another one will respawn close by in the area. This means you can repeatedly farm these items until time runs out
On top of that, the items commonly found inside ephemeral nodes are collectables. These collectables are gathered to be broken down into aethersands, which are used for various crafts.
Fishing Basics
Fishing is almost entirely independent from Mining and Botany. It has a separate Gathering Log, different skills, and unique systems such as ocean fishing and spearfishing.
For fishing, you start with an initial loop of casting, waiting, and hooking when the fish tugs. Over time, this evolves into catching fish with various requirements such as weather, time, bait, and mooch (using other fish as bait).
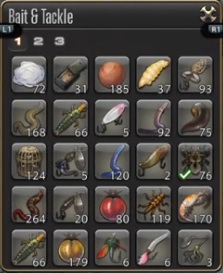
A core part of fishing is that different fish require different bait,
which can be crafted or purchased. You will need to pick the right tools
for the right job. Below is an example of your bait box
when using the skill ![]() Bait.
Bait.
As you level up, you will unlock more bait, fishing holes, and skills that impact how you fish.
How To Find Specific Fish
In FFXIV, there is no information provided about the fish available in any hole. The game also tells you nothing about a fishes time requirements, weather requirements, bait requirements or anything else that may be important.
There are many resources to help you find out which bait is needed for specific fish, including FFXIV Teamcraft and Carbuncleplushy. The game otherwise does not give you the information on which bait is used for each fish, meaning you would have to use trial and error to figure this out.
Fishing Stats
Your stats for fishing work a little differently compared to Mining and Botany, warranting having a separate section for explanation. The stats are still gathering, perception, and GP. However, your goals and purposes work a little differently. Fishing also still works with hard breakpoints for the most part.
Gathering
For fishing, Gathering has a much more defined breakpoint. You need
to hit X Gathering to get specific fish, and you otherwise cannot. Your Gathering can
also determine your yield when using ![]() Double Hook. It is worth
mentioning that hitting a Gathering breakpoint does not guarantee a fish,
and no matter your level, the fish can still get away by pure luck.
Double Hook. It is worth
mentioning that hitting a Gathering breakpoint does not guarantee a fish,
and no matter your level, the fish can still get away by pure luck.
Perception
Perception works in a similar way to Gathering, where you need to hit a breakpoint to be able to get large fish. Large fish are very important because they give you the Angler's Art buff, which allows you to spend stacks of Angler's Art on certain skills. On top of this, some large fish can be mooched, meaning you can use a caught fish as bait to catch other fish.
Gathering Points(GP)
GP is a lot more flexible for fishing. To put it simply, the more you have increases the chances to hit breakpoints and catch a fish. It gives you room to use more Cordials and allows you to use more skills. Fishers also have a unique Spearfishing offhand called a gig that gives extra GP.
Angler's Arts
Angler's Arts is a buff mechanic for fishing that is gained when you catch or spearfish large-sized fish. This buff has a max stack of 10, which can be used on several skills.
Fishing Holes
Standard fishing is where you simply use your bait on a hole of water to try and get the fish that you need. Of the 1000+ fish that exist in the game, many of them have various requirements. These can include:
- Using specific baits
- Only using fish that have been mooched, or even double mooched
- The in-game time
- The current weather
- Gaining a buff called 'Intuition.'
Because of this, there can be fish that require very strict requirements with small-time windows, rare weathers, and so on. Many of these fish are often referred to as big fish and Legendary fish.
Spearfishing
Spearfishing is a type of fishing unlocked during the Stormblood expansion
that is very different from normal fishing and closer to Mining/Botany. You have
to circle around underwater looking for 'Teeming Waters,' which are the
equivalent of gathering nodes. Players use the skill ![]() Shark Eye to locate
these nodes more easily.
Shark Eye to locate
these nodes more easily.
When inside a spearfishing node, a minigame will appear. Using your gig, you must spear fish that pass through the screen. By timing the hit of the gig with the area of the fish indicated by the blue brackets, you will gain the specific fish.
You can identify the fish you need based on the size, speed, and hitbox of the fish inside the blue brackets. Once you catch the fish you need for the first time, you will be able to tell it apart from other fish.
Spearfishing nodes have an equivalent to Integrity called Wariness, which is the health displayed in the bar above the node. This increases over time and when you use your gig. There is also a circle in the top left of the minigame, which tracks your counters in a row and decreases the rate at which Wariness will increase.
Changelog
- 16 Dec. 2025: Reviewed for 7.4.
- 05 Aug. 2025: Reviewed for 7.3.
- 25 Mar. 2025: Reviewed for 7.2.
- 10 Nov. 2024: Reviewed for 7.1.
- 27 Jun. 2024: Updated for Dawntrail.
- 13 Jan. 2022: Guide added.
More FFXIV Content

This guide has been written by I'nanghal Shikhu (Discord - Shikhu). He is a Crafting & Gathering theorycrafter, mentor for The Balance and also a guide maker for Teamcraft alongside Icy Veins. He also managed to obtain 10 top 12's on the leaderboard during the Ishgard Restoration rankings.
- Complete Dawntrail’s Art Book Collection With – Relics of Eternity –
- New Framer’s Kit With Return Of Breaking Brick Mountains
- Last Chance For THE PRIMALS x Download Festival T-Shirt!
- Team DN Claims #WorldFirst in FFXIV’s Dancing Mad!
- FFXIV Players Blown Away By Store Updates!
- Support #WorldFirst in FFXIV Dancing Mad Ultimate — Now Available!
- Calling FFXIV Fishers To Catch The Rainbow For Charity!
- Last Chance To Enter FFXIV x Jollibee Sweepstakes!