Monk DPS Rotation, Openers, and Abilities — Dawntrail 7.5
On this page, you will learn how to optimise your opener and rotation in both single-target and multi-target situations. We also cover the use of your cooldowns, to ensure you can achieve the best use of them every time as a Monk DPS in Final Fantasy XIV: Dawntrail (Patch 7.5).
Monk Rotation Overview
The Dawntrail iteration of Monk can be summed up with a single idea:
generating and expending different types of orbs. Between the new job gauge,
chakra stacks, Beast Chakra, and Nadi, we are juggling 4 different types of
orbs at any one given time. While that may sound like a lot to consider, the
job gauge elements that Monk has makes tracking these different orbs very
intuitive, leaving us with plenty of spare brainpower to consider how to use
our orbs effectively and efficiently, ensuring that we can put as much damage
into our ![]() Riddle of Fire as possible. On this page we will break
down the Monk kit into its constituent parts, and then slowly assemble it to
develop an effective understanding of the job.
Riddle of Fire as possible. On this page we will break
down the Monk kit into its constituent parts, and then slowly assemble it to
develop an effective understanding of the job.
Monk Basics
Flowchart
The core of Monk's single target rotation is a very simple flowchart.
- When in Opo-opo form, do you have a stack of Opo-opo's Fury?
- If yes, use
 Leaping Opo.
 - If no, use
 Dragon Kick.
- If yes, use
- When in Raptor form, do you have a stack of Raptor's Fury?
- If yes, use
 Rising Raptor.
 - If no, use
 Twin Snakes.
- If yes, use
- When in Coeurl form, do you have a stack of Coeurl's Fury?
- If yes, use
 Pouncing Coeurl.
 - If no, use
 Demolish.
- If yes, use
This forms the basis of the Monk rotation, and is what you will be doing in-between burst windows.
Chakra
Chakra is a resource that we passively gain throughout fights due to our
![]() Deep Meditation II and
Deep Meditation II and ![]() Brotherhood. We can build up
to 5 chakra stacks, at which point they can be spent on either the single
target
Brotherhood. We can build up
to 5 chakra stacks, at which point they can be spent on either the single
target ![]() The Forbidden Chakra, or the AoE
The Forbidden Chakra, or the AoE
![]() Enlightenment.
Enlightenment.
Effective chakra management is all about avoiding overcapping chakra stacks. Overcapping refers to when you are are at Chakra capacity and generate another stack, wasting its potential potency. In order to avoid this, simply spend your stacks as soon as you hit 5 chakra.
A single stack of chakra is effectively worth 80 potency, as
![]() The Forbidden Chakra converts 5 stacks into 400 potency, and 400/5
= 80.
The Forbidden Chakra converts 5 stacks into 400 potency, and 400/5
= 80. ![]() Six-sided Star also deals an additional 80 potency per
chakra stack consumed - but more on that later.
Six-sided Star also deals an additional 80 potency per
chakra stack consumed - but more on that later.
Perfect Balance, Beast Chakra, and Nadi
![]() Perfect Balance allows us to use any 3 GCDs in any order we
like, and generates a Beast Chakra based on the GCDs used. We are then able to
execute
Perfect Balance allows us to use any 3 GCDs in any order we
like, and generates a Beast Chakra based on the GCDs used. We are then able to
execute ![]() Masterful Blitz, a powerful GCD that changes effects
based on the Beast Chakra we have, while also granting 1 of 2 different Nadi.
When we have 2 different Nadi,
Masterful Blitz, a powerful GCD that changes effects
based on the Beast Chakra we have, while also granting 1 of 2 different Nadi.
When we have 2 different Nadi, ![]() Masterful Blitz becomes
Masterful Blitz becomes
![]() Phantom Rush, our strongest skill with a massive 1500 potency. As
a result, our basic gameplay loop revolves around generating 1 solar Nadi, 1
lunar Nadi, then spending them on
Phantom Rush, our strongest skill with a massive 1500 potency. As
a result, our basic gameplay loop revolves around generating 1 solar Nadi, 1
lunar Nadi, then spending them on ![]() Phantom Rush, repeat. The
following section will outline the most effective way of doing this.
Phantom Rush, repeat. The
following section will outline the most effective way of doing this.
Firstly, let's look at ![]() Perfect Balance. This skill has 2
charges, and a 40 second cooldown. You may have noticed that we need 3 charges
of
Perfect Balance. This skill has 2
charges, and a 40 second cooldown. You may have noticed that we need 3 charges
of ![]() Perfect Balance to execute our
Perfect Balance to execute our ![]() Phantom Rush -
and that 3 charges multiplied by 40 seconds comes out at 120 seconds, or 2
minutes - keep that piece of information in mind for later.
Phantom Rush -
and that 3 charges multiplied by 40 seconds comes out at 120 seconds, or 2
minutes - keep that piece of information in mind for later.
As mentioned, we gain a Beast Chakra depending on the GCDs used in
![]() Perfect Balance - so Opo-opo GCDs give Opo-opo Chakra, Raptor
GCDs give Raptor Chakra, and Coeurl GCDs give Coeurl Chakra.
Perfect Balance - so Opo-opo GCDs give Opo-opo Chakra, Raptor
GCDs give Raptor Chakra, and Coeurl GCDs give Coeurl Chakra.
There are 4 different blitzes that ![]() Perfect Balance allows us
to use.
Perfect Balance allows us
to use.
![]() Elixir Burst grants one Lunar Nadi, and is generated by using
Elixir Burst grants one Lunar Nadi, and is generated by using
![]() Masterful Blitz while we possess three of the same
Beast Chakra. That means that for example, you could use
Masterful Blitz while we possess three of the same
Beast Chakra. That means that for example, you could use
![]() Pouncing Coeurl,
Pouncing Coeurl, ![]() Rockbreaker, and
Rockbreaker, and
![]() Demolish in order to generate three Coeurl Chakra, which would
satisfy the conditions for
Demolish in order to generate three Coeurl Chakra, which would
satisfy the conditions for ![]() Masterful Blitz to become
Masterful Blitz to become
![]() Elixir Burst.
Elixir Burst.
That being said, this would not be ideal.
![]() Leaping Opo is our strongest "spammable" GCD, and so as a
result we want to get as many of these into an ecounter as possible. To that
end, whenever we want to generate an
Leaping Opo is our strongest "spammable" GCD, and so as a
result we want to get as many of these into an ecounter as possible. To that
end, whenever we want to generate an ![]() Elixir Burst we are going to
use three Opo-opo GCDS, alternating between
Elixir Burst we are going to
use three Opo-opo GCDS, alternating between ![]() Dragon Kick and
Dragon Kick and
![]() Leaping Opo depending on if you have or do not have a stack of
Opo-opo's Fury.
Leaping Opo depending on if you have or do not have a stack of
Opo-opo's Fury.
We refer to this as a "Lunar sequence ![]() Perfect Balance".
Perfect Balance".
![]() Rising Phoenix gives one Solar Nadi, and unlike
Rising Phoenix gives one Solar Nadi, and unlike
![]() Elixir Burst requires three unique Beast Chakra: one
Opo-opo, one Raptor, and one Coeurl, which can be generated in any order.
Elixir Burst requires three unique Beast Chakra: one
Opo-opo, one Raptor, and one Coeurl, which can be generated in any order.
This is referred to as a Solar sequence ![]() Perfect Balance.
Perfect Balance.
Although the order we generate the Beast Chakra in does not matter, we
ideally want to be using these ![]() Perfect Balance GCDs in the order
of weakest → strongest. The reasoning for this will be explained later.
Perfect Balance GCDs in the order
of weakest → strongest. The reasoning for this will be explained later.
Once a Lunar and Solar Nadi have been generated,
![]() Masterful Blitz will become
Masterful Blitz will become ![]() Phantom Rush,
regardless of which Beast Chakra are generated.
Phantom Rush,
regardless of which Beast Chakra are generated.
Although it is possible to use any sequence of any GCDs to generate a
![]() Phantom Rush, we want to do the same thing as for
Phantom Rush, we want to do the same thing as for
![]() Elixir Burst - 3 Opo GCDs - for the exact same reasoning.
Elixir Burst - 3 Opo GCDs - for the exact same reasoning.
Upon use ![]() Phantom Rush consumes both Nadi.
Phantom Rush consumes both Nadi.
![]() Celestial Revolution is effectively a consolation prize for
when you make a mistake under
Celestial Revolution is effectively a consolation prize for
when you make a mistake under ![]() Perfect Balance, executed when you
have accumulated only two different types of Beast Chakra. It has a lower
potency than every other Blitz, while simultaneously being a single-target
skill, whereas all other Blitzes are AoE. This skill should never be used
intentionally.
Perfect Balance, executed when you
have accumulated only two different types of Beast Chakra. It has a lower
potency than every other Blitz, while simultaneously being a single-target
skill, whereas all other Blitzes are AoE. This skill should never be used
intentionally. ![]() Celestial Revolution generates a Lunar Nadi by
default, but will generate a Solar Nadi if you already have a Lunar Nadi
filled.
Celestial Revolution generates a Lunar Nadi by
default, but will generate a Solar Nadi if you already have a Lunar Nadi
filled.
Introducing Riddle of Fire, Riddle of Wind, and Brotherhood
![]() Riddle of Fire,
Riddle of Fire, ![]() Riddle of Wind and
Riddle of Wind and
![]() Brotherhood are our three personal buffs.
Brotherhood are our three personal buffs.
![]() Riddle of Fire increases damage dealt by 15% for 20 seconds,
and has a cooldown of 60 seconds. It also grants the Fire's Rumination buff for
20 seconds, allowing the use of
Riddle of Fire increases damage dealt by 15% for 20 seconds,
and has a cooldown of 60 seconds. It also grants the Fire's Rumination buff for
20 seconds, allowing the use of ![]() Fire's Reply once per buff
window.
Fire's Reply once per buff
window.
![]() Brotherhood is an AoE buff granted to all nearby party members which increases damage dealt by
5% for 20 seconds.
Brotherhood is an AoE buff granted to all nearby party members which increases damage dealt by
5% for 20 seconds.
Alongside increasing damage dealt, it also applies a buff that gives a 30% chance for the Monk who used it to generate a stack of Chakra whenever anyone with the buff executes a weaponskill, as well as temporarily increasing our maximum amount of chakra stacks to 10, reducing the risk of overcapping while temporarily increasing chakra generation.
![]() Riddle of Wind increases auto-attack speed for 15 seconds, and
has a 90 second cooldown. The additional auto-attacks gained end up being worth
approximately 700 potency per use.
Riddle of Wind increases auto-attack speed for 15 seconds, and
has a 90 second cooldown. The additional auto-attacks gained end up being worth
approximately 700 potency per use.
Like ![]() Riddle of Fire,
Riddle of Fire, ![]() Riddle of Wind grants the
Wind's Rumination buff, which allows the execution of the
Riddle of Wind grants the
Wind's Rumination buff, which allows the execution of the
![]() Wind's Reply skill.
Wind's Reply skill.
Form Shift and Six Sided Star
Form Shift
![]() Form Shift is a GCD that does no damage, but grants the
Formless Fist buff, which allows the use of any GCD with all form bonuses
applied.
Form Shift is a GCD that does no damage, but grants the
Formless Fist buff, which allows the use of any GCD with all form bonuses
applied.
You will never use this skill during uptime, but before a pull and during downtime you will want to use it once so that you can avoid using any GCDs without the form bonus.
Six Sided Star
![]() Six-sided Star is the highest potency of our "spammable" GCDs,
but at the cost of having a double recast timer. It's already high potency can
be increased even further, as for each stack of chakra it conumes it gains 80
potency, up to a maximum of 10 chakra during
Six-sided Star is the highest potency of our "spammable" GCDs,
but at the cost of having a double recast timer. It's already high potency can
be increased even further, as for each stack of chakra it conumes it gains 80
potency, up to a maximum of 10 chakra during ![]() Brotherhood for a
total 1580 potency.
Brotherhood for a
total 1580 potency.
In spite of this potential for massive potency, you do not want to blindly use this skill as it is absolutely a DPS loss when used incorrectly.
Firstly, the double recast timer.
While 780 potency in 1 GCD is a lot, when you consider the fact that the
time it takes to use is as long as just using 2 other GCDs, and when you start
to look at the potency of our other GCDs, you'll notice that almost any other
combo of 2 GCDs ends up being more potency than 1 use of
![]() Six-sided Star. In fact, even in the one instance where
Six-sided Star. In fact, even in the one instance where
![]() Six-sided Star is more potency (
Six-sided Star is more potency (![]() Dragon Kick +
Dragon Kick +
![]() Twin Snakes = 740), you have to consider that
Twin Snakes = 740), you have to consider that
![]() Six-sided Star is not replacing those 2 GCDs - you will still have
to use them in order to generate the relevant fury stacks. The GCDs that are
really being replaced are the ones at the very end of a fight/phase.
Six-sided Star is not replacing those 2 GCDs - you will still have
to use them in order to generate the relevant fury stacks. The GCDs that are
really being replaced are the ones at the very end of a fight/phase.
Even accounting for chakra potency, using this skill in a vacuum is not a
DPS gain. While ![]() Six-sided Star gains 80 potency per chakra stack,
Six-sided Star gains 80 potency per chakra stack,
![]() The Forbidden Chakra spends chakra at a rate of 80 potency
per stack, as it is a 400 potency skill that requires 5 stacks, and 400/5 = 80.
You are better off using
The Forbidden Chakra spends chakra at a rate of 80 potency
per stack, as it is a 400 potency skill that requires 5 stacks, and 400/5 = 80.
You are better off using ![]() The Forbidden Chakra to spend chakra
stacks instead.
The Forbidden Chakra to spend chakra
stacks instead.
Having covered all the reasons why you shouldn't use this skill in a vacuum, we can now look at what situations are appropriate for this skills' use.
Essentially, the only times to use this skill are when we can bypass the double duration GCD timer.
That means things like using it as the final GCD before casting a limit break, using it as the final GCD before a boss dies or goes untargettable, or using it as the final GCD before having to disengage from a target. In all of these situations, we are able to leverage the high potency while being unaffected by the long recast.
Intermediate Monk
Now that we have looked at all of the relevant skills in the Monk kit and understand what they do, it is time to start thinking about how to optimally use each one.
Opo-maxxing
"Opo-maxxing" is all about getting as many Opo-opo GCDs into an encounter as
possible to maximise the amount of buffed ![]() Leaping Opos we get. We
have already looked at this a little bit with Lunar sequence
Leaping Opos we get. We
have already looked at this a little bit with Lunar sequence
![]() Perfect Balances, but there are more opportunities in our kit
to squeeze out additional Opos.
Perfect Balances, but there are more opportunities in our kit
to squeeze out additional Opos.
This primarily comes in the form of Formless Fist. There are 3 main sources of Formless Fist;
 Form Shift
 Masterful Blitz
 Fire's Reply
All 3 of these skills grant us a stack of Formless Fist, and so we want to ensure that we are always spending that buff on an Opo GCD.
We can also squeeze in additional Opos with where we place our
![]() Masterful Blitz,
Masterful Blitz, ![]() Perfect Balance, and
Perfect Balance, and
![]() Fire's Reply.
Fire's Reply.
Essentially we only ever want to be using these 3 skills after an Opo GCD.
We also don't want to use ![]() Fire's Reply either during
Fire's Reply either during
![]() Perfect Balance or immediately following a
Perfect Balance or immediately following a
![]() Masterful Blitz, as this will waste a stack of Formless Fist.
Masterful Blitz, as this will waste a stack of Formless Fist.
Cooldown Usage
This section is primarily regarding ![]() Riddle of Fire,
Riddle of Fire,
![]() Brotherhood, and
Brotherhood, and ![]() Riddle of Wind.
Riddle of Wind.
The optimal time to use these skills is very easy to remember - it is on cooldown. Following your opener (which we will cover later), you will simply be pressing each of these buttons as soon as they become available. This is for 3 main reasons.
Firstly, it ensures we get the maximum amount of uses of each ability within
an encounter. Were we to, for example, hold ![]() Riddle of Wind for a
full 30 seconds to line up with our other buffs, we would end up losing a lot
of additional uses of the skill. Having more uses of skills that
don't necessarily line up is worth more damage than having less uses of
skills that are aligned.
Riddle of Wind for a
full 30 seconds to line up with our other buffs, we would end up losing a lot
of additional uses of the skill. Having more uses of skills that
don't necessarily line up is worth more damage than having less uses of
skills that are aligned.
Secondly, it will keep us aligned with our own rotation.
![]() Riddle of Fire is a 60 second cooldown, where
Riddle of Fire is a 60 second cooldown, where
![]() Brotherhood is a 120 second cooldown, so as long as we press
each skill without drifting them, every other use of
Brotherhood is a 120 second cooldown, so as long as we press
each skill without drifting them, every other use of
![]() Riddle of Fire is going to naturally line up with
Riddle of Fire is going to naturally line up with
![]() Brotherhood.
Brotherhood.
Third, it will keep us aligned with the rest of our party. Every other raid buff in the game is also a 120 second cooldown, and most important burst skills are either 60 or 120 second cooldowns, so as long as everyone presses everything on cooldown, everyones burst windows will naturally line up together.
Now, though we do want to press ![]() Riddle of Fire on cooldown, it
is important that we "late weave" every use. Late weaving an oGCD just means
that we press it in the latter half of the GCD roll, instead of pressing it
immediately following the previous GCD.
Riddle of Fire on cooldown, it
is important that we "late weave" every use. Late weaving an oGCD just means
that we press it in the latter half of the GCD roll, instead of pressing it
immediately following the previous GCD.
This is because it's possible to fit 11 GCDs into a
![]() Riddle of Fire window, but only if it is late weaved.
Riddle of Fire window, but only if it is late weaved.
Odd and Even Windows
Following on from our 60 / 120 second cooldowns, this is an opportune moment to introduce the concept of odd and even burst windows.
The words 'odd' and 'even' merely refer to the minute in an encounter that these windows happen, so an odd window is any burst window at an odd minute - 1, 3, 5, etc. - where an even window is a burst window at an even minute - 2, 4, 6, etc.
The reason we distinguish between the 2 is because even windows are stronger.
We have ![]() Riddle of Fire up every 1 minute, whereas
Riddle of Fire up every 1 minute, whereas
![]() Brotherhood and all of the rest of the raid buffs in our party
are up every 2 minutes. This means that odd windows contain only
Brotherhood and all of the rest of the raid buffs in our party
are up every 2 minutes. This means that odd windows contain only
![]() Riddle of Fire, whereas even windows are comprised of
Riddle of Fire, whereas even windows are comprised of
![]() Riddle of Fire,
Riddle of Fire, ![]() Brotherhood, and any additional
raid buffs from our party members.
Brotherhood, and any additional
raid buffs from our party members.
We prioritise even windows because of this, and will look at how to build them later.
Nadi Alignment
While the basic idea of Monk is to generate a solar nadi, a lunar nadi, and
then spend them on ![]() Phantom Rush, we can play around with how we
choose to generate nadi in order to gain DPS.
Phantom Rush, we can play around with how we
choose to generate nadi in order to gain DPS.
Playing as described above, generating 1 of each nadi in our opener, would
result in ![]() Phantom Rush being stuck in the odd windows, which as
covered, are weaker than even windows.
Phantom Rush being stuck in the odd windows, which as
covered, are weaker than even windows.
However, if we instead generate 2 lunar nadi in our opener, it pushes the
entire nadi generation cycle back by 1, and results in our odd windows
containing a ![]() Rising Phoenix instead, with
Rising Phoenix instead, with
![]() Phantom Rush being the first blitz in our even windows.
Phantom Rush being the first blitz in our even windows.
In fact, you can take this a step further even and do what we call "triple
lunar", where you generate 2 lunar nadi in the opener, another lunar nadi in
the odd windows, and then even windows will consist of a
![]() Rising Phoenix and a
Rising Phoenix and a ![]() Phantom Rush.
Phantom Rush.
Of course, by overcapping on nadi we do increase the risk of losing a use of
![]() Phantom Rush, and so it is not always ideal to do.
Phantom Rush, and so it is not always ideal to do.
While double and triple lunar gain damage from being able to put
![]() Phantom Rush into more buffs, if we were to lose a use of
Phantom Rush into more buffs, if we were to lose a use of
![]() Phantom Rush as a result it ends up being a DPS loss overall. As
such, if a boss dies after an odd window, solar lunar is better, whereas if a
boss were to die after an even window it would be better to overcap nadi in the
opener.
Phantom Rush as a result it ends up being a DPS loss overall. As
such, if a boss dies after an odd window, solar lunar is better, whereas if a
boss were to die after an even window it would be better to overcap nadi in the
opener.
Triple lunar is essentially a slightly stronger version of double lunar, but
at a greater risk of losing a ![]() Phantom Rush.
Phantom Rush.
We generally recommend double lunar for unknown encounter durations, and then when you know what you killtime will be you can then decide if it will be better to swap to solar lunar or triple lunar.
The reason double lunar is recommended is that it ends up being better at more killtimes on average than the other 2 nadi alignment choices.
Rules Review
In summary, there are a few key rules to keep in mind when we are looking at building a Monk burst window.
- Press
 Riddle of Fire,
  Brotherhood, and
 Riddle of Wind on cooldown.
 - Use 2 charges of
 Perfect Balance in even windows and 1
charge in odd windows.
Perfect Balance in even windows and 1
charge in odd windows. - Always late-weave Riddle of Fire.
- Only use Perfect Balance after an Opo GCD.
- Only use Fire's Reply after an Opo GCD.
- Spend any Formless Fist buffs on Opo GCDs.
Burst Windows
Now that all of the relevant rules have been established, we can cover how to build optimal odd and even burst windows.
Depending on which Nadi we are looking to build, there are 2 different sequences of odd window that will need to be learned. Thankfully, all even windows are structured the same, no matter which rotation you are using.
A few key things to keep in mind here is that because we are pressing
![]() Riddle of Fire on cooldown, it can be coming up during any of our
GCDS. This means that we need to know how to sequence burst windows that
accommodate
Riddle of Fire on cooldown, it can be coming up during any of our
GCDS. This means that we need to know how to sequence burst windows that
accommodate ![]() Riddle of Fire happening on any of our 6 core
GCDs.
Riddle of Fire happening on any of our 6 core
GCDs.
Thankfully, we do not actually care about the specific GCD itself - only the
form of each GCD, which means there are 3 possible ![]() Riddle of Fire
placements.
Riddle of Fire
placements.
Odd Windows
Lunar Odd Windows
Identifying Lunar odd windows is relatively straightforward - after pressing
![]() Riddle of Fire, use
Riddle of Fire, use ![]() Perfect Balance after your next
Opo-Opo GCD, and then start building out your
Perfect Balance after your next
Opo-Opo GCD, and then start building out your ![]() Perfect Balance
window depending on the blitz you are using.
Perfect Balance
window depending on the blitz you are using.
Once you have finished generating your 3 Beast Chakra, you have a little
flexibility. Either you immediately excecute ![]() Masterful Blitz, and
then follow up with an Opo GCD →
Masterful Blitz, and
then follow up with an Opo GCD → ![]() Fire's Reply → Opo GCD,
or you can use
Fire's Reply → Opo GCD,
or you can use ![]() Fire's Reply → Opo GCD →
Fire's Reply → Opo GCD →
![]() Masterful Blitz, → Opo GCD. In a vacuum, this order does not
matter, however certain encounters may favour doing one over the other - for
instance, if you need to move your ranged GCD to another spot to keep uptime
more effectively.
Masterful Blitz, → Opo GCD. In a vacuum, this order does not
matter, however certain encounters may favour doing one over the other - for
instance, if you need to move your ranged GCD to another spot to keep uptime
more effectively.
![]() Wind's Reply does not always line up with odd windows. In the
instances where it does line up, you have the freedom to place it absolutely
anywhere within the window, as it will not push any important GCDs out of the
end of the buff. This grants the ability to fully capitalise on the additional
attributes of
Wind's Reply does not always line up with odd windows. In the
instances where it does line up, you have the freedom to place it absolutely
anywhere within the window, as it will not push any important GCDs out of the
end of the buff. This grants the ability to fully capitalise on the additional
attributes of ![]() Wind's Reply - the extra range and AoE damage -
wherever it is needed the most.
Wind's Reply - the extra range and AoE damage -
wherever it is needed the most.
Generally speaking, lunar odd windows will look something like this:
- Opo GCD → Riddle of Fire
- Raptor GCD → Riddle of Fire
- Coeurl GCD → Riddle of Fire
- Opo GCD → Perfect Balance → Riddle of Fire
- Opo GCD
- Opo GCD
- Opo GCD
- Masterful Blitz
- Opo GCD
- Fire's Reply
- Opo GCD
- Raptor GCD
- Coeurl GCD
Obviously you cannot actually use ![]() Riddle of Fire 4 times, it is
merely listed 4 times as those are all of the potential placements it can
have.
Riddle of Fire 4 times, it is
merely listed 4 times as those are all of the potential placements it can
have.
Now we did say that there were 3 possible burst windows, but there are 4
![]() Riddle of Fire placements here - this is because the first and
last window are identical.
Riddle of Fire placements here - this is because the first and
last window are identical.
They both involve pressing ![]() Riddle of Fire after an Opo GCD, the
only difference is that in the first instance, you wait until the next
Opo GCD to use
Riddle of Fire after an Opo GCD, the
only difference is that in the first instance, you wait until the next
Opo GCD to use ![]() Perfect Balance, whereas with the other you double
weave
Perfect Balance, whereas with the other you double
weave ![]() Perfect Balance and
Perfect Balance and ![]() Riddle of Fire.
Riddle of Fire.
Again, both options here contain the exact same GCDs and do the exact same
damage, you merely have the option to do either in case you need to move your
![]() Masterful Blitz or
Masterful Blitz or ![]() Fire's Reply around in the window
to better accommodate certain fights.
Fire's Reply around in the window
to better accommodate certain fights.
Solar Odd Windows
Identifying Solar odds requires only slightly more brainpower.
When excecuting Solar odd windows, we want to press
![]() Perfect Balance before
Perfect Balance before ![]() Riddle of Fire instead of
after. To know when to do this, we need to keep an eye on our
Riddle of Fire instead of
after. To know when to do this, we need to keep an eye on our
![]() Riddle of Fire cooldown.
Riddle of Fire cooldown.
Essentially, we know that we are looking to press
![]() Perfect Balance following an Opo-opo GCD, so we need to find the
Opo-opo GCD that is being pressed when
Perfect Balance following an Opo-opo GCD, so we need to find the
Opo-opo GCD that is being pressed when ![]() Riddle of Fire has between
2 - 7 seconds remaining. This is the Opo GCD that we are going to follow with
Riddle of Fire has between
2 - 7 seconds remaining. This is the Opo GCD that we are going to follow with
![]() Perfect Balance. From here, we want to build the Solar Nadi by
using our 3 GCDs in order of weakest → strongest, to ensure that only
the weaker GCDs fall out of
Perfect Balance. From here, we want to build the Solar Nadi by
using our 3 GCDs in order of weakest → strongest, to ensure that only
the weaker GCDs fall out of ![]() Riddle of Fire should it become
available mid-PB window.
Riddle of Fire should it become
available mid-PB window.
After this the idea is the same as the Lunar odd windows, including the mentioned flexibility. Blitz → Opo → Reply → Opo.
Generally speaking, solar odd windows will look something like this:
- Opo GCD
- Raptor GCD
- Coeurl GCD
- Opo GCD → Perfect Balance → Riddle of Fire
- Weakest GCD → Riddle of Fire
- Second strongest GCD → Riddle of Fire
- Strongest GCD → Riddle of Fire
 Rising Phoenix
- Opo GCD
- Fire's Reply
- Opo GCD
- Raptor GCD
- Coeurl GCD
Even Windows
Building an even window is the same as building Solar odd window. We need to
use ![]() Perfect Balance before
Perfect Balance before ![]() Riddle of Fire, so we are
looking for the Opo GCD that happens when
Riddle of Fire, so we are
looking for the Opo GCD that happens when ![]() Riddle of Fire has
between 2 - 7 seconds remaining on cooldown.
Riddle of Fire has
between 2 - 7 seconds remaining on cooldown.
From there, we generate our 3 Beast Chakra before executing the first
![]() Masterful Blitz. If done correctly, this blitz will be under the
effects of both
Masterful Blitz. If done correctly, this blitz will be under the
effects of both ![]() Brotherhood and
Brotherhood and ![]() Riddle of Fire.
Riddle of Fire.
Depending on the rotation you are following, this will either be a Solar
sequence for ![]() Rising Phoenix, or a Lunar sequence for
Rising Phoenix, or a Lunar sequence for
![]() Phantom Rush.
Phantom Rush.
After this we just continue to follow the rules we established earlier -
execute our ![]() Masterful Blitz → Opo GCD →
Masterful Blitz → Opo GCD →
![]() Fire's Reply → Opo GCD, before executing our second
Fire's Reply → Opo GCD, before executing our second
![]() Perfect Balance window. Regardless of your rotation, this
will always be a Lunar sequenced
Perfect Balance window. Regardless of your rotation, this
will always be a Lunar sequenced ![]() Perfect Balance, either for
Perfect Balance, either for
![]() Phantom Rush or Elixir Burst.
Phantom Rush or Elixir Burst.
Just as with the odd window, we have the ability here to place
![]() Fire's Reply after the
Fire's Reply after the ![]() Perfect Balance but before
the
Perfect Balance but before
the ![]() Masterful Blitz if necessary, on either
Masterful Blitz if necessary, on either
![]() Perfect Balance use.
Perfect Balance use.
Again, ![]() Wind's Reply won't always be available in even windows,
but when it is you are able to place it anywhere within the window without
pushing out any important skills.
Wind's Reply won't always be available in even windows,
but when it is you are able to place it anywhere within the window without
pushing out any important skills.
Generally speaking, even windows will look something like this:
- Opo GCD
- Raptor GCD
- Coeurl GCD
- Opo GCD → Perfect Balance
- Blitz-building GCD → Brotherhood → Riddle of Fire
- Blitz-building GCD → Brotherhood → Riddle of Fire
- Blitz-building GCD → Brotherhood → Riddle of Fire
- Masterful Blitz
- Opo GCD
- Fire's Reply
- Opo GCD
- Perfect Balance
- Opo GCD
- Opo GCD
- Opo GCD
- Masterful Blitz
- Opo GCD
"Blitz-building GCD" simply refers to the fact that this could be either a solar sequnce or a lunar sequence depending on your rotation, so adjust as necessary.
The second ![]() Perfect Balance will always be a lunar sequence,
but the blitz itself could either be an
Perfect Balance will always be a lunar sequence,
but the blitz itself could either be an ![]() Elixir Burst or a
Elixir Burst or a
![]() Phantom Rush.
Phantom Rush.
Fixing the -3 PB
In the instance where you misidentify the window that requires you to use
![]() Perfect Balance 4 GCDs before
Perfect Balance 4 GCDs before ![]() Riddle of Fire, you
will find yourself in the grim position of having just used an Opo GCD, then
needing to weave
Riddle of Fire, you
will find yourself in the grim position of having just used an Opo GCD, then
needing to weave ![]() Perfect Balance,
Perfect Balance, ![]() Brotherhood, and
Brotherhood, and
![]() Riddle of Fire, all in the same weave slot.
Riddle of Fire, all in the same weave slot.
Triple weaving is not an option here, however we do thankfully have a solution.
You are able to double weave ![]() Brotherhood and
Brotherhood and
![]() Riddle of Fire, and then use
Riddle of Fire, and then use ![]() Fire's Reply → Opo
GCD →
Fire's Reply → Opo
GCD → ![]() Perfect Balance in order to get yourself back on
track.
Perfect Balance in order to get yourself back on
track.
The only downside to this is that if ![]() Riddle of Wind is
available in this even window, you will need to skip one of your Formless GCDs
in order to fit
Riddle of Wind is
available in this even window, you will need to skip one of your Formless GCDs
in order to fit ![]() Wind's Reply into the even window.
Wind's Reply into the even window.
Openers
Now that everything else has been covered, we can finally go over the most important burst window of a fight - the opener.
As we mentioned there are both solar lunar and double lunar options for each opener, however each of these 2 nadi alignment options also have 3 different variations to accommodate certain different situations.
These are: DK 5s, DK 7s, and Demo 7s.
The DK refers to ![]() Dragon Kick, and signifies that the
opener starts with that as the first GCD; likewise, Demo indicates that the
opener starts with
Dragon Kick, and signifies that the
opener starts with that as the first GCD; likewise, Demo indicates that the
opener starts with ![]() Demolish.
Demolish.
The 5s and 7s refer to the timing of ![]() Brotherhood.
Brotherhood.
The reason we have two different options here is that some jobs prefer 5s, and some prefer 7s. Monk itself does not care and can accommodate either timing - which one you pick depends on when the rest of your group is bursting in their openers.
Finally, the reason there is a DK 7s and a Demo 7s is because the Demo 7s opener sets up a very slightly stronger opener and 1 minute burst window. The DK opener can still sometimes be worth using depending on fury stacks at the end of a phase/encounter, but generally speaking Demo 7s is a better choice than DK 7s, if indeed you are doing a 7s opener.
Double Lunar
DK Opener - 5s buffs
- Dragon Kick → Gemdraught → Perfect Balance
- Leaping Opo
- Dragon Kick → Brotherhood → Riddle of Fire
- Leaping Opo →
 The Forbidden Chakra → Riddle of Wind
 - Elixir Burst
- Dragon Kick
 Wind's Reply
- Fire's Reply
- Leaping Opo → Perfect Balance
- Dragon Kick
- Leaping Opo
- Dragon Kick
- Elixir Burst
- Leaping Opo
DK Opener - 7s buffs
- Gemdraught 1.4s pre-pull
- Dragon Kick → Perfect Balance → The Forbidden Chakra
- Leaping Opo
- Dragon Kick
- Leaping Opo → Brotherhood → Riddle of Fire
- Elixir Burst → Riddle of Wind
- Dragon Kick
- Wind's Reply
- Fire's Reply
- Leaping Opo → Perfect Balance
- Dragon Kick
- Leaping Opo
- Dragon Kick
- Elixir Burst
- Leaping Opo
Demo Opener - 7s buffs
- Demolish
- Dragon Kick → Perfect Balance → Gemdraught
- Leaping Opo
- Dragon Kick → Brotherhood → Riddle of Fire
- Leaping Opo → Riddle of Wind → The Forbidden Chakra
- Elixir Burst
- Dragon Kick
- Wind's Reply
- Fire's Reply
- Leaping Opo → Perfect Balance
- Dragon Kick
- Leaping Opo
- Dragon Kick
- Elixir Burst
- Leaping Opo
Solar Lunar
DK Opener - 5s buffs
- Dragon Kick → Perfect Balance
- Twin Snakes → Gemdraught
- Demolish → Brotherhood → Riddle of Fire
- Leaping Opo → The Forbidden Chakra → Riddle of Wind
- Rising Phoenix
- Dragon Kick
- Wind's Reply
- Fire's Reply
- Leaping Opo → Perfect Balance
- Dragon Kick
- Leaping Opo
- Dragon Kick
- Elixir Burst
- Leaping Opo
DK Opener - 7s buffs
- Dragon Kick → Perfect Balance → Gemdraught
- Twin Snakes
- Leaping Opo
- Demolish → Brotherhood → Riddle of Fire
- Rising Phoenix → Riddle of Wind → The Forbidden Chakra
- Dragon Kick
- Wind's Reply
- Fire's Reply
- Leaping Opo → Perfect Balance
- Dragon Kick
- Leaping Opo
- Dragon Kick
- Elixir Burst
- Leaping Opo
Demo Opener - 7s buffs
- Demolish
- Dragon Kick → Perfect Balance → Gemdraught
- Twin Snakes
- Pouncing Coeurl → Brotherhood → Riddle of Fire
- Leaping Opo → Riddle of Wind → The Forbidden Chakra
- Rising Phoenix
- Dragon Kick
- Wind's Reply
- Fire's Reply
- Leaping Opo → Perfect Balance
- Dragon Kick
- Leaping Opo
- Dragon Kick
- Elixir Burst
- Leaping Opo
Additional Situational Skills
Thunderclap
![]() Thunderclap is our mobility tool, and is arguably the
strongest mobility skill in the game. With three charges, a reasonable cooldown of
30 seconds, and the ability to dash to both enemies and allies, this
makes Monk one of the most agile jobs in the game.
Thunderclap is our mobility tool, and is arguably the
strongest mobility skill in the game. With three charges, a reasonable cooldown of
30 seconds, and the ability to dash to both enemies and allies, this
makes Monk one of the most agile jobs in the game.
The skill ceiling on ![]() Thunderclap is reasonably high, as
there are many creative ways that it can be used in order to keep uptime, or to
continue to hit positionals on a large target ring that you may otherwise
struggle to maneuver around in time due to ongoing mechanics. If timed well it
can also be used to almost invalidate proximity damage that may force other
jobs to lose uptime, by staying in melee range until the last second, before
Thunderclap is reasonably high, as
there are many creative ways that it can be used in order to keep uptime, or to
continue to hit positionals on a large target ring that you may otherwise
struggle to maneuver around in time due to ongoing mechanics. If timed well it
can also be used to almost invalidate proximity damage that may force other
jobs to lose uptime, by staying in melee range until the last second, before
![]() Thunderclapping out to a safe distance by targetting a ranged
party member, then dashing back into melee range as soon as the damage snapshot
is locked in.
Thunderclapping out to a safe distance by targetting a ranged
party member, then dashing back into melee range as soon as the damage snapshot
is locked in.
Riddle of Earth, Earth's Reply, and Mantra
![]() Riddle of Earth is our personal mitigation, granting us 20%
damage mitigation and a 500 potency cure in the form of a 15s regen. As with
Riddle of Earth is our personal mitigation, granting us 20%
damage mitigation and a 500 potency cure in the form of a 15s regen. As with
![]() Riddle of Fire and
Riddle of Fire and ![]() Riddle of Wind however, this skill
has the
Riddle of Wind however, this skill
has the ![]() Earth's Reply followup ability - an short range AoE heal
with up to 500 potency. In combination with
Earth's Reply followup ability - an short range AoE heal
with up to 500 potency. In combination with ![]() Mantra, this
can be a very respectable heal for your party, and so these skills in
combination can allow a Monk to be a great defensive presence within their
party.
Mantra, this
can be a very respectable heal for your party, and so these skills in
combination can allow a Monk to be a great defensive presence within their
party.
As for the best time to use these skills, this will always come down to what your healers need from you depending on how they are healing a given encounter, and so should be discussed with them. For general use outside of co-ordinated play however, you are typically safe to throw these out to cover instances of raidwide damage. Even if you end up overhealing, that's better than not healing at all, as it costs nothing to use.
Advanced Monk Concepts
Double Weaving
Unfortunately, due to the fast GCD of Monk, double weaving is effectively impossible unless you have single-digit ping. This presents a problem as there will be scenarios that force you to double weave to avoid drifting buffs. Thankfully, there is a third-party program we can use to mitigate this issue - XIVAlexander. XIVAlexander works by effectively simulating a low ping environment by shaving off some of the animation lock certain skills have. While this is incredibly useful and evens out the playing field for those of us with worse ping, it is still a third party program and so should not be discussed in game. While there are no known bans of users who simply use this tool in a responsible manner (as it is not detectable unless modified to an extreme), I would still stress that you use it at your own discretion.
FPS Locking
Our FPS matters when it comes to our GCD speed, as the game waits until the next frame is rendered after your GCD is up to execute the action you currently have queued. What this means in practice is that the GCD the game shows on your tooltip may not necessarily be accurate, resulting in a potential loss of GCDs over a large span of time. Given a consistent frame rate, your effective GCD including FPS may be calculated via GCD+((1-GCD*FPS) mod 1)*1/FPS, where "GCD" is the GCD speed shown on your in-game tooltips, "FPS" is your framerate, and "mod" indicates the usage of the modulo operation. This is easier to understand by graphing the results of this for a given tooltip GCD. The graph for a 1.96 tooltip GCD looks as follows;
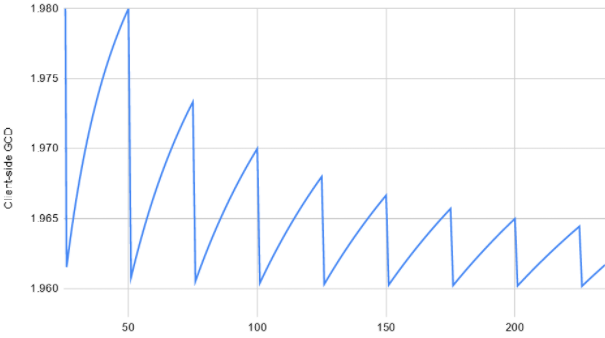
As you can see, there are clearly certain framerates that are preferable to others. Each dip in the graph represents your effective GCD speed accounting for FPS being as close as possible to the advertised tooltip GCD, which occurs every 1+50n FPS where n is an integer, for example, 1FPS, 51 FPS, 101 FPS, etc.
At Monk's ideal GCD speed of 1.94, the rotation drifts slightly as you are
forced to hold ![]() Riddle of Fire briefly in order to accommodate the
late weave slot. This can be mitigated somewhat via third-party software that
will minimize the amount of required
Riddle of Fire briefly in order to accommodate the
late weave slot. This can be mitigated somewhat via third-party software that
will minimize the amount of required ![]() Riddle of Fire drift in order
to retain our ideal late-weave spot while simultaneously minimizing how much we
drift out of our teams' 60/120s raid buffs. Both the ReAction plugin available
via Quicklauncher and XIVAlexander have FPS aligning functionality, which will
save you having to use something like Rivatuner to lock your FPS to a specific
number.
Riddle of Fire drift in order
to retain our ideal late-weave spot while simultaneously minimizing how much we
drift out of our teams' 60/120s raid buffs. Both the ReAction plugin available
via Quicklauncher and XIVAlexander have FPS aligning functionality, which will
save you having to use something like Rivatuner to lock your FPS to a specific
number.
To offer a simplified explanation of the problem, the GCD speed shown in-game
is not strictly accurate, being variably slower based on your frame rate. For
example, if your game displays a 1.94 GCD, but you play at 60 FPS, your actual
GCD is closer to 1.95; as a result of this, after 106 GCDs (or roughly 206
seconds) you would be a full GCD behind someone who was playing at 1.94 but had
an optimal frame rate. At the same, you can also suffer even when not a full GCD
behind. With regards to end of fight/phase scenarios, if you were for example
1/3 of a GCD ahead, for randomly distributed encounter durations you would lose
a full GCD in one in three of those. This is also not the only place where losses can
occur due to frame rate; again, assuming 1.94 GCD 60 FPS, you would lose out on
buff alignment over the course of a fight as you would be forced to slightly
hold ![]() Riddle of Fire on each use in order to late-weave it,
gradually pushing you further and further out of raid buffs.
Riddle of Fire on each use in order to late-weave it,
gradually pushing you further and further out of raid buffs.
Locking your frame rate at specific values via Rivatuner or using the FPS functionality of either ReAction or XIVAlexander mitigates these issues by aligning your GCD with your framerate as closely as possible such that you have minimized wait times before queued actions are executed. Please note again that third-party tools are to be used at your own discretion.
Changelog
- 02 May 2026: Reviewed for 7.5.
- 17 Dec. 2025: Reviewed for 7.4.
- 05 Aug. 2025: Reviewed for 7.3.
- 31 Jul. 2024: Reformatted guide content.
- 30 Jul. 2024: Updated for Dawntrail.
- 18 Jan. 2024: Updated for patch 6.55.
- 24 May 2023: Updated for 6.4.
- 13 Jan. 2023: Up-to-date for Patch 6.3
- 20 Apr. 2022: Updated for Patch 6.1
- 24 Mar. 2022: Youtube embeds for dummy rotation videos added, triple blitz added
- 07 Jan. 2022: FPS information added.
- 05 Jan. 2022: Optimal Drift Even Window description fixed.
- 31 Dec. 2021: Guide added.
Guides from Other Classes

Lappy is a devout and active believer in Rhalgr, opting to practice her worship for the fist through late nights trawling through spreadsheets and Google documents. Having started playing Final Fantasy XIV in Shadowbringers, she has formed an intense love for all things jank, esoteric and obtuse, quickly taking to Monk and learning everything there is to know. She creates resources for both FFXIV, as well as Granblue Fantasy: Versus Rising on Dustloop, and is always learning a different fighting game every time you ask. She can be found on discord at @liatris, or hosting FGC tournaments on her Twitch!
- Complete Dawntrail’s Art Book Collection With – Relics of Eternity –
- New Framer’s Kit With Return Of Breaking Brick Mountains
- Last Chance For THE PRIMALS x Download Festival T-Shirt!
- Team DN Claims #WorldFirst in FFXIV’s Dancing Mad!
- FFXIV Players Blown Away By Store Updates!
- Support #WorldFirst in FFXIV Dancing Mad Ultimate — Now Available!
- Calling FFXIV Fishers To Catch The Rainbow For Charity!
- Last Chance To Enter FFXIV x Jollibee Sweepstakes!