Keybindings and Hotbar Setup for Reaper — Dawntrail 7.4
Welcome to our keybinding and controller setup guide for Reaper. Here you'll find example setups to play FFXIV for mouse and keyboard configurations, as well as controller users.
Keybindings
Keybinds are an important aspect to consider when playing your job. Placing frequently used actions in comfortable positions makes executing your rotation smoother and less tiring. We provide two example layouts below, but ultimately, how you arrange your hotbars depends on your personal preference and setup.
Hotbar Setup Examples
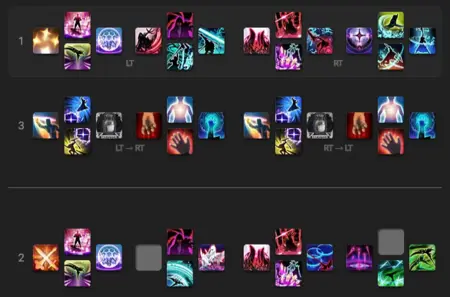
Reaper doesn't require many buttons, allowing all actions used in single-target encounters to fit within one static hotbar and half of another — for which we'll use the double trigger pull setting (hotbar 3). We chose to double up actions on hotbar 3 to ensure consistency regardless of which trigger is pulled first. You can, however, adjust this if you prefer to reserve additional slots beyond those available on hotbar 2.
The layout shown below is close to my personal setup. It relies heavily on numeric keybinds and modifier combinations, but you can
easily adapt it to letter keys or simplify it if you use a mouse with additional buttons! Notice that buttons that will be pressed during
![]() Enshroud are all grouped closely together, allowing for quick and comfortable execution.
Enshroud are all grouped closely together, allowing for quick and comfortable execution.
General Keybind Advice
-
While most jobs rely heavily on their basic combo, Reaper's most frequently used skills are actually
 Gibbet and
  Gallows, due to their transformation during
  Enshroud — under
which they're also pressed in rapid succession. Placing these — along with
  Shadow of Death,
  Gluttony,
and
  Blood Stalk — in comfortable, easy-to-reach spots will greatly improve your ergonomics.
 -
Your single-target combo (
 Slice,
  Waxing Slice,
  Infernal Slice) should also be placed on
accessible keybinds, as it will see frequent use during filler phases of the rotation.
 -
If you play multiple jobs — especially other melees — consider keeping similar utility actions on the same keybinds across all of them.
These include:
 Feint,
  Arm's Length,
  True North,
  Second Wind,
  Bloodbath,
  Leg Sweep, and
  Limit Break.
 -
 Hell's Egress and
  Hell's Ingress are two sides of the same coin, so place them close together. Remember that you'll need to press one shortly after the other to use
  Regress.
 - Finally, plan a dedicated keybind for your potions, as they play an important role in burst windows and overall optimization.
Guides from Other Classes

This guide is maintained by Azra Lacrimae, who began serious raiding in Shadowbringers and has since completed most of XIV’s high-end content, alongside multiple week-one Savage clears and several top placings on the parsing leaderboards during even-patches. A strong enthusiast of Reaper optimization and a Balance mentor, they are also responsible for formalizing what is now known as “non-Standard Reaper”: a compendium of results and formulae that offers a framework for high-end optimization of the job.
- FFXIV Players Can Now Grab Berlin Fan Fest Merch Before It Sells Out
- FFXIV Players: Here’s Every Major Drop Before Evercold Hits
- Evangelion Alliance Raid Announced for FFXIV Evercold in 2027
- FFXIV Launching on Switch 2 But Leaving PS4 — Here’s What You Need to Know
- FFXIV Patch 7.5 Just Kicked Off Dawntrail’s Final Chapter
- Yoshi-P Fanfest Q&A: Glamour Plates, Job Design, and Favorite Scion
- Get Ready ASAP for Kefka’s Ultimate Raid in Patch 7.51
- Find Out How Evercold is Changing FFXIV to a Weekly System

