Blunderbuss Guide and Builds for New World
Welcome to our guide for Blunderbuss, a weapon in New World. Within these pages, you will find everything required to understand how best to play with this weapon in both PvE and PvP.
Blunderbuss Overview
The Blunderbuss is a unique weapon that scales primarily with Strength and uses Intelligence for secondary scaling. It deals a variety of mixed damage including physical Thurst damage, and abilities that will deal magical Fire damage. It is the first hybrid weapon of its kind. Generally, this weapon will be used in close quarters combat, but it will be used by both frontline bruisers, and backline assassins due to the strength of its builds. When used properly this will apply immense damage pressure. At times it can be awkward to use because of its hit registration and it can be hard to master because the player needs to aim its shots. In all, this is a powerful weapon for burst damage, AoE damage, and anti-heal debuffs. It is most frequently seen in PvP and not seen often in PvE.
Blunderbuss Strengths and Weaknesses
Incredible burst damage
Valuable anti-healing debuff potential
Strong defensive passives for survival
Mixed damage sources that result in more effective damage
Can be very mobile when used properly
One of the more difficult weapons to master
Awkward reload animation
Hit registration can be cofusing
Minimal PvE value
Minimal range when compared to other ranged weapons
Blunderbuss Builds
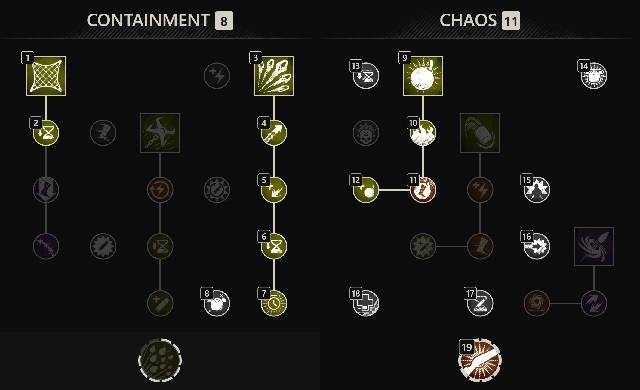
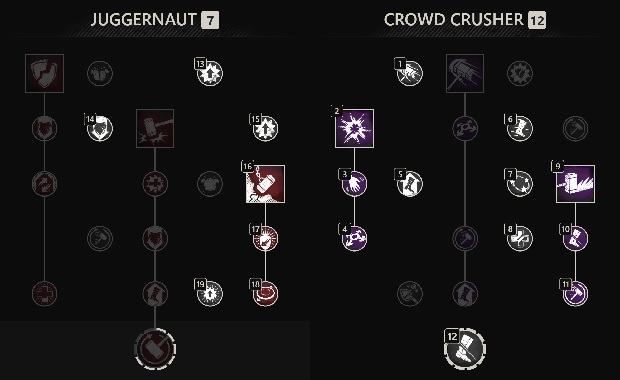
The Blunderbuss builds in the current META primarily rely upon your choice of ultimate. In most cases ![]() Double Down will be the
best option and results in fantastic ability output. There are a few niche scenarios in which
Double Down will be the
best option and results in fantastic ability output. There are a few niche scenarios in which ![]() Unload can be beneficial, but more
often than not, even in burst damage focused builds, the cooldown reduction passives are fantastic.
Unload can be beneficial, but more
often than not, even in burst damage focused builds, the cooldown reduction passives are fantastic.
Double Down Cooldown Reset
 Net Shot — When combined with
  Exhaustive Net Shot this is a powerful CC ability that will slow a target and make them vulnerable to exhausting themselves
and being easily taken down. It will deal a moderate amount of damage but allow you to quickly close gaps. It can also be a fantastic source of mobility if you use this while walking
backwards so that you can escape enemies.
 Azoth Shrapnel Blast — This is the Blunderbuss's highest damaging ability. This should always be used immediately after firing off a basic attack so that you can deal a
potent burst of damage. It has incredible range, AoE potential, and when used in combination with a regular shot it can take away a significant amount of health. It should also be used on
clumps of enemies to take advantage of the bomb it leaves on the ground after being used.
 Splitting Grenade — Aim to use this on
  Gravity Well or other clumps of enemies. It will deal a great amount of initial burst damage, but it can also leave a
devastating damage over time effect that lasts 10 seconds and can stack up to 3 times depending on how many of the bombs hit the target. This is the greatest source of AoE damage on
the Blunderbuss.
This is the more common build option paired with an Ice Gauntlet due to its ability to cycle through cooldowns quickly. It is very strong not only because of its burst potential, but its ability to anti-heal, debuff enemies, and lock down targets.
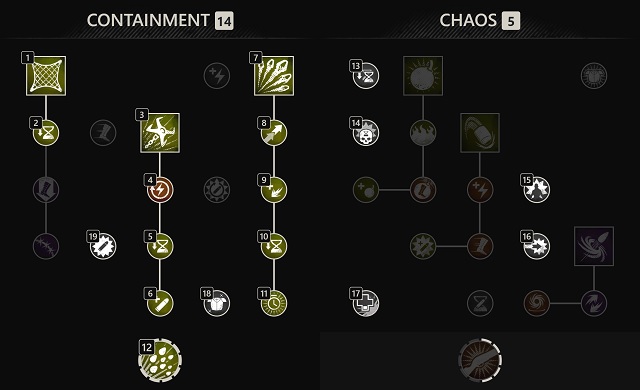
Unload Burst Build
 Claw Shot — This can be used to root enemies in place for a moment and offer a free window of damage. It has a decent range that will allow you to close gaps, and can
be canceled as long as you fire your weapon. This can be strong to root enemies who are trying to run away, pull yourself to them, and attempt a kill combo. It can also be great to support
allies, if they are fighting a target you use this ability and cancel it to root the enemy from a range to help your team. In a pinch, this can rarely be used survival. If you fire it at an
enemy outside of a
  Gravity Well you can pull yourself out. This can also be used on friendly players using
  Entombed.
This variant is most commonly used for builds that are looking to capitalize on the sheer damage ouput of a well placed aimed shot in combination with an
![]() Azoth Shrapnel Blast. It is important to ability weave in a build like this. That means using an ability, immediately firing a basic attack, using another
ability, and firing again, to take advantage of
Azoth Shrapnel Blast. It is important to ability weave in a build like this. That means using an ability, immediately firing a basic attack, using another
ability, and firing again, to take advantage of ![]() Unload.
Unload.
This build is best used in single-target backline dive builds that want to quickly deal as much damage as possible and escape. It is not always the best option when paired with an Ice
Gauntlet, but you may use this if you prefer. It is important to try and immediately fire your Blunderbuss right after using an ability. For example, you could approach a target and fire a
![]() Net Shot while moving toward them so you do not activate the movement component of the ability. Then as soon as you have hit that you can shoot, then immediately use
Net Shot while moving toward them so you do not activate the movement component of the ability. Then as soon as you have hit that you can shoot, then immediately use ![]() Claw Shot,
then shoot, and then use
Claw Shot,
then shoot, and then use ![]() Azoth Shrapnel Blast. The animation is longer on this ability so it is hard to instantly shoot after using it, but then you still have 6 seconds to fire off a
final empowered shot. This combination when used correctly can take down an entire health bar.
Azoth Shrapnel Blast. The animation is longer on this ability so it is hard to instantly shoot after using it, but then you still have 6 seconds to fire off a
final empowered shot. This combination when used correctly can take down an entire health bar.
Secondary Weapons
Ice Gauntlet
For more detailed information on Ice Gauntlet usage and other aspects of its gameplay, please refer to our Ice Gauntlet guide.
Support/Defensiveness
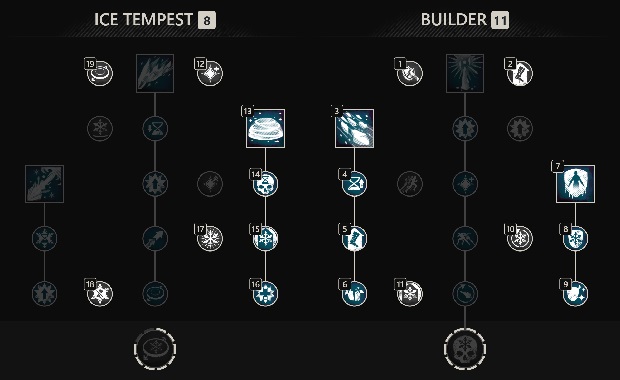
When using this build you will most likely be in medium armor and playing this similarly to as if you were using a Void Gauntlet. This build in combination with the
Blunderbuss will allow you to be a defensive frontline bruiser with far more damage output. You will lose some CC and Utility, but you have great AoE and burst pressure
along with a plethora of debuffs, like healing reduction. The primary ability in this build is ![]() Ice Shower and making sure that cooldown is used properly is
fundamental to its success.
Ice Shower and making sure that cooldown is used properly is
fundamental to its success.
Damage
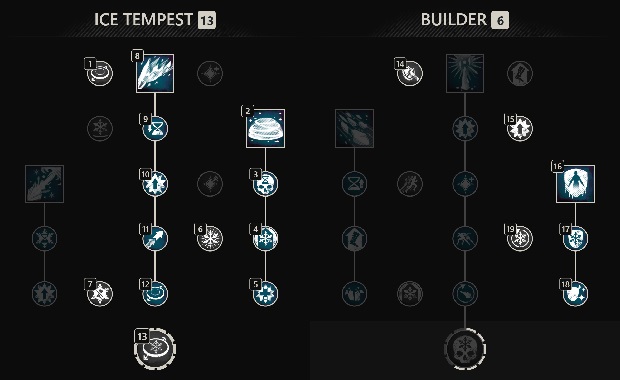
This is the optimal build when seeking high burst damage with ![]() Ice Spikes and it best with a light armor loadout. In additional to high burst, you have great sustained
AoE damage through
Ice Spikes and it best with a light armor loadout. In additional to high burst, you have great sustained
AoE damage through ![]() Ice Storm. This pairs great with the Blunderbuss to offer two burst weapon options that can completely decimate light armor targets or healers. It still
has great AoE output, and can apply anti-healing debuffs and damage over time effects. The Blunderbuss also offers great defensive passives, primarily through fortify buffs, that
will also keep you alive when playing lower Constitution.
Ice Storm. This pairs great with the Blunderbuss to offer two burst weapon options that can completely decimate light armor targets or healers. It still
has great AoE output, and can apply anti-healing debuffs and damage over time effects. The Blunderbuss also offers great defensive passives, primarily through fortify buffs, that
will also keep you alive when playing lower Constitution.
War Hammer
For more detailed information on War Hammer usage and other aspects of its gameplay, please refer to our War Hammer guide.
The War Hammer has two similar setups to the Ice Gauntlet, you can play a light or medium loadout depending on your preference and role. In medium, you can play a defensive
frontline bruiser equipped with all of the fantastic crowd-control options of the War Hammer. Every ability, especially ![]() Shockwave and
Shockwave and ![]() Wrecking Ball offer massive
AoE stun and crowd-control pressure. On top of that
Wrecking Ball offer massive
AoE stun and crowd-control pressure. On top of that ![]() Path Of Destiny also staggers and interrupts enemies, and applies a slowing debuff. No matter what ability hits a target
they will always be affected by
Path Of Destiny also staggers and interrupts enemies, and applies a slowing debuff. No matter what ability hits a target
they will always be affected by ![]() Aftershock on top of the crowd-control effect.
Aftershock on top of the crowd-control effect.
This weapon combination also opens up a unique opportunity for a backline assassin build because of how easily you can lock down a single target. By chaining a ![]() Wrecking Ball
and then
Wrecking Ball
and then ![]() Shockwave, you can then swap to your Blunderbuss fire an aimed shot at the target's head and chain it right into an
Shockwave, you can then swap to your Blunderbuss fire an aimed shot at the target's head and chain it right into an ![]() Azoth Shrapnel Blast to one shot most light armor
targets. You can choose either Blunderbuss build, but for the most utility the
Azoth Shrapnel Blast to one shot most light armor
targets. You can choose either Blunderbuss build, but for the most utility the ![]() Double Down will be preferred and offer more opportunities for one shotting players and also
have AoE pressure.
Double Down will be preferred and offer more opportunities for one shotting players and also
have AoE pressure.
Attributes
In most Blunderbuss builds you will focus on having at least 150 Intelligence, and then a decent amount into Strength. Depending on your secondary weapon you may scale these slightly in order to get more out of your secondary, but it's important to pick up specific attribute bonuses (like boosted elemental damage at 150 Intelligence) when creating Blunderbuss builds to get the most out of them.
Important Perks
Ability Perks
 Plagued Splitting Grenade — (Weapon) In any build where you choose to use
  Splitting Grenade you will be needing to run this perk on
your Blunderbuss for incredible AoE anti-healing potential. You can hit entire clumps and reduce their incoming healing by 24% for a long duration.
 Leeching Shrapnel Blast — (Armor) For fantastic self-sustain this perk is a great utility option if you can fit it into your gear. The Blunderbuss
already has amazing defensive passives, but this will also give you self-healing frequently.
 Exhaustive Net Shot — (Armor) When running this ability it its an incredibly strong CC tool. It should specifically be used in a light armor assassin
build which will alow you to lock down targets with a lack of mobility. Nonetheless, in most cases this will make most players misjudge their stamina regeneration
and they will exhaust themselves and make them more vulnerable.
Weapon Perks
 Enchanted — The majority of the burst damage coming from the Blunderbuss is from its basic aimed shots. Having enchanted on your weapon will make
every pellet fired hit for more damage.
 Flame Attunement — This is a great damage boost when scaling Fire damage. This will proc only once, not on every pellet, when doing basic aimed shots.
It will also add extra damage to all of your abilities when they hit.
PvP Perks
 Enchanted Ward — This will provide additional protection in both PvE and PvP content.
 Health — This provides free damage reduction against all sources and is one of the most beneficial PvP options.
 Shirking Heals — Incredible source of self-healing and allows for great survivability regardless of build.
 Shirking Fortification — Can be a great complement to
  Shirking Heals. Will add increased armor to
improve overall defensiveness.
 Freedom — This will allow you to play more aggressively by reducing the duration of crowd-control. You should
play with either 3 or 5 stacks.
 Elemental Aversion — Use this perk for elemental damage reduction from weapons like the Fire Staff.
 Refreshing — This can be an optional third perk when you want a source of cooldown reduction in your build.
- Harnessing Perks — Stack these for increased damage if you chose to forgo defensive options. In most cases, you'll want to focus on Fire Harnessing.
Mortal Empowerment vs. Invigorated Punishment
In most light armor builds, or ranged builds, it can be very strong to snowball kills with ![]() Mortal Empowerment,
and drastically increase your damage potential. This is the case for Blunderbuss and War Hammer builds in light armor.
But for other light builds that can do very high burst damage, such as Blunderbuss and Ice Gauntlet, the weapons have
many sources of persistent damage or DoT effects. In some cases, even though an ability deals the final blow, the damage
calculation may register that a persistent damage source, or DoT, dealt the final blow.
Mortal Empowerment,
and drastically increase your damage potential. This is the case for Blunderbuss and War Hammer builds in light armor.
But for other light builds that can do very high burst damage, such as Blunderbuss and Ice Gauntlet, the weapons have
many sources of persistent damage or DoT effects. In some cases, even though an ability deals the final blow, the damage
calculation may register that a persistent damage source, or DoT, dealt the final blow. ![]() Mortal Empowerment will
not stack if those technically kill the target, making it inconsistent and not worth using in some builds.
Mortal Empowerment will
not stack if those technically kill the target, making it inconsistent and not worth using in some builds.
When making this decision you also have to think about your likliness to be killed. If you are playing a light armor
build, or one that is frequently diving into melee, you have high chances of dying. At that point if you lose your stacks,
it is a wasted perk, especially if this happens multiple times, or in the middle of building stacks. As such, it may be
more advantageous to use ![]() Invigorated Punishment.
Invigorated Punishment.
TLDR: If you are medium armor, want more consistent damage, or you have a high chance of death,
![]() Invigorated Punishment is the better option. If you want to snowball and have insanely high damage,
you have a pocket healer, you are a dedicated ranged build, or you simply do not care and want to gamble,
Invigorated Punishment is the better option. If you want to snowball and have insanely high damage,
you have a pocket healer, you are a dedicated ranged build, or you simply do not care and want to gamble,
![]() Mortal Empowerment is the better option.
Mortal Empowerment is the better option.
PvE Perks
 Enchanted Ward — This will provide additional protection in both PvE and PvP content.
 Health — Great for adding more defensiveness to any role's build.
 Refreshing — This can be an optional third perk when you want a source of cooldown reduction in your build.
- Harnessing Perks — Stack these for increased damage if you chose to forgo defensive options.
 Elemental Aversion — This perk is a viable alternative in PvP as well, but is overshadowed by other PvP options. It provides great defense
in mutated expeditions to help mitigate magical effects.
Jewelry Perks
Amulet
 Health — This is the standard pick for all builds, it is free health that will add to the defensiveness of your kit.
 Stamina Recovery — This is a backpocket save when being focused and taking heavy damage. You will receive a burst of stamina that will allow you to
potentially get a quick dodge that can save your iife and continue the fight.
 Slash Protection — This acts as a third perk slot that provides more defensiveness against Greatswords, Great Axes, Hatchets, and Swords.
 Thrust Protection — This acts as a third perk slot that provides more defensiveness against Bows, Muskets, Blunderbusses, and Spears.
Ring
Earring
Artifacts
Weapon
Armor
Jewelry
Heartrune
![]() Minor Heartrune of Grasping Vines is best for builds using medium armor and are focused heavily on point presence and crowd control. Typically more defensive
builds will be using this, but it still can be a great option for light armor builds to more easily land
Minor Heartrune of Grasping Vines is best for builds using medium armor and are focused heavily on point presence and crowd control. Typically more defensive
builds will be using this, but it still can be a great option for light armor builds to more easily land ![]() Ice Spikes or a Blunderbuss shot.
Ice Spikes or a Blunderbuss shot.
There are three viable upgrade options:
 Brutal Heartrune of Grasping Vines
 Stalwart Heartrune of Grasping Vines
 Cunning Heartrune of Grasping Vines
![]() Brutal Heartrune of Grasping Vines is the best pick to make sure that enemies caught in the rooting effect are vulnerable to high damage bursts because
of the rend it applies. Enemies caught by CC will be easier to kill for your allies. Alternatively, when using something like
Brutal Heartrune of Grasping Vines is the best pick to make sure that enemies caught in the rooting effect are vulnerable to high damage bursts because
of the rend it applies. Enemies caught by CC will be easier to kill for your allies. Alternatively, when using something like ![]() Ice Spikes the rend effect
can add to your burst potential.
Ice Spikes the rend effect
can add to your burst potential.
![]() Minor Heartrune of Detonate should be used for light armor builds where you are prioritizing burst damage.
Minor Heartrune of Detonate should be used for light armor builds where you are prioritizing burst damage.
There are two viable upgrade options:
![]() Brutal Heartrune of Detonate makes you more vulnerable, but will result in a massive
AoE burst of damage. This is best in more defensive builds or for light armor builds
where you play with more risk.
Brutal Heartrune of Detonate makes you more vulnerable, but will result in a massive
AoE burst of damage. This is best in more defensive builds or for light armor builds
where you play with more risk.
![]() Cunning Heartrune of Detonate is an interesting choice that can be taken for builds
using
Cunning Heartrune of Detonate is an interesting choice that can be taken for builds
using ![]() Ice Spikes or a Blunderbuss. This will increase your outgoing damage and can be great
for adding more burst potential to your Spikes. It will detonate for less damage, but it can
be used to dive a target and finish them off.
Ice Spikes or a Blunderbuss. This will increase your outgoing damage and can be great
for adding more burst potential to your Spikes. It will detonate for less damage, but it can
be used to dive a target and finish them off.
If you are looking for a more defensive option, ![]() Stalwart Heartrune of Stoneform will be best. This will be typically used by medium armor players
looking to push through chokepoints into the Fort in Wars, or just to be able to hold points more effectively. It is very effective in a light armor build too.
Stalwart Heartrune of Stoneform will be best. This will be typically used by medium armor players
looking to push through chokepoints into the Fort in Wars, or just to be able to hold points more effectively. It is very effective in a light armor build too.
Heartrune Usage Tips
Save your Vines for when there are multiple targets stacked on top of one another. Preferably the targets will already be under some kind of CC effect, or exhausted and unable to dodge
out of them. It is best paired with something like ![]() Gravity Well or
Gravity Well or ![]() Shockwave.
Shockwave.
Try to avoid using ![]() Brutal Heartrune of Detonate while you have low health or are being focused on. The goal is to start the ability and wait a short duration and attempt to dive in right as
the ability detonates so you can catch enemies off guard and not be bursted down.
Brutal Heartrune of Detonate while you have low health or are being focused on. The goal is to start the ability and wait a short duration and attempt to dive in right as
the ability detonates so you can catch enemies off guard and not be bursted down.
You can activate your Detonate and then use ![]() Entombed. It will not deal damage unless you are out of the Tomb, but if you pop out right before it detonates, this can be a
great way to stall out large groups of enemies.
Entombed. It will not deal damage unless you are out of the Tomb, but if you pop out right before it detonates, this can be a
great way to stall out large groups of enemies.
When using Detonate try to time it right as you hit an enemy with another burst damage weapon ability, like ![]() Ice Spikes or
Ice Spikes or ![]() Azoth Shrapnel Blast. This can
result in a kill even when the target is full health.
Azoth Shrapnel Blast. This can
result in a kill even when the target is full health.
Take advantage of down time to charge your heartrune. For instance if you are far away you might as well continue to try hitting targets at range. Alternatively, you can use target dummies
or objects to your advantage for additional charge. Also, be sure to always be hitting as many enemies as possible with your cooldowns. ![]() Ice Storm and
Ice Storm and ![]() Splitting Grenade will result in
a high amount of recharge from persistent damage and damage over time effects.
Splitting Grenade will result in
a high amount of recharge from persistent damage and damage over time effects.
Your heartrune will charge fast. While it is obviously beneficial to hold for times where there are large clusters of enemies. Do not wait too long and continue to waste your cooldown when you would have had the time to get another one recharged. Get familiar with how quickly you can get it back online and do not hesitate to use it to secure high priority kills.
A Heartrune in PvE is significantly different than PvP. This will charge incredibly fast due to the sustained damage output on targets mixed with damage over time effects and supplemental healing. When using
something like ![]() Brutal Heartrune of Grasping Vines this is best used on large numbers of enemies instead of single target. It also has great single target value due to its rending effect on a bosses. The same
logic applies to
Brutal Heartrune of Grasping Vines this is best used on large numbers of enemies instead of single target. It also has great single target value due to its rending effect on a bosses. The same
logic applies to ![]() Brutal Heartrune of Detonate. This explodes for a large amount of damage, so taking advantage of this on as many enemies as possible is advantageous. Alternatively, using this as many times as
possible on a boss is fantastic for free damage.
Brutal Heartrune of Detonate. This explodes for a large amount of damage, so taking advantage of this on as many enemies as possible is advantageous. Alternatively, using this as many times as
possible on a boss is fantastic for free damage.
Gems and Consumables
For more detailed information on how to properly use Gems in your Blunderbuss builds, please refer to our comprehensive Blunderbuss Gem guide.
Gems
Remember, Runeglass can only be slotted into armor pieces that are not jewelry items, and weapons.
Weapon Gems
The best gem for burst damage on the Blunderbuss will be a ![]() Runeglass of Ignited Opal.
Runeglass of Ignited Opal.
When using a War Hammer and hybrid scaling, it will be most optimal to use ![]() Runeglass of Ignited Ruby
in the War Hammer to maximize its damage.
Runeglass of Ignited Ruby
in the War Hammer to maximize its damage.
PvP Gems
In PvP combat your optimal resistance distribution is going to prioritize Slash resistance, then Physical, and lastly Elemental. This is the standard for any build where you will frequently be in melee range.
To hit a 20 (Slash)/10 (Physical)/7.5 (Elemental) resistance setup you will need:
 Runeglass of Ignited Onyx x5 &
  Cut Pristine Opal x3 +
  Slash Protection on Amulet
PvE Gems
In PvE combat, gem selection is vitally important. Be sure to take advantage of mob type weaknesses to get the most out of your Blunderbuss. For example, if you are fighting Angry Earth mobs, you should consider embedding rubies into your weapon, as Fire Damage has a buff against Angry Earth mobs.
In regards to the gems you place into your armor, consider the following:
- Elemental Resistance Gem x8 + Amulet Protection Perk (Based on mutator elemental effect.)
Consumables
For more information on how to manage your cooldown hotbar, what consumables to use, what foods should be eaten, or tips on how to be more effective with your consumables in PvP and PvE, please refer to Blunderbuss Gem guide.
Rotation and Gameplay
Ability Priority List
- Use
 Net Shot to initiate combat, CC a priority target who is escaping, or to escape something like a
  Gravity Well
 - Use
 Splitting Grenade on clumps of enemies, or priority targets. This can be reactivated to provide burst damage or drop it
at a specific location.
 - Ability weave
 Azoth Shrapnel Blast on clumps or to quickly execute priority targets. Always shoot then use your ability right
after to weave two high damage bursts.
 - Aim down sight for tighter bullet spread, and use basic shots while targeting the head.
- When out of ammo, swap weapons, then swap back to instant reload (See FAQ).
- Repeat
Secondary Weapon Priority List and Build Rotation
To learn how to use your second weapon properly, and complete rotation, please refer to our PvE and PvP build pages:
Gameplay Tips
Quick Aiming
Whenever you fire a basic shot, you should always quickly aim down sights and shoot to have the tighest pellet spread. This will land more pellets in a concentrated area and more easily get max headshot damage. This will make it easier to take advantage of its range that is commonly overlooked. If you are close enough and do not have the time, you can hipfire, it is just not optimal.
Ability Weaving
With most Blunderbuss abilities it is crucial to weave a quick basic shot right before or after to add additional burst damage, or cancel animations. For
example, whenever you use ![]() Azoth Shrapnel Blast, you should fire before using it because it has a long recovery animation. But, for abilities like
Azoth Shrapnel Blast, you should fire before using it because it has a long recovery animation. But, for abilities like ![]() Net Shot
or
Net Shot
or ![]() Claw Shot, you should shoot immediately after if the target is close enough to maximize damage output. This concept is incredibly important when using a
Claw Shot, you should shoot immediately after if the target is close enough to maximize damage output. This concept is incredibly important when using a
![]() Unload build.
Unload build.
Instant Reloads
You technically never have to reload your Blunderbuss. After firing one shot, or using all available shots, you can instantly reload your weapon by swapping to your secondary. You cannot instantly swap back, you must wait for the second weapon's unsheathing animation. For example, the Ice Gauntlet will come out on your hand and your wrist will quickly move forward on your character. As soon as that happens, you can swap back to your Blunderbuss and it will have all of its bullets ready again.
This makes it possible to never take passives related to max ammo capacity or reloading. While it may only save marginal amounts of time, the benefit is you do not have to go through the incredibly slow animation and reduce your movement speed. You can be active an taking advantage of your second weapon.
Splitting Grenade Usage and Aiming
![]() Splitting Grenade can be awkward at times. You do have to arc your shots so that it can be focused on ranged players, or just to get it to go a significant distance. So
getting comfortable with it will take practice. Once you are comfortable, you can simply determine where you can place your grenades by reactivating the ability so that it drops
down immediately. This can be advantageous when trying to hit enemies hiding behind cover or terrain, or if you miscalculate your aim.
Splitting Grenade can be awkward at times. You do have to arc your shots so that it can be focused on ranged players, or just to get it to go a significant distance. So
getting comfortable with it will take practice. Once you are comfortable, you can simply determine where you can place your grenades by reactivating the ability so that it drops
down immediately. This can be advantageous when trying to hit enemies hiding behind cover or terrain, or if you miscalculate your aim.
If timed correctly, ![]() Splitting Grenade can be great for burst damage combos. If you have a target who is exhausted, CC'd, or is just unaware, you can quickly shoot your
grenade at them and reactivate it to drop the split grenades at their feet. You can then combine this with a basic shot and an
Splitting Grenade can be great for burst damage combos. If you have a target who is exhausted, CC'd, or is just unaware, you can quickly shoot your
grenade at them and reactivate it to drop the split grenades at their feet. You can then combine this with a basic shot and an ![]() Azoth Shrapnel Blast, or an
Azoth Shrapnel Blast, or an ![]() Ice Spikes,
to result in a potential instant kill.
Ice Spikes,
to result in a potential instant kill.
Net Shot Mobility
When using ![]() Net Shot it will move you backwards a significant distance if you are standing still or move backwards right before it is used. Even if you are rooted you can
attempt to move backwards, use the ability, and this will allow you to get out of dangerous situations like
Net Shot it will move you backwards a significant distance if you are standing still or move backwards right before it is used. Even if you are rooted you can
attempt to move backwards, use the ability, and this will allow you to get out of dangerous situations like ![]() Gravity Well and
Gravity Well and ![]() Ice Shower. This adds great mobility to
any build that is often unexpected. Additionally, when pairing this with
Ice Shower. This adds great mobility to
any build that is often unexpected. Additionally, when pairing this with ![]() Double Down and
Double Down and ![]() Fast Hands, you can get near back to back Nets for extra movement.
Fast Hands, you can get near back to back Nets for extra movement.
Proper Cooldown Management
As a Support you have some incredibly impactful cooldowns like ![]() Splitting Grenade or
Splitting Grenade or ![]() Ice Shower. Recognize when there is an opportunity to properly use each of these abilities. For example,
try to save your major CC for large clusters of enemies or high priority targets. It is okay to freely use these cooldowns, but do not waste them when you know there is a major fight incoming.
Ice Shower. Recognize when there is an opportunity to properly use each of these abilities. For example,
try to save your major CC for large clusters of enemies or high priority targets. It is okay to freely use these cooldowns, but do not waste them when you know there is a major fight incoming.
Also be cognizant of how you can reduce your cooldowns to get them back up. On a Blunderbuss you will have cooldown reset windows with ![]() Double Down, but you will also get reduction when
using abilities, and a large amount of reduction when hitting with a basic shot due to headshot cooldown reduction and multiple per pellet hit cooldown reduction passives.
Double Down, but you will also get reduction when
using abilities, and a large amount of reduction when hitting with a basic shot due to headshot cooldown reduction and multiple per pellet hit cooldown reduction passives.
Movement
Effective movement is incredibly important in a build like this, especially when playing in medium. Do not panic and use your entire stamina bar and exhaust yourself, as it may result in death. You can take advantage of jumping, diving (going prone while moving), and changing direction by quickly moving your mouse or taking advantage of quick inputs on your movement keys.
There are many movements in New World that will stagger you in place for a moment when quickly changing direction. If you move left and right or if you jump left and right you will notice there is a moment where you will be standing still. To prevent this you will need to use a key input while your character is in the animation. For example, if you hold your left directional key and jump then right before you land you hit your right directional key and jump, you will quickly jump left and right. If you simply run left and right using your directional keys your character will respond similarly. To avoid this you can move left and then right before you pivot to go right, hit the backward directional key and instantly follow up with your right directional key. If you continue doing this back and forth you will avoid the sliding animation.
Ice Gauntlet Usage
When choosing to use an Ice Gauntlet as your secondary weapon it will prioritize cooldown management to provide CC availability through ![]() Ice Shower or
Ice Shower or ![]() Ice Storm. These abilities should
be used with purpose and intent in order to secure the most kills for your team, or to properly take down large packs of enemies. The alternative build chosen when using this secondary will emphasize
Ice Storm. These abilities should
be used with purpose and intent in order to secure the most kills for your team, or to properly take down large packs of enemies. The alternative build chosen when using this secondary will emphasize ![]() Ice Spikes
usage. It is important to understand how
Ice Spikes
usage. It is important to understand how ![]() Ice Spikes should be aimed at your target's feet and to the right in order to hit them three times.
Ice Spikes should be aimed at your target's feet and to the right in order to hit them three times.
To learn more about ability usage and the intricacies of the Ice Gauntlet, please refer to our Ice Gauntlet guide.
War Hammer Usage
When deciding to use a War Hammer builds, you will need to get comfortable with opportunistic cooldown usage. Do not just waste valuable crowd-control cooldowns on a low health target who will surely die. Save them for large clumps or priority targets, like healers. If you do play as a backline assassin with it, this still holds true--but you will be prioritizing high value targets with your cooldowns. You will generally be able to kill low health targets without wasting anything and just firing basic shots.
Please refer to our War Hammer tips for more on this playstyle.
FAQ - Blunderbuss
What Gem Do I Use In My Blunderbuss?
In PvP, it is recommended to us a ![]() Runeglass of Ignited Opal, since all builds will take advantage of its damage increase right before doing a kill combo.
Runeglass of Ignited Opal, since all builds will take advantage of its damage increase right before doing a kill combo.
Should I Be Doing More Damage?
When playing any medium build that is focused on being a support player for CC, you will never be at the top of the leaderboard. This role is not damage focused by any means. You are a defensive role that has the sole purpose of providing CC to your allies so that they can pick up kills. While you will surely do large amounts of AoE damage, your goal is not to be the one doing burst damage to kill and enemy, rather you are effectively using cooldowns to secure large numbers of kills. With that being said, most Blunderbuss build variants will offer higher damage output than other CC builds.
Is a Blunderbuss Worthwhile as DPS?
In all honesty, most players choose alternative weapons that will translate into builds for other expeditions or other build types, or simply because other weapon options are just better for output. It is difficult to use weapons like this due to its ammunition and reloading. For more consistent output you could simply just keep swinging a melee weapon and close your eyes. With a Blunderbluss you have many idle windows, and you do have to aim slightly. On top of this, it is difficult to use in Mutators at times due to rotating mutated effects that could drastically reduce Fire damage taken.
Changelog
- 13 Sep. 2025 (this page): Guide updated with additional suggestions.
- 19 Nov. 2024 (this page): Guide updated with additional tips and tricks.
- 15 Oct. 2024 (PvP builds page): Guide updated for expansion.
- 15 Oct. 2024 (PvE builds page): Guide updated for expansion.
- 15 Oct. 2024 (gems page): Guide updated for expansion.
- 15 Oct. 2024 (perks page): Guide updated for expansion.
- 15 Oct. 2024 (abilities page): Guide updated for expansion.
- 15 Oct. 2024 (this page): Guide updated for expansion.
- 22 Oct. 2023 (PvP builds page): Guide updated for expansion.
- 22 Oct. 2023 (PvE builds page): Guide updated for expansion.
- 22 Oct. 2023 (gems page): Guide updated for expansion.
- 22 Oct. 2023 (perks page): Guide updated for expansion.
- 22 Oct. 2023 (abilities page): Guide updated for expansion.
- 22 Oct. 2023 (this page): Guide updated for expansion.
- 28 Mar. 2023 (gems page): Updated PvE Gems.
- 28 Mar. 2023 (perks page): Updated perk tiers for Season One.
- 28 Mar. 2023 (this page): Updated perks, gems, and heartrunes.
- 27 Jan. 2023 (PvP builds page): Guide added.
- 27 Jan. 2023 (PvE builds page): Guide added.
- 27 Jan. 2023 (gems page): Guide added.
- 27 Jan. 2023 (perks page): Guide added.
- 27 Jan. 2023 (abilities page): Guide added.
- 27 Jan. 2023 (this page): Guide added.
More Weapon Guides
Savvvo is a full-blown MMORPG try-hard who overthinks every build, min-maxes every stat, and theorycrafts like his life depends on it. If there’s a meta, he’s dissecting it. If there isn’t, he’s creating one.
You can take a closer look at his guides and content on YouTube.
- AMA Session with New World’s Former Lead World Designer
- New World Aeternum 2026 Roadmap Revealed
- Can New World Be Saved? Offers Are Starting to Pop Up.
- The Last Day of New World: Aeternum
- New World Server Mergers (Again)
- What Else Was Planned for New World: Aeternum?
- Global Storage Search is Now Live in New World: Aeternum
- Daggers Are Officially Live in New World: Aeternum


