Ice Gauntlet Guide and Builds for New World
Welcome to our guide for Ice Gauntlet, a weapon in New World. Within these pages, you will find everything required to understand how best to play with this weapon in both PvE and PvP.
Ice Gauntlet Overview
The Ice Gauntlet is a magical weapon that scales with Intelligence
and deals Ice Damage. This weapon excels at dealing decent damage at
mid-range and keeping its foes just out of arms' reach with area of effect (AoE) crowd
control (CC) spells like ![]() Ice Storm and
Ice Storm and ![]() Ice Shower. It has consistent
damage output, but fantastic burst potential through abilities like
Ice Shower. It has consistent
damage output, but fantastic burst potential through abilities like ![]() Ice Spikes.
Additionally, it provides great defensiveness through
Ice Spikes.
Additionally, it provides great defensiveness through ![]() Entombed.
The Ice Gauntlet shines as one of the premiere PvP magic weapons in a support role, as
well as builds focused on pure burst damage. Its damage output combined
with its CC make it the go-to option for many players.
Entombed.
The Ice Gauntlet shines as one of the premiere PvP magic weapons in a support role, as
well as builds focused on pure burst damage. Its damage output combined
with its CC make it the go-to option for many players.
Video Walkthrough
For those of you who are more visual, here is a summarized version of this Easy Mode guide to give you everything you need to start using the Ice Gauntlet effectively!
Builds
In general you will almost always see that an Ice Gauntlet will be paired with a Void Gauntlet.
These two weapons perfectly complement one another and can adapt to the
role that player is trying to fill. Whether you are looking to be a burst damage mage with
![]() Ice Spikes, or a support mage with CC using
Ice Spikes, or a support mage with CC using ![]() Ice Shower, a Void Gauntlet's
utility will perfectly adjust to the needs of the Ice Gauntlet. Alternatively, the damage and CC of
the Ice Gauntlet can pair very well with a Blunderbuss for high damage output, or a
Fire Staff to execute enemies and provide defensiveness.
Ice Shower, a Void Gauntlet's
utility will perfectly adjust to the needs of the Ice Gauntlet. Alternatively, the damage and CC of
the Ice Gauntlet can pair very well with a Blunderbuss for high damage output, or a
Fire Staff to execute enemies and provide defensiveness.
Ice Spike Build
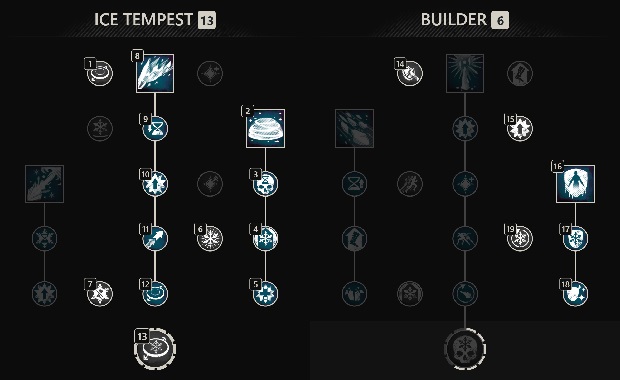
When using this build you will need to be playing in a light armor loadout with a Void
Gauntlet secondary and act as a backline dive assassin. You can use abilities like ![]() Ice Storm,
and
Ice Storm,
and ![]() Orb of Decay, in combination with light and heavy attacks to gradually work
enemy healthbars down. Then when they are low enough you can go in to
Orb of Decay, in combination with light and heavy attacks to gradually work
enemy healthbars down. Then when they are low enough you can go in to ![]() Ice Spikes.
It is also possible that with more squishy targets you can hit them with a Spike and when it
critically strikes it has the potential to completely kill them with one ability.
You have a lot of cooldown reduction potential, especially within Iced Refresh and
Ice Spikes.
It is also possible that with more squishy targets you can hit them with a Spike and when it
critically strikes it has the potential to completely kill them with one ability.
You have a lot of cooldown reduction potential, especially within Iced Refresh and
![]() Refreshing Frost so you can chain abilities on after the other.
Refreshing Frost so you can chain abilities on after the other.
 Ice Spikes — When used properly this is one of the highest damage abilities
in the game. If you aim at the target's feet and slightly to the right it will
allow for all of the Ice Spikes to hit one target. This is because the largest Spike will
shoot out two seperate projectiles. If tight enough to the hit box a target will take
three devistating hits that can all critically strike. This can be reactivated earlier to
shorten its range and immediately cause the Mighty Spike to strike the target.
Ice Spikes — When used properly this is one of the highest damage abilities
in the game. If you aim at the target's feet and slightly to the right it will
allow for all of the Ice Spikes to hit one target. This is because the largest Spike will
shoot out two seperate projectiles. If tight enough to the hit box a target will take
three devistating hits that can all critically strike. This can be reactivated earlier to
shorten its range and immediately cause the Mighty Spike to strike the target. Ice Storm — This activates a large AoE damage ability that has high
overall damage ouput but also results in large amounts of crowd control (CC) opportunity.
Those within the ability will be slowed and when using the perk Unending Thaw the
slowing effect will last an additional two seconds. This makes them prone to being rooted from
Ice Storm — This activates a large AoE damage ability that has high
overall damage ouput but also results in large amounts of crowd control (CC) opportunity.
Those within the ability will be slowed and when using the perk Unending Thaw the
slowing effect will last an additional two seconds. This makes them prone to being rooted from
 Heavy Freeze. It is fantastic for frontlines due to its stacking damage
component based on the number of players within the storm.
Heavy Freeze. It is fantastic for frontlines due to its stacking damage
component based on the number of players within the storm. Entombed — The most common use for this ability is for survival. It can be
held in times where there is heavy damage, to avoid incoming CC, or simply for damage reduction. Also,
when used correctly it can be used for cooldown reduction through
Entombed — The most common use for this ability is for survival. It can be
held in times where there is heavy damage, to avoid incoming CC, or simply for damage reduction. Also,
when used correctly it can be used for cooldown reduction through  Refreshing Frost.
Support Ice Gauntlet
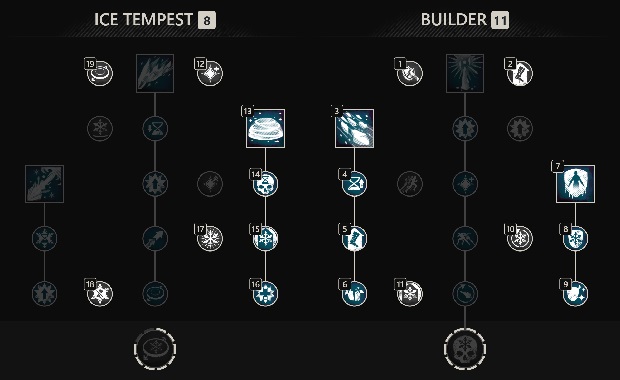
When using this build you will need to be playing in a medium armor loadout. This build is solely focused on a support mindset that is constantly providing utility to teammates and offering multiple avenues of crowd control to secure kills and set up combination for entire clumps kills. You will not be a primary damage dealer, instead you will be securing assists and ensuring that your team has the ability to put forth kill pressure on targets. This is the premiere PvP META build in combination with the Void Gauntlet.
- Ice Storm — This activates a large AoE damage ability that has high overall
damage ouput but also results in large amounts of crowd control (CC) opportunity.
Those within the ability will be slowed and when using the perk Unending Thaw the
slowing effect will last an additional two seconds. This makes them prone to being rooted from
Heavy Freeze. It is fantastic for frontlines due to its stacking damage component
based on the number of players within the storm.
 Ice Shower — When used properly this is one of the most incredible forms of
AoE CC that New World has to offer. An Ice Gauntlet player can quickly move their camera to adjust
its placement, but anyone caught in this ability will be rooted, rended, and thanks to
Deadly Frost they will also receive a damage over time effect (DoT). This can be used to kill entire
groups of enemies and should be used in combination with abilities like
Ice Shower — When used properly this is one of the most incredible forms of
AoE CC that New World has to offer. An Ice Gauntlet player can quickly move their camera to adjust
its placement, but anyone caught in this ability will be rooted, rended, and thanks to
Deadly Frost they will also receive a damage over time effect (DoT). This can be used to kill entire
groups of enemies and should be used in combination with abilities like  Gravity Well
- Entombed — The most common use for this ability is for survival. It can be
held in times where there is heavy damage, to avoid incoming CC, or simply for damage reduction. Also,
when used correctly it can be used for cooldown reduction through Refreshing Frost.
Pylon
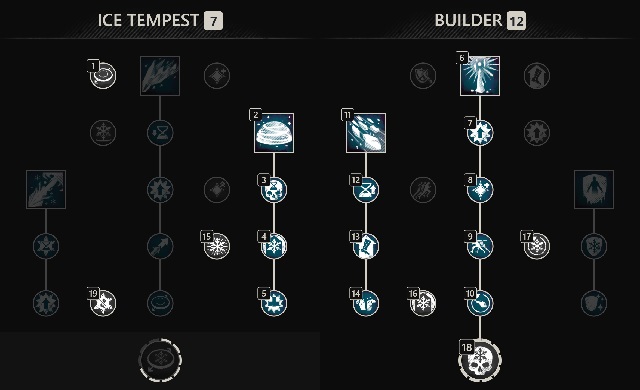
A build like this can be useful in PvE combat, but has plenty of PvP viability. It
would be recommended to use ![]() Entombed instead of
Entombed instead of ![]() Ice Shower. Pylon
builds are a bit more of a niche build but it can be very strong when using it properly and
placing your Pylons in a way that will take advantage of
Ice Shower. Pylon
builds are a bit more of a niche build but it can be very strong when using it properly and
placing your Pylons in a way that will take advantage of ![]() Pylon Burst. In all
it is build with high AoE damage output!
Pylon Burst. In all
it is build with high AoE damage output!
Secondary Weapons
Void Gauntlet
For more specific information on how to play with this weapon as your secondary please refer to our Void Gauntlet guide.
Blunderbuss
For a thorough breakdown on the Blunderbuss and how it can be used, please refer to our Blunderbuss guide.
Double Down Cooldown Reset
This is the more common build option paired with an Ice Gauntlet due to its ability to cycle through cooldowns quickly. It is very strong not only because of its burst potential, but its ability to anti-heal, debuff enemies, and lock down targets.
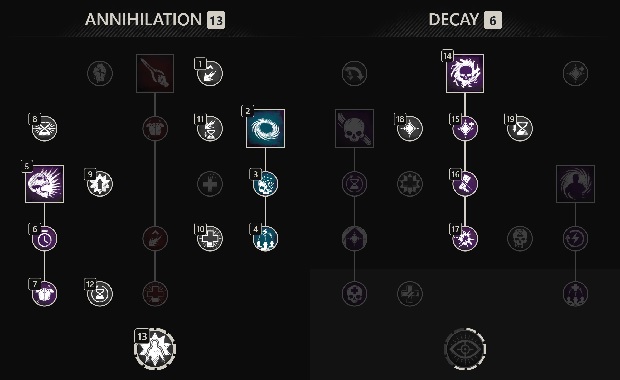
Unload Burst Build

This variant is most commonly used for builds that are looking to capitalize on
the sheer damage ouput of a well placed aimed shot in combination with an
![]() Azoth Shrapnel Blast. It is important to ability weave in a build like this.
That means using an ability, immediately firing a basic attack, using another
ability, and firing again, to take advantage of
Azoth Shrapnel Blast. It is important to ability weave in a build like this.
That means using an ability, immediately firing a basic attack, using another
ability, and firing again, to take advantage of ![]() Unload.
Unload.
Fire Staff
For more detailed information on Fire Staff usage and other aspects of its gameplay, please refer to our Fire Staff guide.
Standard
This is the standard PvP option that offers great ranged damage, cooldown reduction, and mobility. It is best used when playing solo or in a group that does not have a healer.
High Damage
This build focuses on pure damage output. It is the primary option for a DPS looking to use the Fire Staff in PvE, but it is also a great option if you are not worried about mobility and have a healer in a PvP scenario.
Flamethrower
At face value ![]() Flamethrower may seem like a funny ability that is weaker
than most, but that is completely false. Flamethrower builds in PvP are incredibly powerful
in PvP combat due to their ability to proc Attunement perks and critically hit. This in
addition to its stacking damage over time effect (DoT) will surely melt players in light armor.
The drawback is having to play in melee range to use it properly.
Flamethrower may seem like a funny ability that is weaker
than most, but that is completely false. Flamethrower builds in PvP are incredibly powerful
in PvP combat due to their ability to proc Attunement perks and critically hit. This in
addition to its stacking damage over time effect (DoT) will surely melt players in light armor.
The drawback is having to play in melee range to use it properly.
Attributes
Damage (Spikes or Fire Staff)
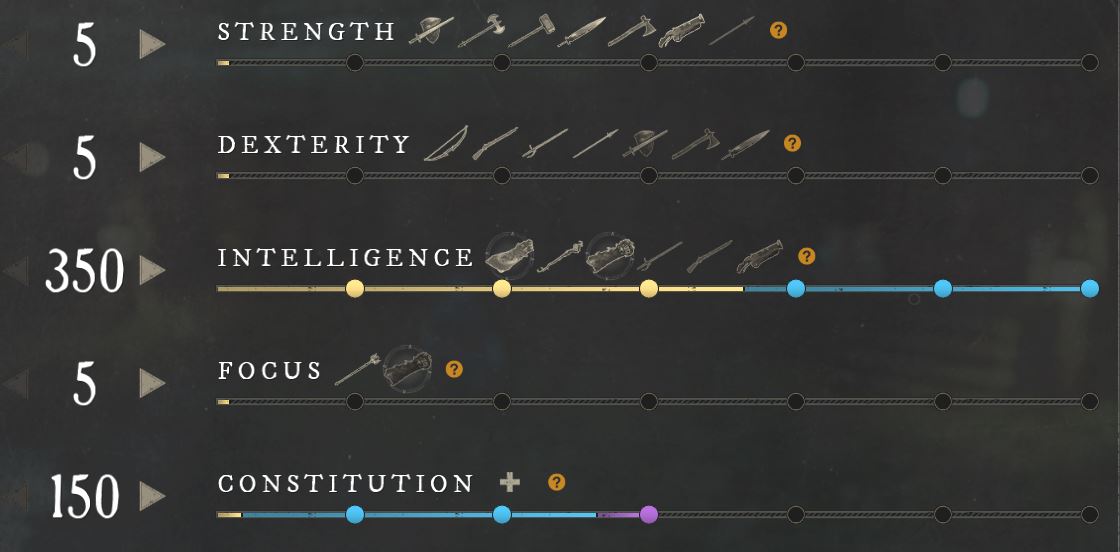
This is the optimal attribute distribution when playing something like a light armor damage focused build with a Void Gauntlet. If you do not feel comfortable enough you can certainly increase your Constitution to 200. This attribute distribution should offer you plenty of burst damage to take down players.
In PvE you can play at 150 Constitution if you would like, but the goal should be to get your Consitution as low as possible, especially because you are playing as a ranged build. It would be recommended to play around 100 Constitution if you are confident in dodging and damage reduction.
Support Medium IG/VG
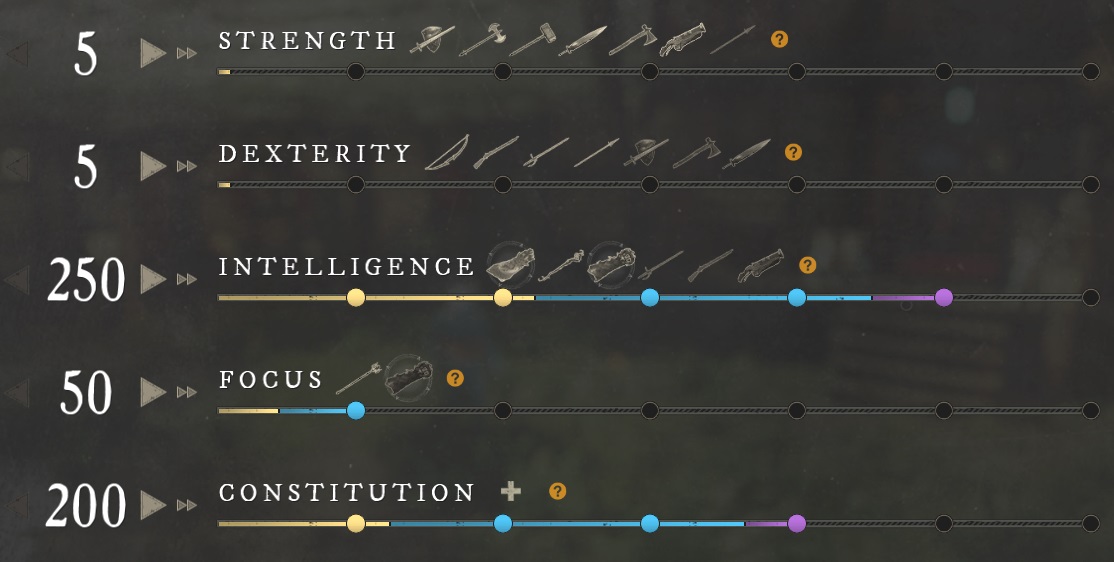
Playing with 200 Constitution while in a medium armor loadout makes you incredibly defensive so that you can commit to the front line fights. This is crucial to set up your allies for success. The Void Gauntlet is extremely important so it is crucial to obtain the bonus from 50 Focus to reduce the cooldown of all your utility-based abilities. This will also increase your overall Void Gauntlet damage. It is not necessary to solely focus on Intelligence because damage is not the priority. When having a Void Gauntlet focused attribute distribution it is important to be attacking with your Void Gauntlet with light and heavy attacks to try and get more cooldown reduction.
Blunderbuss Damage
When playing Ice Gauntlet and Blunderbuss, it can be a unique damage setup that is done in two ways. The
most optimal Attribute distribution would prioritize Blunderbuss damage and result in the Ice Gauntlet only
being used for CC and utility. For builds where you do not want to take advantage of ![]() Ice Spikes, use
this setup:
Ice Spikes, use
this setup:
Max Damage - Light
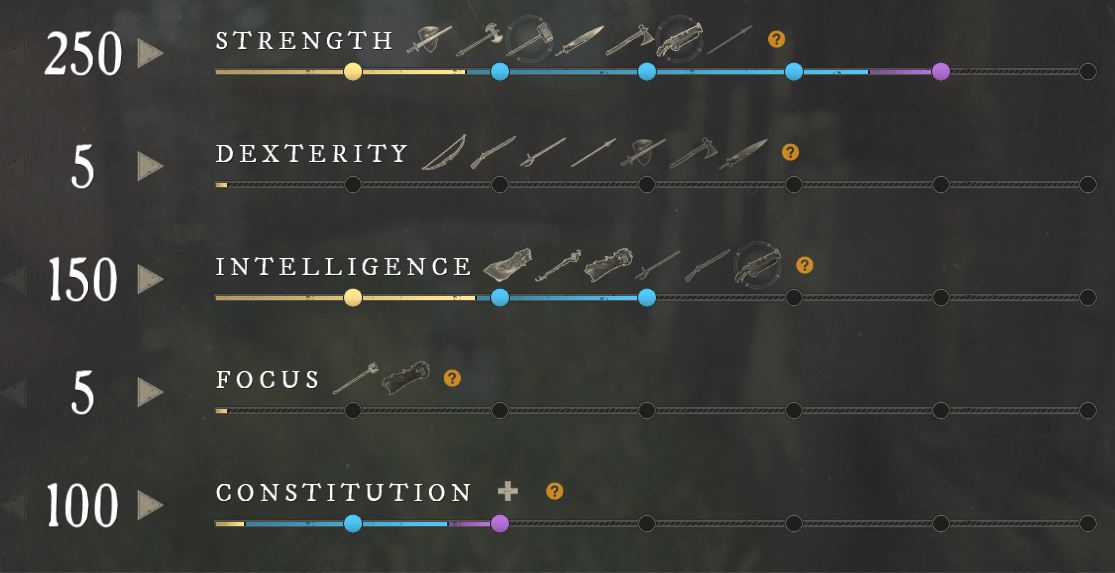
If you want max damage while playing with light armor and you prioritizes Blunderbuss damage. You can play with 150 Constitution and lower your Strength to be more defensive.
Medium BB/IG
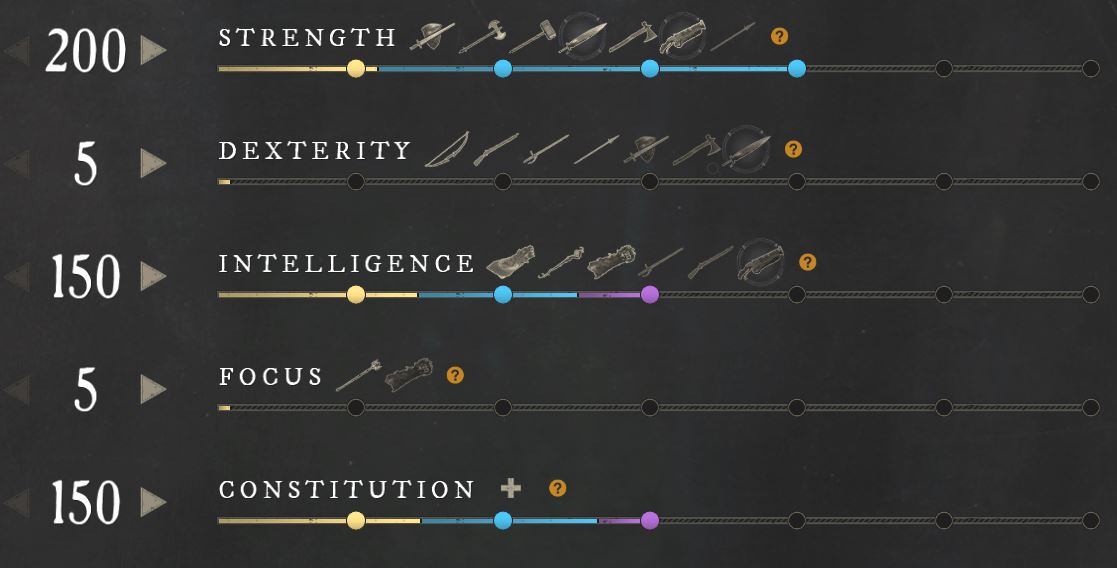
This is the default build for medium armor loadouts with Ice Gauntlet and Blunderbuss. If you wish to have more point presence, you can play with 200 Constitution by dropping to 150 Strength.
Important Perks
Ability Perks
When using an Ice Gauntlet, no matter what build, it is crucial to have an Ice Gauntlet specific perk on your Weapon. These perks are incredibly strong:
- Unending Thaw — (Weapon)/(Armor) This will increase the damage on your
Ice Storm and will be almost double when on a weapon. No matter what
this should always at least be on an armor piece if you choose to use a different perk so
that you can also have the additional slowing effect from the Storm for 2
more seconds.
- Deadly Frost — (Weapon)/(Armor) This is the optimal choice on a weapon when
playing a support mage build. It will reduce the cooldown by 14% when on a weapon
and apply a damage over time effect. If you are using this ability, it will most likely be
on your Ice Gauntlet, but regardless it is needed in any build using Ice Shower.
- Iced Refresh — (Weapon)/(Armor) When using Ice Spikes it is important
to have this perk. There is some debate to its viability when placed on a weapon versus
on gear. If you are confident in using the Spike, you can get a nearly full cooldown reset for
all of your abilities. It is important to note that this resets more than just the cooldown
of Ice Spikes. If you choose to have it on a piece of gear, you will still get significant
cooldown reduction and can go with a different perk on your Ice Gauntlet for more damage
output.
Weapon Perks
 Refreshing Move — This perk can be incredibly strong in most Ice Gauntlet builds.
This will allow for frequent ability usage as long as you can land Ice Gauntlet light
and heavy attacks. It can be used in almost any build.
Refreshing Move — This perk can be incredibly strong in most Ice Gauntlet builds.
This will allow for frequent ability usage as long as you can land Ice Gauntlet light
and heavy attacks. It can be used in almost any build. Keen — A great damage option for any Ice Gauntlet to increase critical hit chance.
 Enchanted — If using a build where an Ice Gauntlet is your primary filler
weapon for light and heavy attacks, this will result in a flat damage increase.
Enchanted — If using a build where an Ice Gauntlet is your primary filler
weapon for light and heavy attacks, this will result in a flat damage increase.- Chain Damage Perks — Many Ice Gauntlet builds, especially when playing a support mage, benefit from having a chain damage perk (It is most optimal to have Void damage or Ice damage) to increase Heartrune charge and have free damage output.
- Vicious — This is a great budget perk alternative for some extra damage
if you are just starting to get a build going with an Ice Gauntlet.
PvP Perks
 Health — This provides free damage reduction against all sources and is one of the most beneficial PvP options.
- Shirking Heals — Incredible source of self-healing and allows for great survivability regardless of build.
 Shirking Fortification — Can be a great complement to Shirking Heals. Will add increased armor to
improve overall defensiveness.
Shirking Fortification — Can be a great complement to Shirking Heals. Will add increased armor to
improve overall defensiveness. Freedom — This will allow you to play more aggressively by reducing the duration of crowd-control. You should
play with either 3 or 5 stacks.
Freedom — This will allow you to play more aggressively by reducing the duration of crowd-control. You should
play with either 3 or 5 stacks. Elemental Aversion — Use this perk for elemental damage reduction from weapons like the Fire Staff.
- Refreshing — This can be an optional third perk when you want a source of cooldown reduction in your build.
- Harnessing Perks — Stack these for increased damage if you chose to forgo defensive options.
- Mortal Empowerment — This will be the preferred option for maximum damage output in PvP.
Mortal Empowerment vs. Invigorated Punishment
In most light armor builds, or ranged builds, it can be very strong to snowball kills with ![]() Mortal Empowerment,
and drastically increase your damage potential. This is the case for Blunderbuss and War Hammer builds in light armor.
But for other light builds that can do very high burst damage, such as Blunderbuss and Ice Gauntlet, the weapons have
many sources of persistent damage or DoT effects. In some cases, even though an ability deals the final blow, the damage
calculation may register that a persistent damage source, or DoT, dealt the final blow.
Mortal Empowerment,
and drastically increase your damage potential. This is the case for Blunderbuss and War Hammer builds in light armor.
But for other light builds that can do very high burst damage, such as Blunderbuss and Ice Gauntlet, the weapons have
many sources of persistent damage or DoT effects. In some cases, even though an ability deals the final blow, the damage
calculation may register that a persistent damage source, or DoT, dealt the final blow. ![]() Mortal Empowerment will
not stack if those technically kill the target, making it inconsistent and not worth using in some builds.
Mortal Empowerment will
not stack if those technically kill the target, making it inconsistent and not worth using in some builds.
When making this decision you also have to think about your likliness to be killed. If you are playing a light armor
build, or one that is frequently diving into melee, you have high chances of dying. At that point if you lose your stacks,
it is a wasted perk, especially if this happens multiple times, or in the middle of building stacks. As such, it may be
more advantageous to use ![]() Invigorated Punishment.
Invigorated Punishment.
TLDR: If you are medium armor, want more consistent damage, or you have a high chance of death,
![]() Invigorated Punishment is the better option. If you want to snowball and have insanely high damage,
you have a pocket healer, you are a dedicated ranged build, or you simply do not care and want to gamble,
Invigorated Punishment is the better option. If you want to snowball and have insanely high damage,
you have a pocket healer, you are a dedicated ranged build, or you simply do not care and want to gamble,
![]() Mortal Empowerment is the better option.
Mortal Empowerment is the better option.
PvE Perks
- Elemental Aversion — This perk is a viable alternative in PvP
as well, but it is overshadowed by other PvP options. It provides great defense
in mutated expeditions to help mitigate magical effects.
 Physical Aversion — Only projectiles that do physical damage will be
mitigated by this perk. As such, it can be useful in PvE as another potential option. It also
provides a small amount of PvP value, but Elemental Aversion and enemy
ward perks are certainly more defensive options.
Physical Aversion — Only projectiles that do physical damage will be
mitigated by this perk. As such, it can be useful in PvE as another potential option. It also
provides a small amount of PvP value, but Elemental Aversion and enemy
ward perks are certainly more defensive options.
Jewelry Perks
Amulet
- Health — This is the standard pick for all builds, it is
free health that will add to the defensiveness of your kit.
 Stamina Recovery — This is a backpocket save when being
focused and taking heavy damage. You will receive a burst of stamina that will allow you to
potentially get a quick dodge that can save your iife and continue the fight.
Stamina Recovery — This is a backpocket save when being
focused and taking heavy damage. You will receive a burst of stamina that will allow you to
potentially get a quick dodge that can save your iife and continue the fight. Thrust Protection — This acts as a third perk option that
provides more defensiveness against Bows, Muskets,
Blunderbusses, Spears, and Rapiers.
Thrust Protection — This acts as a third perk option that
provides more defensiveness against Bows, Muskets,
Blunderbusses, Spears, and Rapiers. Slash Protection — This acts as a third perk slot that
provides more defensiveness against Greatswords,
Great Axes, Hatchets, and
Swords.
Slash Protection — This acts as a third perk slot that
provides more defensiveness against Greatswords,
Great Axes, Hatchets, and
Swords.
Ring
- Keen Awareness — This perk functions similarly to Keen.
It is a free increase to critical hit chance.
 Invigorated Punishment — Only use in PvP.
- Mortal Empowerment — If you are playing a build that can pick up a
significant amount of kills, or you have a dedicated
healer. This can be an option in PvP.
- Refreshing
 Ice Damage — This is optimal when playing with an Ice damage focus.
It should be used when using Ice Spikes.
Ice Damage — This is optimal when playing with an Ice damage focus.
It should be used when using Ice Spikes. Void Damage — This is a solid option to start off while gathering gear
for this build. It is not as good as Keen Awareness or Invigorated Punishment
but it will still result in some throughput to help get started. Only use this when playing as a support mage.
Void Damage — This is a solid option to start off while gathering gear
for this build. It is not as good as Keen Awareness or Invigorated Punishment
but it will still result in some throughput to help get started. Only use this when playing as a support mage. Fire Damage — This is optimal when playing with a Fire Staff
or Blunderbuss.
Fire Damage — This is optimal when playing with a Fire Staff
or Blunderbuss.- Hearty — This is never needed for a medium armor loadout since the
stamina increase has a minimal effect on our ability to dodge. But if playing in light, this is
necessary.
Earring
Artifacts
Weapon
Armor
Jewelry
Heartrune
![]() Minor Heartrune of Grasping Vines is the best option for most Ice Gauntlet builds since it will
most commonly pair with a Void Gauntlet. It charges very quickly thanks to damage
over time effects and persistent sources of damage. This drastically increases the CC of a build and
results in a great way to set up a clump so your allies can capitalize and secure kills.
Minor Heartrune of Grasping Vines is the best option for most Ice Gauntlet builds since it will
most commonly pair with a Void Gauntlet. It charges very quickly thanks to damage
over time effects and persistent sources of damage. This drastically increases the CC of a build and
results in a great way to set up a clump so your allies can capitalize and secure kills.
There are three viable upgrade options:
 Brutal Heartrune of Grasping Vines
- Stalwart Heartrune of Grasping Vines
- Cunning Heartrune of Grasping Vines
![]() Brutal Heartrune of Grasping Vines is the best pick to make sure that enemies caught
in the rooting effect are vulnerable to high damage bursts.
Brutal Heartrune of Grasping Vines is the best pick to make sure that enemies caught
in the rooting effect are vulnerable to high damage bursts.
When using other weapons, or if you are seeking more damage, ![]() Minor Heartrune of Detonate should be used.
Minor Heartrune of Detonate should be used.
There are two viable upgrade options:
![]() Brutal Heartrune of Detonate makes you more vulnerable, but will result in a massive
AoE burst of damage. This is best in more defensive builds or for light armor builds
where you play with more risk.
Brutal Heartrune of Detonate makes you more vulnerable, but will result in a massive
AoE burst of damage. This is best in more defensive builds or for light armor builds
where you play with more risk.
![]() Cunning Heartrune of Detonate is an interesting choice that can be taken for builds
using
Cunning Heartrune of Detonate is an interesting choice that can be taken for builds
using ![]() Ice Spikes. This will increase your outgoing damage and can be great
for adding more burst potential to your Spikes. It will detonate for less damage, but it can
be used to dive a target and finish them off.
Ice Spikes. This will increase your outgoing damage and can be great
for adding more burst potential to your Spikes. It will detonate for less damage, but it can
be used to dive a target and finish them off.
If you are looking for a more defensive option, ![]() Cunning Heartrune of Stoneform will be your best option.
Cunning Heartrune of Stoneform will be your best option.
Heartrune Usage Tips
Grasping Vines
Save your Vines for when there are multiple targets stacked on top of one another. Preferably
the targets will already be under some kind of CC effect, or exhausted and unable to dodge
out of them. It is best paired with something like ![]() Gravity Well or
Gravity Well or ![]() Shockwave.
Shockwave.
Take advantage of down time to charge your heartrune. For instance if you are far away you might
as well continue to try hitting targets at range. Alternatively, you can use target dummies
or objects to your advantage for additional charge. Also, be sure to always htting as many enemies as
possible with your cooldowns. ![]() Ice Storm and
Ice Storm and ![]() Diminishing Orb will result in
a high amount of recharge from persistent damage and damage over time effects.
Diminishing Orb will result in
a high amount of recharge from persistent damage and damage over time effects.
Your heartrune will charge fast. While it is obviously beneficial to hold for times where there are large clusters of enemies. Do not wait too long and continue to waste your cooldown when you would have had the time to get another one recharged. Get familiar with how quickly you can get it back online and do not hesitate to use it to secure high priority kills.
A Heartrune in PvE is significantly different than PvP. This will charge incredibly fast due to the
sustained damage output on targets mixed with damage over time effects and supplemental healing. When using
something like ![]() Brutal Heartrune of Grasping Vines this is best used on large numbers of enemies instead of
single target. But, it has great single target value due to its rending effect on a bosses. The same
logic applies to
Brutal Heartrune of Grasping Vines this is best used on large numbers of enemies instead of
single target. But, it has great single target value due to its rending effect on a bosses. The same
logic applies to ![]() Brutal Heartrune of Detonate. This explodes for a large amount of damage, so taking advantage
of this on as many enemies as possible is advantageous. Alternatively, using this as many times as
possible on a boss is fantastic for free damage.
Brutal Heartrune of Detonate. This explodes for a large amount of damage, so taking advantage
of this on as many enemies as possible is advantageous. Alternatively, using this as many times as
possible on a boss is fantastic for free damage.
Detonate
Try to avoid using ![]() Brutal Heartrune of Detonate while you have low health or are
being focused on. The goal is to start the ability and wait a short duration and attempt to dive in right as
the ability detonates so you can catch enemies off guard and not be bursted down.
Brutal Heartrune of Detonate while you have low health or are
being focused on. The goal is to start the ability and wait a short duration and attempt to dive in right as
the ability detonates so you can catch enemies off guard and not be bursted down.
You can activate your Detonate and then use ![]() Entombed. It will not deal damage
unless you are out of the Tomb, but if you pop out right before it detonates, this can be a
great way to stall out large groups of enemies.
Entombed. It will not deal damage
unless you are out of the Tomb, but if you pop out right before it detonates, this can be a
great way to stall out large groups of enemies.
If you are using a Fire Staff you can combine Detonate with ![]() Burnout and hit enemies
with a large burst of damage because they can be hit with the Fire Staff ability and detonated almost
simultaneously. This can be a clever way to catch an enemy while their guard is down.
Burnout and hit enemies
with a large burst of damage because they can be hit with the Fire Staff ability and detonated almost
simultaneously. This can be a clever way to catch an enemy while their guard is down.
In PvE do not waste free Detonates. It will charge incredibly fast. Use it on cooldown for boss fights and whenever there are large packs of enemies.
Gems and Consumables
There will be suggestions regarding Runeglass for many builds. Depending on if you are
focused on doing Ice damage (![]() Ice Spikes builds), Void damage (Support Mage builds),
Fire damage (Fire Staff builds), or Ranged damage
(Blunderbuss builds), your Runeglass will need to change.
Ice Spikes builds), Void damage (Support Mage builds),
Fire damage (Fire Staff builds), or Ranged damage
(Blunderbuss builds), your Runeglass will need to change.
For more detailed information on how to properly use Gems in your Ice Gauntlet build, please refer to our comprehensive Ice Gauntlet Gems guide.
Gems
Remember, Runeglass can only be slotted into armor pieces that are not jewelry items, and weapons.
Weapon Gems
When you are in a damage build you will either use ![]() Runeglass of Abyssal Opal,
Runeglass of Abyssal Opal, ![]() Runeglass of Frozen Opal, or
Runeglass of Frozen Opal, or
![]() Runeglass of Ignited Opal, in your Ice Gauntlet.
Runeglass of Ignited Opal, in your Ice Gauntlet.
PvP Gems
In PvP combat your optimal resistance distribution is dependent on the second weapon you have chosen and the focus of your build.
In most cases it will be optimal to hit a 20 (Slash)/10 (Physical)/7.5 (Elemental)
defensive split. You will reach 20% Slash resist through ![]() Slash Protection. To reach this you can use:
Slash Protection. To reach this you can use:
 Runeglass of Frozen Onyx x5 (This will change dependending on build) &
  Cut Pristine Opal x3
PvE Gems
You can use the following gems in your gear:
- Elemental Resistance Gem x8 + Amulet Protection Perk (Based on mutator elemental effect.)
Consumables
For more information on how to manage your cooldown hotbar, what consumables to use, what foods should be eaten, or tips on how to be more effective with your consumables in PvP and PvE, please refer to Ice Gauntlet Consumables guide.
Rotation and Gameplay
Ability Priority List
- (If chosen) Use Ice Shower to root clusters of targets in place.
Prioritize using this on chokepoints, on Gravity Well, or
any other situation where targets will stack.
- Use Ice Storm, focusing using this on large clusters of enemies,
or on priority targets you are trying to CC.
- (If chosen)Use Ice Spikes on target, prioritize using this on a
low health enemy to guarantee a Iced Refresh proc.
- Heavy attack a target who is afflicted by Unending Thaw to
trigger Heavy Freeze.
- Light attack with Ice Gauntlet while abilities are on cooldown or
heavy attack to trigger Heavy Freeze from a different Ice Storm
that does not belong to you.
- Repeat
Secondary Weapon Priority List and Build Rotation
To learn how to use your second weapon properly, and complete rotation, please refer to our PvE and PvP build pages:
Gameplay Tips
Cooldown Management and Refreshing Frost
Many Ice Gauntlet focused builds, especially support mages, will be focused on maximizing
ability usage and reducing cooldowns in whatever way possible. When using an Ice Gauntlet, be cognizant of the cooldowns
you are using and when. If there is one target but a just cluster on the way to a fight,
it may not be advantageous to use something like ![]() Ice Storm or
Ice Storm or ![]() Ice Shower. The same logic applies if there is
already one of those abilities placed, or if a target is about to die. Make sure you understand
your builds too. When you use something like
Ice Shower. The same logic applies if there is
already one of those abilities placed, or if a target is about to die. Make sure you understand
your builds too. When you use something like ![]() Refreshing Frost you will get 20% cooldown reduction when using
an ability in a frosted area. This applies to other ally Ice Gauntlet abilities. Try to cast
yours while inside of an
Refreshing Frost you will get 20% cooldown reduction when using
an ability in a frosted area. This applies to other ally Ice Gauntlet abilities. Try to cast
yours while inside of an ![]() Ice Storm, or if you position correctly you can also use
Ice Storm, or if you position correctly you can also use ![]() Ice Shower. This is
important when thinking about abilities like
Ice Shower. This is
important when thinking about abilities like ![]() Entombed. This can be used for quick cooldown
reduction instead of using it for pure defense.
Entombed. This can be used for quick cooldown
reduction instead of using it for pure defense.
How to Use Entombed
Many players will hold their ![]() Entombed for far too long. This ability can be used for
signficant cooldown reduction with
Entombed for far too long. This ability can be used for
signficant cooldown reduction with ![]() Refreshing Frost, but also can be an additional fortify and source of damage if you
choose to break out of it by using a light attack. If you feel confident in your gameplay begin to
get more comfortable using
Refreshing Frost, but also can be an additional fortify and source of damage if you
choose to break out of it by using a light attack. If you feel confident in your gameplay begin to
get more comfortable using ![]() Entombed for cooldown management, do not play scared with it. Additionally, this ability
can also be used defensively when stuns are incoming, projectiles are coming your way, or any other
source of damage, so that you can completely mitigate incoming attacks. In summary, it is not just a final survival option.
Entombed for cooldown management, do not play scared with it. Additionally, this ability
can also be used defensively when stuns are incoming, projectiles are coming your way, or any other
source of damage, so that you can completely mitigate incoming attacks. In summary, it is not just a final survival option.
Ice Gauntlet Blocking
When taking the passive to convert mana into stamina when blocking it makes for a great source
of utility in order to survive. This block will allow you to block ![]() Shockwave or any other incoming attacks. Most importantly
though this can be used when there are many attackers. If you hold block and wait until it is broken by
draining your stamina, you can use that to buy a little bit more time right before you use
Shockwave or any other incoming attacks. Most importantly
though this can be used when there are many attackers. If you hold block and wait until it is broken by
draining your stamina, you can use that to buy a little bit more time right before you use ![]() Entombed. This could also be
used to prevent the need to use it in the first place.
Entombed. This could also be
used to prevent the need to use it in the first place.
Aiming Ice Spikes
Aiming with your Ice Spike can be awkward at times. To get comfortable with its range and functionality it is best to practice killing low level PvE enemies. In order to hit the target three times with it you must aim your crosshair at the enemy's feet and slightly to the right. You then have to determine the range of the target. In most cases you will have to activate the Mighty Spike early by light attacking in order to hit. If the target is CC'd you can either roll at them, cast the ability, and instantly activate it to guarantee the triple hit. Alternatively, if they are stuck in place you may be able to roll backwards and use the ability to perfectly hit at max range without early activation.
Iced Refresh
When playing a build with ![]() Ice Spikes a practiced player will be able to use Iced Refresh
to their advantage and continue chaining Spikes for kills. It is important to get familiar with your damage output
so that you know when you can guarantee a quick kill so that Spike can come back up and be used again. If you
are comfortable you should roll this onto your Ice Gauntlet for full cooldown reset. If not it may be best to use
Ice Spikes a practiced player will be able to use Iced Refresh
to their advantage and continue chaining Spikes for kills. It is important to get familiar with your damage output
so that you know when you can guarantee a quick kill so that Spike can come back up and be used again. If you
are comfortable you should roll this onto your Ice Gauntlet for full cooldown reset. If not it may be best to use
![]() Refreshing Move.
Refreshing Move.
ABC
Always Be Clicking: Always light attack and only stop when you absolutely have to. This is easy to weave between abilities as you can. A build like this has many more abilities used that should be prioritized. But if you have a moment where you can sneak a light attack in you certainly can. Abilities take the priority always. This is also another great way to freely charge your heartrune.
Movement
Effective movement is incredibly important in a build like this, especially when playing in medium. Do not panic and use your entire stamina bar, exhaust yourself, and the die. You can take advantage of jumping, diving (going prone while moving), and changing direction by quickly moving your mouse or taking advantage of quick inputs on your movement keys.
There are many movements in New World that will stagger you in place for a moment when quickly changing direction. If you move left and right or if you jump left and right you will notice there is a moment where you will be standing still. To prevent this you will need to use a key input while your character is in the animation. For example, if you hold your left directional key and jump then right before you land you hit your right directional key and jump, you will quickly jump left and right. If you simply run left and right using your directional keys your character will respond similarly. To avoid this you can move left and then right before you pivot to go right, hit the backward directional key and instantly follow up with your right directional key. If you continue doing this back and forth you will avoid the sliding animation.
FAQ - Ice Gauntlet
Should I Always Use Crystalline Curse?
By getting to 200 Arcana you can craft this Ice Gauntlet very cheaply. This weapon is debatably a
best in slot option. It can be flexed into any Ice Gauntlet build, regardless of its focus, and have
success with its perk options. ![]() Refreshing Move increases the availability of your abilities in any
build.
Refreshing Move increases the availability of your abilities in any
build. ![]() Enchanted complements this well because your filler attacks will now be amplified.
Lastly,
Enchanted complements this well because your filler attacks will now be amplified.
Lastly, ![]() Unending Thaw provides a significant increase to
Unending Thaw provides a significant increase to ![]() Ice Storm, and that ability is used
in almost every Ice Gauntlet build. This can be the ulimtate flex weapon that will allow you to
have a great option in any scenario. It may not always be the absolute best option, but it is always
consistently good.
Ice Storm, and that ability is used
in almost every Ice Gauntlet build. This can be the ulimtate flex weapon that will allow you to
have a great option in any scenario. It may not always be the absolute best option, but it is always
consistently good.
Should I Use Pylon
On the surface ![]() Ice Pylon sometimes seems like a funny option. While it is not commonly taken,
there are a few niche builds in both light and medium armor, that allow for you to take
advantage of
Ice Pylon sometimes seems like a funny option. While it is not commonly taken,
there are a few niche builds in both light and medium armor, that allow for you to take
advantage of ![]() Pylon Burst and do great damage. In most builds, it is not recommended though. In all,
respect it when it is being used, do not just ignore it.
Pylon Burst and do great damage. In most builds, it is not recommended though. In all,
respect it when it is being used, do not just ignore it.
Should I Be Taking the Energized Critical Passive?
This is almost never worth taking due to the playstyle of almost all Ice Gauntlet variants. In most
cases you will be using some type of ![]() Cut Pristine Opal in your weapons, and you will
be frequently dodging. As a result, there are very few times where you are at full stamina, so this
will have very low up-time.
Cut Pristine Opal in your weapons, and you will
be frequently dodging. As a result, there are very few times where you are at full stamina, so this
will have very low up-time.
Should I Be Placing Higher on Leaderboards?
When playing an Ice Gauntlet build, primarily a support or ![]() Ice Spikes build, you have
the capability to put out great damage. Most likely though, you will not be at the peak of the leaderboard.
This is okay, it is outside the scope of the role to be top placing in everything it does. Support
builds are focused on assists and setting up teammates. Even in burst builds where you are picking up kills
sometimes you will not be getting a high score because you are not consistently clump fighting. Do not
use your leaderboard position as a determination of your performance at all times. Understand how your goals
are and focus on the role rather than independent rankings.
Ice Spikes build, you have
the capability to put out great damage. Most likely though, you will not be at the peak of the leaderboard.
This is okay, it is outside the scope of the role to be top placing in everything it does. Support
builds are focused on assists and setting up teammates. Even in burst builds where you are picking up kills
sometimes you will not be getting a high score because you are not consistently clump fighting. Do not
use your leaderboard position as a determination of your performance at all times. Understand how your goals
are and focus on the role rather than independent rankings.
What Runeglass Should I Be Using?
This all depends on your build. If you are a support mage you will want Abyssal Runeglass
to improve your Void Gauntlet damage since you will be using that to try and proc extra cooldown reduction. When using
![]() Ice Spikes with a Void Gauntlet secondary you will want Ice Runeglass. If you are using
a Blunderbuss as your primary damage source and
Ice Spikes with a Void Gauntlet secondary you will want Ice Runeglass. If you are using
a Blunderbuss as your primary damage source and ![]() Ice Spikes as a secondary, or a utility Ice Gauntlet build
with it, you will want Ignited Runeglass. Lastly if you are using a Fire Staff you will want to use
Sighted Runeglass, this is because these elemental sources of damage count as empowerment and there is a total
empowerment cap. As such, improving ranged damage still buffs the Fire Staff.
Ice Spikes as a secondary, or a utility Ice Gauntlet build
with it, you will want Ignited Runeglass. Lastly if you are using a Fire Staff you will want to use
Sighted Runeglass, this is because these elemental sources of damage count as empowerment and there is a total
empowerment cap. As such, improving ranged damage still buffs the Fire Staff.
Also, you do not always have to use ![]() Cut Pristine Opal or
Cut Pristine Opal or ![]() Cut Pristine Onyx for your Runeglass.
You may use whatever gems as Runeglass variants that will allow you to get to your desired defensiveness.
Cut Pristine Onyx for your Runeglass.
You may use whatever gems as Runeglass variants that will allow you to get to your desired defensiveness.
Changelog
- 22 Oct. 2023 (PvP builds page): Guide updated for expansion.
- 22 Oct. 2023 (gems page): Guide updated for expansion.
- 22 Oct. 2023 (abilities page): Guide updated for expansion.
- 22 Oct. 2023 (this page): Guide updated for expansion.
- 29 Mar. 2023 (PvP builds page): Removed Ice Spikes Blunderbuss build.
- 29 Mar. 2023 (gems page): Updated PvE Gems.
- 29 Mar. 2023 (perks page): Updated tiers for Season One.
- 29 Mar. 2023 (this page): Updated perks and gems.
- 23 Jan. 2023 (PvP builds page): Guide added.
- 23 Jan. 2023 (PvE builds page): Guide added.
- 23 Jan. 2023 (gems page): Guide added.
- 23 Jan. 2023 (perks page): Guide added.
- 23 Jan. 2023 (abilities page): Guide added.
- 23 Jan. 2023 (this page): Guide added.
Savvvo is a full-blown MMORPG try-hard who overthinks every build, min-maxes every stat, and theorycrafts like his life depends on it. If there’s a meta, he’s dissecting it. If there isn’t, he’s creating one.
You can take a closer look at his guides and content on YouTube.
- AMA Session with New World’s Former Lead World Designer
- New World Aeternum 2026 Roadmap Revealed
- Can New World Be Saved? Offers Are Starting to Pop Up.
- The Last Day of New World: Aeternum
- New World Server Mergers (Again)
- What Else Was Planned for New World: Aeternum?
- Global Storage Search is Now Live in New World: Aeternum
- Daggers Are Officially Live in New World: Aeternum