Void Gauntlet Guide and Builds for New World
Welcome to our guide for Void Gauntlet, a weapon in New World. Within these pages, you will find everything required to understand how best to play with this weapon in both PvE and PvP.
Void Gauntlet Overview
The Void Gauntlet is a magical weapon that scales with Intelligence and Focus and deals Void Damage. This weapon specializes in being one of New World's top-tier secondary weapon options thanks to the massive amount of utility it brings to both PvP and PvE scenarios. While it does not necessarily shine as a primary damage option it still contributes to a significant amount of total damage through its raw damage potential, damage over time (DoT) effects, and disease effects. It is so coveted due to its offensive and support potential. It can provide allies with defensive and uitlity buffs, but it can also heal through several of its abilities, making it an incredibly strong option for healers. Almost all roles can benefit from using a Void Gauntlet and when it is present in a battle, it is noticeable.
Void Gauntlet Strengths and Weaknesses
 Incredible utility through various types of CC, empowerment, and other buffs/debuffs
- Great cooldown reduction when critically striking
- Secondary healing weapon that increases overall healing output
- Strong survivability and defensiveness through fortify, additional healing, and leeching
- Fast Heartrune charging through damage over time effects and high cooldown uptime

 No burst damage options
- Low damage scaling
- Lack of ability diversity
- Lack of secondary weapon options (Life Staff or Ice Gauntlet)
- Can be awkward to light and heavy attack with

Void Gauntlet Builds
While the Void Gauntlet can shine as a secondary weapon with most magic weapons, and even some physical damage ones, it is the main complement to several Ice Gauntlet builds. The abilities of both gauntlets synergize in a way to offer support roles to set up allies, or high damage burst builds to lock down low health enemies. Nonetheless, the Void Gauntlet offers undeniable PvP and PvE power. The builds that primarily see a Void Gauntlet secondary are generally the Ice Gauntlet and Life Staff.
Recently, with the launch of some unique Void Gauntlet artifacts like ![]() Lifetaker, the Void Gauntlet has been seen more and more as
a secondary weapon used with DEX-based ranged builds (typically Bow or Musket builds), making it even more of a usable weapon!
Lifetaker, the Void Gauntlet has been seen more and more as
a secondary weapon used with DEX-based ranged builds (typically Bow or Musket builds), making it even more of a usable weapon!
You can even get creative by matching a Void Gauntlet with other attribute-specific artifacts like ![]() The Abyss Great Axe artifact, turning yourself
into a Void-based Bruiser. See the video below for a closer look.
The Abyss Great Axe artifact, turning yourself
into a Void-based Bruiser. See the video below for a closer look.
Universal Void Gauntlet Build
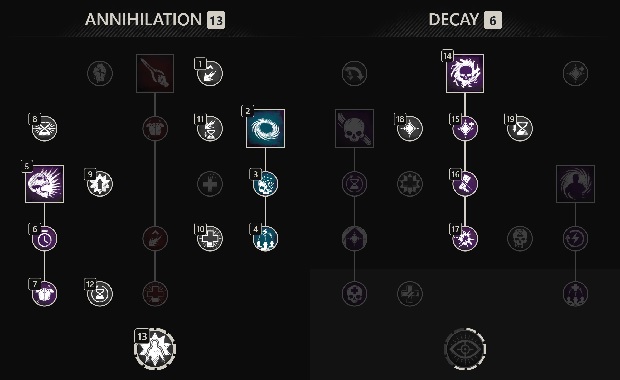
This build can flex into any weapon, even a Life Staff. It has great damage output and maximizes group utility. This is the common pick for any PvP scenario, but can offer great PvE usage as well.
 Petrifying Scream — Unleash a Void-infused scream, dealing 100% weapon damage, staggering and inflicting Root on
nearby enemies. This also provides a high level of defensiveness through the fortify on
Petrifying Scream — Unleash a Void-infused scream, dealing 100% weapon damage, staggering and inflicting Root on
nearby enemies. This also provides a high level of defensiveness through the fortify on  Fortifying Echoes. As a Void Gauntlet player
this skill is crucial to use properly. Focus on setting up large "clumps" of enemies by combining it with a
Fortifying Echoes. As a Void Gauntlet player
this skill is crucial to use properly. Focus on setting up large "clumps" of enemies by combining it with a  Gravity Well or any other
form of crowd control (CC). This is also great for locking down players who have exhausted themselves after avoiding other abilities.
Gravity Well or any other
form of crowd control (CC). This is also great for locking down players who have exhausted themselves after avoiding other abilities. Orb of Decay — This is the main source of damage output. When used correctly a player can cast this ability and right as
it hits a target they can detonate it so that it double hits the target, also applying 2 stacks of rend and a damage over time effect. When used
on large clumps it results in a large amount of cooldown reduction in addition to damage due to the passives in the Void Gauntlet skill tree.
Orb of Decay — This is the main source of damage output. When used correctly a player can cast this ability and right as
it hits a target they can detonate it so that it double hits the target, also applying 2 stacks of rend and a damage over time effect. When used
on large clumps it results in a large amount of cooldown reduction in addition to damage due to the passives in the Void Gauntlet skill tree. Oblivion — The most common use for this ability comes through its perk Nullifying Oblivion to remove buffs from
enemies. Otherwise, it deals a deceiving amount of AoE damage that is commonly under-rated. But its other purpose is to regenerate stamina and
provide all those within the zone an empowerment buff to do more damage. This ability is great to use before going through a Void Gauntlet rotation
to maximize damage.
Oblivion — The most common use for this ability comes through its perk Nullifying Oblivion to remove buffs from
enemies. Otherwise, it deals a deceiving amount of AoE damage that is commonly under-rated. But its other purpose is to regenerate stamina and
provide all those within the zone an empowerment buff to do more damage. This ability is great to use before going through a Void Gauntlet rotation
to maximize damage.
It is crucial to take advantage of the cooldown reduction potential of this weapon. Try your best to use ![]() Oblivion and
Oblivion and ![]() Petrifying Scream
before using
Petrifying Scream
before using ![]() Orb of Decay. If you can land critical hits you will get full cooldown resets. If you are in an idle window with nothing else happening
be sure to reduce all cooldowns by using Refreshing Harvest.
Orb of Decay. If you can land critical hits you will get full cooldown resets. If you are in an idle window with nothing else happening
be sure to reduce all cooldowns by using Refreshing Harvest.
Blade Build
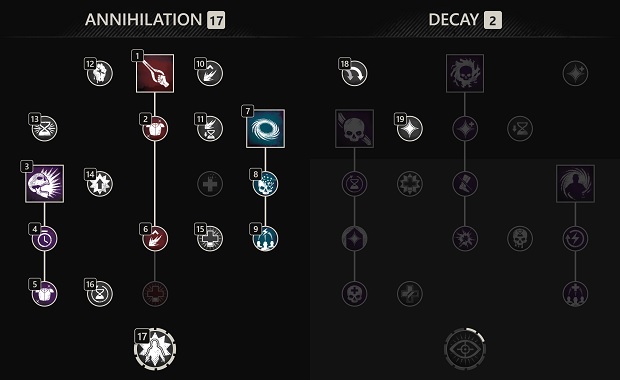
This build is typically not used in PvP and more in PvE. It provides pure damage output through properly using ![]() Void Blade. It can allow a healer
in PvP to fight while heavily outnumbered due to its lifesteal capabilities, but it lacks group utility and is prone to CC effects. In PvE it can be
ran by DPS or healers to act as a pseudo-dps.
Void Blade. It can allow a healer
in PvP to fight while heavily outnumbered due to its lifesteal capabilities, but it lacks group utility and is prone to CC effects. In PvE it can be
ran by DPS or healers to act as a pseudo-dps.
 Void Blade — While the damage is not focused on burst. This does average damage while applying many debuffs like DoTs. The main draw is the healing
and survivability you can obtain through Voracious Blade. If used correctly you will be able to live for incredible lengths of time by yourself. If you are going
to use the Void Gauntlet as a primary weapon, this is one of the only builds that allows you to do so. Be careful, if you weapon swap your Void Blade will deactivate and
if it is on cooldown you will have to attempt to get it back online, making it a difficult playstyle at times.
Void Blade — While the damage is not focused on burst. This does average damage while applying many debuffs like DoTs. The main draw is the healing
and survivability you can obtain through Voracious Blade. If used correctly you will be able to live for incredible lengths of time by yourself. If you are going
to use the Void Gauntlet as a primary weapon, this is one of the only builds that allows you to do so. Be careful, if you weapon swap your Void Blade will deactivate and
if it is on cooldown you will have to attempt to get it back online, making it a difficult playstyle at times.
Secondary Weapons
Ice Gauntlet
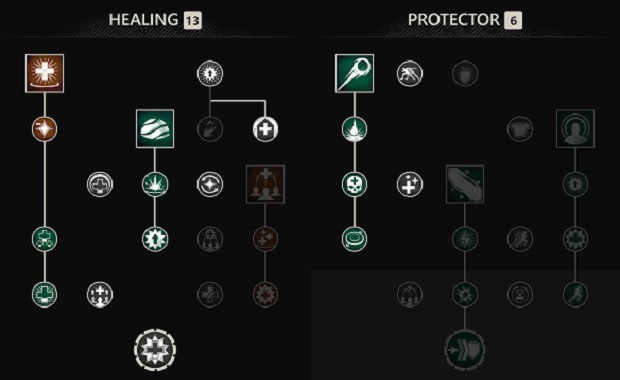
Pure Support
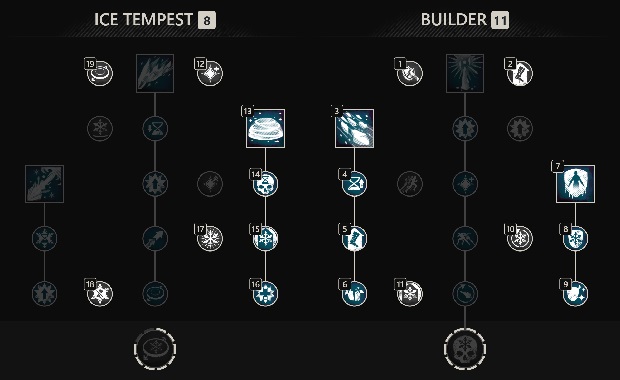
When using this build you will need to be playing in a medium armor loadout. This build is solely focused on a support mindset that is constantly providing utility to teammates and offering multiple avenues of crowd control to secure kills and set up combination for entire clumps kills. You will not be a primary damage dealer, you will be securing assists and ensuring that your team has the ability to put forth kill pressure on targets. This is the premiere PvP META build in combination with the Void Gauntlet.
Damage
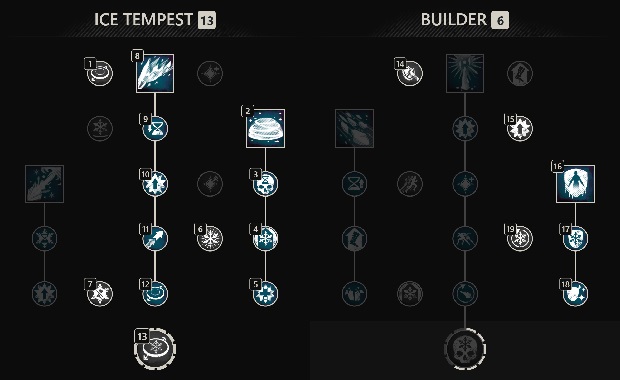
This is the optimal build when seeking high burst damage with ![]() Ice Spikes and it best with a light armor loadout. In additional to high burst, you have great sustained
AoE damage through both
Ice Spikes and it best with a light armor loadout. In additional to high burst, you have great sustained
AoE damage through both ![]() Ice Storm and
Ice Storm and ![]() Orb of Decay. This pairs great with the CC and utility of the Void Gauntlet because you can more easily root targets and leave
them vulnerable.
Orb of Decay. This pairs great with the CC and utility of the Void Gauntlet because you can more easily root targets and leave
them vulnerable. ![]() Orb of Decay should not be underestimated in a build like this in terms of single target damage as well. You can "double pop" your orb as it hits a target
resulting in a sizeable burst and then follow up with an
Orb of Decay should not be underestimated in a build like this in terms of single target damage as well. You can "double pop" your orb as it hits a target
resulting in a sizeable burst and then follow up with an ![]() Ice Spikes or an Ice Gauntlet heavy/light attack. This build lacks mobility options, but has a good amount of
survivability through defensive passives.
Ice Spikes or an Ice Gauntlet heavy/light attack. This build lacks mobility options, but has a good amount of
survivability through defensive passives.
Life Staff
The Life Staff will utilize the Void Gauntlet as a secondary in either build setup. Normally a targeted group healer will use it in PvE, whereas an AoE healer will try to take advantage of it in PvP
Targeted Group Healer
This burst healing build is focused on 5-player groups. It is best paired with ![]() Refreshing due to lower
cooldown abilities. This is the optimal build for war group healing (PvP) or expeditions and mutators (PvE).
Refreshing due to lower
cooldown abilities. This is the optimal build for war group healing (PvP) or expeditions and mutators (PvE).
AoE
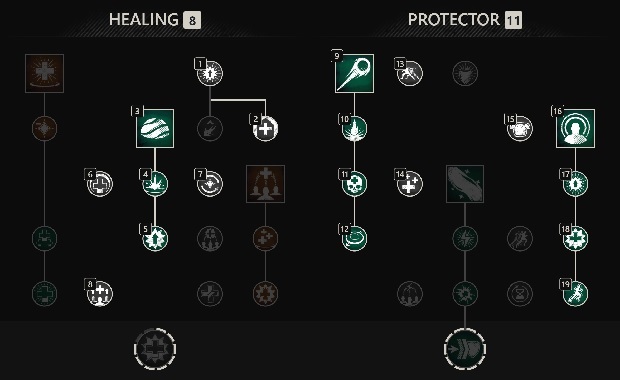
This build relies on healing over time abilities to heal large groups. It is best paired with ![]() Refreshing Evasion
due to high cooldown abilities. It is best for AoE war healing (PvP) or large group open world content.
Refreshing Evasion
due to high cooldown abilities. It is best for AoE war healing (PvP) or large group open world content.
Attributes
Support
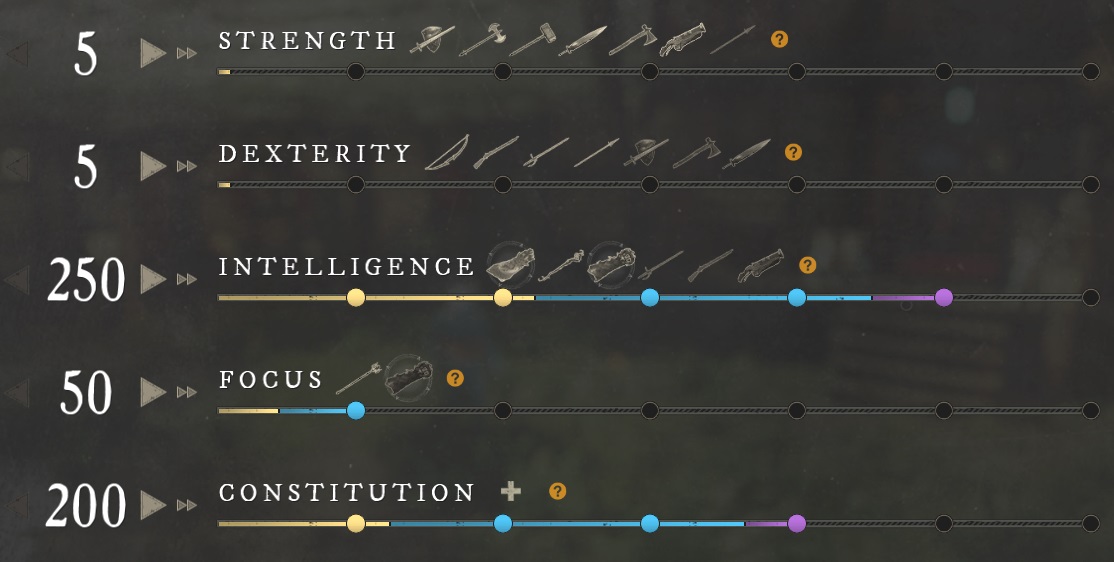
200 Constitution will be your baseline for almost all types PvP and PvE content. Playing with 200 Constitution while in a medium armor loadout makes you incredibly defensive so that you can commit to the front line fights. This is crucial to set up your allies for success. While playing in a build like this, the Void Gauntlet is extremely important so it is crucial to obtain the bonus from 50 Focus to reduce the cooldown of all your utility-based abilities. This will also increase your overall Void Gauntlet damage. It is not necessary to solely focus on Intelligence because damage is not the priority. When having a Void Gauntlet focused attribute distribution it is important to be attacking with your Void Gauntlet with light and heavy attacks to try and get more cooldown reduction.
Damage
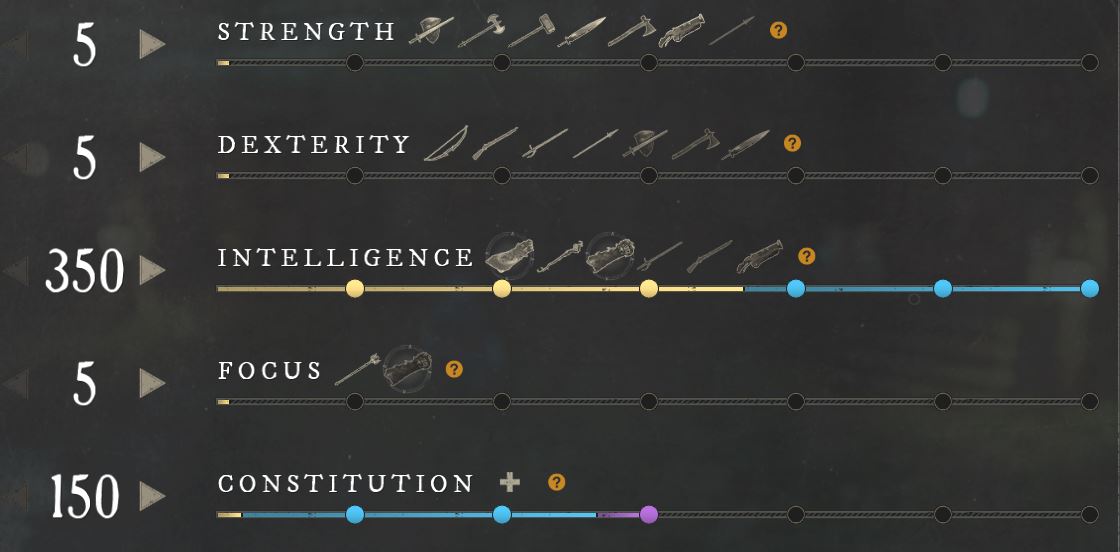
This is the optimal attribute distribution when playing something like a light armor damage focused build. If you feel that you have enough damage output
you can certainly choose to go 200 Constitution for more survivability. Otherwise in this setup it is easy to put out incredible amounts of damage
through ![]() Ice Storm and
Ice Storm and ![]() Orb of Decay, then pick off low health targets with a quick
Orb of Decay, then pick off low health targets with a quick ![]() Ice Spikes. This is not optimal for a support focused build,
but you certainly can adjust your attribute split to something of this nature, or a 300 Intellect and 200 Constitution build, if you want to attempt to do more
damage in a support style setup.
Ice Spikes. This is not optimal for a support focused build,
but you certainly can adjust your attribute split to something of this nature, or a 300 Intellect and 200 Constitution build, if you want to attempt to do more
damage in a support style setup.
Void Gauntlet Important Perks
- Nullifying Oblivion — This is a necessary perk because of its cooldown reduction, but more importantly due to its ability
to completely remove buffs from a target.
- Putrefying Scream — When using this it will provide an incredible amount of healing reduction, resulting in more kill
pressure.
- Diminishing Orb — It is not necessary to use this, but it should be put in a best in slot setup. It is another form
of buff removal that improves the utility of the Void Gauntlet.
Life Staff Important Perks
This section restricts itself to the important perks of Life Staff. For a complete rundown, please read our dedicated guide:
Ability Perks
- Putrefying Scream — (Weapon) In almost all Void Gauntlet focused builds, support and damage, it is beneficial to use one with this on the Gauntlet
to apply the largest disease on a target to reduce overall healing received and lockdown kills for yourself or your allies.
- Nullifying Oblivion — (Armor) This perk is necessary in any Void Gauntlet build using Oblivion. You now have the ability to remove
debuffs on use and it charges Oblivion faster for more damage, stamina, and other forms of utility.
- Diminishing Orb — (Armor) In order to completely focus on the utility of the Void Gauntlet, this will now allow you to remove even more enemy buffs
at a faster rate. This can reduce durations of healing over time effects, fortifies, empowers, or any other buff applied to the player as long as it does not derive
from a consumable. This is most efficacious in PvP combat and not needed in PvE.
Weapon Perks
 Keen — Critical hit chance is the most important stat for Void Gauntlets. Its output purely relies on your ability to critically strike and receive
cooldown reduction.
Keen — Critical hit chance is the most important stat for Void Gauntlets. Its output purely relies on your ability to critically strike and receive
cooldown reduction.- Vicious — The Void Gauntlet will innately crit frequently. You may make use of this perk as a third perk option for more damage output.
- Attunement Perks — This adds a great burst of damage to every attack.
PvP Perks
 Health — This provides free damage reduction against all sources and is one of the most beneficial PvP options.
- Shirking Heals — Incredible source of self-healing and allows for great survivability regardless of build.
 Shirking Fortification — Can be a great complement to Shirking Heals. Will add increased armor to
improve overall defensiveness.
Shirking Fortification — Can be a great complement to Shirking Heals. Will add increased armor to
improve overall defensiveness. Freedom — This will allow you to play more aggressively by reducing the duration of crowd-control. You should
play with either 3 or 5 stacks.
Freedom — This will allow you to play more aggressively by reducing the duration of crowd-control. You should
play with either 3 or 5 stacks. Elemental Aversion — Use this perk for elemental damage reduction from weapons like the Fire Staff.
 Refreshing — This can be an optional third perk when you want a source of cooldown reduction in your build.
- Harnessing Perks — Stack these for increased damage if you chose to forgo defensive options.
PvE Perks
- Elemental Aversion — This perk is a viable alternative in PvP as well, but is overshadowed by other PvP options. It provides great defense
in mutated expeditions to help mitigate magical effects.
 Physical Aversion — Only projectiles that do physical damage will be mitigated by this perk. As such, it can be useful in PvE as another potential option. It also
provides a small amount of PvP value, but Elemental Aversion and enemy ward perks are certainly more defensive options.
Physical Aversion — Only projectiles that do physical damage will be mitigated by this perk. As such, it can be useful in PvE as another potential option. It also
provides a small amount of PvP value, but Elemental Aversion and enemy ward perks are certainly more defensive options.
Jewelry Perks
Amulet
- Health — This is the standard pick for all builds, it is
free health that will add to the defensiveness of your kit.
 Stamina Recovery — This is a backpocket save when being focused
and taking heavy damage. You will receive a burst of stamina that will allow you to
potentially get a quick dodge that can save your iife and continue the fight.
Stamina Recovery — This is a backpocket save when being focused
and taking heavy damage. You will receive a burst of stamina that will allow you to
potentially get a quick dodge that can save your iife and continue the fight. Slash Protection — This acts as a third perk slot that provides
more defensiveness against Greatswords, Great Axes, Hatchets, and Swords.
Slash Protection — This acts as a third perk slot that provides
more defensiveness against Greatswords, Great Axes, Hatchets, and Swords.
Ring
- Keen Awareness — This perk functions similarly to Keen. It is a free increase to critical hit chance.
 Invigorated Punishment
- Refreshing
 Void Damage — This is a solid option to start off while gathering
gear for this build. It is not as good as Keen Awareness or Invigorated Punishment,
but it will still result in some throughput to help get started.
Void Damage — This is a solid option to start off while gathering
gear for this build. It is not as good as Keen Awareness or Invigorated Punishment,
but it will still result in some throughput to help get started.- Hearty — This is never needed for a medium armor loadout since the
stamina increase has a minimal effect on our ability to dodge, but if playing in light, this is
necessary.
Earring
Artifacts
Weapon
Armor
Jewelry
Heartrune
![]() Minor Heartrune of Grasping Vines is the best option for most Void Gauntlet builds
because it becomes available very quickly thanks to damage over time effects and persistent
sources of damage. This drastically increases the CC of a build and results in a great way
to set up a clump so your allies can capitalize and secure kills.
Minor Heartrune of Grasping Vines is the best option for most Void Gauntlet builds
because it becomes available very quickly thanks to damage over time effects and persistent
sources of damage. This drastically increases the CC of a build and results in a great way
to set up a clump so your allies can capitalize and secure kills.
There are three viable upgrade options:
 Brutal Heartrune of Grasping Vines
- Stalwart Heartrune of Grasping Vines
- Cunning Heartrune of Grasping Vines
![]() Brutal Heartrune of Grasping Vines is the best pick to make sure that enemies
caught in the rooting effect are vulnerable to high damage bursts.
Alternatively, when you are focused on doing damage, you can swap to
Brutal Heartrune of Grasping Vines is the best pick to make sure that enemies
caught in the rooting effect are vulnerable to high damage bursts.
Alternatively, when you are focused on doing damage, you can swap to
![]() Brutal Heartrune of Detonate since you will always be surrounded by enemies and it charges quickly, resulting
in high damage output. If you choose to heal, or are looking for a more defensive option,
Brutal Heartrune of Detonate since you will always be surrounded by enemies and it charges quickly, resulting
in high damage output. If you choose to heal, or are looking for a more defensive option,
![]() Cunning Heartrune of Stoneform will be your best option.
Cunning Heartrune of Stoneform will be your best option.
Heartrune Usage Tips
Save your Vines for when there are multiple targets stacked on top of one another.
Preferably the targets will already be under some kind of CC effect, or exhausted and unable to dodge
out of them. It is best paired with something like ![]() Gravity Well or
Gravity Well or ![]() Shockwave.
Shockwave.
Take advantage of down time to charge your heartrune. For instance if you are far away
you might as well continue to try hitting targets at range. Alternatively, you can use target dummies
or objects to your advantage for additional charge. Also, be sure to always be hitting as
many enemies as possible with your cooldowns. ![]() Ice Storm and
Ice Storm and ![]() Diminishing Orb will result in
a high amount of recharge from persistent damage and damage over time effects.
Diminishing Orb will result in
a high amount of recharge from persistent damage and damage over time effects.
Your heartrune will charge fast. While it is obviously beneficial to hold for times where there are large clusters of enemies. Do not wait too long and continue to waste your cooldown when you would have had the time to get another one recharged. Get familiar with how quickly you can get it back online and do not hesitate to use it to secure high priority kills.
A Heartrune in PvE is significantly different than PvP. This will charge incredibly
fast due to the sustained damage output on targets mixed with damage over time effects and supplemental healing. When using
something like ![]() Brutal Heartrune of Grasping Vines this is best used on large numbers
of enemies instead of single target. But, it has great single target value due to its rending effect on a bosses. The same
logic applies to
Brutal Heartrune of Grasping Vines this is best used on large numbers
of enemies instead of single target. But, it has great single target value due to its rending effect on a bosses. The same
logic applies to ![]() Brutal Heartrune of Detonate. This explodes for a large amount of
damage, so taking advantage of this on as many enemies as possible is advantageous. Alternatively, using this as many times as
possible on a boss is fantastic for free damage.
Brutal Heartrune of Detonate. This explodes for a large amount of
damage, so taking advantage of this on as many enemies as possible is advantageous. Alternatively, using this as many times as
possible on a boss is fantastic for free damage.
Gems and Consumables
The following information covers Void Gauntlet builds with a damage or support emphasis. If you are looking to learn more about gems and consumables when healing with a Void Gauntlet, please refer to our Void Gauntlet Gems guide.
Gems
Remember, Runeglass can only be slotted into armor pieces that are not jewelry items, and weapons.
Weapon Gems
When you are in a damage build you will either use ![]() Runeglass of Abyssal Opal or
Runeglass of Abyssal Opal or
![]() Runeglass of Frozen Opal depending on if you are focusing on your Ice
Gauntlet or Void Gauntlet. If you are using a build utilizing the Void Gauntlet to heal
you will be using
Runeglass of Frozen Opal depending on if you are focusing on your Ice
Gauntlet or Void Gauntlet. If you are using a build utilizing the Void Gauntlet to heal
you will be using ![]() Cut Pristine Diamond.
Cut Pristine Diamond.
PvP Gems
In PvP combat the goal is to hit a 20 (Slash)/10 (Physical)/7.5 (Elemental) defensive
split. You will reach 20% Slash resist through ![]() Slash Protection. To reach this you can use:
Slash Protection. To reach this you can use:
 Runeglass of Abyssal Onyx x5 (In armor) &
  Cut Pristine Opal x3
 Runeglass of Frozen Onyx x5 (In armor) & Cut Pristine Opal x3 (Ice Gauntlet Focused)
PvE Gems
In PvE combat, more specifically mutators, elemental resistance is the main concern.
You can use the following gems in your gear:
- Elemental Resistance Gem x8 + Amulet Protection Perk (Based on mutator elemental effect.)
Consumables
For more information on how to manage your cooldown hotbar, what consumables to use, what foods should be eaten, or tips on how to be more effective with your consumables in PvP and PvE, please refer to Void Gauntlet Consumables guide
Heartrune
![]() Minor Heartrune of Grasping Vines is the best option for most Void Gauntlet builds
because it becomes available very quickly thanks to damage over time effects and persistent
sources of damage. This drastically increases the CC of a build and results in a great way
to set up a clump so your allies can capitalize and secure kills.
Minor Heartrune of Grasping Vines is the best option for most Void Gauntlet builds
because it becomes available very quickly thanks to damage over time effects and persistent
sources of damage. This drastically increases the CC of a build and results in a great way
to set up a clump so your allies can capitalize and secure kills.
There are three viable upgrade options:
![]() Brutal Heartrune of Grasping Vines is the best pick to make sure that enemies caught
in the rooting effect are vulnerable to high damage bursts.
Brutal Heartrune of Grasping Vines is the best pick to make sure that enemies caught
in the rooting effect are vulnerable to high damage bursts.
Alternatively, when you are focused on doing damage, you can swap to ![]() Brutal Heartrune of Detonate
since you will always be surrounded by enemies and it charges quickly, resulting
in high damage output.
Brutal Heartrune of Detonate
since you will always be surrounded by enemies and it charges quickly, resulting
in high damage output.
If you choose to heal, or are looking for a more defensive option, ![]() Cunning Heartrune of Stoneform
will be your best option.
Cunning Heartrune of Stoneform
will be your best option.
Heartrune Usage Tips
Save your Vines for when there are multiple targets stacked on top of one another. Preferably the
targets will already be under some kind of CC effect, or exhausted and unable to dodge
out of them. It is best paired with something like ![]() Gravity Well or
Gravity Well or ![]() Shockwave.
Shockwave.
Take advantage of down time to charge your heartrune. For instance if you are far away you might as
well continue to try hitting targets at range. Alternatively, you can use target dummies
or objects to your advantage for additional charge. Also, be sure to always be hitting as many enemies
as possible with your cooldowns. ![]() Ice Storm and
Ice Storm and ![]() Diminishing Orb will result in
a high amount of recharge from persistent damage and damage over time effects.
Diminishing Orb will result in
a high amount of recharge from persistent damage and damage over time effects.
Your heartrune will charge fast. While it is obviously beneficial to hold for times where there are large clusters of enemies. Do not wait too long and continue to waste your cooldown when you would have had the time to get another one recharged. Get familiar with how quickly you can get it back online and do not hesitate to use it to secure high priority kills.
A Heartrune in PvE is significantly different than PvP. This will charge incredibly fast due to the
sustained damage output on targets mixed with damage over time effects and supplemental healing. When using
something like ![]() Brutal Heartrune of Grasping Vines this is best used on large numbers of enemies
instead of single target. But, it has great single target value due to its rending effect on a bosses. The same
logic applies to
Brutal Heartrune of Grasping Vines this is best used on large numbers of enemies
instead of single target. But, it has great single target value due to its rending effect on a bosses. The same
logic applies to ![]() Brutal Heartrune of Detonate. This explodes for a large amount of damage, so
taking advantage of this on as many enemies as possible is advantageous. Alternatively, using this as many times as
possible on a boss is fantastic for free damage.
Brutal Heartrune of Detonate. This explodes for a large amount of damage, so
taking advantage of this on as many enemies as possible is advantageous. Alternatively, using this as many times as
possible on a boss is fantastic for free damage.
Void Gauntlet Rotation and Gameplay
The key of any rotation with a Void Gauntlet is cooldown reduction and critical hit chance. You
have to be cognizant of the abilities you are using, the order they are being used, and
be situationally aware. You do not want to get caught with zero cooldowns available when an ally
hits a massive ![]() Gravity Well or other combination simply because you were hungry to get
a little bit more damage in. Communication and awareness are what make great Void Gauntlet players
succeed. Be ready to complement the abilities of your team. As such, it is important to know
when you have an opportunity. In most cases, it will be best to use abilities like
Gravity Well or other combination simply because you were hungry to get
a little bit more damage in. Communication and awareness are what make great Void Gauntlet players
succeed. Be ready to complement the abilities of your team. As such, it is important to know
when you have an opportunity. In most cases, it will be best to use abilities like ![]() Oblivion
and
Oblivion
and ![]() Petrifying Scream before using
Petrifying Scream before using ![]() Orb of Decay since Orb can reduce all three
ability cooldowns and has two chances to do so with its detonate functionality.
Orb of Decay since Orb can reduce all three
ability cooldowns and has two chances to do so with its detonate functionality.
Try your best to not telegraph a ![]() Petrifying Scream. This is a very easy ability to notice
since most players simply run at a target with their Void Gauntlet out. It can be predicted and then
wasted. Try to wait for players to exhaust themselves, when there are large groups of players, or
attack your enemy from a different line of sight that makes it hard for them to notice you. Also note
that this ability results in a ton of defensive fortify and can be used to help push through chokepoints
and save your life.
Petrifying Scream. This is a very easy ability to notice
since most players simply run at a target with their Void Gauntlet out. It can be predicted and then
wasted. Try to wait for players to exhaust themselves, when there are large groups of players, or
attack your enemy from a different line of sight that makes it hard for them to notice you. Also note
that this ability results in a ton of defensive fortify and can be used to help push through chokepoints
and save your life.
When using ![]() Orb of Decay, get used to learning how to detonate it properly. As soon as you see a
damage number from hitting a target, immediately reactivate the ability to ensure they are
double hit. Try your best to aim for large clumps of concentrated players for the best results.
Orb of Decay, get used to learning how to detonate it properly. As soon as you see a
damage number from hitting a target, immediately reactivate the ability to ensure they are
double hit. Try your best to aim for large clumps of concentrated players for the best results.
In most builds it is benefical to light attack with your Void Gauntlet over an Ice Gauntlet due to the effect of critical chance cooldown reduction and applying a damage over time effect to the target. Be mindful of using this. Additionally, you can take advantage of Refreshing Harvest when there is no combat to force cooldown reduction, or if a cooldown is close to being active.
In general, your ability priority list on the Void Gauntlet will be as follows:
- Use Petrifying Scream to lock a target, or targets, in place.
- If time permits, place Oblivion on the ground. This could also be used pre-emptively depending on the situation.
- Hit the target(s) with Orb of Decay.
- Detonate Orb of Decay as soon as it lands the initial hit on the target(s).
- Light attack with Void Gauntlet as a filler or use Refreshing Harvest during downtime or if cooldowns are close to being active.
- Repeat.
This rotation will change dependent on the build you are playing. For more specific rotations that cover secondary weapon usage please refer to our PvP Builds and PvE Builds:
For more information, about Void Gauntlet abilities, we have a dedicated guide that goes through every single ability in great detail:
Gameplay Tips
ABC
Always Be Clicking: Always light attack and only stop when you absolutely have to. This is easy to weave between abilities as you can. A build like this has many more abilities used that should be prioritized. But if you have a moment where you can sneak a light attack in you certainly can. Abilities take the priority always. This is also another great way to freely charge your heartrune.
Movement
Effective movement is incredibly important in a build like this, especially when playing in medium. Do not panic and use your entire stamina bar and exhaust yourself, as it may result in death. You can take advantage of jumping, diving (going prone while moving), and changing direction by quickly moving your mouse or taking advantage of quick inputs on your movement keys.
There are many movements in New World that will stagger you in place for a moment when quickly changing direction. If you move left and right or if you jump left and right you will notice there is a moment where you will be standing still. To prevent this you will need to use a key input while your character is in the animation. For example, if you hold your left directional key and jump then right before you land you hit your right directional key and jump, you will quickly jump left and right. If you simply run left and right using your directional keys your character will respond similarly. To avoid this you can move left and then right before you pivot to go right, hit the backward directional key and instantly follow up with your right directional key. If you continue doing this back and forth you will avoid the sliding animation.
Refreshing Harvest
Harvest Essence sacrifices health for mana, but when taking this perk you will also receive cooldown
reduction. Whenever you have a moment where there is no combat, no incoming damage, or a cooldown is close to coming
back up, you can take advantage of this forced cooldown reduction. It is great especially if you miss all
of your cooldowns, or misuse your ![]() Orb of Decay.
Orb of Decay.
Proper Cooldown Management
As a Support you have some incredibly impactful cooldowns like ![]() Petrifying Scream,
Petrifying Scream, ![]() Ice Shower,
and
Ice Shower,
and ![]() Orb of Decay. Recognize when there is an opportunity to properly use each of these abilities. For example,
try to save your major CC for large clusters of enemies or high priority targets. It is okay to freely use these
cooldowns, but do not waste them when you know there is a major fight incoming.
Orb of Decay. Recognize when there is an opportunity to properly use each of these abilities. For example,
try to save your major CC for large clusters of enemies or high priority targets. It is okay to freely use these
cooldowns, but do not waste them when you know there is a major fight incoming.
Also be cognizant of how you can reduce your cooldowns to get them back up. Critical hits will be one
of your largest sources of cooldown reduction, so proper detonation of your ![]() Orb of Decay is very important. This
also raises the importance on making sure that you are light attacking with your Void Gauntlet out as a filler
since these critical hits will result in cooldown reduction. Be sure to also freely use Refreshing Harvest.
When it comes to your Ice Gauntlet be aware of
Orb of Decay is very important. This
also raises the importance on making sure that you are light attacking with your Void Gauntlet out as a filler
since these critical hits will result in cooldown reduction. Be sure to also freely use Refreshing Harvest.
When it comes to your Ice Gauntlet be aware of ![]() Refreshing Frost opportunities. It does not have to be
your Ice spell in order to take advantage of the cooldown reduction. In theory you could use your
Refreshing Frost opportunities. It does not have to be
your Ice spell in order to take advantage of the cooldown reduction. In theory you could use your ![]() Entombed
even while in an ally
Entombed
even while in an ally ![]() Ice Storm to quickly refresh
Ice Storm to quickly refresh ![]() Ice Shower.
Ice Shower.
Ice Gauntlet Usage
When choosing to use an Ice Gauntlet as your secondary weapon it will prioritize cooldown management
to provide CC availability through ![]() Ice Shower or
Ice Shower or ![]() Ice Storm. These abilities should
be used with purpose and intent in order to secure the most kills for your team, or to properly take down
large packs of enemies. The alternative build chosen when using this secondary will emphasize
Ice Storm. These abilities should
be used with purpose and intent in order to secure the most kills for your team, or to properly take down
large packs of enemies. The alternative build chosen when using this secondary will emphasize ![]() Ice Spikes
usage. It is important to understand how
Ice Spikes
usage. It is important to understand how ![]() Ice Spikes should be aimed at your target's feet and to the
right in order to hit them three times.
Ice Spikes should be aimed at your target's feet and to the
right in order to hit them three times.
To learn more about ability usage and the intricacies of the Ice Gauntlet, please refer to our Ice Gauntlet guide.
Life Staff Usage
When deciding to use a Life Staff in combination with a Void Gauntlet there are two scenarios
where this will most likely take place. When PvE healing, it is the most preferred option and it can be used
to provide damage increases through ![]() Oblivion and additional healing through abilities like
Oblivion and additional healing through abilities like
![]() Essence Rupture and
Essence Rupture and ![]() Orb of Decay. If you are using it in PvP, you are looking for a little bit
more healing most likely because you are an AoE healer. When using it in PvP be sure to position properly
away from enemies due to your lack of mobility. Use
Orb of Decay. If you are using it in PvP, you are looking for a little bit
more healing most likely because you are an AoE healer. When using it in PvP be sure to position properly
away from enemies due to your lack of mobility. Use ![]() Orb of Decay on large groups of allies to
provide a great healing over time effect in additional to the rest of your Life Staff loadout.
Orb of Decay on large groups of allies to
provide a great healing over time effect in additional to the rest of your Life Staff loadout.
Please refer to our Life Staff tips for more on this playstyle.
FAQ - Void Gauntlet
Refreshing vs. Refreshing Evasion
- Refreshing — Reduces max cooldowns by 2.9% per stack.
- Refreshing Evasion — Reduces active cooldowns by 0.74% after exiting the dodging animation.
![]() Refreshing is best for builds that have many sources of passive cooldown reduction. While
you can use
Refreshing is best for builds that have many sources of passive cooldown reduction. While
you can use ![]() Refreshing Evasion to quickly build an end game set, it is not as optimal and will more frequently
result in you exhausting yourself and dying in order to reset your cooldowns. Since you have access
to so many different mediums of cooldown reduction,
Refreshing Evasion to quickly build an end game set, it is not as optimal and will more frequently
result in you exhausting yourself and dying in order to reset your cooldowns. Since you have access
to so many different mediums of cooldown reduction, ![]() Refreshing becomes the better pick since all cooldown reduction
is dependent on the ability's base cooldown.
Refreshing becomes the better pick since all cooldown reduction
is dependent on the ability's base cooldown.
Should I Attack With Void Gauntlet or Ice Gauntlet?
Void Gauntlet will be the optimal filler weapon for light and heavy attacks. Its passives and additional
crit chance make it the "primary" weapon in this scenario since it will allow for more cooldowns to come back up
if a critical hit were to occur. The range on the Ice Gauntlet is slightly father if long range attacks are
necessary, otherwise the only time an Ice Gauntlet should be used for regular attacks is to set up a ![]() Heavy Freeze.
Heavy Freeze.
Should I Be Doing More Damage?
When playing most Void Gauntlet based builds you will be a support player for CC. This role is not damage focused by any means. You are a defensive role that has the sole purpose of providing CC to your allies so that they can pick up kills. While you will surely do large amounts of AoE damage, your goal is not to be the one doing burst damage to kill and enemy, rather you are effectively using cooldowns to secure large numbers of kills. When focusing on the leaderboard look to how your teammates performed, your assists, and compare your stats to others in the same role before getting discouraged.
PvE
Is a Void Gauntlet Worthwhile as DPS?
In all honesty, most players choose alternative weapons that will translate into builds for other expeditions or other build types, or simply because other weapon options are just better for output. For example, the only enemy type that Void Damage is more effective against is Ancient. With that being said, strike damage (War Hammer) is even more effective and is also more effective against Lost enemy types whereas the Void Gauntlet is very weak against Lost. It is just not the most optimal weapon choice when thinking about pure damage output. But, it can be a fantastic option for a healer to quickly flex as a DPS because they can still wear all of their Focus gear.
Do I Have to Use a Life Staff?
No you do not have to, but when playing a build like this it just makes more sense to use something that is more utility based. A Void Gauntlet has high ability up time and plenty of AoE options as well in its kit. There is never a real need for weapon swapping. This build is also great to put on as a healer to act as a fourth DPS when no healing is required.
Changelog
- 24 Aug. 2025 (perks page): Guide updated with new perk suggestions.
- 24 Aug. 2025 (this page): Guide updated with updates Void Gauntlet best practices.
- 22 Oct. 2023 (PvP builds page): Guide updated for expansion.
- 22 Oct. 2023 (PvE builds page): Guide updated for expansion.
- 22 Oct. 2023 (gems page): Guide updated for expansion.
- 22 Oct. 2023 (perks page): Guide updated for expansion.
- 22 Oct. 2023 (abilities page): Guide updated for expansion.
- 22 Oct. 2023 (this page): Guide updated for expansion.
- 29 Mar. 2023 (gems page): Updated PvE Gems.
- 29 Mar. 2023 (perks page): Updated perk tiers for Season One.
- 29 Mar. 2023 (abilities page): Removed Refreshing Harvest and added Cleansing Harvest.
- 29 Mar. 2023 (this page): Updated perks and gems.
- 19 Jan. 2023 (PvP builds page): Guide added.
- 19 Jan. 2023 (PvE builds page): Guide added.
- 19 Jan. 2023 (gems page): Guide added.
- 19 Jan. 2023 (perks page): Guide added.
- 19 Jan. 2023 (abilities page): Guide added.
- 19 Jan. 2023 (this page): Guide added.
More Weapon Guides
Savvvo is a full-blown MMORPG try-hard who overthinks every build, min-maxes every stat, and theorycrafts like his life depends on it. If there’s a meta, he’s dissecting it. If there isn’t, he’s creating one.
You can take a closer look at his guides and content on YouTube.
- AMA Session with New World’s Former Lead World Designer
- New World Aeternum 2026 Roadmap Revealed
- Can New World Be Saved? Offers Are Starting to Pop Up.
- The Last Day of New World: Aeternum
- New World Server Mergers (Again)
- What Else Was Planned for New World: Aeternum?
- Global Storage Search is Now Live in New World: Aeternum
- Daggers Are Officially Live in New World: Aeternum