Life Staff Guide and Builds for New World
Welcome to our guide for Life Staff, a weapon in New World. Within these pages, you will find everything required to understand how best to play with this weapon in both PvE and PvP.
Life Staff Overview
The Life Staff acts as the primary healing weapon in New World: Aeternum. It offers flexible builds to support high burst group healing, as well as builds that allow for massively spread area of effect healing. It provides an array of buffs that benefit a player's defensiveness in PvP and PvE.
Life Staff Strengths and Weaknesses
 Primary healing weapon in PvP and PvE
- Offers a wide array of defensive and utility buffs through its abilities
- Not extremely gear dependent and can be picked up quickly
- Is a highly desired role and will be easier to find War slots and Expedition groups
- Typically results in faster queue times for PvP game modes

 Focus does not scale well with damage, even when using Amber gems.
- Has limited secondary weapon options in PvP and PvE
- Can be difficult to master when trying to use targeted healing
- Lacks defensiveness due to light armor
- Frequently focused by enemies in PvP

Life Staff Builds
There are two main variations to the Life Staff. One build focuses on targeted burst healing to keep your group members alive. The second build focuses on non-targeted healing through the use of area of effect (AoE) abilities and heals over time.
For more builds, beyond the two builds we present below, please refer to our PvE and PvP build pages:
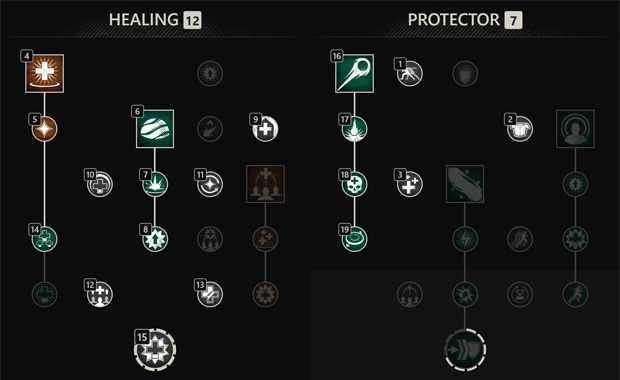
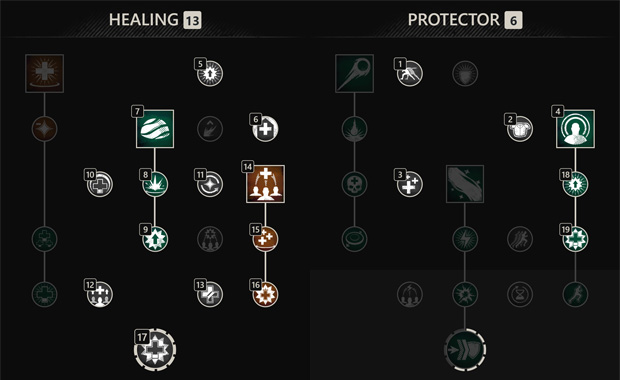
Group Healing (Beacon)
This is the preferred group healing build for Season One. It can be used to provide a mix of AoE and targetted healing.
 Divine Embrace — Targets party members and acts as a traditionally-cast burst heal.
It also has AoE opportunity through
Divine Embrace — Targets party members and acts as a traditionally-cast burst heal.
It also has AoE opportunity through  Shared Struggle and
  Rebound
 Sacred Ground — Targets a player and casts a zone at their feet. This creates a healing circle
for a quick burst heal and residual healing over time. It also amplifies the healing received of any player in the zone
through
Sacred Ground — Targets a player and casts a zone at their feet. This creates a healing circle
for a quick burst heal and residual healing over time. It also amplifies the healing received of any player in the zone
through  Anointed.
 Beacon — Projectile that is aimed and will stick to the first player or surface it touches.
This can be used on the ground when large damage is occurring, but it is best placed on front-line melee players
so that the healing area continues to move to the action.
Beacon — Projectile that is aimed and will stick to the first player or surface it touches.
This can be used on the ground when large damage is occurring, but it is best placed on front-line melee players
so that the healing area continues to move to the action.
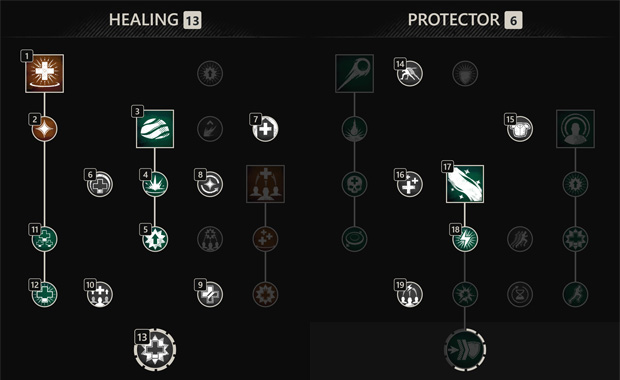
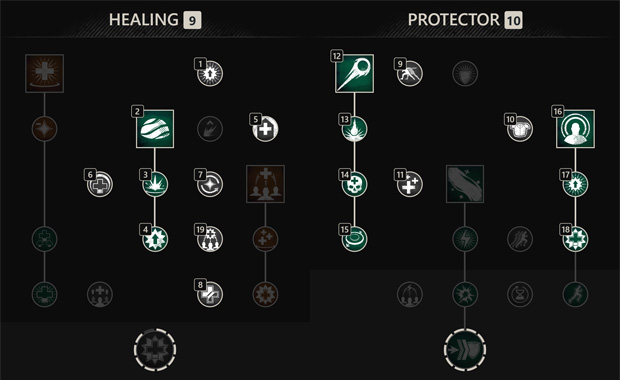
Group Healing (Orb)
This build can be used, but be mindful that in Season One Fortify is significantly weaker, and the
buffs applied from ![]() Orb of Protection result in increased damage from
Orb of Protection result in increased damage from ![]() Invigorated Punishment.
Invigorated Punishment.
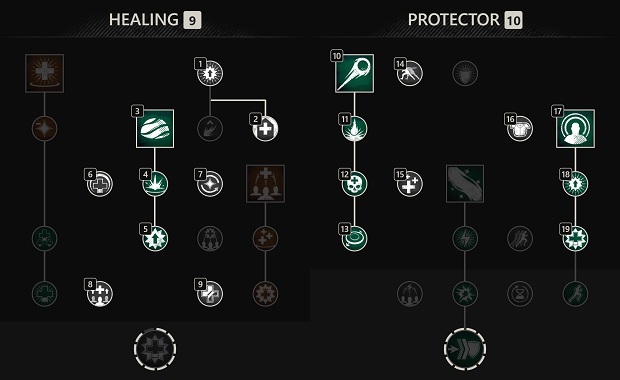
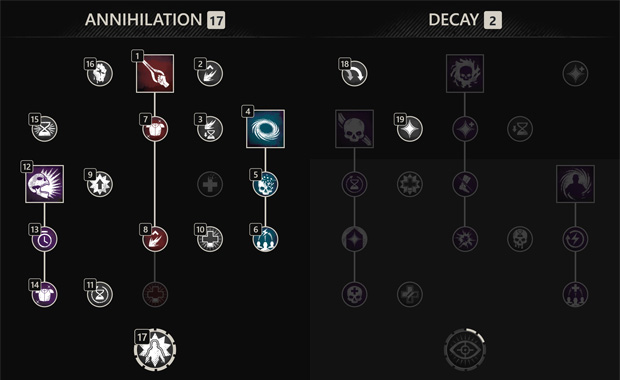
Targeted Healing
This build can be used to heal groups near point, but it is better for more niche groups such as a kill squad or a Dex group.
 Light's Embrace — Casted heal that will have lower baseline healing than Divine Embrace, but has great
utility through Accelerating Light's Embrace and its stamina return. This should be used to top off the health bars of allies, when
the target is not below 50% health, or Divine is on cooldown.
Light's Embrace — Casted heal that will have lower baseline healing than Divine Embrace, but has great
utility through Accelerating Light's Embrace and its stamina return. This should be used to top off the health bars of allies, when
the target is not below 50% health, or Divine is on cooldown.
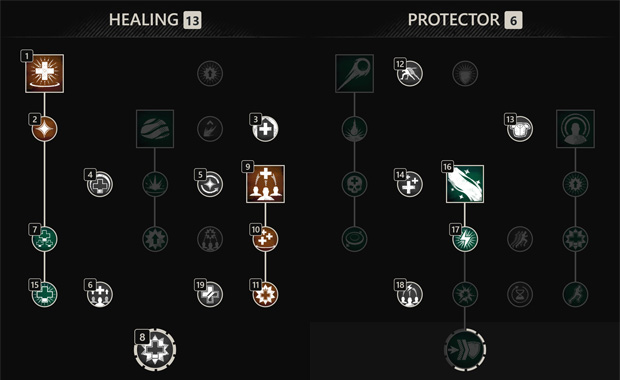
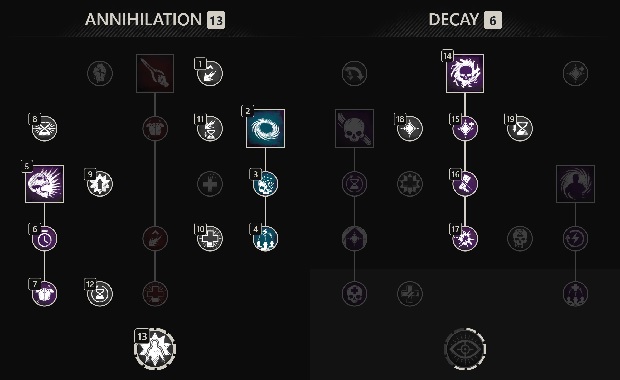
AoE Healing
This build relies on healing over time abilities to heal large groups. It is best paired with ![]() Refreshing
due to high cooldown abilities. It is best for AoE war healing (PvP) or large group open world content.
Refreshing
due to high cooldown abilities. It is best for AoE war healing (PvP) or large group open world content.
- Sacred Ground — Can be freely placed on the ground to heal large "clumps" of players where the highest
concentration of players are located. It is best to preemptively place it to counter enemy AoE damage and crowd control.
It also amplifies the healing received of any player in the zone through Anointed.
 Orb of Protection — Projectile that is aimed at friendly players and provides a small burst of healing
with long healing over time effects and a 10% fortify to reduce damage taken. Aim this on the most concentrated "clumps" of
players to provide a long-duration heal over time to large groups. The more players with the heal will increase
the amount of times you will receive Mending Protection.
Orb of Protection — Projectile that is aimed at friendly players and provides a small burst of healing
with long healing over time effects and a 10% fortify to reduce damage taken. Aim this on the most concentrated "clumps" of
players to provide a long-duration heal over time to large groups. The more players with the heal will increase
the amount of times you will receive Mending Protection.- Beacon — Projectile that is aimed and will stick to the first player or surface it touches.
This can be used on the ground when large damage is occurring, but it is best placed on front-line melee players
so that the healing area continues to move to the action.
Splash Healing
![]() Splash of Light is a very interesting ability. It has 100m range, but it also does not require line of sight.
The problem is that you are locked into an animation that makes you very vulnerable. It can be an effective option when
you have a group that will be very spread out, or it can be used when playing inside of a Fort and it is easy to lose
track of group members.
Splash of Light is a very interesting ability. It has 100m range, but it also does not require line of sight.
The problem is that you are locked into an animation that makes you very vulnerable. It can be an effective option when
you have a group that will be very spread out, or it can be used when playing inside of a Fort and it is easy to lose
track of group members.
Group Only
This build can be an effective option for groups that are playing in light armor and who are highly mobile. It can also be an option if you want to dedicate all of your healing to your dedicated group.
AoE Splash
This build can be great for when you are tasked with healing a group, such as a Dex group, that is not playing near you. This allows you to then still contribute fantastic AoE healing to point groups.
PvE Healing
In PvE you will be using healing over time so that you can swap to your Void Gauntlet more often
and deal damage in order to push content faster. Also, note that you should not take ![]() Sacred Protection
because it increases threat generation and you do not need the healing increase. You can also take
Sacred Protection
because it increases threat generation and you do not need the healing increase. You can also take
![]() Mending Touch instead of
Mending Touch instead of ![]() Enchanted Justice.
Enchanted Justice.
Life Staff Secondary Weapons
The Life Staff secondary weapons provide more options for healing and group utility, or options for survival through defensiveness and mobility.
Rapier (PvP)

Rapier is the premier PvP secondary as it offers defensiveness and mobility with all of its abilities
to help escape enemies and reposition. ![]() Riposte will stun targets and completely block and incoming attack.
Riposte will stun targets and completely block and incoming attack.
![]() Evade allows for dodging abilities, a quick invulnerability frame, and a way to get haste and stamina back.
Evade allows for dodging abilities, a quick invulnerability frame, and a way to get haste and stamina back.
![]() Fleche dashes a far distance to escape and quickly reposition.
Fleche dashes a far distance to escape and quickly reposition.
Void Gauntlet
Void Gauntlet offers healing over time and burst healing through ![]() Orb of Decay. It allows you to root
enemies in place with
Orb of Decay. It allows you to root
enemies in place with ![]() Petrifying Scream for defensive utility and to set up kills for teammates. You can also use
Petrifying Scream for defensive utility and to set up kills for teammates. You can also use ![]() Oblivion
to increase damage output, stamina and mana regeneration, and remove enemy buffs.
Oblivion
to increase damage output, stamina and mana regeneration, and remove enemy buffs.
M3 Blade (PvE)
This is the best option for speedrun attempts in M3 expeditions. It will allow you to pair it with a healing over time build and maximize your ability to contribute damage.
PvP
This can be used if you prefer the Void Gauntlet as a PvP secondary instead of the Rapier.
Life Staff Attributes
100 Constitution will be your baseline for all types of healing in both PvP and PvE. It gives you enough defensiveness while still maintaining great healing output. The additional points from higher gearscore sets can go into Focus for increased healing, or Constitution for more survivability. When PvP AoE healing, you can go as low as 5 Constitution to offer more healing output by putting more points into Focus, but that's truly once you master the art of healing!
Life Staff Important Perks
This section restricts itself to the important perks of Life Staff. For a complete rundown, please read our dedicated guide:
Ability Perks
- Refreshing Divine Embrace (Weapon) — When using a targeted
healing build be sure that this perk is on a life staff for maximum value.
- Mending Protection (Weapon/Armor) — When AoE healing, this is
best placed on your life staff for more healing output. But when using a
targeted build, the healing increase is not as valuable as cooldown reduction
from Refreshing Divine Embrace.
- Keen Beacon (Armor) — This provides free critical chance to
all players being healed by your beacon. It offers great utility if able to fit
it into an AoE healing gear setup.
Weapon Perks
 Blessed — This perk is NECESSARY for healing. It is one of
the only weapon perks that improves healing output.
Blessed — This perk is NECESSARY for healing. It is one of
the only weapon perks that improves healing output. Refreshing Move — This is the most optimal third perk in
addition to an ability perk ( Refreshing Divine Embrace or
Mending Protection) and Blessed. This provides a large amount of
cooldown reduction in addition to
Refreshing Move — This is the most optimal third perk in
addition to an ability perk ( Refreshing Divine Embrace or
Mending Protection) and Blessed. This provides a large amount of
cooldown reduction in addition to  Revitalize when light attacking.
PvP Perks
 Health — This provides free damage reduction against all sources and is one of the most beneficial PvP options.
- Shirking Heals — Incredible source of self-healing and allows for great survivability regardless of build.
 Shirking Fortification — Can be a great complement to Shirking Heals. Will add increased armor to
improve overall defensiveness.
Shirking Fortification — Can be a great complement to Shirking Heals. Will add increased armor to
improve overall defensiveness. Freedom — This will allow you to play more aggressively by reducing the duration of crowd-control. You should
play with 4 stacks.
Freedom — This will allow you to play more aggressively by reducing the duration of crowd-control. You should
play with 4 stacks. Elemental Aversion — Use this perk for elemental damage reduction from weapons like the Fire Staff.
 Enchanted Ward — This perk reduces the damage of light and heavy attacks - very useful for both PvE and PvP situations.
- Refreshing — This can be an optional third perk when you want a source of cooldown reduction in your build.
PvE Perks
- Elemental Aversion — This perk is a viable alternative in PvP
as well, but it is overshadowed by other PvP options. It provides great defense
in mutated expeditions to help mitigate magical effects.
- Enchanted Ward — This perk reduces the damage of light and heavy attacks -
very useful for both PvE and PvP situations.
- Refreshing — This can be an optional third perk when you want a source of
cooldown reduction in your build.
Jewelry Perks
Amulet
- Health — This is the standard pick for all builds, it is free
health that will add to the defensiveness of your kit.
 Stamina Recovery — This is a backpocket save when being
focused and taking heavy damage. You will receive a burst of stamina that will
allow you to potentially get a quick dodge that can save your life and continue
the fight.
Stamina Recovery — This is a backpocket save when being
focused and taking heavy damage. You will receive a burst of stamina that will
allow you to potentially get a quick dodge that can save your life and continue
the fight. Thrust Protection — This acts as a third perk option that
provides more defensiveness against Bows, Muskets,
Blunderbusses, Spears, and Rapiers.
Thrust Protection — This acts as a third perk option that
provides more defensiveness against Bows, Muskets,
Blunderbusses, Spears, and Rapiers. Slash Protection — This acts as a third perk slot that
provides more defensiveness against Greatswords,
Great Axes, Hatchets, and
Swords.
Slash Protection — This acts as a third perk slot that
provides more defensiveness against Greatswords,
Great Axes, Hatchets, and
Swords.
Ring
- Sacred — This perk functions similarly to Blessed. It
is one of the only ring perks that will result in a healing output increase.
This should be the main perk you are searching for on a ring. You NEED this perk if you are a healer.
- Hearty — This provides an increase to your stamina cap, making it a
high priority for all builds. You NEED this perk if you are a healer.
 Healing Breeze — This will act as free additional healing
over time that should be added in any build.
Healing Breeze — This will act as free additional healing
over time that should be added in any build.- Purifying — This can be an alternative option that will allow
you to have some self healing.
- Blessed
- Refreshing
Earring
Artifacts
Weapon
The ![]() Heceta Life Staff artifact has always been considered the best option when it comes to healing with this weapon - until recently. The
Heceta Life Staff artifact has always been considered the best option when it comes to healing with this weapon - until recently. The ![]() Vengeance Life Staff has recently been reworked
and is now a viable option for healing buildings. Regardless of which artifact you are using, it's important to ensure you spam Heavy attacks on your group members as your cooldowns are up to maximize the buffs on them.
Keep in mind that you likely are one of the most important members of your team if you are the healer - your job is to keep the team alive, so be sure you are constantly healing (even if your abilities are on cooldown)!
Vengeance Life Staff has recently been reworked
and is now a viable option for healing buildings. Regardless of which artifact you are using, it's important to ensure you spam Heavy attacks on your group members as your cooldowns are up to maximize the buffs on them.
Keep in mind that you likely are one of the most important members of your team if you are the healer - your job is to keep the team alive, so be sure you are constantly healing (even if your abilities are on cooldown)!
Armor
Jewelry
Life Staff Heartrune
Stoneform
![]() Minor Heartrune of Stoneform is the most defensive and useful option a
healer has. It allows you to freely break out of crowd control effects, become
immune to stagger, and obtain defensive buffs. There are three viable upgrade
options:
Minor Heartrune of Stoneform is the most defensive and useful option a
healer has. It allows you to freely break out of crowd control effects, become
immune to stagger, and obtain defensive buffs. There are three viable upgrade
options:
![]() Stalwart Heartrune of Stoneform is the best pick as it not
only gives a 10% Fortify, but a healing over time effect as well. This
is our best option after the changes to Fortify in Season One.
Stalwart Heartrune of Stoneform is the best pick as it not
only gives a 10% Fortify, but a healing over time effect as well. This
is our best option after the changes to Fortify in Season One.
Life Staff Stoneform Usage Tips
Stoneform is best used as an anti-cc button. Try your best to save this for moments where you have been stunned, rooted, or about to be knocked down, so that you can escape.
While this does provide a hefty defensive buff. The most important piece of it is being predictive. Use it proactively before abilities like ![]() Shockwave or
Shockwave or ![]() Petrifying Scream since
it prevents you from being CC'd or staggered. This is also great for pushing through doors to get into fort, or other choke points. The same logic should be applied in PvE to various mechanics
that may stun or root you.
Petrifying Scream since
it prevents you from being CC'd or staggered. This is also great for pushing through doors to get into fort, or other choke points. The same logic should be applied in PvE to various mechanics
that may stun or root you.
Do not waste Stoneform by holding it too long. While it is a valuable cooldown, heartrunes charge extremely fast for healers. All of the healing we do charges the heartrune, so it is great if you can spread your heals to many allies to get maximum charge. Use it when you feel it can be useful. Do not waste a life by not using it.
PvE
In PvE, you can still use ![]() Stalwart Heartrune of Stoneform, but it is more optimal to focus on damage output. As such, you could use
Stalwart Heartrune of Stoneform, but it is more optimal to focus on damage output. As such, you could use
![]() Brutal Heartrune of Grasping Vines to keep enemies clumped and apply a rend, or use
Brutal Heartrune of Grasping Vines to keep enemies clumped and apply a rend, or use ![]() Brutal Heartrune of Detonate for free damage.
Brutal Heartrune of Detonate for free damage.
Gems and Consumables
Gems
For more detailed information on how to properly use Gems in your Life Staff build, please refer to the our Life Staff Gems guide.
Weapon Gems
In any weapon that you heal with you will be using ![]() Cut Pristine Diamond. This includes Life Staffs and
Void Gauntlets.
Cut Pristine Diamond. This includes Life Staffs and
Void Gauntlets.
If you are wanting to increase the damage scaling of a secondary weapon, use ![]() Cut Pristine Amber if you are completely Focus scaling. If you
are hybrid scaling (You have some dedicated points into a weapons primary scaling attributes and some Focus) it is better in most cases to just use
Cut Pristine Amber if you are completely Focus scaling. If you
are hybrid scaling (You have some dedicated points into a weapons primary scaling attributes and some Focus) it is better in most cases to just use
![]() Cut Flawed Amber.
Cut Flawed Amber.
PvP Gems
In PvP it is most effective to have an even resistance split, and then dedicate additional defensiveness to Thrust through an amulet perk
like ![]() Thrust Protection. To achieve an even resistance split you can use either of the following gem setups:
Thrust Protection. To achieve an even resistance split you can use either of the following gem setups:
 Cut Pristine Onyx x4 &
  Cut Pristine Opal x4
 Cut Pristine Diamond x4 &
  Cut Pristine Malachite x4
PvE Gems
In PvE combat, more specifically mutators, elemental resistance is the main concern. You can use the following gems in your gear:
- Elemental Resistance Gem x8 (Based on mutator elemental effect) + Amulet Protection Perk (Based on mutator elemental effect)
Consumables
For more information on how to manage your cooldown hotbar, what consumables to use, what foods should be eaten, or tips on how to be more effective with your consumables in PvP and PvE, please refer to our Life Staff Consumables guide.
Life Staff Rotation and Gameplay
Healing in New World is very situational and dependent on cooldown usage. It
is valuable to know when to hold a cooldown to prepare for windows of high
damage, or when to not hold a cooldown and use it because it will come back
before it is needed again. When in doubt, shorter cooldowns, such as
![]() Orb of Protection can be used liberally due to the long buff durations it
provides and small burst healing potential.
Orb of Protection can be used liberally due to the long buff durations it
provides and small burst healing potential. ![]() Divine Embrace is similar
but should be used with more caution as anyone can receive a large amount of
damage in an instant. While this cooldown is still low and can be used more
freely, be aware of the situation and acknowledge the fact that a fight may be
coming soon. If anyone is ever below 50%, always use this ability since
Divine Embrace is similar
but should be used with more caution as anyone can receive a large amount of
damage in an instant. While this cooldown is still low and can be used more
freely, be aware of the situation and acknowledge the fact that a fight may be
coming soon. If anyone is ever below 50%, always use this ability since
![]() Refreshing Divine Embrace will reset its cooldown. For cooldowns such as
Refreshing Divine Embrace will reset its cooldown. For cooldowns such as
![]() Sacred Ground and
Sacred Ground and ![]() Beacon, try to save these for large group
fights or high damage output situations to ensure survival. These are cooldowns
that are necessary to have and can be detrimental to your team's survival if
they are down when a fight is starting.
Beacon, try to save these for large group
fights or high damage output situations to ensure survival. These are cooldowns
that are necessary to have and can be detrimental to your team's survival if
they are down when a fight is starting.
Buff management is another high priority skill. As a healer, you must
maintain ![]() Bend Light by dodging to refresh its duration to receive a
healing effectiveness increase. If you select
Bend Light by dodging to refresh its duration to receive a
healing effectiveness increase. If you select ![]() Intensify ensure this is
maintained before using any abilities to result in the largest amount of
healing possible. Keep an eye on your buffs above your health bar, and when
possible, make sure these buffs do not fall off.
Intensify ensure this is
maintained before using any abilities to result in the largest amount of
healing possible. Keep an eye on your buffs above your health bar, and when
possible, make sure these buffs do not fall off.
The theoretical healing rotation for the most healing output is as follows.
- (If chosen)Heavy attack x3 to build
 Intensify stacks.
 - Dodge to receive
 Bend Light
 - Cast Orb of Protection to obtain the Mending Protection buff.
- Cast Sacred Ground to increase the target's healing received through Anointed.
- (If chosen)Cast Beacon at the location of your Sacred Ground.
- (If chosen)Cast Divine Embrace to burst heal any party member who continues to lose significant health.
- Light attack as a filler ability when cooldowns are not up, or not needed, this provides healing through
 Blissful Touch.
 - Repeat.
This rotation will change dependent on the build you are playing. For more specific rotations please refer to our PvP Builds and PvE Builds:
For more information, about Life Staff abilities, we have a dedicated guide that goes through every single ability in great detail:
ABC
Always Be Clicking: Always light attack and only stop when you
absolutely have to. Light attacks result in so much free healing from
![]() Blissful Touch and cooldown reduction from
Blissful Touch and cooldown reduction from ![]() Revitalize and
Revitalize and
![]() Refreshing Move. This is also another great way to freely charge your
heartrune.
Refreshing Move. This is also another great way to freely charge your
heartrune.
Pre-Casting and Cancel Casting
You can begin casting an ability like ![]() Divine Embrace and successfully
pre-cast the ability right before damage goes out onto an ally. It may not look
like there health bar goes up and down, but if done properly your cast will
completely negate the received damage.
Divine Embrace and successfully
pre-cast the ability right before damage goes out onto an ally. It may not look
like there health bar goes up and down, but if done properly your cast will
completely negate the received damage.
You can also begin casts while waiting for an ally to take damage to try and predict incoming damage spikes. If the damage does not come, it is helpful to block right as the ability is about to be casted to completely cancel the cast. Then begin another pre-cast to make sure you are ready for the incoming damage.
Mid-cast Target Swapping
When casting something like ![]() Divine Embrace you can swap the target
that is being focused on using a keybind or the scroll wheel. When the cast
finishes, it will cast the heal on whoever is targeted last, not who is
targeted first. So, if done correctly, you can redirect healing to the target
who needs it the most in an instant.
Divine Embrace you can swap the target
that is being focused on using a keybind or the scroll wheel. When the cast
finishes, it will cast the heal on whoever is targeted last, not who is
targeted first. So, if done correctly, you can redirect healing to the target
who needs it the most in an instant.
Targeted Healing
One of the best things you can do as a healer is practice with targeted keybinds right away. Determine what works best for you, but having targeted keybinds will improve your healing immensely. This offers an extremely efficient method of healing once you have practiced it. To optimize targeted casts you will want to first hit the keybind for your respective ability, then hit the keybind of the player in need of healing. This will eliminate any awkward scroll healing and does not require you to have to left click to confirm any heals.
Self Healing
Make sure that you set a key-bind in your settings that acts as a self-healing modifier. To properly use this first hold whatever key is bound, then hit the ability you are wanting to cast, and then it will cast on yourself. This removes any need to ever have a keybind for Party Member 1. You are always the first member of the party, therefore if you have a self heal keybind, you do not need to worry about a Party Member 1 Bind. If you do not bind a self heal modifier, then you will need to keep the Party Member bind.
Rapier Usage
![]() Riposte is an extremely valuable cooldown. Your instincts will tell
you to pop it as soon as there is trouble. Think before you use it. Just
because are getting caught in a
Riposte is an extremely valuable cooldown. Your instincts will tell
you to pop it as soon as there is trouble. Think before you use it. Just
because are getting caught in a ![]() Gravity Well or a
Gravity Well or a ![]() Shockwave is
incoming does not mean you have to use this cooldown. You can simply
Shockwave is
incoming does not mean you have to use this cooldown. You can simply
![]() Evade to get out of something like a Gravity Well. For Shockwave and
other stuns you can just block or dodge. When in doubt, it is better to use
evade first and see if that gets you out of danger, then resort to
repositioning, then your last ditch effort should be Riposte.
Evade to get out of something like a Gravity Well. For Shockwave and
other stuns you can just block or dodge. When in doubt, it is better to use
evade first and see if that gets you out of danger, then resort to
repositioning, then your last ditch effort should be Riposte.
Repositioning is an incredibly powerful tool in PvP healing, and making sure
that you use ![]() Fleche to do so is important. When possible, use your
abilities and maintain your position, keep your eyes open and ready for a
future push. Use Fleche to quickly cover ground, or to confuse enemies and
change direction. This is great when combined with
Fleche to do so is important. When possible, use your
abilities and maintain your position, keep your eyes open and ready for a
future push. Use Fleche to quickly cover ground, or to confuse enemies and
change direction. This is great when combined with ![]() Refreshing Fleche.
When using this perk, try to just narrowly clip the back of enemies when using
the ability to potentially get a huge reset on your cooldown.
Refreshing Fleche.
When using this perk, try to just narrowly clip the back of enemies when using
the ability to potentially get a huge reset on your cooldown.
![]() Evade is much stronger than most believe. While it did receive a
nerf and only provides stamina after dodging an attack, this ability is a
strong defensive tool. When being attacked you can use it to receive a quick
invulnerability frame and avoid damage, return stamina, and receive a haste
buff. It is exceptional when trying to confuse incoming enemies, a clever evade
can misdirect an attacker and offer you a route to escape.
Evade is much stronger than most believe. While it did receive a
nerf and only provides stamina after dodging an attack, this ability is a
strong defensive tool. When being attacked you can use it to receive a quick
invulnerability frame and avoid damage, return stamina, and receive a haste
buff. It is exceptional when trying to confuse incoming enemies, a clever evade
can misdirect an attacker and offer you a route to escape.
Void Gauntlet Usage
![]() Orb of Decay has incredible healing potential when used correctly.
Whenever possible, aim this ability toward the largest clump of allies and
enemies. On the way out it will deal damage, apply a DoT, and rend the targets
(If enough are hit it can activate
Orb of Decay has incredible healing potential when used correctly.
Whenever possible, aim this ability toward the largest clump of allies and
enemies. On the way out it will deal damage, apply a DoT, and rend the targets
(If enough are hit it can activate ![]() Voidcaller for additional healing).
On the way back it will provide a large healing over time effect to any ally it
passes through. If timed correctly, the ability can be reactivated to explode
the orb and give an additional burst heal. To be the most efficient, try to
"pop" your orb right as it passes through your targets so that they receive a
heal over time and a quick burst heal.
Voidcaller for additional healing).
On the way back it will provide a large healing over time effect to any ally it
passes through. If timed correctly, the ability can be reactivated to explode
the orb and give an additional burst heal. To be the most efficient, try to
"pop" your orb right as it passes through your targets so that they receive a
heal over time and a quick burst heal.
![]() Petrifying Scream is your primary defensive peel. This ability is
easy to predict, so be smart with using it. Often times Void Gauntlet healers
will swap to the weapon as soon as they are being swarmed by enemies and the
first instinct is to use Scream. Most players can predict that. Try to add some
confusion. It may be best to dodge in a direction first and place a
Petrifying Scream is your primary defensive peel. This ability is
easy to predict, so be smart with using it. Often times Void Gauntlet healers
will swap to the weapon as soon as they are being swarmed by enemies and the
first instinct is to use Scream. Most players can predict that. Try to add some
confusion. It may be best to dodge in a direction first and place a
![]() Oblivion to provide stamina regeneration and then throw after your
enemy has dodged or exhausted themselves. If you cast a different ability
before Scream, they may try to predict it and preemptively avoid the ability.
If you then immediately follow up with a Scream you may bait them and catch
them off guard. This ability also provides a large fortify buff so use that to
your defensive advantage.
Oblivion to provide stamina regeneration and then throw after your
enemy has dodged or exhausted themselves. If you cast a different ability
before Scream, they may try to predict it and preemptively avoid the ability.
If you then immediately follow up with a Scream you may bait them and catch
them off guard. This ability also provides a large fortify buff so use that to
your defensive advantage.
Void Gauntlet has many self-healing components. ![]() Orb of Decay can give
you a heal over time or a burst heal, but also keep in mind the passives in the
skill tree. Whenever your Void Gauntlet critically hits you will receive some
healing based on the damage. But most importantly, if you are max mana and
dodge with your Void Gauntlet out you will get a significant amount of health
every 30 seconds. Use this to your advantage!
Orb of Decay can give
you a heal over time or a burst heal, but also keep in mind the passives in the
skill tree. Whenever your Void Gauntlet critically hits you will receive some
healing based on the damage. But most importantly, if you are max mana and
dodge with your Void Gauntlet out you will get a significant amount of health
every 30 seconds. Use this to your advantage!
In windows of down time, feel free to block while using your Void Gauntlet to restore mana and receive cooldown reduction for your Void Gauntlet abilities.
![]() Voidcaller is a very strong ultimate when used properly. A total of
6 targets must be hit by an ability such as
Voidcaller is a very strong ultimate when used properly. A total of
6 targets must be hit by an ability such as ![]() Petrifying Scream or
Petrifying Scream or
![]() Orb of Decay. When aiming at large groups of enemie, or if you pop Orb on
a few targets during its damage phase, this will cause a large damage and
healing circle to spin around you lasting 6 seconds. This heal will tick allies
for similar amounts as a
Orb of Decay. When aiming at large groups of enemie, or if you pop Orb on
a few targets during its damage phase, this will cause a large damage and
healing circle to spin around you lasting 6 seconds. This heal will tick allies
for similar amounts as a ![]() Beacon would. If combined with all other AoE
heals, this can be an effective way to provide allies with significant burst.
Also, if you weapon swap while this is active it will drop onto the ground and
function as if it were like a
Beacon would. If combined with all other AoE
heals, this can be an effective way to provide allies with significant burst.
Also, if you weapon swap while this is active it will drop onto the ground and
function as if it were like a ![]() Sacred Ground
Sacred Ground
Abilitiy Specific Gameplay
Divine Embrace Usage
When using this ability the main point of focus is
![]() Refreshing Divine Embrace and making sure it is on your weapon. When
casting this on an ally you want to prioritize using it on someone who is below
50% health so you can get an almost instant reset and have it available. Do
your best to not use this to top off health bars. It may be advantageous to
delay a heal on a teammate when you know there is more damage incoming so that
you can get a proper reset. This is one of your largest burst heal options and
should be used in moments of high damage.
Refreshing Divine Embrace and making sure it is on your weapon. When
casting this on an ally you want to prioritize using it on someone who is below
50% health so you can get an almost instant reset and have it available. Do
your best to not use this to top off health bars. It may be advantageous to
delay a heal on a teammate when you know there is more damage incoming so that
you can get a proper reset. This is one of your largest burst heal options and
should be used in moments of high damage.
Sacred Ground Usage
This can be used multiple different ways, the most common is in AoE clump
fighting or when you have allies stacked together. This ability has the largest
AoE output in the game. It is great to place this on points, on bosses, or on
top of enemy abilities--like ![]() Gravity Well. It can also be used in single
target scenarios to increase the incoming healing of that target through
Gravity Well. It can also be used in single
target scenarios to increase the incoming healing of that target through
![]() Anointed. Typically this ability will be one of the first ones you
place down so that the rest of your follow-up healing is more effective.
Anointed. Typically this ability will be one of the first ones you
place down so that the rest of your follow-up healing is more effective.
Safe Splash of Light Usage
The clap animation from ![]() Splash of Light makes you a vulnerable target
if used at inopportune times. When used, you will take on the role of a
cheerleader and clap your hands above your head. This locks you into your
animation and you cannot cancel it. This makes it easy to be CC'd and killed.
When choosing to use this ability make sure you are in a safe location and that
your allies are within 100 meters. Try your best to not use this with enemies
in your face unless it is an emergency.
Splash of Light makes you a vulnerable target
if used at inopportune times. When used, you will take on the role of a
cheerleader and clap your hands above your head. This locks you into your
animation and you cannot cancel it. This makes it easy to be CC'd and killed.
When choosing to use this ability make sure you are in a safe location and that
your allies are within 100 meters. Try your best to not use this with enemies
in your face unless it is an emergency.
Orb of Protection Usage
When using this ability it is one that can be used rather freely. It has a
low cooldown, resets fast, and applies a very long set of buffs to the target.
All of the buffs it provides are longer than the cooldown of the ability,
meaning it can be used on as many targets as possible to continue maintaining the
long heal over time and fortify effects. Try to get this on as many targets as
possible so that you can increase your up time on ![]() Mending Protection.
Additionally, make sure to prioritize casting this on your allies. Whenever
someone is healed by it you will also receive the healing over time effect and
fortify. As such, only when you have no other option for survival should you
cast it on your own feet.
Mending Protection.
Additionally, make sure to prioritize casting this on your allies. Whenever
someone is healed by it you will also receive the healing over time effect and
fortify. As such, only when you have no other option for survival should you
cast it on your own feet.
Lights Embrace Usage
This ability has incredible healing potential due to its scaling effect with
Life Staff buffs and it applying even when the buffs derive from other Life
Staffs. It has an incredibly low cooldown which makes it able to be casted much
more than ![]() Divine Embrace without being punished. As such, use this to
heal allies even when slight amounts of health are gone. As long as health is
restored the target will receive the
Divine Embrace without being punished. As such, use this to
heal allies even when slight amounts of health are gone. As long as health is
restored the target will receive the ![]() Accelerating Light's Embrace haste
buff, and receive 15 stamina back. Otherwise, be sure to have this ready for
large bursts of damage on your allies. If you cast
Accelerating Light's Embrace haste
buff, and receive 15 stamina back. Otherwise, be sure to have this ready for
large bursts of damage on your allies. If you cast ![]() Divine Embrace and
miss the chance of the reset through
Divine Embrace and
miss the chance of the reset through ![]() Refreshing Divine Embrace, you are
able to immediately follow it up with Light's Embrace. This rotation of
alternating casted healing abilities should allow for one to be up continuously
to offer repeated burst healing. Having two strong casted heals like this also
allows for you to maintain multiple targets at once in an outnumbered fight in
addition to keeping yourself alive in a pinch.
Refreshing Divine Embrace, you are
able to immediately follow it up with Light's Embrace. This rotation of
alternating casted healing abilities should allow for one to be up continuously
to offer repeated burst healing. Having two strong casted heals like this also
allows for you to maintain multiple targets at once in an outnumbered fight in
addition to keeping yourself alive in a pinch.
Beacon Usage
When used in combination with ![]() Sacred Ground this will produce the
most potent AoE healing that New World has to offer. Only use this ability if
you are choosing to be in an AoE healing build that maximizes
Sacred Ground this will produce the
most potent AoE healing that New World has to offer. Only use this ability if
you are choosing to be in an AoE healing build that maximizes
![]() Refreshing. Or if you are in PvE combat and can reliably light
attack a single target. Be careful when using this ability. While it can be
extremely beneficial to stick it to an ally, this can result in missed skill
shots and the Beacon projectile ends up out of range and unusable. If you are
not confident in your ability to hit your ally feel free to stick it to the
ground on a point, a doorway, or on top of a
Refreshing. Or if you are in PvE combat and can reliably light
attack a single target. Be careful when using this ability. While it can be
extremely beneficial to stick it to an ally, this can result in missed skill
shots and the Beacon projectile ends up out of range and unusable. If you are
not confident in your ability to hit your ally feel free to stick it to the
ground on a point, a doorway, or on top of a ![]() Sacred Ground. This is a
long cooldown so it is punishing when it is wasted.
Sacred Ground. This is a
long cooldown so it is punishing when it is wasted.
Life Staff FAQ
Intensify or No Intensify?
In many healing builds you can stray off of the suggested skill trees and opt to take ![]() Intensify. While this does
increase overall healing, it does result in a missed healing opportunity, lack of cooldown reduction, and more margin for error.
In the time it takes to land three heavy attacks on enemies to properly stack the buff, you can most definitely get 4-5 light attacks
off. These light attacks will trigger
Intensify. While this does
increase overall healing, it does result in a missed healing opportunity, lack of cooldown reduction, and more margin for error.
In the time it takes to land three heavy attacks on enemies to properly stack the buff, you can most definitely get 4-5 light attacks
off. These light attacks will trigger ![]() Revitalize for cooldown reduction if they hit an enemy, and additionally they
will offer a large amount of healing as you shoot through allies with
Revitalize for cooldown reduction if they hit an enemy, and additionally they
will offer a large amount of healing as you shoot through allies with ![]() Blissful Touch. Furthermore, if you ever miss a
heavy attack it simply wastes time, and if you ever swap weapons the buff completely drops. In all, it is easier and more effective
in most cases to just avoid taking this and opt for a skill with more consistent value.
Blissful Touch. Furthermore, if you ever miss a
heavy attack it simply wastes time, and if you ever swap weapons the buff completely drops. In all, it is easier and more effective
in most cases to just avoid taking this and opt for a skill with more consistent value.
Can I Cast Two Sacred Grounds or Two Beacons at the Same Time?
If you have your ![]() Beacon come off cooldown while one is still active the first beacon will disappear. This is not the case for
Beacon come off cooldown while one is still active the first beacon will disappear. This is not the case for ![]() Sacred Ground. Two of these
can be out at the same time.
Sacred Ground. Two of these
can be out at the same time.
Is Divine Blessing Necessary?
While weapon ultimate abilities are very strong. In some cases it is unnecessary to push for ![]() Divine Blessing due to suboptimal skills being in the way.
In any
Divine Blessing due to suboptimal skills being in the way.
In any ![]() Divine Embrace build you can easily pick this up. But for AoE healing builds or
Divine Embrace build you can easily pick this up. But for AoE healing builds or ![]() Light's Embrace builds you will be forced to take something like
Light's Embrace builds you will be forced to take something like
![]() Enchanted Justice, this skill in combination with needing to take
Enchanted Justice, this skill in combination with needing to take ![]() Intensify to reach the ultimate is just outweighed by other skill choices. So, no you
do not always need this skill.
Intensify to reach the ultimate is just outweighed by other skill choices. So, no you
do not always need this skill.
Do I Need 200 Constitution?
Most simply put, no you do not NEED it. But this is the standard PvP setup and it is great for mitigating heavy burst damage. In this build I would not go under 150 Constitution. Wanting more healing output to increase scoreboard position is not the point of this build. Save that for the AoE healers.
It Is Okay to Not Hit Players?
In PvP there are plenty of objects and structures that you can light attack, such as: Target Dummies, Doors, Turrets, and War Horns, that will still trigger
skills and perks like ![]() Revitalize and
Revitalize and ![]() Refreshing Move. Once again, you can also charge your heartrune easily with this.
Refreshing Move. Once again, you can also charge your heartrune easily with this.
Does Leaderboard Matter?
If you are a healer and you are concerned about low position on the War leaderboard, or you are proud of your top healing position, go back and take a look at how your group performed. Healing in general, and especially in this build, is not leaderboard focused. Some of the best healers do the least healing in a PvP environment. Just because people pad numbers does not mean that they are the best healer. Focus on saving lives, communicating properly, and seeing how many kills you can help your teammates get.
Do I Have to Use Void Gauntlet in PvE?
You never have to use any weapon if you do not wish to. Void Gauntlet is the only weapon that offers another way to heal and multiple utility options to help with damage output and survivability.
Can I use Void Blade?
Void Blade healing is great for pushing speed runs and acting like a pseudo
fourth DPS in PvE. It is not recommended in PvP. Make sure you put out all your
heals over time and then pump out as much damage as you can. If done correctly,
you can time this with ![]() Voidcaller availability to heal while you are
doing damage. You can then combine this with
Voidcaller availability to heal while you are
doing damage. You can then combine this with ![]() Essence Rupture to continue
resetting its cooldown and healing the party strictly with your Void Gauntlet
out!
Essence Rupture to continue
resetting its cooldown and healing the party strictly with your Void Gauntlet
out!
Changelog
- 08 Aug. 2025 (this page): Guide updated with additional perk suggestions for healer builds.
- 27 Jun. 2025 (this page): Guide updated with additional artifact and build suggestions.
- 23 Jan. 2025 (this page): Guide updated with season 7 updates.
- 19 Nov. 2024 (this page): Guide updated with Life Staff artifact and best practices.
- 14 Oct. 2024 (gems page): Guide updated for expansion.
- 22 Oct. 2023 (PvP builds page): Guide updated for expansion.
- 22 Oct. 2023 (PvE builds page): Guide updated for expansion.
- 22 Oct. 2023 (gems page): Guide updated for expansion.
- 22 Oct. 2023 (perks page): Guide updated for expansion.
- 22 Oct. 2023 (abilities page): Guide updated for expansion.
- 22 Oct. 2023 (this page): Guide updated for expansion.
- 28 Mar. 2023 (PvP builds page): Updated builds for Season One.
- 28 Mar. 2023 (PvE builds page): Updated builds for Season One.
- 28 Mar. 2023 (gems page): Updated PvE and PvP resistances.
- 28 Mar. 2023 (perks page): Updated perk tier placements for Season One.
- 28 Mar. 2023 (this page): Updated builds, perks, heartrune, and gems.
- 18 Jan. 2023 (PvP builds page): Guide added.
- 18 Jan. 2023 (PvE builds page): Guide added.
- 18 Jan. 2023 (gems page): Guide added.
- 18 Jan. 2023 (perks page): Guide added.
- 18 Jan. 2023 (abilities page): Guide added.
- 18 Jan. 2023 (this page): Guide added.
Savvvo is a full-blown MMORPG try-hard who overthinks every build, min-maxes every stat, and theorycrafts like his life depends on it. If there’s a meta, he’s dissecting it. If there isn’t, he’s creating one.
You can take a closer look at his guides and content on YouTube.
- AMA Session with New World’s Former Lead World Designer
- New World Aeternum 2026 Roadmap Revealed
- Can New World Be Saved? Offers Are Starting to Pop Up.
- The Last Day of New World: Aeternum
- New World Server Mergers (Again)
- What Else Was Planned for New World: Aeternum?
- Global Storage Search is Now Live in New World: Aeternum
- Daggers Are Officially Live in New World: Aeternum