Life Staff Single Target Healing PvE Build for New World
The following is a PvE Pure Targeted Healing Build for Life Staff in New World. This is one of the most difficult healing builds to play and has one of the highest skill ceilings. If you can get comfortable with targeted healing and predicting dmage, you will be a dedicated group healer with the potential to completely save mutators runs when other party members take unnecessary damage or a mechanic is failed. This can also be one of the most punishing if used incorrectly due to a lack of healing over time effects. When used in synergy with a Void Gauntlet this makes for one of the strongest healing builds in all types of content.
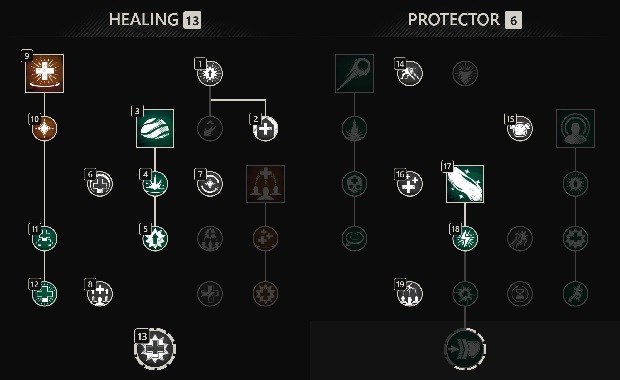
Pure Targeted Healing Build Overview
This build is one of the most difficult healing builds to play in New World
and has a high skill cap. By using ![]() Light's Embrace,
Light's Embrace,
![]() Divine Embrace, and
Divine Embrace, and ![]() Sacred Ground, you can effectively burst heal
your allies in combination with targeted keybinds to be a very potent dedicated
group healer. This build can be played in a variety of content, but it is
difficult to heal allies outside of your group if you are not used to healing
in this way. When played correctly, it is very defensive and provides unmatched
support to your team. It is best suited for players who are familiar with
expeditions and can predict burst damage windows.
Sacred Ground, you can effectively burst heal
your allies in combination with targeted keybinds to be a very potent dedicated
group healer. This build can be played in a variety of content, but it is
difficult to heal allies outside of your group if you are not used to healing
in this way. When played correctly, it is very defensive and provides unmatched
support to your team. It is best suited for players who are familiar with
expeditions and can predict burst damage windows.
Life Staff Build
Targeted Healing Build
This burst healing build is focused on 5-player groups. It is best paired with ![]() Refreshing due to lower
cooldown abilities. It offers more healing output potential through taking all points into
Refreshing due to lower
cooldown abilities. It offers more healing output potential through taking all points into ![]() Divine Embrace to contribute to partial AoE
output, or for large burst windows.
Divine Embrace to contribute to partial AoE
output, or for large burst windows. ![]() Light's Embrace can be used to instantly follow up for significant burst healing, or to top off allies
and give them stamina back and haste. In general, this build emphasizes using light attacks at all times and timing cooldowns to combat burst damage on
each group member.
Light's Embrace can be used to instantly follow up for significant burst healing, or to top off allies
and give them stamina back and haste. In general, this build emphasizes using light attacks at all times and timing cooldowns to combat burst damage on
each group member.
 Divine Embrace — Targets party members and acts as a traditionally casted burst heal.
It also has AoE opportunity through
Divine Embrace — Targets party members and acts as a traditionally casted burst heal.
It also has AoE opportunity through  Shared Struggle and
  Rebound
 Sacred Ground — Targets a player and casts a zone at their feet. This creates a healing circle
for a quick burst heal and residual healing over time. It also amplifies the healing received of any player in the zone
through
Sacred Ground — Targets a player and casts a zone at their feet. This creates a healing circle
for a quick burst heal and residual healing over time. It also amplifies the healing received of any player in the zone
through  Anointed.
 Light's Embrace — Casted heal that will have lower baseline healing than Divine Embrace, but has great
utility through Accelerating Light's Embrace and its stamina return. This should be used to top off the health bars of allies, when
the target is not below 50% health, or Divine is on cooldown.
Light's Embrace — Casted heal that will have lower baseline healing than Divine Embrace, but has great
utility through Accelerating Light's Embrace and its stamina return. This should be used to top off the health bars of allies, when
the target is not below 50% health, or Divine is on cooldown.
In general, this buff is easier to maintain in PvE combat, but the healing increase is never truly needed. In the time
it takes to land 3 heavy attacks on enemies to properly stack the buff, you can most definitely get 4-5 light attacks
off. These light attacks will trigger ![]() Revitalize for cooldown reduction if they hit an enemy, and additionally they
will offer a large amount of healing as you shoot through allies with
Revitalize for cooldown reduction if they hit an enemy, and additionally they
will offer a large amount of healing as you shoot through allies with ![]() Blissful Touch (See FAQ for more information).
Blissful Touch (See FAQ for more information).
Secondaries
In all PvE settings it is best to use the additional healing, damage, and utility of the Void Gauntlet.
Void Gauntlet (Utility)
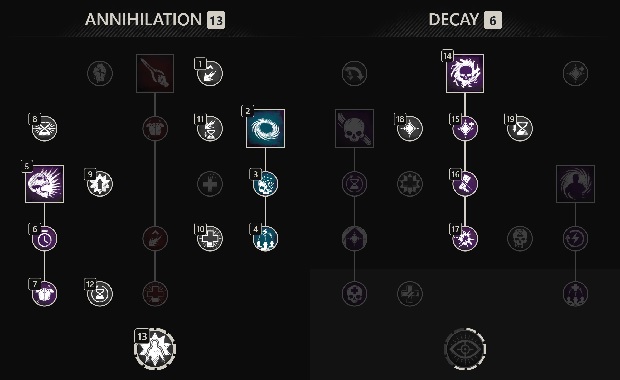
Void Gauntlet offers healing over time and burst healing through ![]() Orb of Decay, as well as, high amounts of AoE damage plus stacks of rend.
This version uses
Orb of Decay, as well as, high amounts of AoE damage plus stacks of rend.
This version uses ![]() Petrifying Scream to give you the opportunity to lock down packs of enemies for easier burst dps and defensiveness.
You can also use
Petrifying Scream to give you the opportunity to lock down packs of enemies for easier burst dps and defensiveness.
You can also use ![]() Oblivion in melee range to weaken enemies, increase stamina regen, and provide a damage bonus to party members.
Oblivion in melee range to weaken enemies, increase stamina regen, and provide a damage bonus to party members.
Void Gauntlet (Healing Output)
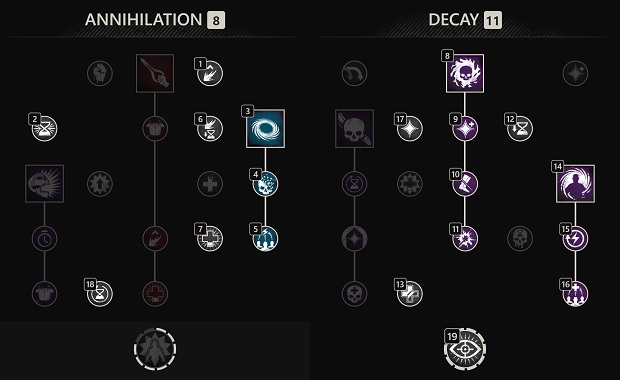
This version offers more healing output by taking advantage of cooldown reduction with ![]() Glimpse of the Void and
Glimpse of the Void and ![]() Essence Rupture to give
more overall passive healing power.
Essence Rupture to give
more overall passive healing power. ![]() Essence Rupture is essentially a leeching effect and at the end of its duration will detonate for a burst
heal that is similar to detonating
Essence Rupture is essentially a leeching effect and at the end of its duration will detonate for a burst
heal that is similar to detonating ![]() Orb of Decay. If the target is already affected by a Rupture and you place a fresh on on the target, the healing
detonation will automatically pop and then reapply the leech component.
Orb of Decay. If the target is already affected by a Rupture and you place a fresh on on the target, the healing
detonation will automatically pop and then reapply the leech component.
Attributes
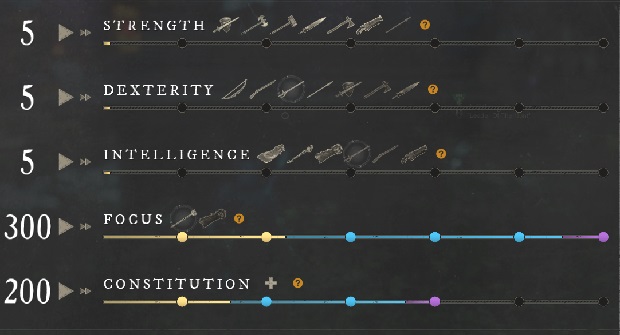
200 Constitution will be your baseline for all types of healing in both PvP and PvE. It gives you enough defensiveness while still maintaining great healing output. The additional points from higher gearscore sets can go into Focus for increased healing, or Constitution for more survivability.
Gearing
| Slot | Perks | Gem | Weight | Attribute | Source |
|---|---|---|---|---|---|
| Life Staff | - | Focus | *Dynasty or Crafted/BoE | ||
| Void Gauntlet | - | Focus | Crafted/BoE | ||
| Helmet | Light | Focus or Constitution | Crafted/BoE or TH*** | ||
| Gloves | Light | Focus or Constitution | Crafted/BoE or TH*** | ||
| Chest | Medium/Light*** | Focus or Constitution | Crafted/BoE or TH*** | ||
| Pants | Light | Focus or Constitution | Crafted/BoE or TH*** | ||
| Boots | Medium/Light*** | Focus or Constitution | Crafted/BoE | ||
| Amulet |
|
- | Focus or Constitution | Crafted/BoE | |
| Ring | - | Focus or Constitution | Crafted/BoE | ||
| Earring | - | Focus or Constitution | Crafted/BoE |
*: ![]() Glowing Lifecrystal Staff is a best in slot drop from any version
of Mutated Dynasty Shipyard or it can be crafted with Materia.
Glowing Lifecrystal Staff is a best in slot drop from any version
of Mutated Dynasty Shipyard or it can be crafted with Materia.
**: Having a Void Gauntlet with this perk setup can be flexed into PvP
content as well. While ![]() Keen Speed is not the most beneficial PvE perk it
does have a little value. If you are not concerned with flexing this, then opt
for some type of damage perk.
Keen Speed is not the most beneficial PvE perk it
does have a little value. If you are not concerned with flexing this, then opt
for some type of damage perk.
***: Tempest's Heart Expedition on any difficulty can drop
![]() Sagacious Hat,
Sagacious Hat, ![]() Sagacious Gloves,
Sagacious Gloves, ![]() Sagacious Shirt, and
Sagacious Shirt, and
![]() Sagacious Shoes, which are all essentially Best in Slot PvE drops and
have healing perks on them. This makes gearing a little awkward. The shoes are
not used because
Sagacious Shoes, which are all essentially Best in Slot PvE drops and
have healing perks on them. This makes gearing a little awkward. The shoes are
not used because ![]() Orb of Protection is not in this build. If you use the
chest piece it is a light armor weight which means you can fit one medium piece
into the build for more defensiveness. Since you are not using the pants, you
can either go with a light BiS pair that is BoE or find one that is medium
armor weight to up your resistances slightly. By grinding Tempest you can get
yourself ready for all mutators as a healer.
Orb of Protection is not in this build. If you use the
chest piece it is a light armor weight which means you can fit one medium piece
into the build for more defensiveness. Since you are not using the pants, you
can either go with a light BiS pair that is BoE or find one that is medium
armor weight to up your resistances slightly. By grinding Tempest you can get
yourself ready for all mutators as a healer.
****: Ability perks can go anywhere that you are able to fit them. These slots are just a suggestion.
*****: Using a full opal set up makes gearing standardized and eliminates the need for Ward gear. You can simply add on a relevant Protection Perk (ie: Frozen Protection) for that respective week of mutators.
Overall with PVE gearing, this is the ideal loadout of perks for a best in slot healing build. Healing is one of the easiest roles to gear for in high level mutators, but more difficult to play at times. If you simply use almost all sagacious pieces, stack elemental aversion, completely fill your gear with opals, and slot your neck for protection. You should have a high amount of defensiveness with a 200 Constitution setup.
Ward Gear
While Ward perks can offer a high level of damage reduction, these are simply not needed in the healer roll as long as you are able to dodge. If you are concerned about survivability, feel free to replace any perk for respective Ward perks for whatever expedition you are in. This will result in more PvE sets being needed instead of one general set.
Gem Optimization and Consumables
For more specific information on optimizing your gems and consumables, please refer to our dedicated Gems and Consumables guide.
Heartrune
![]() Minor Heartrune of Stoneform is the most defensive and useful option a
healer has. It allows you to freely break out of crowd control effects, become
immune to stagger, and obtain defensive buffs.
Minor Heartrune of Stoneform is the most defensive and useful option a
healer has. It allows you to freely break out of crowd control effects, become
immune to stagger, and obtain defensive buffs.
![]() Cunning Heartrune of Stoneform is the best defensive pick as it not
only gives a 10% Fortify, but also a 10% damage absorption bonus that stacks an
additional 10% per hit received (+30% max).
Cunning Heartrune of Stoneform is the best defensive pick as it not
only gives a 10% Fortify, but also a 10% damage absorption bonus that stacks an
additional 10% per hit received (+30% max).
Heartrune Usage Tips
Your Heartrune will be used similarly in PvP and PvE scenarios. As such, please refer to the Heartrune section of our Life Staff guide for tips on how it can be used most effectively.
Rotation
The theoretical healing rotation for this build is as follows:
- Dodge to receive
 Bend Light.
 - Cast Sacred Ground to increase the target's healing received through
Anointed.
- Light attack if no healing is needed. Top off health bars using
 Blissful Touch and get cooldown reduction through
  Revitalize to
maintain Sacred Ground.
Revitalize to
maintain Sacred Ground. - Prioritize using Light's Embrace if a targeted is above 50% health
and needs a signifcant heal to top them off.
- Cast Divine Embrace to burst heal any party member who continues to
lose health. Use this first if they are below 50% to make use of
Refreshing Divine Embrace.
- Light attack as a filler ability when cooldowns are not up, or not needed,
this provides healing through Blissful Touch.
- Repeat
Gameplay Tips
When using the Life Staff in PvP and PvE there are many similar nuances to a healer's mechanics and gameplay decisions. To learn more about how you can improve your gameplay, use certain secondary weapons, or additional information on specific abilities, please refer to the gameplay section of the Life Staff guide.
FAQ
For more information on the most frequently asked Life Staff questions please refer to the FAQ section of the Life Staff guide for answers on PvP and PvE topics!
Changelog
- 22 Oct. 2023: Guide updated for expansion.
- 18 Jan. 2023: Guide added.
Savvvo is a full-blown MMORPG try-hard who overthinks every build, min-maxes every stat, and theorycrafts like his life depends on it. If there’s a meta, he’s dissecting it. If there isn’t, he’s creating one.
You can take a closer look at his guides and content on YouTube.
- AMA Session with New World’s Former Lead World Designer
- New World Aeternum 2026 Roadmap Revealed
- Can New World Be Saved? Offers Are Starting to Pop Up.
- The Last Day of New World: Aeternum
- New World Server Mergers (Again)
- What Else Was Planned for New World: Aeternum?
- Global Storage Search is Now Live in New World: Aeternum
- Daggers Are Officially Live in New World: Aeternum