Purify the Corruption Zone Event Guide
Purify the Corruption is one of eight initial Zone Events spread across the world of Sanctuary in Diablo Immortal. It is one of the more approachable zones events due to not being tied to a specific timeframe, though its rewards are slightly more limited as a result.
Purify the Corruption Overview
The Purify the Corruption Zone Event takes place in the Dark Wood. Its completion is not bound to a particular place, time, or mob type; it simply requires slaying (a lot of) enemies in the area, culminating in a boss fight. The breakdown of the event is:
- When: Anytime, no restrictions.
- Where: Turned in at the Tree of Inifuss near the Tree of Inifuss Waypoint.
- Why:
 Glowing Shard, chance for Legendary items.
Purify the Corruption Mechanics
Purify the Corruption is a constantly active event, and it simply requires that you slay enemies in the Dark Wood zone. Ideally, you will not go out of your way to do this Zone Event, and fulfill its requirements purely from doing Bounties and other daily tasks that send you to this zone.
Anytime you visit the Dark Wood, you get a purple "Corruption" progress bar in the upper left corner of the screen that measures how much is left to the event's completion. You can speed up this process by going to areas with high monster respawn rates, such as the Fetid Swamp (east of the Blood Rose Waypoint), the Sanguine Ruins (southwest of the Forgotten Tower Waypoint), or the Nesting Grounds (north of the Rogue Encampment Waypoint).
A consistent (if you trust your and your nearby players' wits) way to get to 100% Corruption is to target the Blood Rose world boss. Slaying the Blood Rose grants 28 (out of a 100) Corruption, contributing a large chunk to the event's progress. See the Blood Rose guide section below to learn more about the boss' mechanics.
Note: Accrued Corruption increases damage taken. To reduce unnecessary deaths, you should kill the Blood Rose first thing, rather than leaving it for last.
When you reach 100% Corruption, you will get a prompt to visit the Tree of Inifuss. Take the Tree of Inifuss and go down the hill to your right; the tree is very visible and you cannot miss it. Interacting with the tree will summon a Shadow clone of your character, which possesses some of your class' abilities. You need to defeat the Shadow within 90 seconds to receive the event's rewards (there's a helpful timer above the Shadow's head).
After defeating the Shadow and completing 'Purify the Corruption', the Zone Event has a 20-minute cooldown before becoming available again.
Blood Rose World Boss Overview
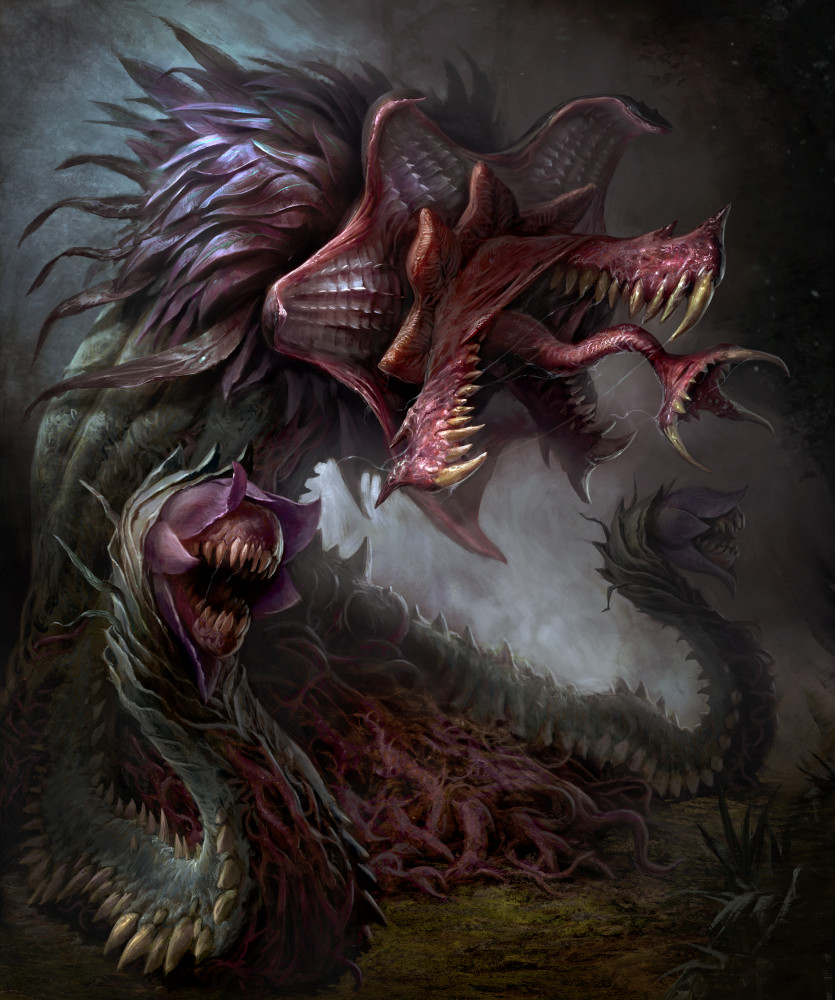
The Blood Rose world boss is a consistently available target, as it respawns 20 minutes after being killed. On top of that, the various difficulties have their own Blood Rose spawn, making it easily farmable. You can find the Blood Rose by teleporting to the Blood Rose Waypoint in Dark Wood, and running down the westward path. You can see if the boss is up by checking the map; it has its own icon if active.
Blood Rose World Boss Guide
The Blood Rose has the following abilities to watch out for:
- Stalk Projectiles: The Blood Rose's twin stalks will consistently fire low-damage projectile attacks that cover much of the battlefield.
- Bloody Beam: The Blood Rose emits a screen-wide beam of crimson energy, slowly tracing a 120-degree arc from left to right, and back again. The beam damages and debuffs the attack rate of targets struck. The only safe spot is the small nook in the bottom left corner near the Blood Rose (just beyond the two dead bodies lying on the ground).
- Impaling Thorns: The Blood Rose forces lines of thorns to erupt from the ground. These thorns follow a pattern: starting with a singular line in front of the boss, then two lines to its left and right, and then another two lines further to the sides. In total, this attack covers almost the entirety of the battlefield; you can either use the safe spot described above, or stand still if you get struck (the attack pattern will not hit the same area twice).
- Blood Rose's Bites: From Blood Rose's second health bar (Phase 2) onward, the boss will trigger a massive AoE circle beneath its base, which also pulls players in throughout its duration. This is the most important attack to pay attention to! Failing to avoid its radius will massively heal the Blood Rose for every additional player or minion standing within, and can potentially reset the fight — to everyone's frustration! Wait until this attack finishes its animation from a safe distance (well outside its telegraphed area), and fight its pull by forcibly running in the opposite direction — even using movement abilities if you have to!
- Dark Detonations: From Blood Rose's second health bar (Phase 2) onward, random players will be targeted by a red circle. After a short delay (marked with a second circle expanding within the initial telegraph), a detonation of dark energy will occur, inflicting moderate damage. The Blood Rose unleashes a total of 5 detonations, and they can stack. Run out of them before they blow up to avoid their damage.
- Summon Bloodsworn Simulacrums: From Blood Rose's second health bar (Phase 2) onward, the boss will summon a pack of 4 melee Warriors and 1 ranged Priestess. These are mostly harmless trash mobs and should be pulled and cleaved down next to the boss.
- Dark Pools: From Blood Rose's third health bar (Phase 3) onward, the Dark Detonations attack will be replaced. In its stead, Blood Rose will spit out projectiles of dark energy at random players; the ground where they detonate will be covered in pools of dark miasma that deal heavy damage over time. These pools can stack. Avoid them at all costs.
- Bombardment: During Blood Rose's fourth and final health bar (Phase 4) onward, the boss will bombard the fight with stacks of Dark Detonations (as described above) in large, semi-circular patterns — leaving very little safe space to maneuver to. Thankfully, the circles cannot overlap as aggressively as their earlier pattern.
Blood Rose World Boss Rewards
Killing the Blood Rose will reward you with ![]() Gold, Experience, items of
varying quality (Common, Magic, Rare, and with a good chance for a Legendary),
and a
Gold, Experience, items of
varying quality (Common, Magic, Rare, and with a good chance for a Legendary),
and a ![]() Glowing Shard. In difficulty Hell I and above, the killing The
Blood Rose has a chance to yield the
Glowing Shard. In difficulty Hell I and above, the killing The
Blood Rose has a chance to yield the ![]() Nor Tiraj's Knowledge vessel — part
of the Legacy of the Horadrim system.
Nor Tiraj's Knowledge vessel — part
of the Legacy of the Horadrim system.
Purify the Corruption Rewards
A side effect of farming Purify the Corruption (which we do not recommend)
is almost assuredly completing your 3 Bestiary turn-ins for the day.
Otherwise, killing the Shadow Clone will reward you with Gold, items of
varying quality (Common, Magic,
Rare, and with a good chance for a
Legendary), and a ![]() Glowing Shard.
Glowing Shard.
Other Zone Events
You can check out the guides for the other Zone Events by following the link below:
Changelog
- 08 Jul. 2022: Guide added.
This build is presented to you by Deadset, one of the very few professional Diablo 3 players. Deadset regularly publishes video guides on Youtube and streams on Twitch, where you can see how this and other builds play out in practice.
- Diablo Immortal x WoW Crossover Event: Frostmourne in Sanctuary!
- Icy Veins Seeking Writers for Zenless Zone Zero: Apply Today!
- Icy Veins Launches Genshin Impact Guides Section
- Icy Veins Podcast About Path of Exile
- ARPG Vault Discord Giveaway
- Diablo Immortal Destruction's Wake Update Notes: June 13th
- Icy Veins is Getting a New Look
- Diablo Immortal: Age of Falling Towers Content Update Notes