Blue Mage Raid Guide for Alexander Prime (A12S)
This page provides a guide for Alexander Prime, the twelfth fight in the Alexander raid series. It's intended to be used specifically for Blue Mage. This guide includes strategies catering to the unique party composition, as well as recommended spells.
Introduction
None can deny the wandering minstrel's inimitable way with words, nor the manner in which his penchant for embellishment and exaggeration has rendered your triumph over the primal Alexander all the more triumphant─and the insurmountable odds over which you did prevail all the more insurmountable. Reach back into your memory and relive your adventure inside the steel giant as it will live on in the hearts and minds of all who hear the tale!
General Notes
This is the sixth fight in the Morbol raid series and is pretty tough overall. It's a long fight with many different phases, but each phase on its own is pretty simple. The DPS check is pretty light, so just remember to respect mechanics and it shouldn't be a huge problem.
Raid Guide
This guide is written assuming you have all Blue Mage spells, appropriate gear, and know how to play your chosen role.
Video Guide
If you prefer video format, there is a full video guide available below. The video itself is older, but the strats are unchanged.
Party Setup
For this fight I would recommend having the standard one tank mimic, two healer mimics, and five DPS mimics.
Utility Spells
 Diamondback
 Mighty Guard on the DPS off-tank
 Stotram on DPS
 Hydro Pull or equivalent AOE on healer
Phase 1: Alexander
Alexander Prime's Abilities
- Divine Spear: Conal tankbuster, hits for about 21k
unmitigated. Can be mitigated with
 Addle.
 - Punishing Heat: Massive magic tankbuster with AOE effect, hits for about 40k unmitigated.
This first phase used to be quite difficult, but now we can skip
essentially the entire phase. All DPS and one healer will do a
![]() Moon Flute opener and push Alexander into his next phase
before any group mechanics happen. If you do see any markers appear over
people as he transitions, they will actually disappear without anything
happening.
Moon Flute opener and push Alexander into his next phase
before any group mechanics happen. If you do see any markers appear over
people as he transitions, they will actually disappear without anything
happening.
Most of the difficulty here is on the tank. The tank should pre-cast
![]() Dragon Force, pull the boss, cast
Dragon Force, pull the boss, cast
![]() White Wind for threat, point Alexander north, and cast
White Wind for threat, point Alexander north, and cast
![]() Diamondback once Punishing Heat starts casting.
While this is happening, the non-Fluting healer will need to pump heals into
the tank as Divine Spear hits quite hard.
Diamondback once Punishing Heat starts casting.
While this is happening, the non-Fluting healer will need to pump heals into
the tank as Divine Spear hits quite hard.
If the tank is able to safely hold Dragon Force until after the pull
starts (this requires the healer to really focus on keeping the tank at max
health), they can survive Punishing Heat with Dragon Force and
![]() Chelonian Gate. This is a nice way to get a little bit of
extra damage, but isn't strictly necessary.
Chelonian Gate. This is a nice way to get a little bit of
extra damage, but isn't strictly necessary.
Phase 2: Adds
Enemy Abilities
- Almost Holy: Moderate raidwide AOE damage.
- Smash: Heavy-hitting physical tankbuster with no cast time.
- Half Gravity: Heavy-hitting magical tankbuster with a 3.5 second cast time.
- Divine Judgment: Massive raidbuster AOE that signals the transition out of adds phase.
There are three waves of adds in this phase, but only the third set is particularly threatening.
The first wave of adds is a bunch of Arrhidaeus's Lanners. They don't do
anything scary, but there are a lot of them. Once they're targetable, the
tank should cast White Wind and start running around the centor of the room
in a circle to avoid getting hit while the party AOEs them down. If the tank
pops ![]() Sprint they won't get hit at all. Healers will want to watch
the tank in case they do start taking damage.
Sprint they won't get hit at all. Healers will want to watch
the tank in case they do start taking damage.
The next wave of adds is four The General's Wings, one in each cardinal
direction. The party just needs to stand in the center and continue hitting
their AOE ability. Some groups will stop DPS just before one dies to let
them finish their Almost Holy cast. Four unmitigated casts of this
will put the party in ![]() Revenge Blast range, allowing them
to use it on the next set of adds. This isn't a necessary optimization, and
an even easier one is to just use
Revenge Blast range, allowing them
to use it on the next set of adds. This isn't a necessary optimization, and
an even easier one is to just use ![]() Cold Fog before the cast
finishes so you can get some extra damage on the next set of adds.
Cold Fog before the cast
finishes so you can get some extra damage on the next set of adds.
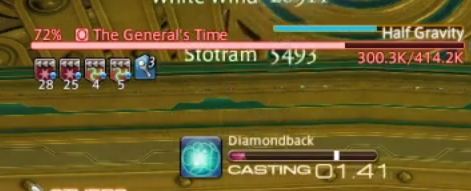
The last wave of adds is one The General's Might and one The General's Time. The Might will periodically give itself a damage up buff and use Smash, a physical tankbuster with no cast time. The Time will also periodically give itself a damage up buff and use Half Gravity, a magic tankbuster with a cast time. We will aim to kill the Might first and then Time, but the tanking of these adds is a bit of a puzzle.
I recommend having the main tank pick up the Might by casting a few
spells and then using ![]() Chelonian Gate to mitigate the first
Smash. The first Smash is completely untelegraphed, but future ones will be
telegraphed by the Might spinning its hands. When it finishes that
animation, you can
Chelonian Gate to mitigate the first
Smash. The first Smash is completely untelegraphed, but future ones will be
telegraphed by the Might spinning its hands. When it finishes that
animation, you can ![]() Diamondback and mitigate two Smashes
in a row. See the video for an example of the timing.
Diamondback and mitigate two Smashes
in a row. See the video for an example of the timing.
You can either have one person single-tank the Time if they're good at
timing ![]() Diamondback or have two people take turns tanking
it with Diamondback and swapping threat with
Diamondback or have two people take turns tanking
it with Diamondback and swapping threat with ![]() Frog Legs.
Two people taking turns is the easiest to execute, but one person doing it
solo allows you to clear the phase slightly faster.
Frog Legs.
Two people taking turns is the easiest to execute, but one person doing it
solo allows you to clear the phase slightly faster.
The timing for solo tanking is pretty tight. There is 9.3 seconds between each Half Gravity cast and Diamondback lasts for 10 seconds, so you have about .7 seconds of leeway for timing. Half Gravity takes 3.5 seconds to cast, so if you start your Diamondback when the Half Gravity is 35-50% finished casting (depending on spell speed), you will mitigate both Half Gravities. It sounds difficult but once you get it down it's very consistent.
Whoever ends up tanking Time should have Mighty Guard up to generate threat so that DPS won't pull aggro when they switch to Time. When I'm main tanking I like to pick up Time after Might is dead to allow whoever was tanking previously to go back to DPSing.
Once all adds are dead, Alexander returns and casts Divine Judgment. Once the first textbox disappears ("Executing judgment protocol in 10 seconds…") you just need to cast Diamondback to survive.
Phase 3: Time Stops
Alexander Prime's Abilities
- Mega Holy: Massive magic damage raidwide, hits for about 9k unmitigated.
- Gravitational Anomaly: Spawns 9 death circles in 3 triangular formations around the arena as well as underneath random players.
- Sacrament: Massive magic damage forming a cross through Alexander's cardinal positions (relative).
- Radiant Sacrament: Massive magic damage in a donut around Alexander (underneath Alexander is safe).
- Temporal Statis: Stops all movement and buff/debuff timers.
Alexander will return and mostly just stand there for a bit. This is a good opportunity for a Moon Flute opener. However, you will not be able to fit an entire opener since about 15 seconds after showing up, Alexander will start channeling Temporal Stasis and apply debuffs to everyone (except one player). The debuffs have the following effects:
- Shared Sentence: Deals light AOE damage around the player and applies Magic Vulnerability Up debuff. If the damage is not shared with someone else, the player will die.
- House Arrest: Two players will be tethered with red and green tethers. These players must be close to each other or they will die.
- Restraining Order: Two players will be tethered with a blue tether. These players must be far away from each other or they will die.
- Defamation: Deals AOE damage in a massive area (about the size of the arena itself) and applies a Magic Vulnerability Up debuff.
In short, Defamation players want to spread out to not hit anyone else, Shared Sentence players need to stack with at least one person that does not also have Shared Sentence, and the tethers need to be near/far as needed.
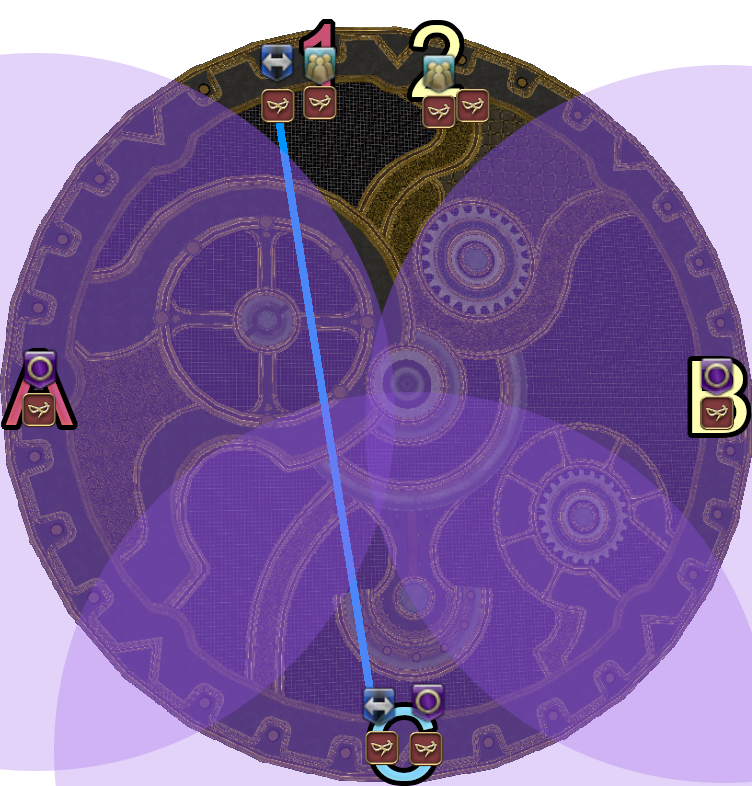
There will be 2 Shared Sentence debuffs, 3 Defamation debuffs, 1 set of tethers, and 1 person with no debuff in the first time stop. We will resolve them by having Defamations go east, west, and south, Shared Sentences to the north (but not stacked on top of one another), no debuff person stacking with the right Shared Sentence, and then either both tethers stacked with the left Shared Sentence or one person stacked with left Shared Sentence and the other with the south Defamation (depending on near/far tether). This ends up looking like the image below:
It sounds tough, but once you've done it a few times it's not too bad. As soon as you see your debuff, the following need to be called out quickly:
- Defamation locations; "I'm going east" (or other direction)
- Shared Sentence locations; "Shared Sentence on 1", or once a Shared Sentence person gets to a spot they can start jumping to signal to the other Shared Sentence person that they already chose a spot
- Blue tether; "I'm blue north" or something to that effect
- Green/red tether and no debuff need no call, their location is fixed
If your team struggles with communication or you have people with no microphones, consider setting default locations for those people and using macros to indicate where people are going with target markers and such. My group had 3 people with no microphones and we were able to do it fine.
Time stops are a really good opportunity for using
![]() Cold Fog. The buff timer stops when you're frozen, so when
you come out you can use White Death immediately, for the full duration,
while moving to a safe spot. This also means that
Cold Fog. The buff timer stops when you're frozen, so when
you come out you can use White Death immediately, for the full duration,
while moving to a safe spot. This also means that
![]() Angel's Snack is very powerful as it continues to tick even
while frozen.
Angel's Snack is very powerful as it continues to tick even
while frozen.
One final note is that the damage from debuffs is quite high. If
completely unmitigated, there is a chance that people can die even at full
health. Try to use ![]() Addle before Time Stop and apply a fresh
Addle before Time Stop and apply a fresh
![]() Gobskin before running to your spots to make sure
everyone is safe.
Gobskin before running to your spots to make sure
everyone is safe.
Once time stop ends, Alexander will use Gravitational Anomaly and
either Sacrament or Radiant Sacrament. Find a safe spot for
Gravitational Anomaly first, and then dodge the sacrament. If it's normal
Sacrament, you need to be on Alexander's intercardinals to be safe. If it's
Radiant Sacrament, you need to be under Alexander to be safe. For Radiant
Sacrament consider using ![]() J Kick or just sprinting straight
in to the center, as the dead center of the arena is always safe. Radiant
Sacrament snapshotting is wacky, so it will take some practice to not die to
it.
J Kick or just sprinting straight
in to the center, as the dead center of the arena is always safe. Radiant
Sacrament snapshotting is wacky, so it will take some practice to not die to
it.
Gravitational Anomaly places circles on the ground in the following pattern (but it can be rotated around the arena in any orientation), as well as underneath people and will kill anyone standing inside after a short delay. Stay out of th ecenter to avoid putting circles there, wait for the circles to appear, and then move accordingly. It can take some practice to get used to these patterns, but it's important to note that there are no impossible patterns, and it's always possible to avoid the circles.

After Sacrament, Alexander will follow up with Mega Holy so make
sure everyone is healed up. If you don't mitigate the damage at all, and
have food up, then everyone will be in ![]() Revenge Blast
range. This was crucial at level 60 for clears, but
Revenge Blast
range. This was crucial at level 60 for clears, but
![]() Cold Fog is a great substitute that is easier to
execute.
Cold Fog is a great substitute that is easier to
execute.
After Mega Holy, it's another Spear → Heat → Spear tankbuster combo before going into a second time stop. The second time stop is the same as the first, but there will be 2 Defamations instead of 3 and 2 sets of tethers instead of 1. The tethers will need to split between the Shared Sentence players and split north/south as needed, and the Defamation players will again need to pick an east, west, or south location.
After the second time stop Alexander will cast Gravitational Anomaly and whichever Sacrament he didn't use for the first time stop. After Sacrament, Alexander will once again cast Mega Holy and a Spear → Heat → Spear combo yet again before transitioning to the next phase.
Phase 4: Time Gates
Alexander Prime's Abilities
- Judgment Crystal: Deals moderate damage to the target and drops a crystal at the location where it was baited.
- Tetrashatter: Deals proximity-based AOE damage from a crystal when Alexander gets too close to it.
- Inception: Alexander teleports away and returns at a cardinal or intercardinal, casting Sacrament as he arrives.
Alexander will briefly teleport away and then return to the center. Four
time gates will appear, one each to the northwest, northeast, southwest, and
southeast. The two northern ones are "DPS," the southwest is "off-tank," and
the southeast is "healer." Assign people to go into each time gate. Each
gate has an add inside that needs to be killed. The two DPS should kill
their add and then use the glowing circles that appear to go help the tank
and healer with theirs. The off-tank add will use Smash, so the off-tank
will need to get aggro and then use Diamondback. Alternatively, the add can
be blown up very quickly with ![]() Moon Flute and
Moon Flute and
![]() Triple Trident/
Triple Trident/![]() Matra Magic/Primal spells
before Smash even happens. The healer will mostly need to spam
Matra Magic/Primal spells
before Smash even happens. The healer will mostly need to spam
![]() Pom Cure on themselves to stay alive during Half Gravity
casts but can also blow their add up similarly to the off-tank. Half Gravity
does a percentage of health, so don't use things like
Pom Cure on themselves to stay alive during Half Gravity
casts but can also blow their add up similarly to the off-tank. Half Gravity
does a percentage of health, so don't use things like
![]() Devour that increase your HP or you may risk dying when
the buff falls off. The adds need to die pretty quickly or it will cause a
wipe.
Devour that increase your HP or you may risk dying when
the buff falls off. The adds need to die pretty quickly or it will cause a
wipe.
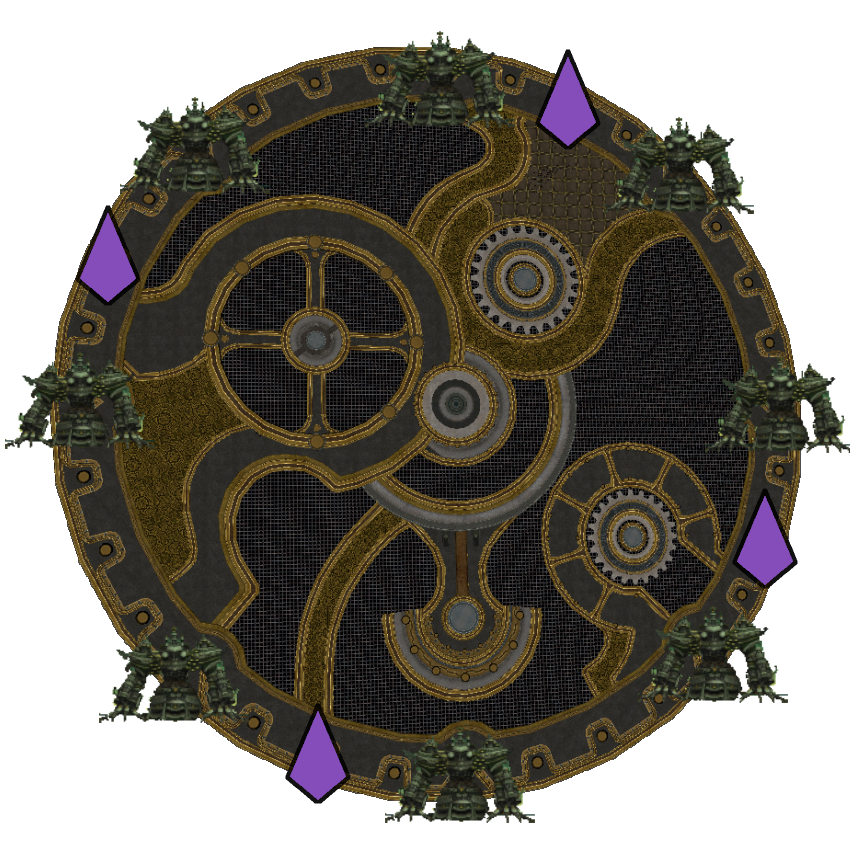
The four folks outside will have slightly more responsibility. There will be four crystals that will drop in sequence with mechanics happening between each. These crystals need to be dropped between each cardinal and the intercardinal spot clockwise from it. It sounds strange, but when Alexander uses Inception later he will appear in a cardinal or intercardinal spot and detonate crystals if nearby. We use the detonating crystal to see where he is, so we want to drop crystals two notches (on the ground) clockwise from each red circle like this to know where he is coming from:

I like to start at the northernmost spot and go clockwise to each of
them. Whoever gets targeted will need to go to the proper spot between the
two red circles to drop their crystal. After the first crystal, someone will
be targeted with a stack marker. It's easiest to just have this person
![]() Diamondback to survive. After the second crystal,
Alexander will use Sacrament or Radiant Sacrament so dodge accordingly.
After the third crystal Alexander will use Punishing Heat so the tank will
need to mitigate appropriately. For this tankbuster I recommend using
Diamondback to survive. After the second crystal,
Alexander will use Sacrament or Radiant Sacrament so dodge accordingly.
After the third crystal Alexander will use Punishing Heat so the tank will
need to mitigate appropriately. For this tankbuster I recommend using
![]() Dragon Force and
Dragon Force and ![]() Chelonian Gate or
casting
Chelonian Gate or
casting ![]() Diamondback early (a few seconds after the third
crystal drops) so that they can move to the fourth crystal spot if they get
targeted. The tank should try to keep Alexander as centered as possible,
since he blows up the crystals with Tetrashatter if he gets too
close.
Diamondback early (a few seconds after the third
crystal drops) so that they can move to the fourth crystal spot if they get
targeted. The tank should try to keep Alexander as centered as possible,
since he blows up the crystals with Tetrashatter if he gets too
close.
The time gate players should return at some point around the third or fourth crystal, but they will not get targeted by any of the remaining crystals.
If done correctly, the crystals should be dropped according to the diagram above, with each possible spawn being adjacent to a crystal. About 15 seconds after the fourth crystal drops, Alexander will start casting Inception and then disappear. The party should return to the center of the arena during the Inception cast to get ready for the movement.
Phase 5: Inception
Alexander Prime's Abilities
- Incinerating Heat: Magic damage stack marker.
When Alexander disappears, he will choose a cardinal or intercardinal to spawn at and will blow up the adjacent crystal with Tetrashatter and also use Sacrament. We don't know which spot specifically he will spawn at but it doesn't matter. The proximity marker will tell us which direction to run to be safe, as shown in the diagram below where he's spawning in either the north or northeast (but this applies to any pair of spawn points):
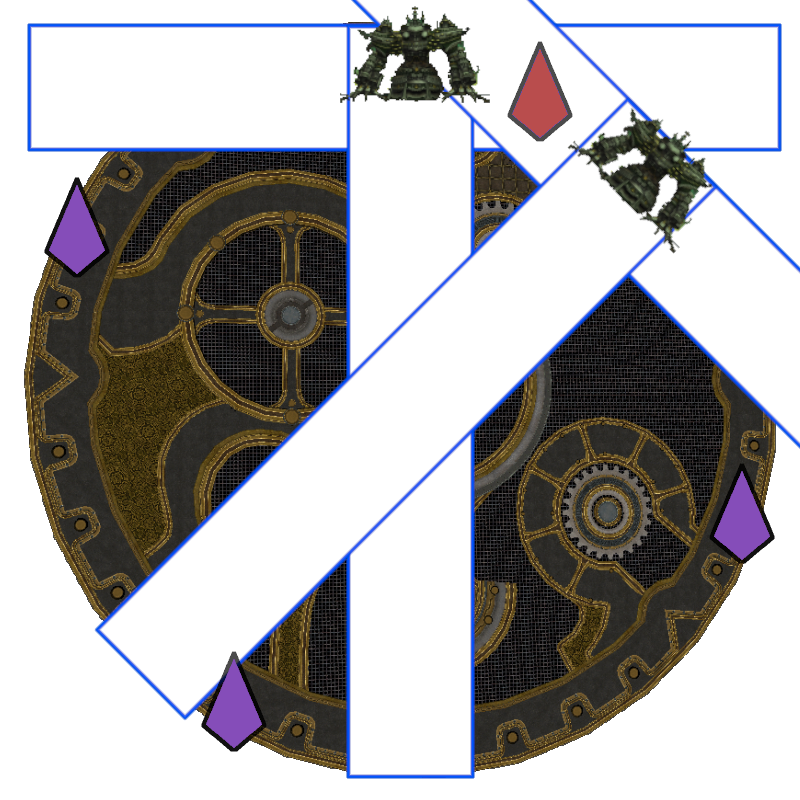
As soon as you see the proximity marker from a crystal, run away from the crystal and east/west relative to the crystal. This will reduce the damage from Tetrashatter and avoid the Sacrament.
Alexander will start casting Radiant Sacrament immediately after he
returns, so ![]() J Kick or sprint in to be safe. Next will be a
Spear → Heat combo, so have the tank face him away from the party and
mitigate appropriately. After the tankbusters there will be a Gravitational
Anomaly followed by Incinerating Heat. Stay out of the center, and
then have everyone move to the center to share the stack damage.
J Kick or sprint in to be safe. Next will be a
Spear → Heat combo, so have the tank face him away from the party and
mitigate appropriately. After the tankbusters there will be a Gravitational
Anomaly followed by Incinerating Heat. Stay out of the center, and
then have everyone move to the center to share the stack damage.
After the stack Alexander will start casting Inception again, but this time will apply time stop debuffs to people. One person will receive Shared Sentence, one person will receive Defamation, and the rest will have randomly determined tethers. The safe spots from Alexander are the same as above, but now we need to handle these debuffs as well. Have Shared Sentence run to the relative west safe spot, and Defamation run to the relative east safe spot. All green/red tethers can run west with Shared Sentence, but any blue tethers will have to split between east and west. The tethers disappear after a few seconds, so you only have a brief time to determine who is going where. This is the hardest mechanic for us in this fight, but it ends up looking like this when resolved:

Phase 6: Summon Alexander
Enemy Abilities
- Void of Repentance: Puddles that deal big magic damage and apply a Magic Vulnerability Up and Healing Potency Down debuff.
- Holy Scourge: Multi-hit magic tankbuster indicated by Prey marker.
- Chastening Heat: Magic tankbuster that applies Physical Vulnerability Up to the target.
- Holy Bleed: Massive raidwide AOE.
- Communion: Chaser AOE under four random players.
When Alexander gets summoned there will also be Void of Repentance
two pools that will spawn. To handle this, have the tank take one pool and
someone else take the other pool. Once in the pool, the players should cast
![]() Diamondback to soak all three hits. These players will
still need heals even through Diamondback. There is about 11 seconds between
the spawn of the pools and the first hit, and about 8 seconds between the
first hit and the third hit. Once you get to the pool you'll want to wait a
few seconds and then cast Diamondback to ensure that all three hits get
mitigated. Each hit applies Magic Vulnerability Up and Healing Potency Down
debuffs.
Diamondback to soak all three hits. These players will
still need heals even through Diamondback. There is about 11 seconds between
the spawn of the pools and the first hit, and about 8 seconds between the
first hit and the third hit. Once you get to the pool you'll want to wait a
few seconds and then cast Diamondback to ensure that all three hits get
mitigated. Each hit applies Magic Vulnerability Up and Healing Potency Down
debuffs.
After the pools, Alexander will cast Incinerating Heat again so everyone except the pool soakers should group up. He will then start casting Holy Bleed which is a massive AOE, followed by Holy Scourge tankbusters (target will need to Diamondback) and Chastening Heat. If your group gets to this point it's likely a wipe. This phase repeats with the addition of Communion puddles that need to be baited until hard enrage is hit.
Final Sting
Alexander Prime's Final Sting threshold is 15%. Once he is at 15%, apply
![]() Off-guard, then use
Off-guard, then use ![]() Moon Flute, any
Primal abilities you have, and finish with
Moon Flute, any
Primal abilities you have, and finish with ![]() Whistle and
Whistle and
![]() Final Sting. Most groups will be able to Final Sting
before Inception 2, and being able to do so makes the fight dramatically
easier.
Final Sting. Most groups will be able to Final Sting
before Inception 2, and being able to do so makes the fight dramatically
easier.
Changelog
- 26 Jun. 2023: Guide added.
More FFXIV Content

This guide has been written by Liam Galt, who created the Blue Academy Youtube channel and Discord in response to the lack of consolidated and accurate Blue Mage resources available. Liam enjoys finding non-standard solutions to problems, so Blue Mage content with all of its zaniness is a natural interest! Outside of Blue Mage, he also enjoys Savage and Ultimate raiding which he streams on Twitch.
- New Framer’s Kit With Return Of Breaking Brick Mountains
- Last Chance For THE PRIMALS x Download Festival T-Shirt!
- Team DN Claims #WorldFirst in FFXIV’s Dancing Mad!
- FFXIV Players Blown Away By Store Updates!
- Support #WorldFirst in FFXIV Dancing Mad Ultimate — Now Available!
- Calling FFXIV Fishers To Catch The Rainbow For Charity!
- Last Chance To Enter FFXIV x Jollibee Sweepstakes!
- The Senor Otters Make Their Grand Debut in FFXIV