Blue Mage Raid Guide for Manipulator (A4S)
This page provides a guide for The Manipulator, the fourth fight in the Alexander raid series. It's intended to be used specifically for Blue Mage. This guide includes strategies catering to the unique party composition, as well as recommended spells.
Introduction
What fun is there in merely restating the facts? Never one to be content with the truth, the wandering minstrel has taken the liberty of retelling the tale of your journey into Alexander with his trademark embellishments. Some may question the value of such entertainment, but none can deny the skill with which he weaves his tapestry of song and verse, immersing you in memory...
General Notes
This is the fourth fight in the Morbol raid series and is one of the easier fights. The mechanics are a little bit janky, but this fight is very approachable even in party finder. The overall flow of the fight is that we kill one leg at a time, and the fight mechanics change each time as we do so. Once all four legs are dead then we kill Manipulator itself.
Raid Guide
This guide is written assuming you have all Blue Mage spells, appropriate gear, and know how to play your chosen role.
Video Guide
If you prefer video format, there is a full video guide available below. The video itself is older, but the strats are unchanged.
Party Setup
For this fight I would recommend having the standard one tank mimic, two
healer mimics, and five DPS mimics. Running a single healer can work well to
skip Royal Pentacle more easily, but it does require some awareness and
extra healing via ![]() White Wind if the healer gets kidnapped
in the middle of the fight.
White Wind if the healer gets kidnapped
in the middle of the fight.
Utility Spells
 Mighty Guard on three DPS for dealing with
adds
Mighty Guard on three DPS for dealing with
adds White Wind to help with healing if healers are
kidnapped
White Wind to help with healing if healers are
kidnapped Bomb Toss or
  Faze to stun legs
when they cast Perpetual Ray.
Faze to stun legs
when they cast Perpetual Ray.
Phase/Leg 1
Manipulator's Abilities
- Hydrothermal Missile: Moderate AOE damage around highest threat target.
- Seed of the Sky: Ground-targeted AOEs underneath players.
- Mortal Revolution: Raid-wide damage after each leg is killed that gets stronger each time it is used.
The first leg isn't really worth mentioning. It will die to Moon Flute
openers rather quickly. Just stay away from the tank to avoid splash damage
from Hydrothermal Missile. It can be worth holding onto
![]() Nightbloom here to use on the second leg since most of
the duration will be lost otherwise.
Nightbloom here to use on the second leg since most of
the duration will be lost otherwise.
The order in which we kill the legs doesn't actually matter, but you need to make sure everyone is attacking the same leg. When one leg is killed the others will fully heal. I usually just start with the Right Hindleg and kill them in counterclockwise order from that.
Once the leg dies, Manipulator becomes targetable for a bit. He will then
go untargetable and cast Mortal Revolution. If the tank is able to
use ![]() Bad Breath before it becomes untargetable it can help.
Bad Breath before it becomes untargetable it can help.
![]() Gobskin is also helpful here.
Gobskin is also helpful here.
Phase/Leg 2
Manipulator's Abilities
- Quarantine: Removes two random players from the main room and sends them to a separate arena to fight a small robot. Players return to the main room when the robot is defeated.
- Carnage: Steam bits around the arena will target a random person with tethers which can be intercepted by other players. After a delay, lasers fire and hit a random number of tethered players dealing small AOE damage around them.
- Perpetual Ray (leg): Multi-hit attack that drains 3000 MP per hit. Can be interrupted by stunning a leg when it starts steaming.
Shortly after this phase starts two players will be affected by
Quarantine. If the tank gets taken, someone will have to use
![]() Mighty Guard to tank until they return. If both healers
get taken, others will have to help heal with
Mighty Guard to tank until they return. If both healers
get taken, others will have to help heal with
![]() White Wind.
White Wind.
Throughout this phase Manipulator will use Carnage. The targeted player should stand still and others should intercept lasers to make sure the targeted player will survive. Players should also spread out so they don't overlap the small AOE from Carnage.
Keep an eye out for legs blowing off steam so that you can stun them to interrupt Perpetual Ray.
Phase/Leg 3
Manipulator's Abilities
- Straf Doll: Large doll with tankbusting cleave. Eventually casts Wirbelwind which sets all players' MP to 0.
- Jagd Doll: Small doll that gets absorbed by Straf Doll when brought together. When absorbed, deals raidwide damage proportional to the amount of remaining health.
Carnage continues in this phase so be ready to intercept tethers.
The main mechanic here is the dolls that spawn. One large Straf Doll will spawn in the center of the arena and one small Jagd Doll will spawn in the east, west, and south of the arena. If a Jagd Dolls is pulled close to the Straf Doll, the Straf Doll consumes the Jagd Doll and deals raidwide damage based on how much health the Jagd Doll has.
To handle this, have the tank pick up the Straf Doll and assign one DPS to each Jagd Doll. The Straf Doll doesn't hit super hard but does apply a Slash Vulnerability Up debuff, which can mostly be ignored since we should only see one doll phase. The Straf Doll also cleaves so it should be faced away from the party. The Jagd Dolls don't hit very hard and are easy to deal with. The DPS needs to damage the Jagd Doll down to about 20-30% and then bring it in to feed it to the Straf Doll. The feeding of Jagd Dolls should be staggered to allow for healing between explosions. If a DPS accidentally kills a Jagd Doll a new one will respawn. The Straf Doll should be killed once it has eaten all three Jagd Dolls. If this whole process takes too long, the Straf Doll will cast Wirbelwind and zap everyone's MP.
Still keep an eye out for legs blowing off steam as Perpetual Ray will still cast during the adds phase.
Phase/Leg 4
Manipulator's Abilities
- Judgment Nisi: Targets one random player with blue nisi and one random player with orange nisi. Nisi debuff deals mild damage over time. If someone with a nisi debuff touches another person, that person also gets nisi. If a person gets both blue and red nisi they die immediately.
- Small Discoid: Spawns three sets of orange orbs from three locations (nine total) that slowly move towards a random target. On impact, orbs deal light AOE damage.
At the beginning of this phase Judgment Nisi will be cast. Players should spread out to prevent passing nisi since we just want to let it fall off.
Next is another doll phase which we handle the same as before.
After the bots we need to deal with Small Discoid. Three sets of three orange orbs will spawn around the room and start slowly moving towards a targeted player (indicated by a marker over their head). Players should intercept these orbs (without killing themselves) to prevent the targeted person from getting hit by all of them.
These mechanics will cycle but we should only see one cycle here.
Once again, keep an eye out for steamy legs and stun them as needed.
Phase 5: Manipulator
Manipulator's Abilities
- Carnage Zero: Targets three random players with lightly damaging AOE laser.
- Perpetual Ray: Multi-hit tankbuster that does not drain MP.
Once all the legs are dead we need to deal with Manipulator itself. This combines mechanics from the previous phases with some added spiciness.
The first thing we see is Carnage Zero. Spread out to avoid overlapping damage and heal up afterward.
There will be Small Discoid to deal with, followed by Big Discoid. Handle Small Discoid the same as before. Big Discoid deals big AOE damage but splits the damage between people hit. Damage mitigation (Mighty Guard, Diamondback) do not work on this so make sure to split this damage with as many people as possible. The tank should not stack due to the Physical Vulnerability Up debuff that gets applied by the Big Discoid.
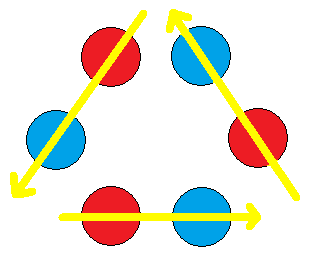
After handling Discoids we have to deal with Royal Pentacle. This is a pretty complicated mechanic that is supposed to involve passing nisi back and forth. Instead, we will completely disregard that and cheese it. Six Steam Regulators will spawn in the center of the arena. They explode when touched by a player, killing that player. If left up too long they will explode and wipe the group. To handle this, we assign three DPS to sprint and jump such that they blow up two regulators each. They will die, and then get resurrected, and Royal Pentacle is done. See below for a hyper-detailed artist's rendering of how three players can run through all six Steam Regulators.
During Royal Pentacle, Manipulator will use Perpetual Ray. This is different from the version cast by the legs. This is a multi-hit tankbuster on the tank. The tank should mitigate appropriately (Diamondback is easiest, but Dragon Force and Chelonian Gate work as well).
After Royal Pentacle there is a doll phase with Carnage Zero casts and then the phase repeats. Most groups will finish the fight before getting this far into the phase. Groups with solid DPS will be able to skip Royal Pentacle entirely.
Final Sting
Manipulator's Final Sting threshold is 30%. Once it is at 30%, apply
![]() Off-guard, then use
Off-guard, then use ![]() Moon Flute, any
Primal abilities you have, and finish with
Moon Flute, any
Primal abilities you have, and finish with ![]() Whistle and
Whistle and
![]() Final Sting.
Final Sting.
Changelog
- 26 Jun. 2023: Guide added.

This guide has been written by Liam Galt, who created the Blue Academy Youtube channel and Discord in response to the lack of consolidated and accurate Blue Mage resources available. Liam enjoys finding non-standard solutions to problems, so Blue Mage content with all of its zaniness is a natural interest! Outside of Blue Mage, he also enjoys Savage and Ultimate raiding which he streams on Twitch.
- Developing FFXIV Big Fish Together With Ryuta Suyama
- These Changes Will Make You Think Twice Before Tanking in Evercold
- Complete Dawntrail’s Art Book Collection With – Relics of Eternity –
- New Framer’s Kit With Return Of Breaking Brick Mountains
- Last Chance For THE PRIMALS x Download Festival T-Shirt!
- Team DN Claims #WorldFirst in FFXIV’s Dancing Mad!
- FFXIV Players Blown Away By Store Updates!
- Support #WorldFirst in FFXIV Dancing Mad Ultimate — Now Available!