AAC Cruiserweight M2 Savage Raid Guide
Welcome to our guide to AAC Cruiserweight M2 Savage (M6S), the second encounter in the second raid tier of The Arcadion. This guide aims to prepare players for the raid so they will know what to expect, with detailed mechanic instructions for clearing and consistent weekly farming.
Introduction to Sugar Riot (Savage)
Sugar Riot is the second boss fought in AAC Cruiserweight (Savage).
How to Unlock Sugar Riot
AAC Cruiserweight M2 (Savage) can be unlocked at level 100 after completing the Normal difficulty of the Light-heavyweight raid and talking to Gabbro in Solution Nine (x22.3, y17.1). It requires a minimum item level of 730 to queue, but this requirement can be bypassed when entering with a full party.
Lore
Your bout against Sugar Riot exposed you to the power of her creativity unleashed. Now you wonder, if she had let her art truly run rampant, what manner of creations might she have revealed?
Video Resources
Video resources for this encounter will be posted when available.
Raid Guide
Sugar Riot is fought on a square arena, though the arena will change based on the phase. The square death wall will remain throughout the encounter.
Sugar Riot's enrage occurs at around 11:24 into the fight and requires at least roughly 190,000 raid DPS, though this includes AoE damage done to adds.
Raid Preparation
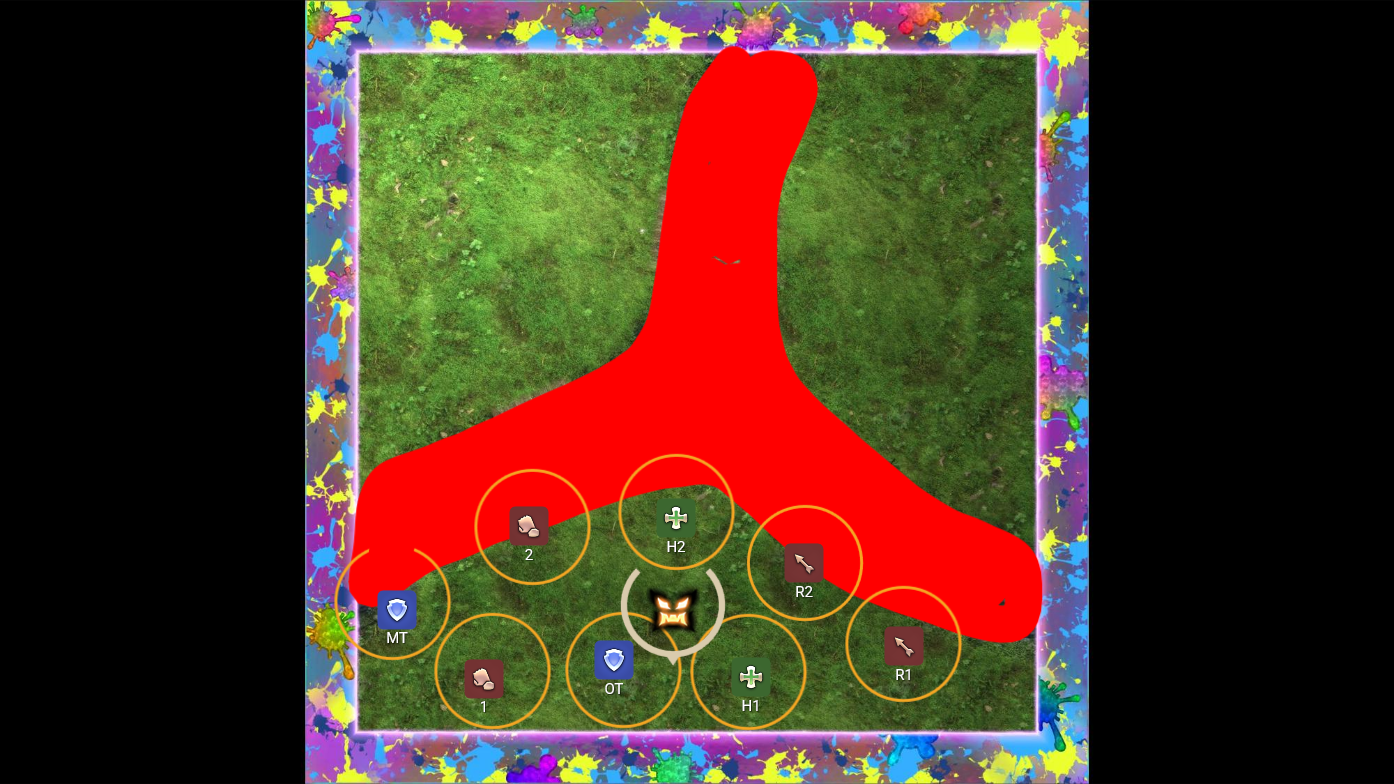
Begin by assigning clock spots to all party members. Divide the raid into two light parties of one tank, one healer, and two DPS each. Split these light parties into partners with tanks and melees together and ranged and healers together.
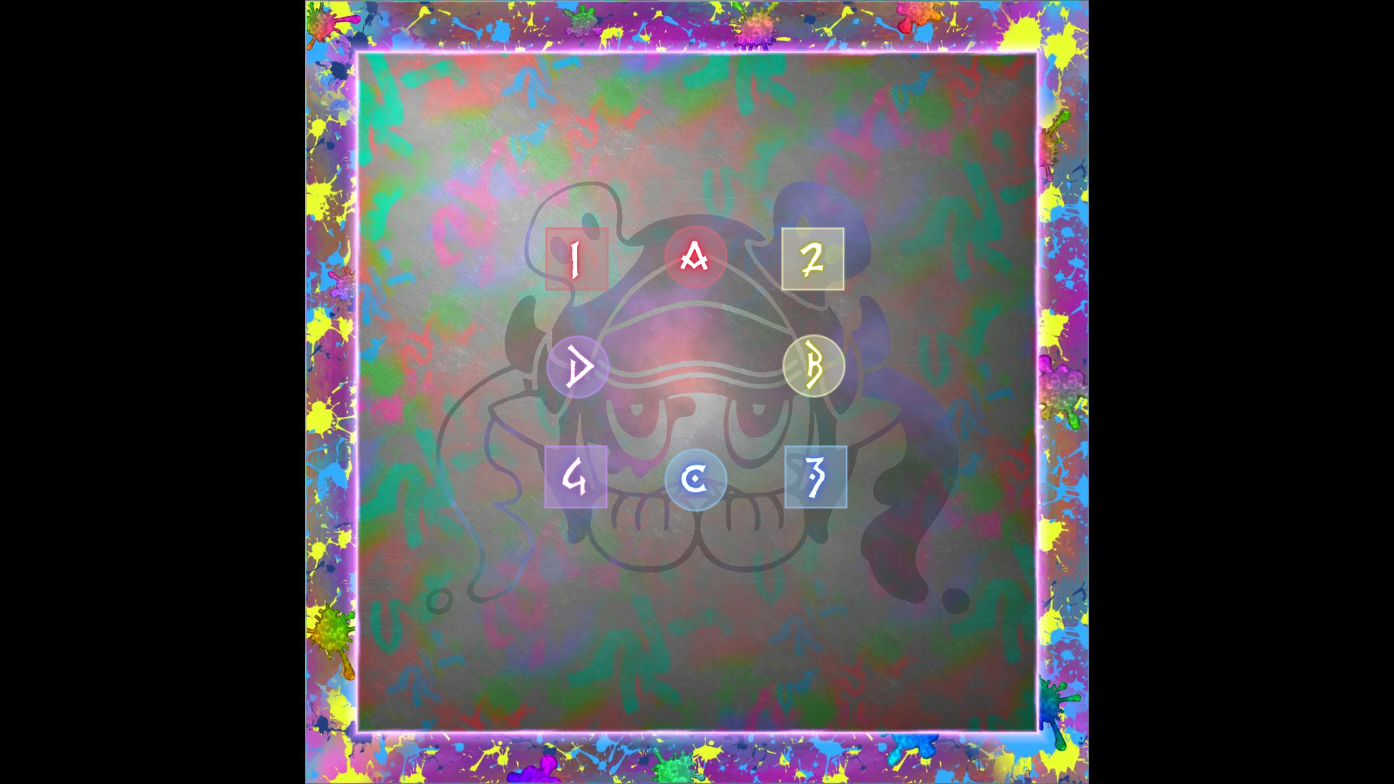
Place waymarks with letters on cardinals and numbers on intercardinals.
Sugar Riot Main Mechanics
Sugar Riot's main mechanic is painting adds and objects. These can be targetable or untargetable, and do certain mechanics based on what they are. Single Style will spawn one object, while Double Style will spawn two objects. The objects are listed below.
- Normal Paint Bombs will explode where they spawn.
- Winged Paint Bombs will jump horizontally across the arena from where they spawn.
- The Mouthwatering Morbol does a wide conal across the arena from where it spawns.
- The Candied Succubus does a large AoE from where it spawns.
- The Sweet Shot Arrow fires a line AoE across the arena.
- The Taste of Fire is unmarked stack AoEs on both healers.
- The Taste of Lightning is unmarked AoEs on all players.
The adds in phase two will be explained in that section.
Phase One
You fight Sugar Riot on the normal and desert arenas in phase one.
Phase One Mechanics
The following mechanics are introduced in the first phase.
- Mousse Mural: Raidwide magical damage.
- Color Riot: An AoE magical tank buster on the closest and furthest player. Sugar Riot will hold up one gun and lower the other: the raised gun hits the closest player and the lowered gun hits the furthest player. The red gun applies Warm Tint and the cold gun applies Cold Tint, and the tanks have to alternate debuffs.
- Wingmark: All players receive the Wingmark debuff, which launches them far across the arena in the direction they are facing when the debuff expires.
- Color Clash: Sugar Riot fires her gun into the air. Two shots will create unmarked stack AoEs on both healers, while four shots will create unmarked stack AoEs on four players in a role. These inflict a vuln debuff.
- Sticky Mousse: Two players are rooted and take magical damage with a short vuln debuff. They receive a 4 second debuff, Mousse Mine, that does a stack AoE when it expires.
- Sugarscape 1: Sugar Riot paints on the background, changing the arena into a scorching desert. All players are afflicted with Sweltering, dealing damage over time. Three supports and one DPS are inflicted with Heating Up, with a tank and DPS receiving a short timer and healers receiving a long timer. This explodes in a large AoE and inflicts damage down debuffs. One other DPS receives Burning Up, which also explodes in a large AoE but does not inflict a damage down.
- Desert Layer 1: Sugar Riot paints cacti on the desert, creating six sets of cacti AoEs that spawn on the arena.
- Desert Layer 2: Sugar Riot paints quicksand on the desert. Staying inside the quicksand for too long or using a movement ability inside will instantly kill the player.
- Pudding Graf: Sugar Riot jumps to the middle. The next Double Style will tether one role with Normal Paint Bombs and the other role with Winged Paint Bombs. These explode in an AoE inflicting a magic vuln and place the corresponding bomb under the player.
Phase One Strategy
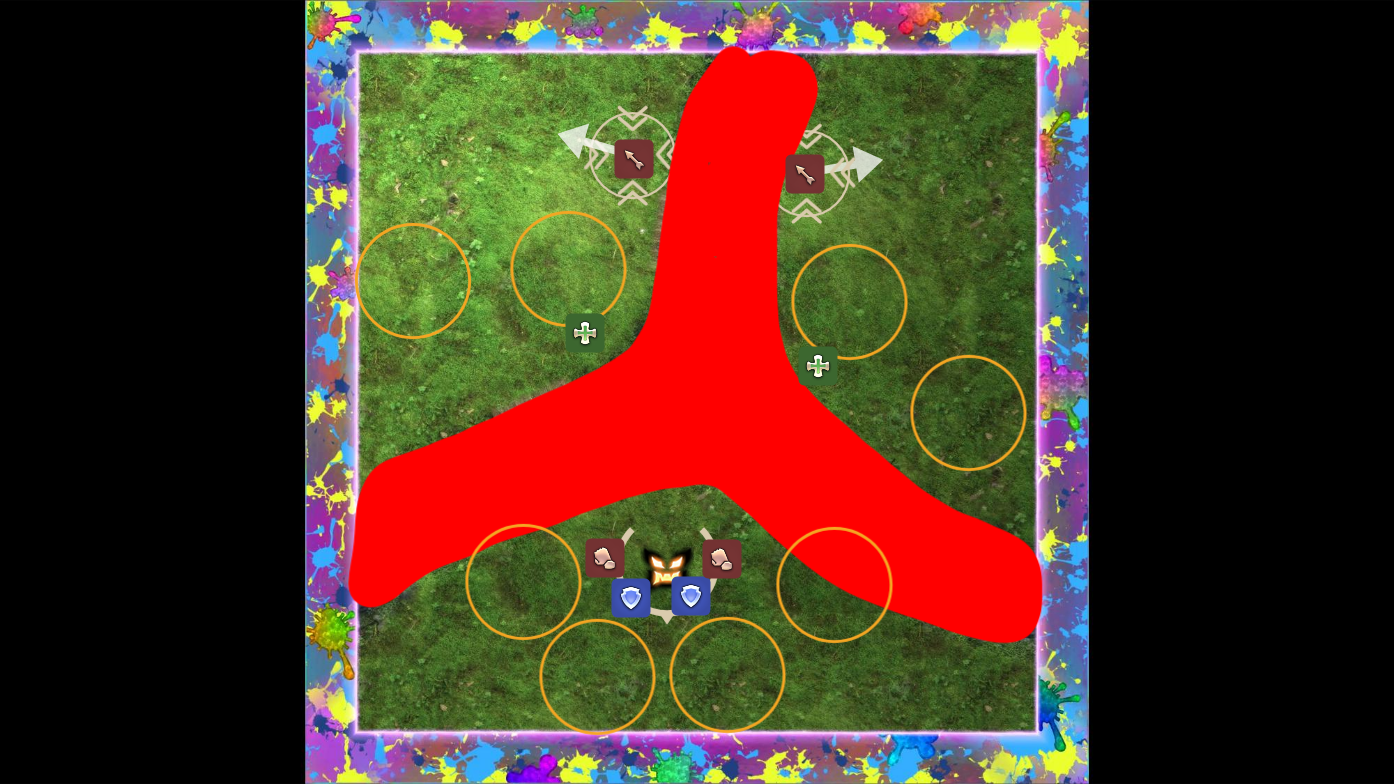
The fight begins with the raidwide, Mousse Mural, into the tank buster Color Riot. Whichever tank has better ranged options should run far to bait the far AoE. The other tank will stand slightly inside the boss hitbox, and the party should stand at max melee range. Every Color Riot from this point on, the tanks need to check their debuff and the gun colours. The close tank will be the opposite colour of the raised gun, and the far tank will be the opposite colour of the lowered gun.
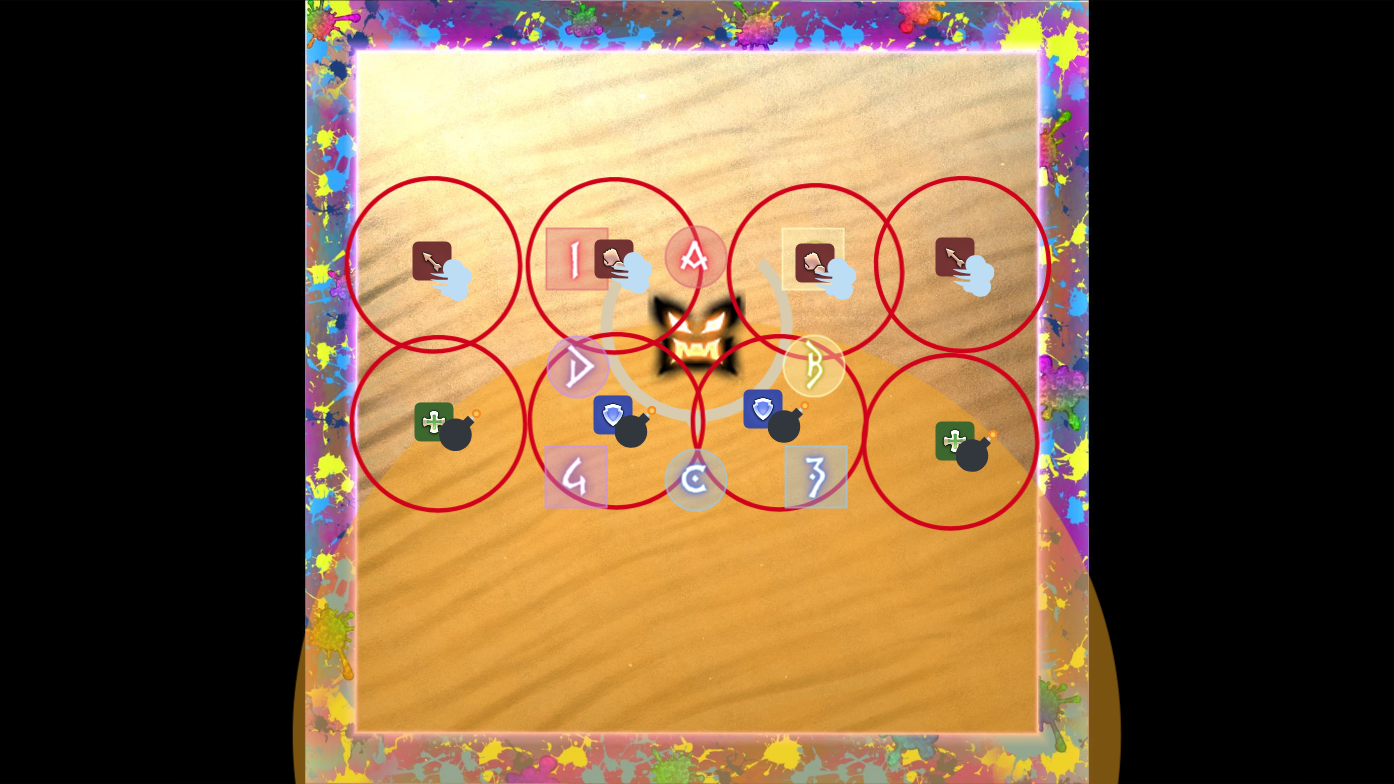
Next, she will cast Wingmark into Color Clash. Players need to note how many shots were fired: four means there will be a partner stack after and two means there will be light party spreads after. Sugar Riot will begin casting Double Style. Players need to get launched by Wingmark to the safe corner that is created with the combination of adds. In general, the priority is as follows.
- Winged bombs are safe;
- Normal bombs are unsafe;
- Go away from Morbol to go towards it;
- Go towards Succubus to get away from it.
For example, if there was a Succubus north and a Morbol east, the party would stand northwest to get launched away from the Succubus south and towards the Morbol east. A few seconds after landing, Color Clash will go off. If it's healer stacks, go into your light parties left and right facing the inside. If it's partner stacks, the healers and their partner goes left and right facing the inside, while the MT and their partner stays in the middle and the OT and their partner goes to the edge. All players can dash back right after.
Head back into the centre and spread around the boss in clock positions. Sugar Riot will cast Sticky Mousse, targeting two random non-tanks with Mousse Mine. This does heavy damage that needs to be split amongst 4 people, though a 3 stack is possible with sufficient mitigation. If the two targeted players are in separately light parties, stack up in light parties. If they're in the same light party, go to the closest player and make sure to not get hit by both stacks. This mechanic occurs multiple times throughout the fight. This is followed by Color Riot, so tanks adjust and party goes max melee range.
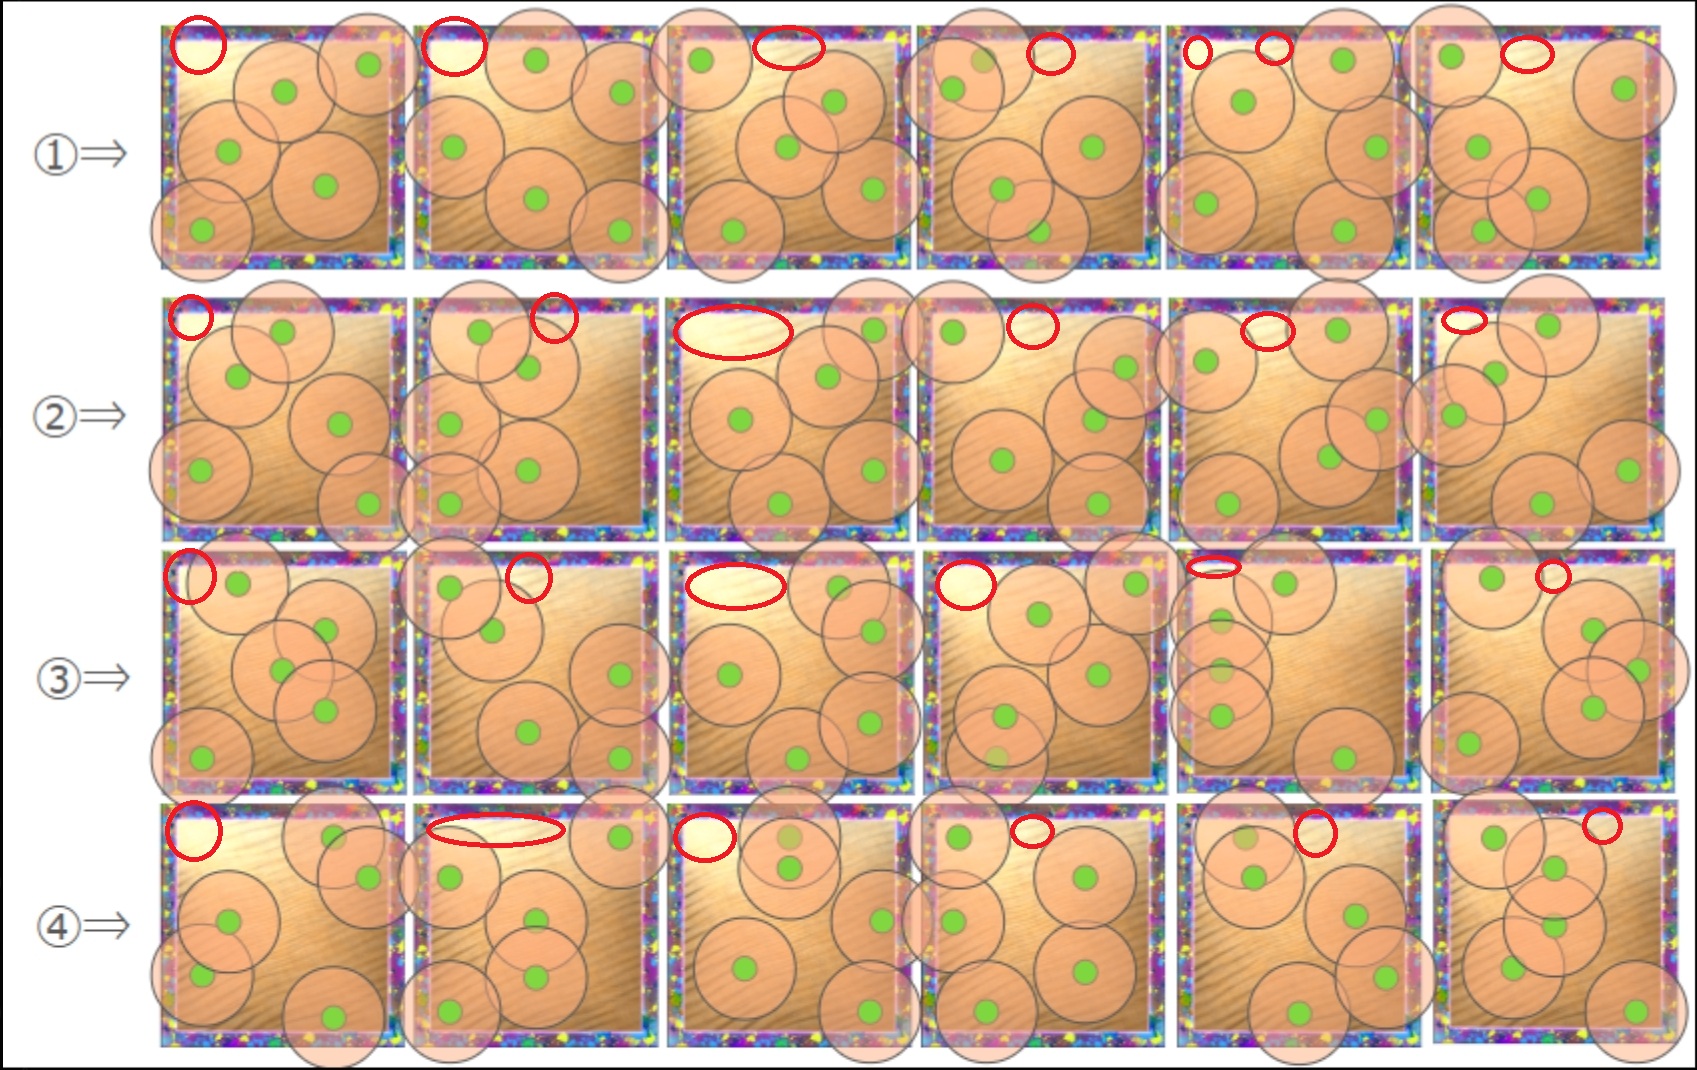
Sugar Riot will jump north and begin painting the Sugarscape. There is persistent damage over time throughout this phase, so healers need to ensure players are full health when going into a mechanic. The tank and DPS marked with Heating Up need to note that they have the debuff. Move Sugar Riot back to the middle, as she will cast the first Layer, creating cacti that explode in a large AoE around the arena. There will be six sets - either dodge around the middle or use the safe spots shown above.
After all six sets, the first two Heating Up debuffs will expire shortly. The marked tank and DPS should run away from the party, with support on the east side and DPS west. The party will all take damage from Burning Up, but that player can stay. Heal up and go around the boss as she jumps to the middle and does Sticky Mousse.
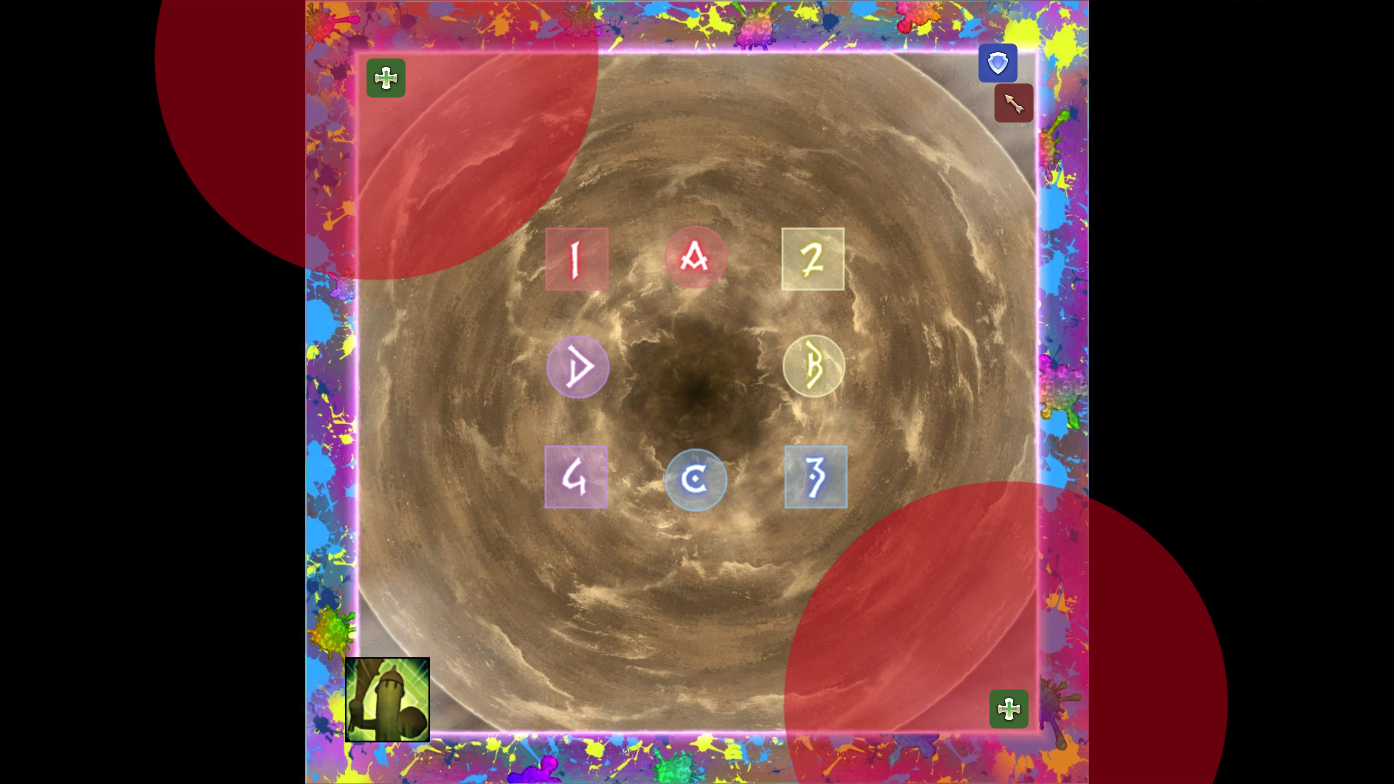
The next layer will paint a giant quicksand hole in the middle arena with the far corners safe. Cacti will spawn at the same time, and there will be one corner of the arena cut off by the cacti. This is the new south: the party will always run to the opposite corner, while healers go to adjacent corners with the light party 1 healer going left and light party 2 healer going right. Do not use any movement abilities while inside the quicksand. In the corner, players may need to dodge a cactus that covers around half of the safe spot.
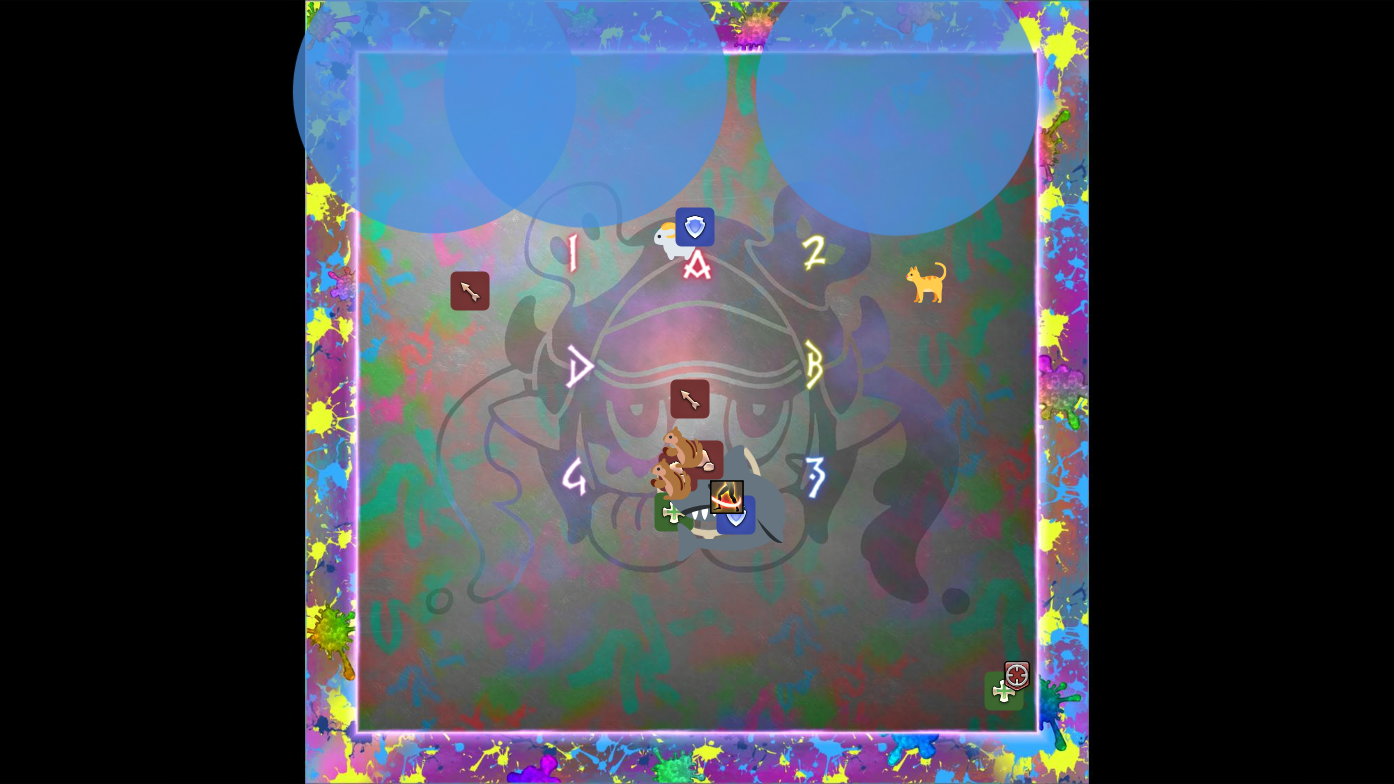
Sugar Riot will then cast Pudding Graf and jump to the centre of the arena. Four players of one role will get tethered to a winged bomb while the other four players get tethered to a normal bomb. Quicksand will appear in half of the arena. Players with the winged bomb need to face towards the quicksand to launch their bombs into it, while players with the normal bomb need to stand inside the quicksand and move out. All players need to be spread out in RMMR, with group 1 east and group 2 west to avoid overlapping AoEs. The phase ends with a final Color Riot, and as always tanks adjust while the party stands max melee range.
Phase Two: Adds Phase
One of the most unique phases in a FFXIV fight, the Sugar Riot adds phase has the party handle four waves of adds while performing their respective mechanics. The arena returns to normal at this point.
Phase Two Mechanics
There are five different adds that appear in the phase. They are summoned onto the arena when Sugar Riot casts Live Painting, and they have static positions each time.
- The Yan deals heavy auto-attack damage and cannot be near the Mu or else it receives a damage up buff.
- The Mu deals moderate auto-attack damage. After Sugar Riot casts Ready Ore Not, which deals raidwide magical damage, these will begin to cast Ore-Rigato, which deals damage and inflicts a stacking DoT to all players.
- The Gimme Cat when summoned reduces your limit break gauge to zero. It then repeatedly jumps around six times before jumping to a random player and casting I Crave Violence, a point-blank AoE that inflicts HP Penalty. After a few cycles, it will enrage.
- The Feather Ray tethers onto the first player that hits it. It will repeatedly cast Water III onto the target, inflicting a vulnerability debuff and placing a large water puddle underneath them at the time that inflicts a Dropsy DoT.
- The Jabberwock targets a random healer with a prey marker, then binds them and deals damage. It then slowly walks towards them, killing them if it reaches them. The bind disappears once it is killed. It is the only add that can be stunned.
Phase Two Strategy
This phase requires efficient cleave damage, burst damage, and knowledge of how the add phase flows. The MT will be picking up the majority of adds and CCing the Jabberwock, while the OT will be responsible for Yan control and mitigating damage properly. Swap around roles if necessary for efficiency.
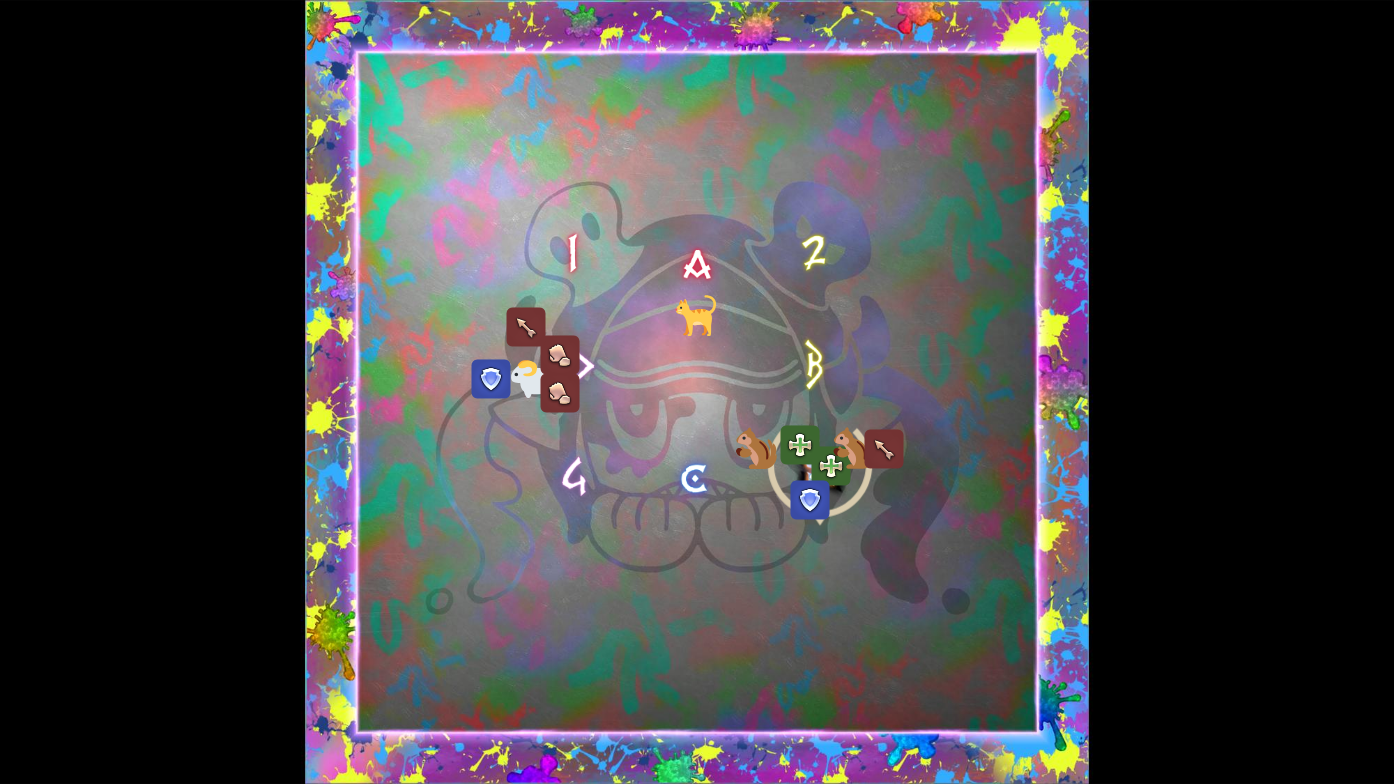
The first wave of adds contains one Yan east, one Gimme Cat, and two Mu west. The OT needs to pick up the Yan, while the MT picks up both Mu. As the Yan cannot be brought near the Mu, the MT will start where the Mu spawn and the OT will start where the Yan spawns. The rest of the party should stand either on the MT or on the OT so that the Gimme Cat jumps onto another add allowing for the raid to cleave them. Melee players except for the MT will focus down the Yan, while ranged players focus down the Gimme Cat.
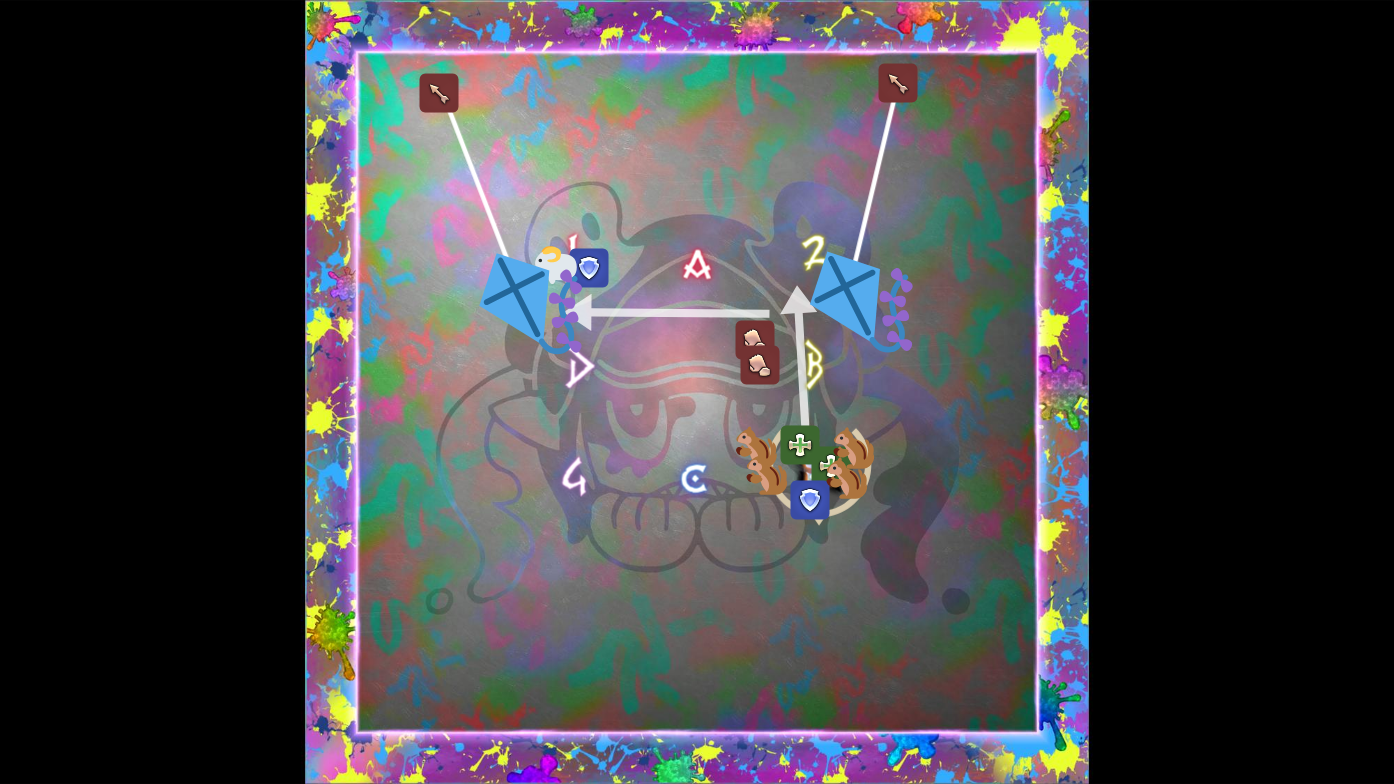
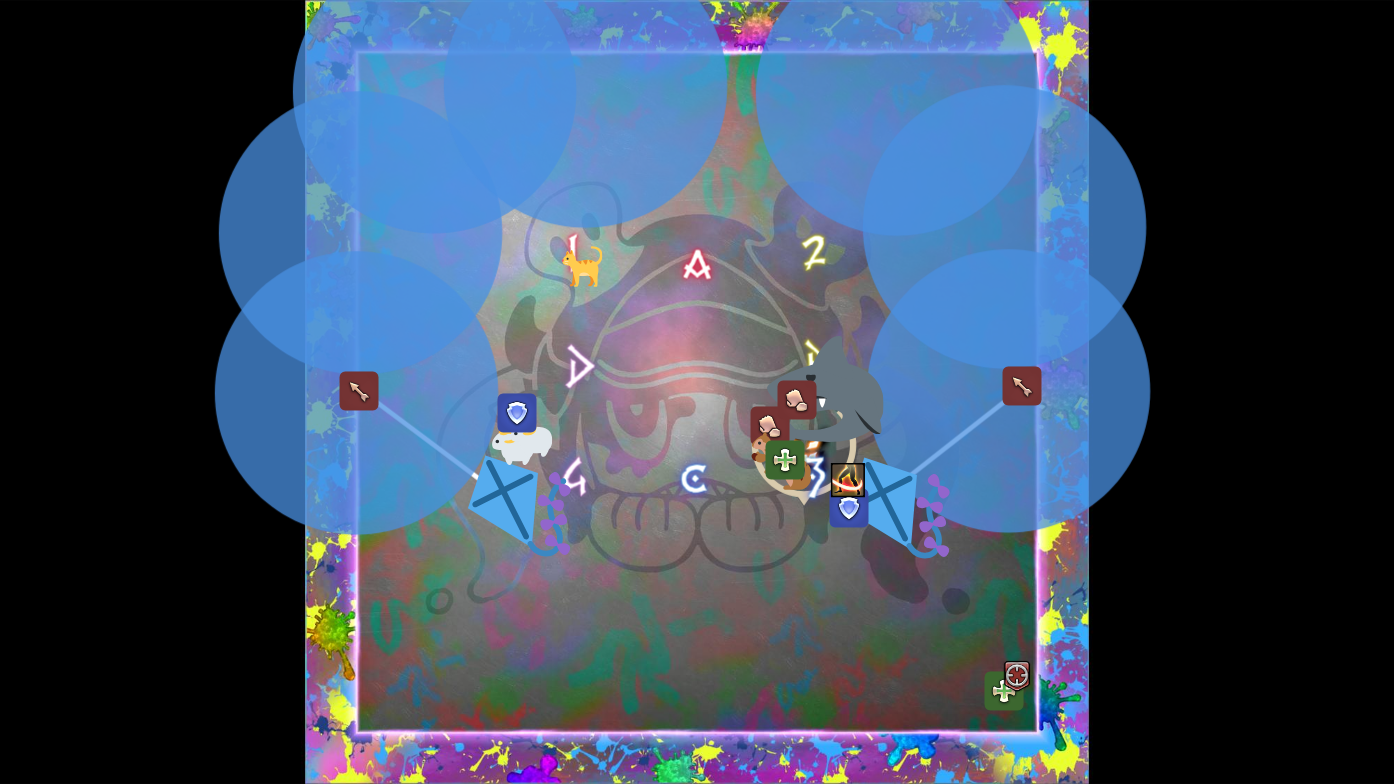
The second wave of adds contains two Feather Rays at west and east, and two Mu south. The first set of two minute raid buffs should be used at this point in the phase. Have the physical ranged pick up the east Ray and magical ranged pick up the west Ray. Ray puddles should be baited on the north wall, then down the east and west walls. The Yan and Gimme Cat should both be dead if not very close to at this point. If the Yan is not dead, bring it to the west Feather Ray and kill it, cleaving onto the Feather Ray.
The MT should pick up both Mu and bring it to the east Feather Ray once it's tethered, cleaving the Feather Ray first with buffs. Once the Yan and east Feather Ray are both dead, bring the Mu and boss to the west Feather Ray and cleave it down before the second puddle.
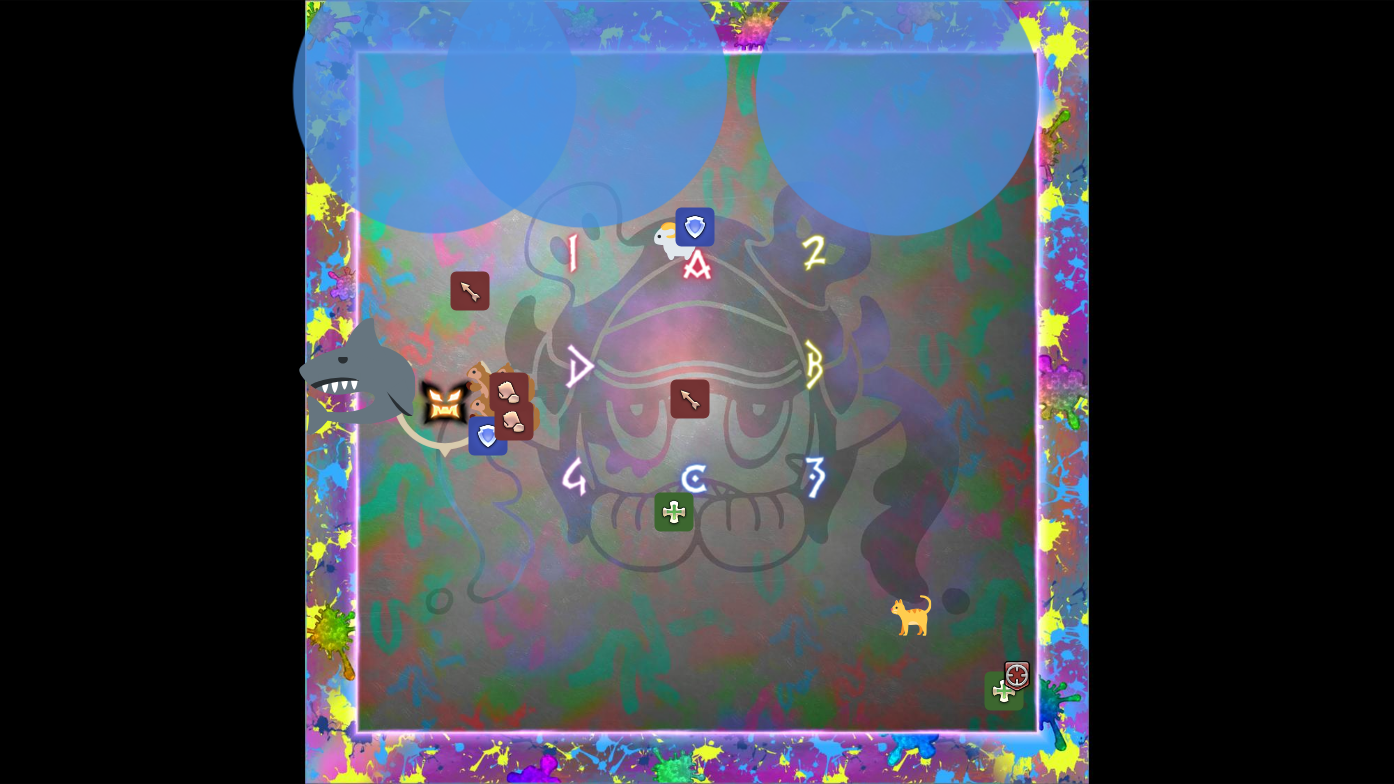
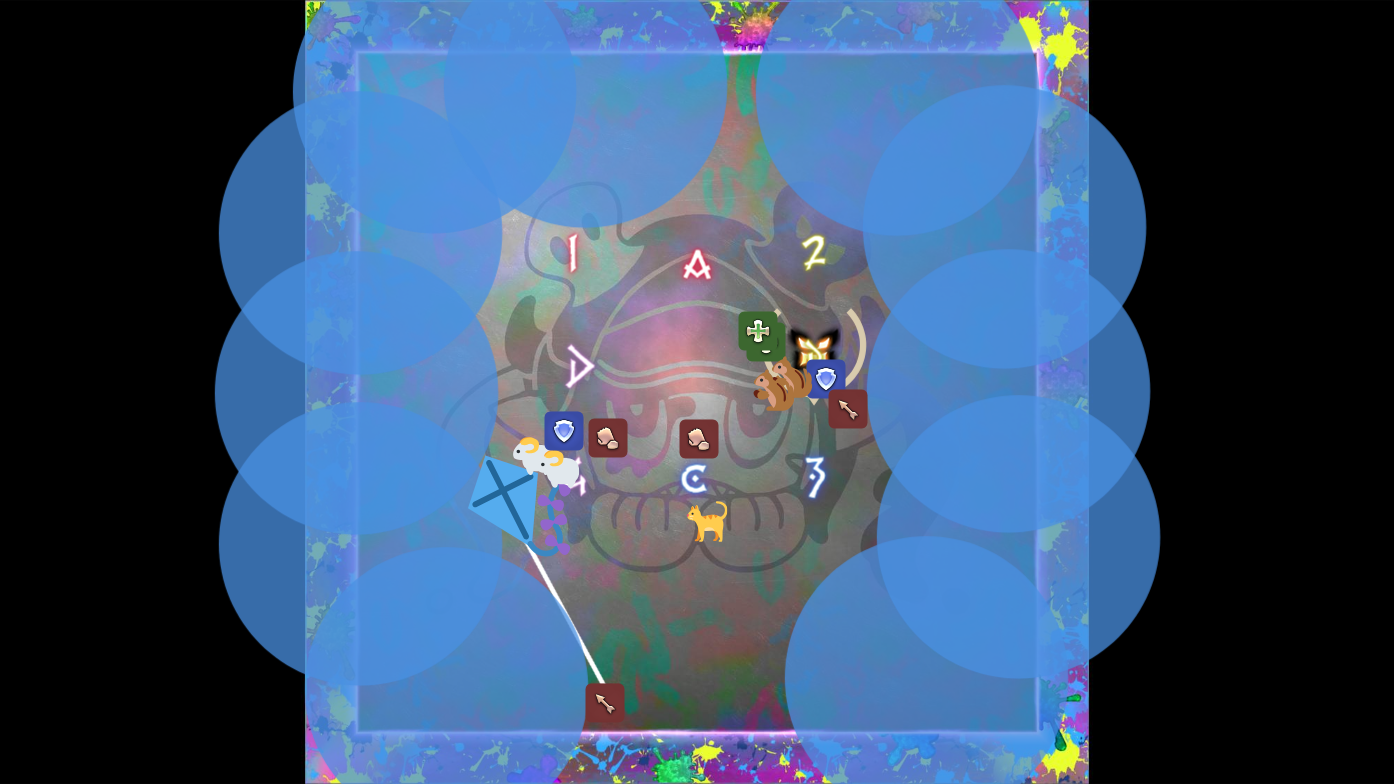
The third wave of adds contains one Jabberwock at the west wall, one Yan north, and one Gimme Cat. The OT picks up the Yan and tanks it there, while the MT brings the Mu and boss close to where the Jabberwock spawns. It will target a healer with a prey marker and that healer needs to go all the way to the southeast corner to ensure maximum distance. The party continues cleaving the boss and Mu until the Jabberwock becomes targetable. Once it is, focus down the Jabberwock with single target attacks and efficient cleave saved for it. Once it's in range of the healer (so that they can attack it too), it should be chain stunned by the MT, M1, and M2 in that order.
When the Jabberwock is near dead, Sugar Riot begins casting Ready Ore Not. Any alive Mu will begin casting Ore-Rigato, and if more than one is allowed to go off the raid will most likely wipe to the high amount of incoming damage. Make sure the Mu and Jabberwock are dead or close to dead by the raidwide. Ranged then focus down the Gimme Cat before it enrages, while melee can go hit the Yan for a few GCDs before the fourth and final wave.

The fourth wave of adds contains one Jabberwock at the north wall, two Feather Ray southeast and southwest, one Yan north, two Mu middle, and one Gimme Cat. Ranged DPS need to pick up their respective Rays immediately and continue baiting puddles down the east and west walls. The OT needs to pick up the second Yan and begin rotating cooldowns, moving towards the southwest Feather Ray once it's tethered. The MT picks up both Mu and slowly heads towards the Jabberwock, passing the Feather Ray on the way. The prey healer goes to the southeast corner.
At this point, potions from the opener and 1 minute cooldowns are up. Focus the Jabberwock down, and once it gets close to the Feather Ray begin the stun rotation, cleaving off of it with cooldowns for maximum damage. At this point, the Yan tank is taking massive damage, so healers should also be giving them single target healing cooldowns. As soon as the healer is free, they need to move out of the corner to avoid being hit by the ranged puddles which are continuing to get baited down the west and east wall. The remaining tethered ranged needs to continue placing water puddles.
From here on out, focus down the west Feather Ray, continuing to cleave. Once it's dead, focus both the Gimme Cat and east Ray. Since the puddles will cover the east Ray eventually, melee should damage whichever one is convenient at the time before going back to the boss and Mu. Both should be dead by the time the six minute buff window is up. The Yan tank should continue to rotate cooldowns, using their invuln if they no longer have any.
Kill the Mu near the second Ready Ore Not cast. Once all adds except the Yan are dead, bring the Yan back to the boss and cleave them down. The MT should provoke one of the Yans to help lessen the incoming auto-attack damage. Dodge the arrows at the side of the arena cast by Single Style. Dropping the puddles along the outside gives plenty of space on the inside for safe spots. Both Yan must be killed soon after, or they will get absorbed by the boss and wipe the party. Killing the final Yan will grant the party three full bars of limit break.
The phase ends with Color Riot into Mousse Mural. As the OT is likely out of mitigation, healers and the MT should help them out. This is a good place for the MT to invuln and give the OT their short mit.
Phase Three
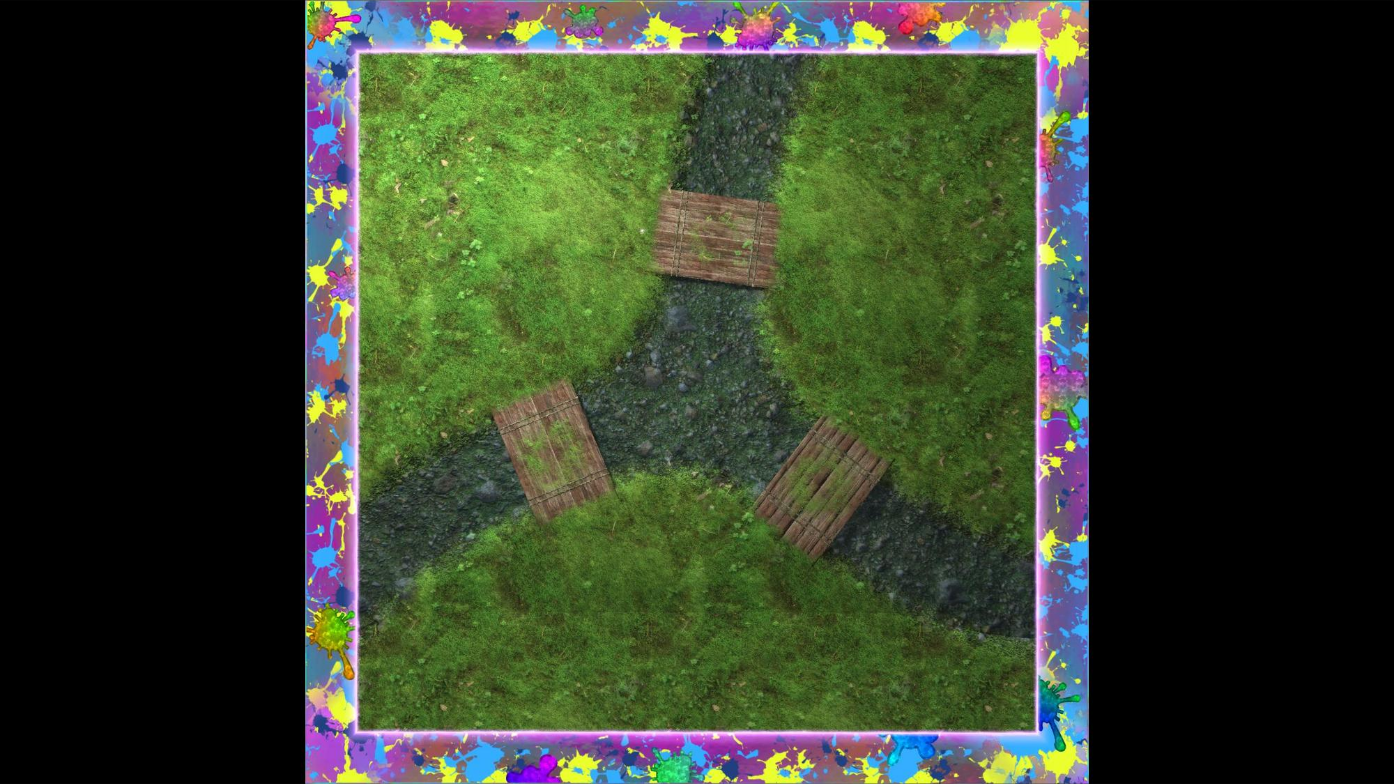
You fight Sugar Riot on the river and normal arenas in phase three. Standing in the river before the storm gives a Lightning Resistance debuff but a Fire Resistance buff. While in the river, you cannot move onto the bridge without first going on land. After the storm it will give a dropsy DoT. When it becomes lava, it will instantly kill players who stand inside.
Phase Three Mechanics
The following mechanics are introduced in the third phase.
- Sugarscape: Changes the arena to the riverscape.
- River Layer 1: Sugar Riot paints a storm on the river, flooding the river.
- River Layer 2: Sugar Riot paints a volcano on the river, creating lava on the river and destroying the bridges.
- Highlightning: A lightning storm spawns that slowly moves from island to island, striking a large area with an AoE.
- Lightning Bolt: Small marked AoEs appear on the ground.
- Lightning Storm: One support and one DPS are targeted with a lightning prey marker. This will do an AoE around them and strike the island they are on. This will repeat for all players.
- Pudding Party: A multi-hit stack marker that deals high magical damage. Hits five times.
- Taste of Thunder: The screen flashes with lightning. Unmarked AoEs spawn under all players when this happens, and they need to move away from where they were when the flash happened.
- Mousse Drip: The furthest two players are targeted with a multi-hit stack AoE. Inflicts a short magic vuln each hit, and leaves behind a puddle. Hits four times.
- Moussacre: Conal AoEs giving a magic vuln on the four closest players.
- Explosion: Summons eight towers which must be soaked.
Phase Three Strategy
Sugar Riot will jump north and start painting the riverscape. Drag her back to the middle of the arena once she stops casting and spread loosely in clock positions. She begins to cast Double Style, spawning Sweet Shot arrows at the edge of the arena and either Taste of Fire or Taste of Thunder. If it's Lightning, spread in safe spots outside of the river near your clock spot. Two players can be in one safe spot, but it's very tight. If it's Fire, the two melee DPS and the supports from group 1 will stay in the middle river and the two ranged DPS and group 2 healer adjusts to the safe spot. It will always be either behind the southwest or southeast bridge.
Sugar Riot then begins casting Layer 1. All players should stack neatly together on a bridge. Once the screen flashes for the Taste of Lightning baits, players should move away from the giant cloud that spawns, going to the bridge opposite of it (if they were on the original bridge, return to it). As the storm begins to move, rotate along with it to the opposite bridge. One player from each role will get targeted with a lightning prey. The targeted DPS should go counter-clockwise of the safe bridge and targeted support should go clockwise of the safe bridge. This repeats four times, then Sugar Riot begins to cast Pudding Party. Stack up and mitigate.
Bring the boss to the south island immediately after. Sugar Riot will cast the second layer, destroying the bridges. Melees and tanks should be on the south island, while the northwest island has the group 1 healer and ranged and the northeast island has the group 2 healer and ranged.
Towers will spawn and Sugar Riot begins casting Mousse Drip. These are baited on the furthest players, so healers should stand close and have ranged DPS bait it. The ranged DPS need to drop the four puddles away from the towers towards the very north of the arena. The healers can elect to move and stack with them, or use mitigation on them and have them solo the stack. At the same time, Sugar Riot casts Moussacre, and tanks and melee should already be pre-positioned.
Stay near the tower but don't go in. Another Taste of Lightning screen flash will happen, and wait until that AoE is baited outside of the tower before entering it to soak it. Right after the bait happens, Sugar Riot will cast Wingmark. The puddles disappear and she spawns eight more towers in either a 2-2-4 pattern where the 4 towers are never on the north island, or 8 towers on one platform. For the 2-2-4 pattern, the tanks and melee need to be launched towards the 4 platform, and the ranged and healers adjust by rotating clockwise or counterclockwise. In the 8 tower pattern, the ranged and healers get launched towards the south island, while tanks and melee stand in the southwest corner and get launched to the same platform.

There is a final Taste of Lightning AoE bait before the towers go off. As such, bait the AoEs outside of the tower before going into your tower. The easiest way to assign towers is a static position, though without them you can pick a tower and lean towards it before the bait.
At this point the arena returns to normal and Sugar Riot repeats mechanics previously seen. Move the boss back to the middle and face her north. She will cast Mousse Mural, Sticky Mousse, and Color Riot. She then does the Wingmark and Color Clash into Double Style combination seen in the beginning of the fight, so get launched towards the correct corner and position in light parties or partners. After this, she will begin casting her enrage, Artistic Anarchy, wiping the raid at 11:24. Kill the boss before she kills you!
Party Finder Strategies
Depending on the data centre and strategy used, party finder pugs may use different strategies for the fight. All differences are explained in the guide, and if new preferred strategies appear they will be documented here.
- There are many, many ways to do the adds phase. I highly recommend parties to use the strategies for wave 1 to 3 detailed in the guide, as it promotes the maximum cleave and buff efficiency possible. After killing the Jabberwock and southeast Ray in wave 4, the add priority can shift due to raid comps and total raid DPS (e.g. 3 ranged DPS would prefer to kill the cat before the Ray) so adjust based on what feels right.
- Spread spots for Taste of Thunder can be different from strategy to strategy. Some like having all the melee on one island for maximum uptime, while some sacrifice uptime for consistency.
Loot
When Sugar Riot is defeated, a treasure coffer will appear that contains Babyface Head, Hands, and Feet Coffers. When opened by a player, these coffers contain an item level 760 Babyface equip for the job the player is currently on. The amount of coffers that appear depend on how many players have already cleared during the weekly lockout. If no players have cleared yet, all three coffers will appear, as well as a Evercharged Glaze and Universal Tomestone 2.0. If one to four players have already cleared, two random coffers will appear and a random upgrade item. If five or more players have already cleared, no treasure coffer will appear.
Players who defeat the encounter for the first time during the weekly reset will also receive an AAC Illustrated: CW Edition II token. Four of these can be traded in for a Babyface Head, Hands, or Feet gear of your choosing at an Arcadion gear vendor.
Changelog
- 05 Apr. 2025: Guide added.
More FFXIV Content

This guide has been written by Lyra an accomplished raider in FFXIV and has written raid guides for the game for the past five years. You can follow him on Twitter and he streams raids on Twitch.
- New Framer’s Kit With Return Of Breaking Brick Mountains
- Last Chance For THE PRIMALS x Download Festival T-Shirt!
- Team DN Claims #WorldFirst in FFXIV’s Dancing Mad!
- FFXIV Players Blown Away By Store Updates!
- Support #WorldFirst in FFXIV Dancing Mad Ultimate — Now Available!
- Calling FFXIV Fishers To Catch The Rainbow For Charity!
- Last Chance To Enter FFXIV x Jollibee Sweepstakes!
- The Senor Otters Make Their Grand Debut in FFXIV